


Category filter
Enroll Windows Server via Windows PowerShell
TL;DR
Enrolling Windows Server via PowerShell is a silent, automated, GUI-free deployment method. By executing a specialized script, System Administrators can securely fetch the Hexnode UEM agent, verify its signature, and provision the server using a Base64-encoded token. This method is the required standard for Server Core environments and mass deployments via RMM or DevOps pipelines.
Deployment Overview
While graphical setup wizards are suitable for standalone servers, modern enterprise infrastructure often relies on headless architectures and automated deployment pipelines. Enrolling Windows Server via PowerShell is a highly efficient, command-line-driven method that completely eliminates the need for visual interaction.
Instead of downloading an installer and clicking through a GUI, System Administrators execute a pre-compiled PowerShell script provided by the Hexnode console. This script handles the entire lifecycle automatically: it temporarily bypasses local execution policies, securely fetches the generic Hexnode agent from the cloud, verifies its digital signature, silently installs the application using a Base64-encoded Enrollment Token, and cleans up the temporary files—all within seconds. This method is the required standard for provisioning GUI-less environments (like Windows Server Core) and integrating UEM enrollment into larger DevOps automation workflows.
Supported Platforms & Prerequisites
Before executing the deployment script, ensure the target Windows Server meets the necessary baseline requirements.
Supported Operating Systems:
- Windows Server 2019
- Windows Server 2022
- Windows Server 2025
Deployment Prerequisites:
- Elevated Privileges: The script must be executed within an elevated PowerShell session (Run as Administrator).
- Active Internet Connectivity: The Windows Server requires an active outbound connection (Port 443/HTTPS) to download the .msi package in real-time and authenticate the enrollment token against your Hexnode UEM portal.
- PowerShell Environment: Windows PowerShell 5.1 or later (standard on supported Server OS versions).
Enterprise Use Cases
System Administrators and DevOps engineers should choose the PowerShell enrollment method in the following scenarios:
- Windows Server Core Provisioning: Because Server Core completely lacks a graphical desktop (meaning standard .msi wizards cannot be displayed), this command-line method is the only way to natively enroll these lightweight, headless servers.
- DevOps & Automated Bootstrapping: The script can be seamlessly injected into post-deployment automation tools (like Terraform, Ansible, AWS UserData, or VMware customization specifications) to ensure Windows Servers are enrolled into Hexnode the moment they are provisioned.
- Bulk Silent Deployments: Infrastructure teams can push this script via existing legacy management tools (like an RMM or Group Policy) to silently enroll hundreds of existing Windows Servers in the background without interrupting active user sessions.
Enrollment Workflow
Step 1: Portal Configuration (Hexnode Admin Console)
To begin, you must act from your Hexnode UEM console to retrieve the specialized enrollment script.
- Log in to the Hexnode UEM console.
- Navigate exactly to: Enroll > Platform-Specific > Windows Server > Windows Server Enrollment > Information.
- Select your desired Enrollment Profile from the dropdown menu.
Understanding the Profile: In Hexnode UEM, an enrollment profile dictates the initial onboarding experience by defining general settings (like device ownership and group assignment), device configurations, and user authentication methods. Learn more about configuring Windows Enrollment Profiles.
- Click the View option located beside the chosen profile. This allows you to quickly double-check the profile’s assignment rules before you deploy.
- Scroll down to the Enrollment Instructions section and locate the Enroll using Windows PowerShell section.
- Here, you will find the Installer download URL, the Enrollment Token, and a fully generated PowerShell script block. The Hexnode portal automatically embeds the universal download URL and your specific Enrollment Token directly inside this script for seamless execution.
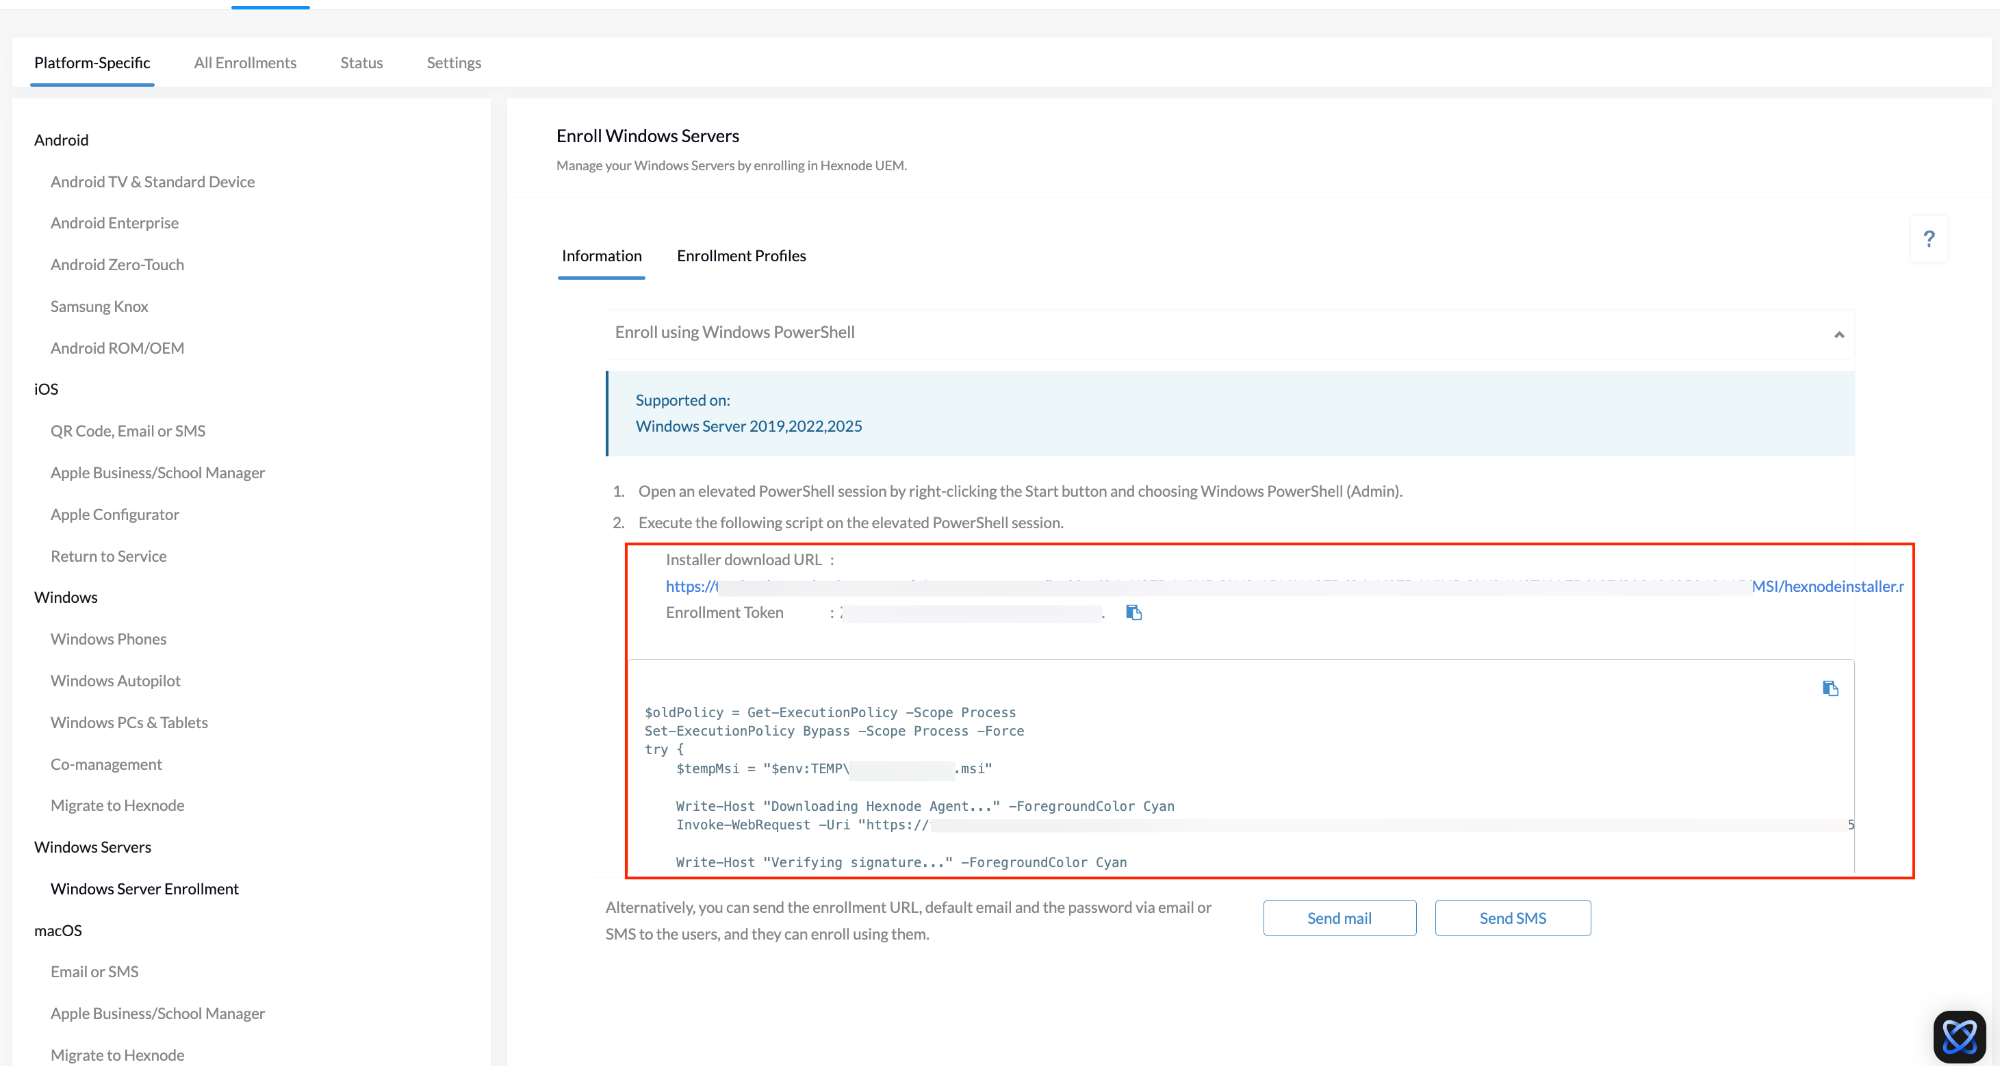
- Copy the entire script block to a secure clipboard.
Reference PowerShell Script: Note that when copied from your portal, the <Installer_Download_URL> and <Enrollment_Token> placeholders will be automatically populated with your actual portal data.Store current execution policy to safely restore it post-installation
123456789101112131415161718192021222324252627282930313233343536373839$oldPolicy = Get-ExecutionPolicy -Scope Process# Temporarily bypass execution policy for this specific session onlySet-ExecutionPolicy Bypass -Scope Process -Forcetry {# Define the temporary path for the downloaded installer$tempMsi = "$env:TEMP\hexnode_agent.msi"Write-Host "Downloading Hexnode Agent..." -ForegroundColor Cyan# Securely fetch the installer payload from the Hexnode UEM portalInvoke-WebRequest -Uri "<Installer_Download_URL>" -OutFile $tempMsiWrite-Host "Verifying signature..." -ForegroundColor Cyan# Verify the digital signature to ensure payload integrityif ((Get-AuthenticodeSignature $tempMsi).Status -ne 'Valid') { throw "Security Alert: Invalid digital signature!" }Write-Host "Installing and enrolling server..." -ForegroundColor Cyan# Silently execute the MSI passing the unique enrollment token$process = Start-Process "msiexec.exe" -ArgumentList "/i `"$tempMsi`" /qn ENROLLMENTTOKEN=<Enrollment_Token>" -Wait -NoNewWindow -PassThruif ($process.ExitCode -eq 0) {Write-Host "Success! Server enrolled." -ForegroundColor Green} else {throw "Install failed with code: $($process.ExitCode)"}# Clean up the downloaded installer from local storageRemove-Item $tempMsi -Force} catch {Write-Host "Enrollment Failed: $_" -ForegroundColor Red}finally {# Safely revert the execution policy back to its original stateSet-ExecutionPolicy $oldPolicy -Scope Process -Force}
Step 2: Device-Side Execution (On the target Windows Server)
Now, transition to the command-line interface of the target Windows Server.
- Open an elevated PowerShell session. (On a GUI-enabled Windows Server, right-click the Start button and select Windows PowerShell (Admin). On Server Core, the default command prompt can be transitioned by typing
powershell). - Paste the copied script block directly into the PowerShell window and press Enter.
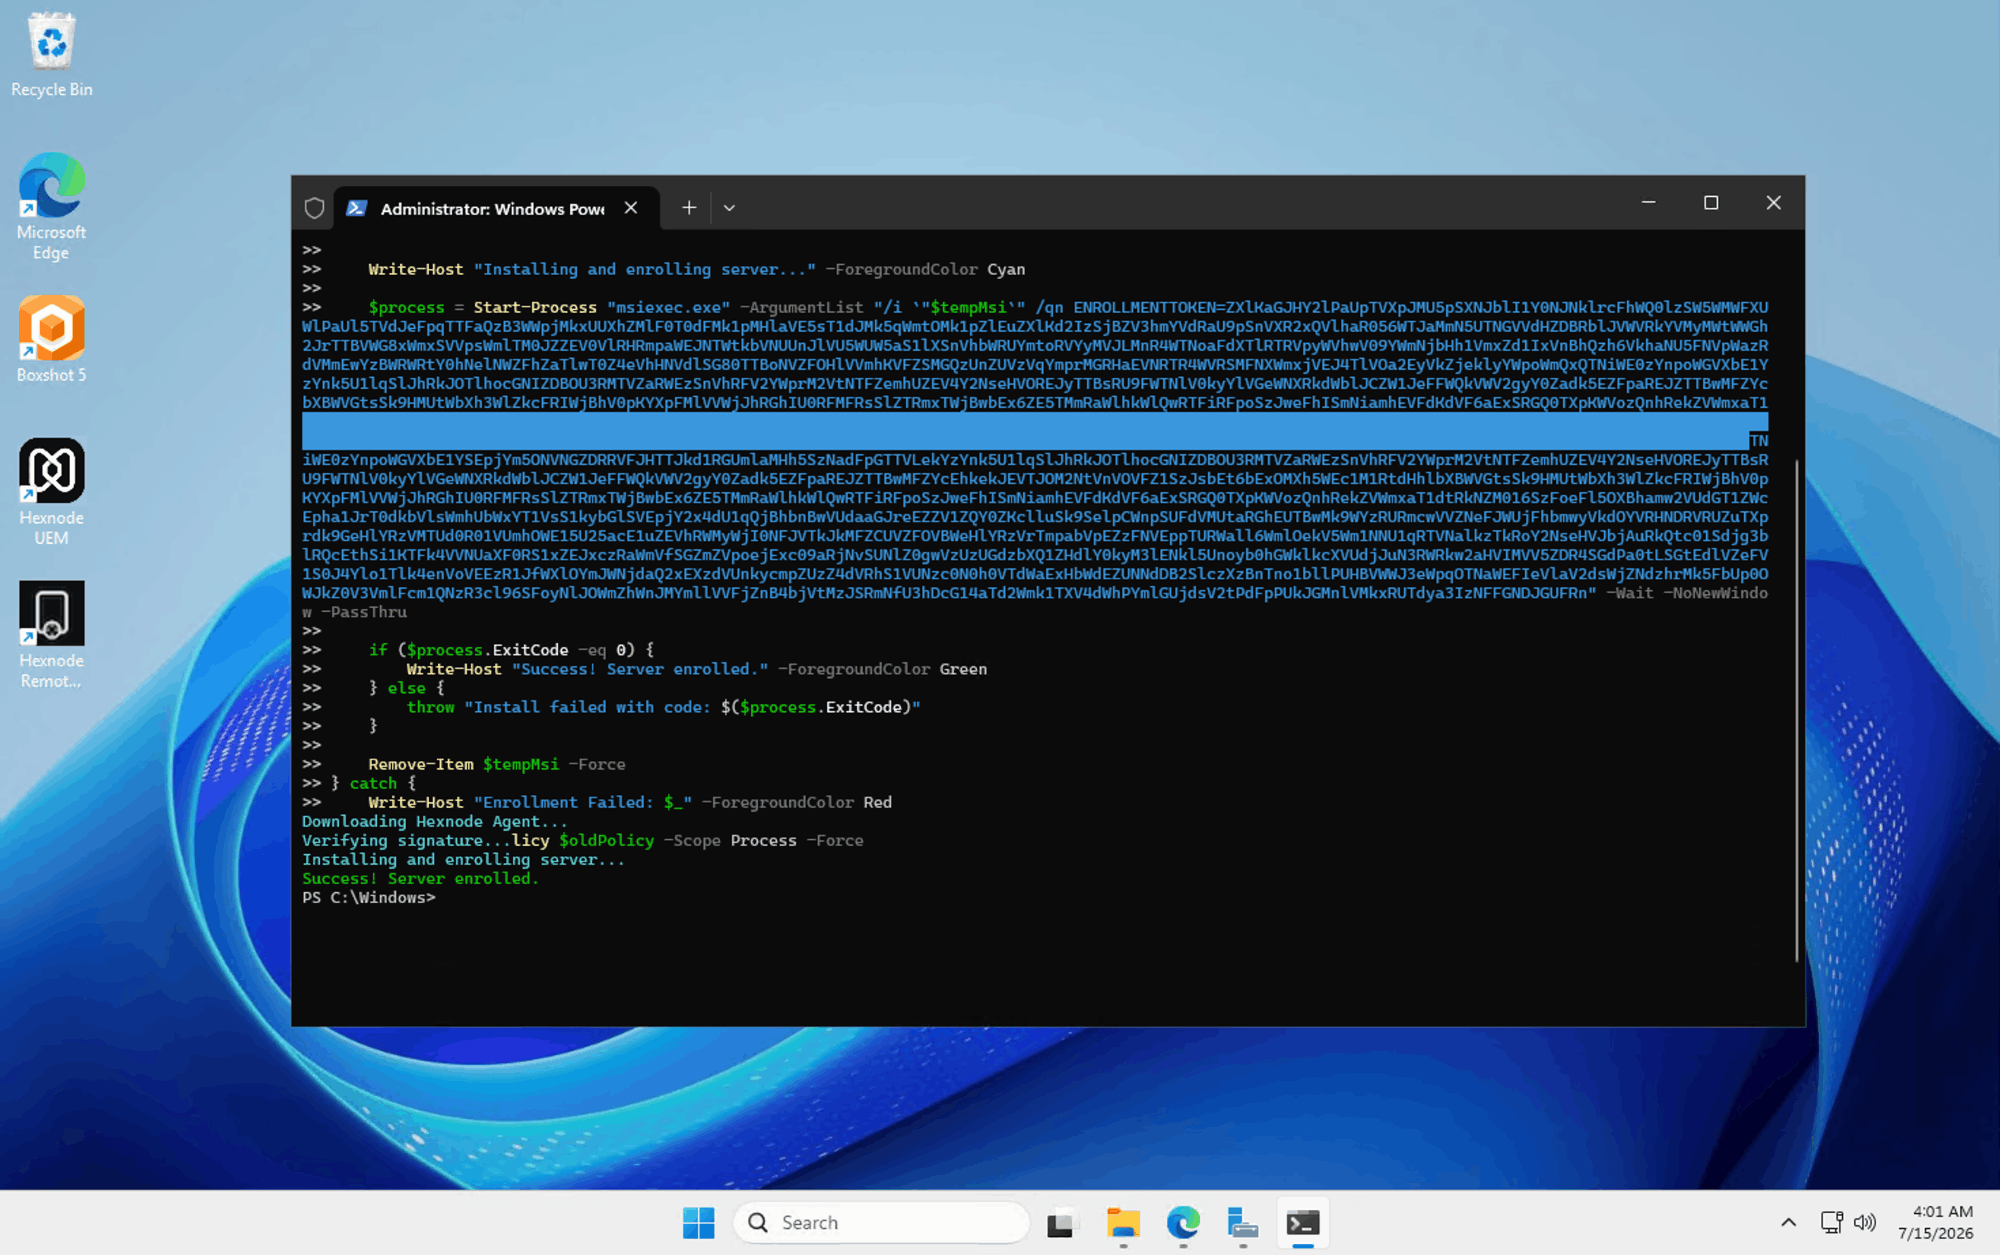
- The script will execute autonomously. You will see colored output detailing its progress:
- Downloading Hexnode Agent…
- Verifying signature…
- Installing and enrolling server…
- Wait for the process to finish. The agent will silently validate the token and authenticate the Windows Server.
- Once complete, the console will output a green “Success! Server enrolled.” message.
Advanced: Bulk Silent Deployment
If you are managing a large fleet of Windows Servers, you do not need to log into each one manually. You can execute the Hexnode deployment script across hundreds of servers simultaneously by wrapping it in a remote execution loop (such as Invoke-Command), deploying it as a Group Policy Startup Script, or passing it as a payload through an existing RMM tool.
Here is a simplified example of passing the script to multiple servers remotely using native PowerShell remoting:
|
1 2 3 4 5 6 7 |
# Define the array of target servers on your domain $servers = @("Server01", "Server02", "ServerCore01") # Execute the enrollment script block remotely across all targets Invoke-Command -ComputerName $servers -ScriptBlock { # [Paste the copied Hexnode script block here] } |
Post-Enrollment Validation
To confirm that the Windows Server is successfully communicating with your management portal, return to your Hexnode UEM console.
Navigate to the Manage > Devices tab. The newly enrolled Windows Server should now appear in your device list. By clicking on the Windows server’s name, you can view its comprehensive Device Summary, verifying its OS version, network status, and real-time health telemetry.
What This Method Does Not Do
To set clear expectations before running the script, review these common misconceptions:
| Assumption | Reality | Recommended Action |
|---|---|---|
| Requires a graphical interface | Operates entirely via command line with no visual wizard. | Use this as the primary method for Server Core environments. |
| Re-enrolls a previously enrolled server | Does not automatically uninstall existing Hexnode agents. | Ensure the server is fully disenrolled and the old agent is uninstalled before running the script. |
| Defines policies natively | Merely enrolls the device into the active UEM portal. | Configure the desired Enrollment Profile inside the Hexnode console prior to copying the script. |
Troubleshooting Common Errors
If the PowerShell output returns red text indicating an enrollment failure, check these common roadblocks:
| Error / Symptom | Likely Cause | Solution |
|---|---|---|
| Script fails on “Downloading Hexnode Agent” | Server lacks outbound internet access on Port 443. | Verify firewall rules allow outbound HTTPS traffic to your Hexnode portal URL. |
| Install fails with code 1603 | The Hexnode UEM agent is already installed or corrupted. | Uninstall the existing agent and clean associated registry keys before re-running. |
| “Execution of scripts is disabled” | A domain GPO strictly enforces the Restricted execution policy at the Machine level. | Temporarily bypass the GPO enforcement or deploy the script via an RMM tool running as SYSTEM. |
| “Security Alert: Invalid digital signature!” | A network proxy intercepted and altered the .msi file during transit. | Allowlist Hexnode UEM domains in your web filtering or proxy appliance to prevent packet inspection. |
Frequently Asked Questions
Does this script permanently alter my Windows Server's PowerShell execution policy?
No. The script is engineered safely for enterprise environments. It uses the -Scope Process parameter to temporarily bypass the execution policy only for that specific, active PowerShell window. Once the script finishes (or if it fails), it automatically reverts the execution policy back to its original state, ensuring your endpoint remains secure.
What happens to the downloaded installer file after the script finishes?
The script handles its own cleanup. It downloads the installer to the Windows Server’s temporary directory ($env:TEMP), and once the silent installation succeeds, it executes a Remove-Item command to forcefully delete the .msi file, leaving zero footprint on your local storage.
Will the Windows Server reboot automatically after the PowerShell script completes?
No. The script uses the /qn switch for a completely silent, uninterrupted installation. It will not force a system restart, ensuring your mission-critical workloads remain online.
Since the installer download URL in the script is universal, how does Hexnode identify my specific portal during enrollment?
The connection relies entirely on your unique Enrollment Token. Because the downloaded .msi file is a universal package, it contains no account-specific data. Instead, the Base64-encoded token embedded in your script acts as a secure identifier. During the silent installation, this token authenticates the Windows Server and securely routes it directly to your specific Hexnode UEM portal.
How does the Windows Server know which Enrollment Profile to apply during setup?
The Windows Server determines this based on the active selection in your Hexnode console. The Enrollment Token itself is unique to your specific Hexnode portal, not to an individual profile. When the script validates the token, it communicates with your portal and automatically applies whichever Enrollment Profile is actively selected in the console at that exact moment.


