


Category filter
Enroll Windows Server via Generic Installer
Deployment Overview
Managing a distributed Windows Server environment requires highly flexible deployment methods. The Hexnode Generic Installer provides this flexibility by using a standardized application file that can be executed on any Windows Server.
Instead of generating a custom installer for each individual Windows Server, this method uses a single universal .msi file sourced directly from the Hexnode UEM console. Because this installer file is completely generic, the application does not inherently know which Hexnode UEM portal to communicate with. To establish the communication link between the target Windows server and the Hexnode UEM portal, System Administrators simply input a unique alphanumeric enrollment token during the Hexnode agent installation wizard.
By keeping the generic installer file separate from the specific portal identity, this method streamlines large-scale deployments. It allows IT teams to host the installer file on internal network drives, pre-install it into standardized virtual machine templates, or carry the file on a USB drive into highly secure data centers. When executing the Hexnode installation wizard, pasting the enrollment token acts as the exact key required to securely route and authenticate the server to the intended Hexnode UEM console.
Supported Platforms & Prerequisites
Before beginning the enrollment process, verify that the target server meets the necessary baseline requirements.
Supported Operating Systems:
- Windows Server 2019
- Windows Server 2022
- Windows Server 2025
Deployment Prerequisites:
- Local Administrator Privileges: You must be logged into the target server with an account that has local administrative rights to execute the installation package.
- Active Internet Connectivity: While the installer can be stored on an offline local drive, the server requires an active outbound internet connection during the setup wizard to validate the Enrollment Token against your Hexnode UEM server.
- Open Browser Ports: Standard outbound web traffic (Port 443/HTTPS) must be permitted for the token authentication handshake to succeed.
Enterprise Use Cases
System Administrators should choose the Generic Installer method to solve logistical deployment challenges in the following scenarios:
- Mass Distribution via Network Shares: Instead of downloading the installer from the web on every single machine, you can host the universal .msi file on an internal file server. Your internal System Administrators can simply access this shared drive to run the installer rapidly across dozens of servers.
- High Security Data Center Staging: In restricted environments where servers are not allowed to freely browse the internet, System Administrators can bring the installer file into the data center on a USB drive. The server only requires a brief outbound connection during setup to validate the token and complete the enrollment.
- Standardized Virtual Machine Imaging: You can pre-install the generic installer directly into your master Windows Server templates. When a new virtual machine is provisioned, the System Administrator simply runs the preloaded file and enters the token to instantly connect the server to Hexnode.
Enrollment Workflow
Step 1: Portal Configuration (Hexnode Admin Console)
To begin, you must act from your Hexnode UEM console. Your goal in this step is to select how the server will be categorized and to generate the specific download link for the installer.
- Log in to the Hexnode UEM console.
- Navigate exactly to: Enroll > Platform-Specific > Windows Server > Windows Server Enrollment > Information.
- Select your desired Enrollment Profile from the dropdown menu.
Understanding the Profile: In Hexnode UEM, an enrollment profile dictates the initial onboarding experience by defining general settings (like device ownership and group assignment), device configurations, and user authentication methods. Learn more about configuring Windows Enrollment Profiles. [Update the windows enrollment profile doc with support for windows server as well] - Click the View option located beside the chosen profile. This allows you to quickly double-check the profile’s assignment rules before you deploy.
- Scroll down to the Enrollment Instructions section and expand the Enroll using Generic Installer tab. Here, the Hexnode provides two critical deployment assets: the Installer download URL and the Enrollment Token.
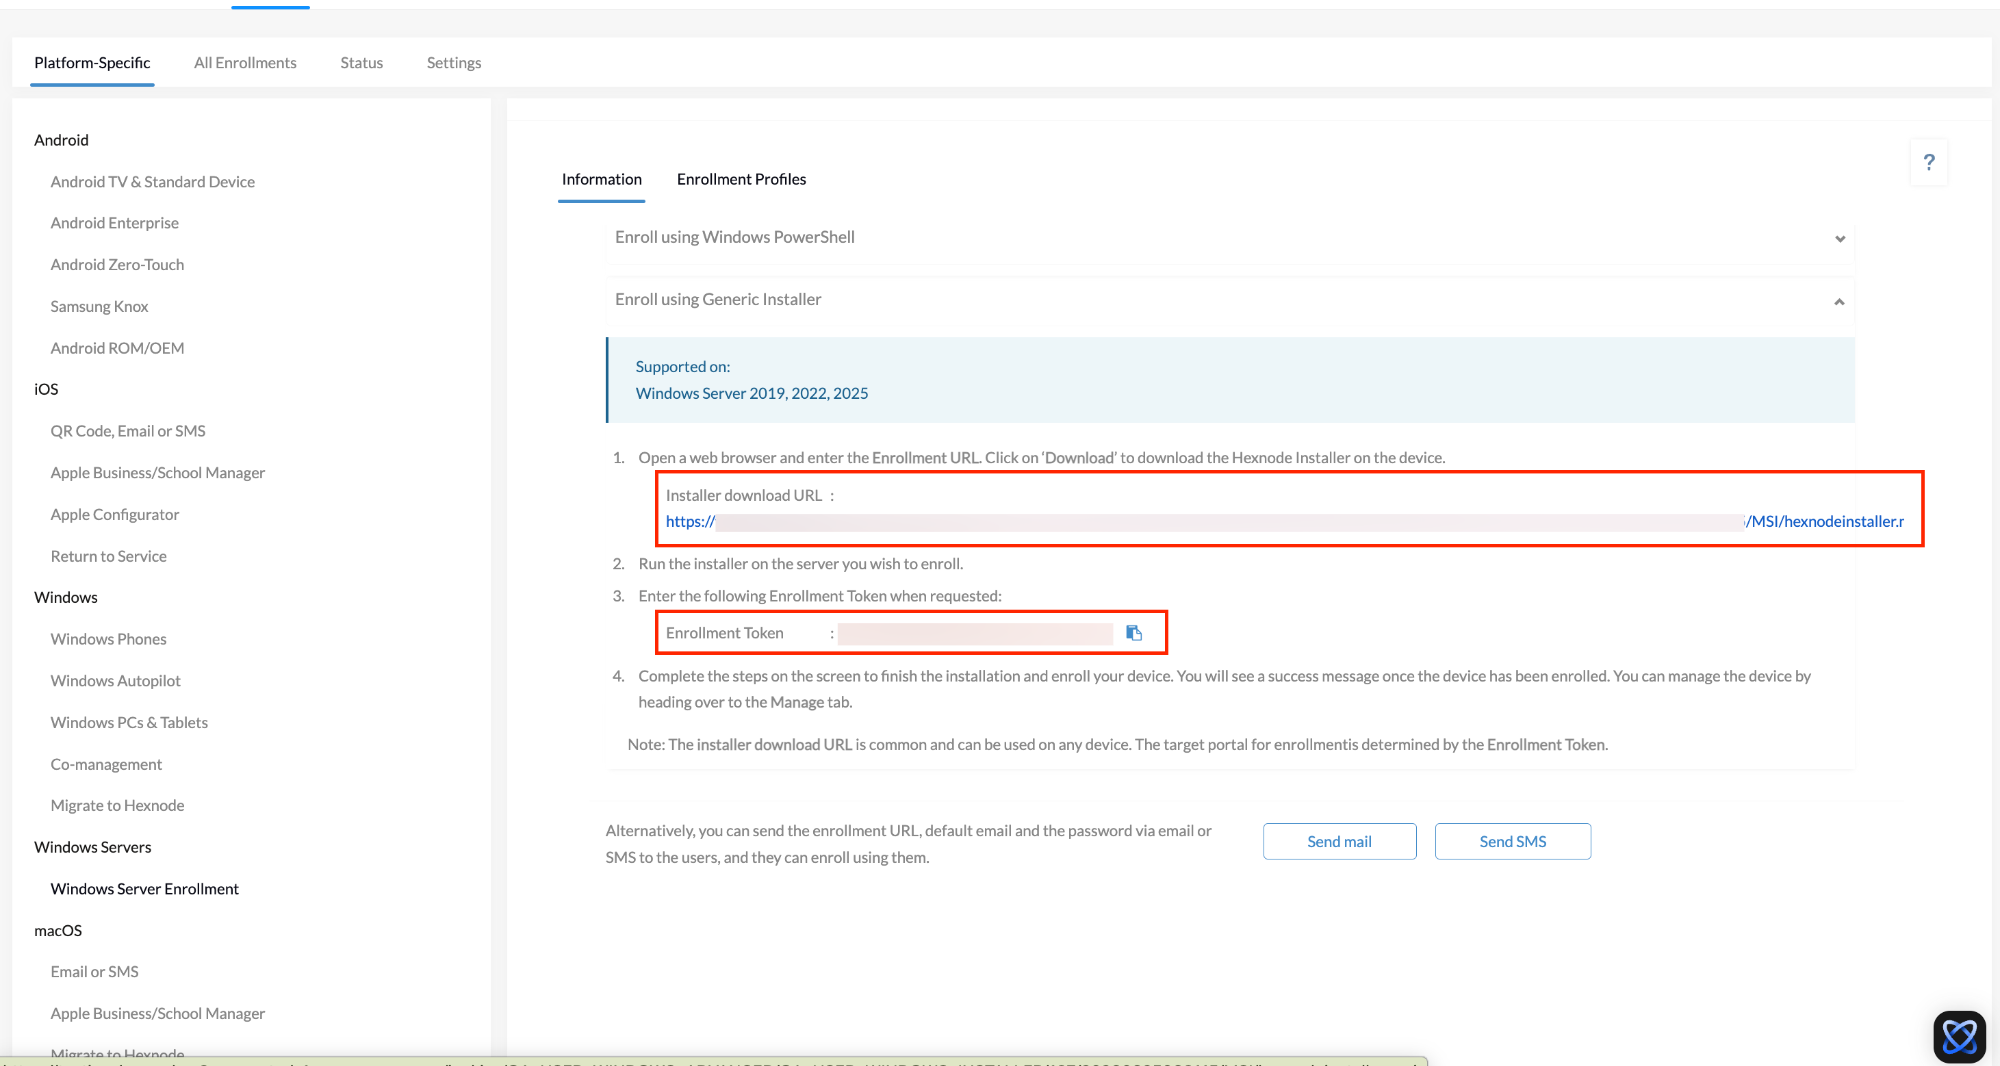
- Copy the Installer download URL and it can be used to download the .msi installer file.
Offline Staging Tip: Because this URL points to a universal file, you do not have to download the installer directly onto the target Windows Server. You can open the link and download the file from any computer, then transfer it to your target machines using a USB drive or a shared network folder.
- Locate the Enrollment Token generated below the URL. This lengthy, alphanumeric string is the critical key that securely binds the generic installer to your specific profile and portal.
- Copy the Enrollment Token to a secure clipboard or shared IT password vault, and prepare your installer file (either via the URL or loaded onto your USB drive) for use on the target servers.
Step 2: Device-Side Execution (On the Target Server)
Now, transition your focus away from the Hexnode UEM console and log directly into the desktop of the target Windows Server.
- On the Windows Server, retrieve the generic installer. You can do this by opening a web browser and pasting the Installer download URL, copying the .msi directly from your internal IT network share, or inserting a USB flash drive containing the pre-downloaded installer.
- Locate the downloaded file (hexnodeinstaller.msi) and run it with elevated administrator rights.
- Proceed through the initial steps of the on-screen setup wizard.
- When prompted by the installation wizard, carefully paste the massive Enrollment Token you copied in Step 1.
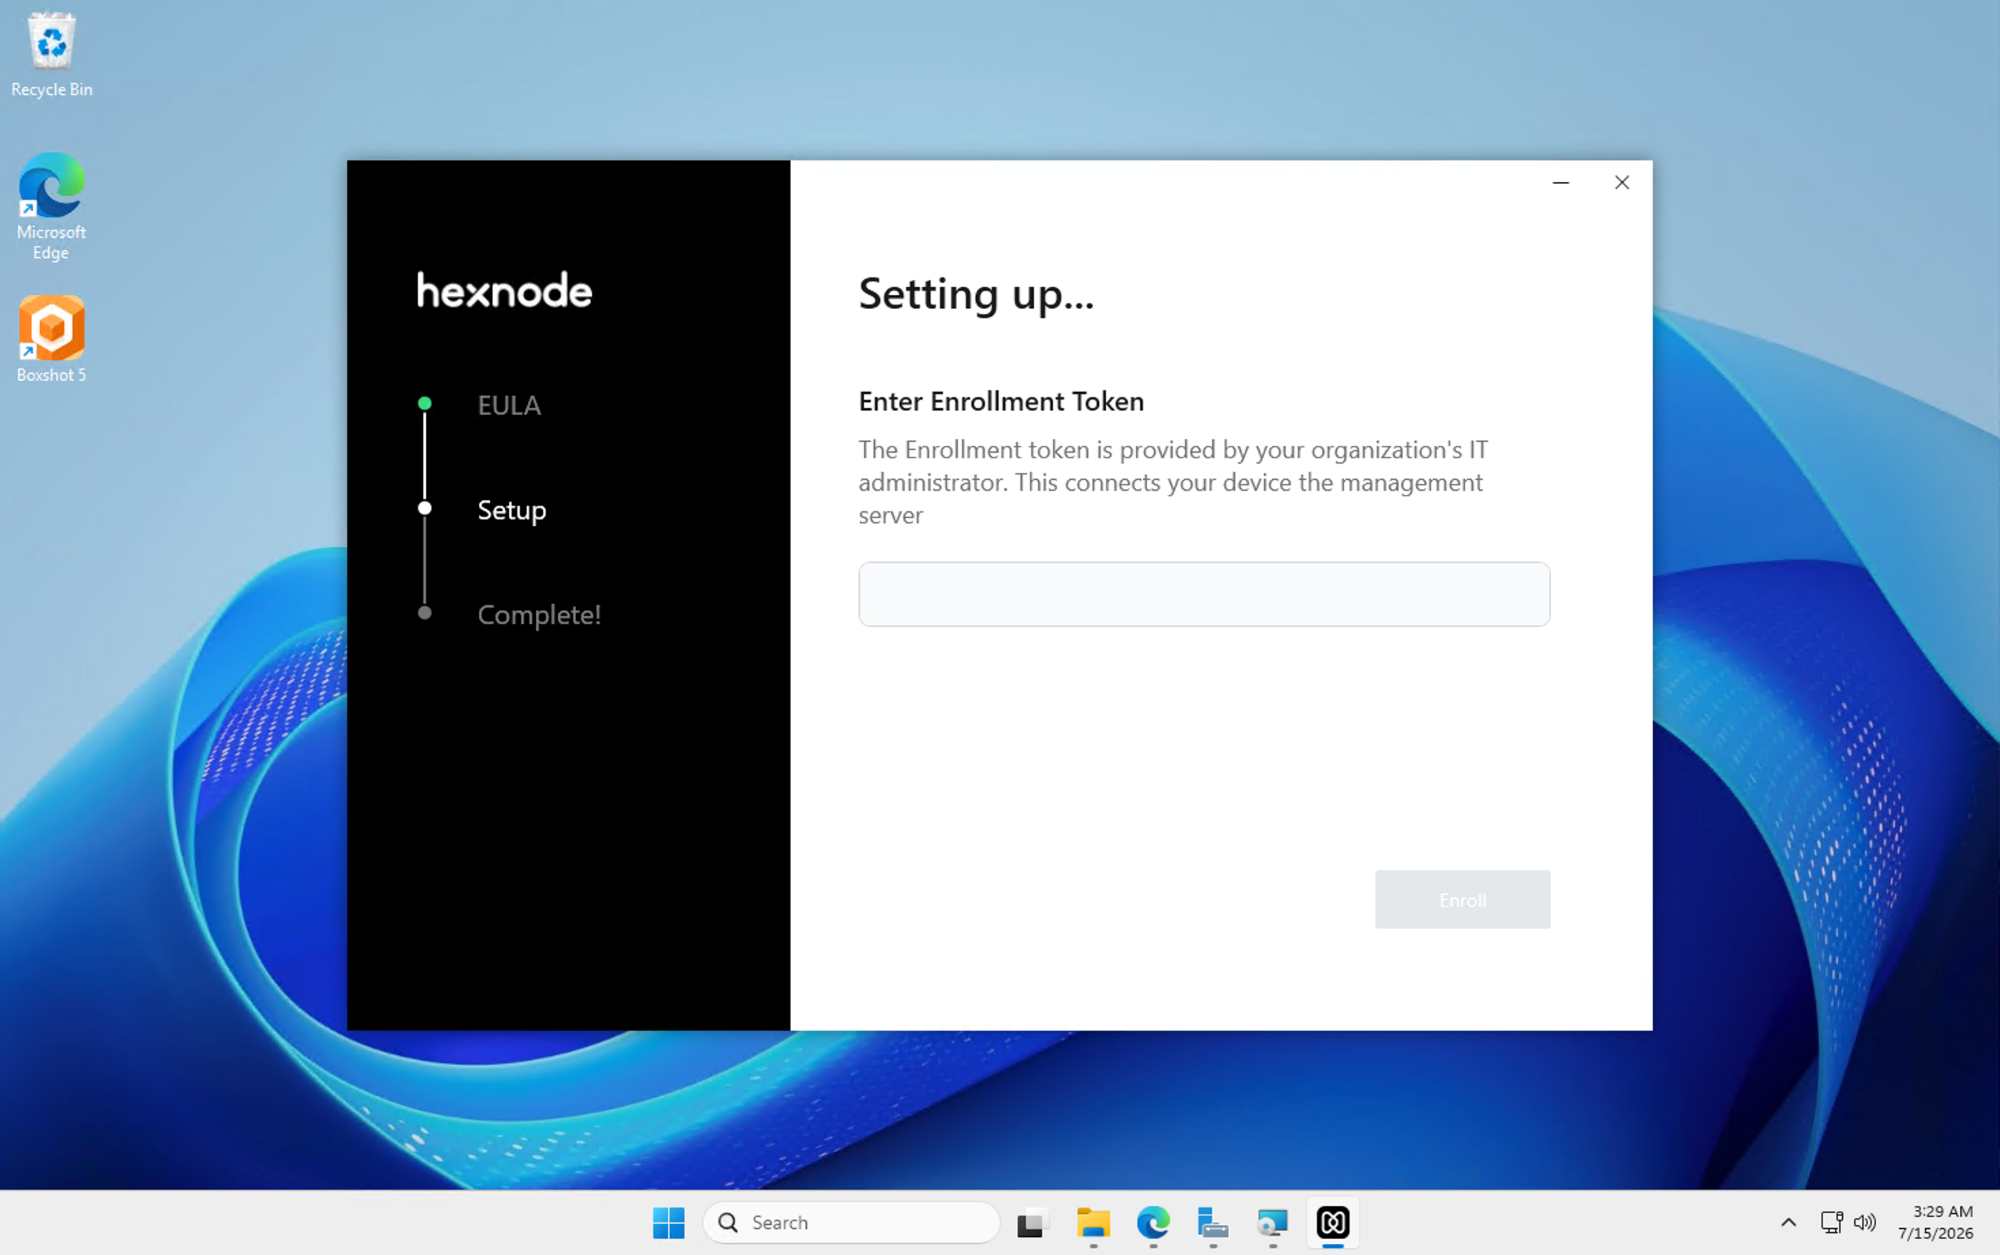
- Complete the remaining steps on the screen to finish the installation. The agent will silently validate the token, authenticate the server, and display a success message once the device is enrolled.
Post-Enrollment Validation
To confirm that the server is successfully communicating with your management portal, return to your Hexnode UEM console.
Navigate to the Manage > Devices tab. The newly enrolled Windows Server should now appear in your device list. By clicking on the server’s name, you can view its comprehensive Device Summary, verifying its OS version, network status, and real-time health telemetry.
Frequently Asked Questions
How is the Installer download URL different from the Enrollment URL used in the standard Hexnode Installer method?
The standard Enrollment URL (used in the Hexnode Installer enrollment method) generates a custom installer file that is already configured with your specific Hexnode UEM portal details. In contrast, the Installer download URL provided for the Generic Installer method is a static universal link. It downloads a completely generic installer file, which is why System Administrators must manually input the Enrollment Token to connect the target Windows Server to your specific Hexnode UEM environment.
How does a generic installer file know which Hexnode UEM portal to enroll the target Windows Server into?
Since the generic installer file does not contain any embedded portal details, it relies entirely on the Enrollment Token. When the System Administrator inputs this unique token during the installation wizard, the installer uses the token to identify the correct destination. The token provides the exact data required to securely connect and enroll the target Windows Server into your specific Hexnode UEM portal.
How does the server know which Enrollment Profile to apply during setup?
The server determines this based on the active selection in your Hexnode console. The Enrollment Token itself is unique to your specific Hexnode portal, not to an individual profile. When the server validates the token during the setup wizard, it communicates with your portal and automatically applies whichever Enrollment Profile is actively selected in the console at that exact moment.


