Category filter
Configure SCEP settings for macOS devices
The document guides IT administrators on configuring SCEP settings for macOS devices and enforcing certificate-based authentication for services such as Wi-Fi, VPN, and email.
The Simple Certificate Enrollment Protocol (SCEP) is a standardized protocol for certificate management and certificate-based authentication. It facilitates certificate deployment to devices from a trusted certificate authority (CA). The obtained certificates are employed for various purposes, such as authentication, encryption, or secure communication.
Configuring SCEP on devices can help administrators establish zero-user-intervention authentication for users across network services via certificates. Devices can use SCEP to automate the process of requesting and receiving digital certificates from a certificate authority (CA). Organizations can opt for certificate-based authentication to prevent unauthorized access to network services, such as Wi-Fi, VPN, and email. Let us understand in detail how to configure SCEP for macOS users from the Hexnode UEM console.
Configure SCEP certificate profiles for Mac
To configure SCEP via policy,
- Log in to your UEM portal.
- Navigate to Policies > New Policy. Assign a suitable name and description (optional) for the policy. You can also choose to continue with an existing policy.
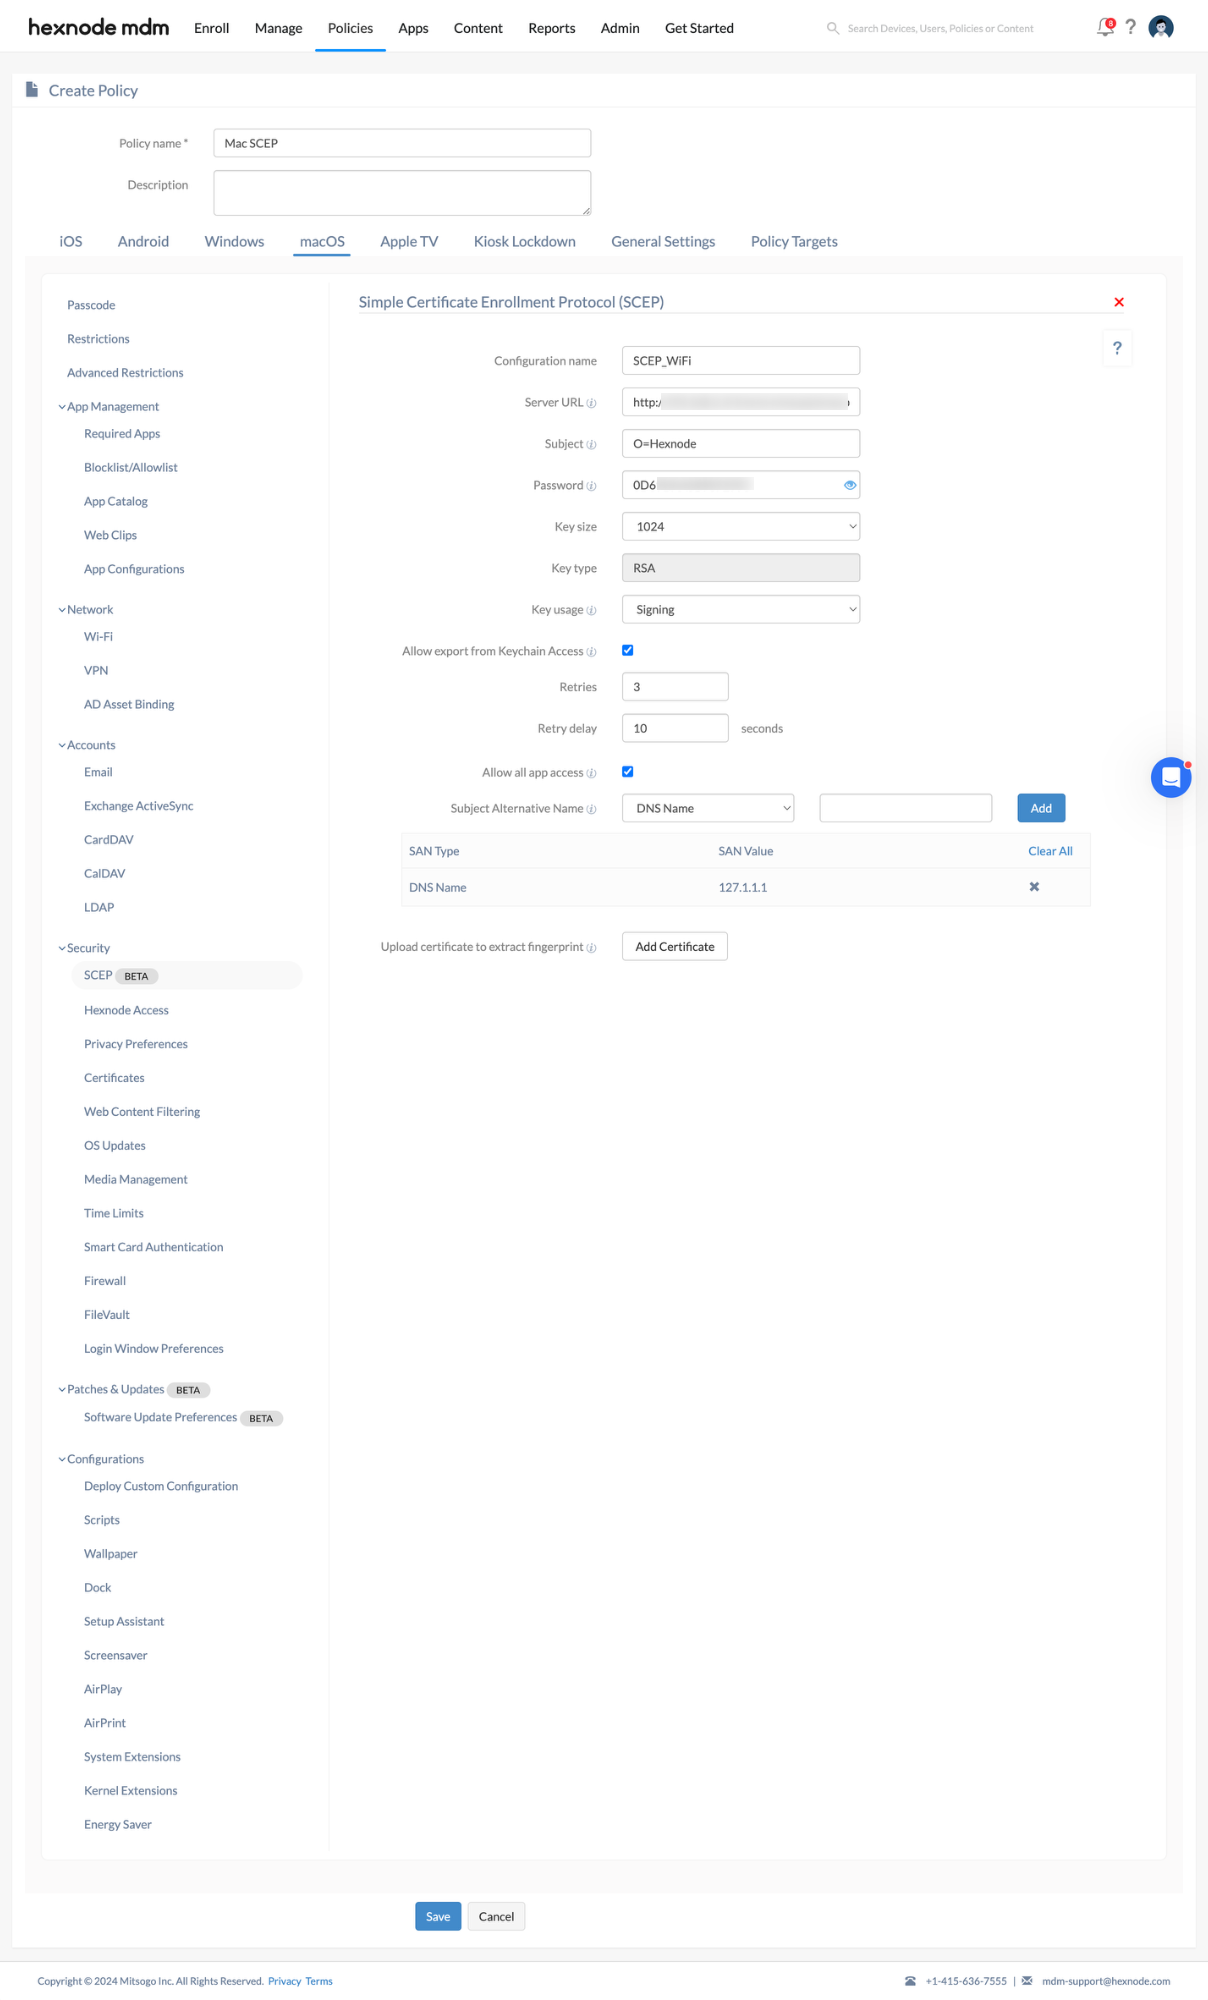
- Go to macOS > Security > SCEP. Click Configure.
SCEP Configuration
To configure SCEP via policy,
| Configuration | Description |
|---|---|
| Configuration name | Enter a name for the SCEP Configuration. |
| SCEP URL | Provide the SCEP server URL. This is the URL that the device uses to contact the certificate authority to obtain an identity certificate. |
| Subject | Configure Subject to include identifying information in the Certificate Signing Request (CSR) to the SCEP server. Type the representation of a X.500 name used to identify entities. For e.g.: – you can use shortcuts as C=Country, L=Locality ST=State, O=Organization Name CN=Common Name OU=Organizational Unit etc. |
| Password | Specify the secret key that the SCEP server uses to verify a certificate request from a user to Certificate Authority (CA). |
| Key size | Select the key size in bits from options of 1024, 2048, or 4096. The default value is 1024 bits. |
| Key type | Select the key encryption type. Key type is currently RSA. |
| Key usage |
Specify the usage of the key in the certificate from the following options:
Note that some certificate authorities won’t support both signing and encryption simultaneously. |
| Allow export from Keychain Access | Uncheck this option to restrict the export of the private key from the keychain. |
| Retries | Type the number of times to retry when the server shows a pending response. |
| Retry delay (in seconds) | Specify the number of seconds between subsequent retries. |
| Allow all app access | By default, this option grants all applications on the device access to the certificate. If left unchecked, users must manually allow access to the applications through the device’s Keychain Access. |
| Subject Alternative Name | Specify the type of alternative name for the SCEP server and its value. You can choose a type of alternative name from the following:
You can provide multiple alternative names using this option. |
| Upload certificate to extract fingerprint | Upload a CA certificate in this field to save its fingerprint. The device uses this fingerprint to verify the authenticity of the CA’s response during certificate enrollment with the CA server. |
Associate SCEP profile settings with target devices
If the policy is not saved,
- Navigate to Policy Targets > Devices > +Add Devices.
- Choose the target devices and click OK. Click Save.
- You can also associate the policy with device groups, users, user groups or domains from the left pane of the Policy Targets tab.
If the policy is already saved,
- Go to Policies and choose the desired policy.
- Click on the Manage drop-down and select Associate Targets.
- Choose the target entities and click Associate.
What happens at the device end?
After successful policy association, certificate-based authentication becomes mandatory for the devices accessing configured network services such as Wi-Fi, VPN, and email. For instance, when SCEP is configured along with a Wi-Fi policy and associated with the devices, it mandates the provision of a certificate to access the configured Wi-Fi network, ensuring secure authentication. With this policy, access to an organization’s network services is regulated through certificates, enhancing security.


