


Category filter
How to run scripts on Mac?
A script is a file containing a set of programming commands used to automate routine Mac management tasks, such as system configurations, app installations, and security updates, without requiring manual Terminal input.
Why Use Custom Scripts for Mac Management?
Executing scripts remotely via Hexnode allows IT administrators to perform complex system-level operations across multiple devices simultaneously. This bypasses the need for physical access and enables configurations that are not natively available in standard MDM feature sets.
- Automation: Streamlines time-consuming tasks like software uninstallation or OS updates.
- Root-Level Execution: Scripts deployed via Hexnode run with root privileges, ensuring full administrative control.
- Zero User Intervention: Tasks are executed in the background without interrupting the end-user.
Prerequisites for Executing Mac Scripts
Before deploying scripts, ensure the following requirements are met to avoid execution failure:
| Category | Requirement |
|---|---|
| OS Support | macOS 10.11 and later. |
| Agent App | Latest version of the Hexnode UEM app must be installed. |
| Binary Presence | The specific binary required to interpret the script (e.g., Python, Ruby) must exist on the Mac. |
| File Formats | .sh, .pl, .csh, .zsh, .ksh, .php, .rb, .py. |
Step 1: Creating an Executable Mac Script Locally
Before uploading to the UEM, follow these steps to create a valid executable file:
- Open Text Edit from Applications and click New Document.
- Input your script (e.g., a restart script):
12#!/bin/sh/sbin/shutdown -r now
- Click Format > Make Plain Text.
- Save the file (File > Save). Uncheck “If no extension is provided, use ‘.txt’“, while saving the file.
- Open Terminal to make the file executable:
- Navigate to the folder:
1cd [location_of_script]
- Grant execution permissions:
1chmod 700 [filename]
- Navigate to the folder:
- Test locally:
1./[filename]
Step 2: Deploying Custom Scripts via Hexnode UEM
Once the script is verified, use the Hexnode console to push it to managed devices.
- Navigate to Manage > Devices and select the target Mac.
- Select Actions > Others > Execute Custom Script.
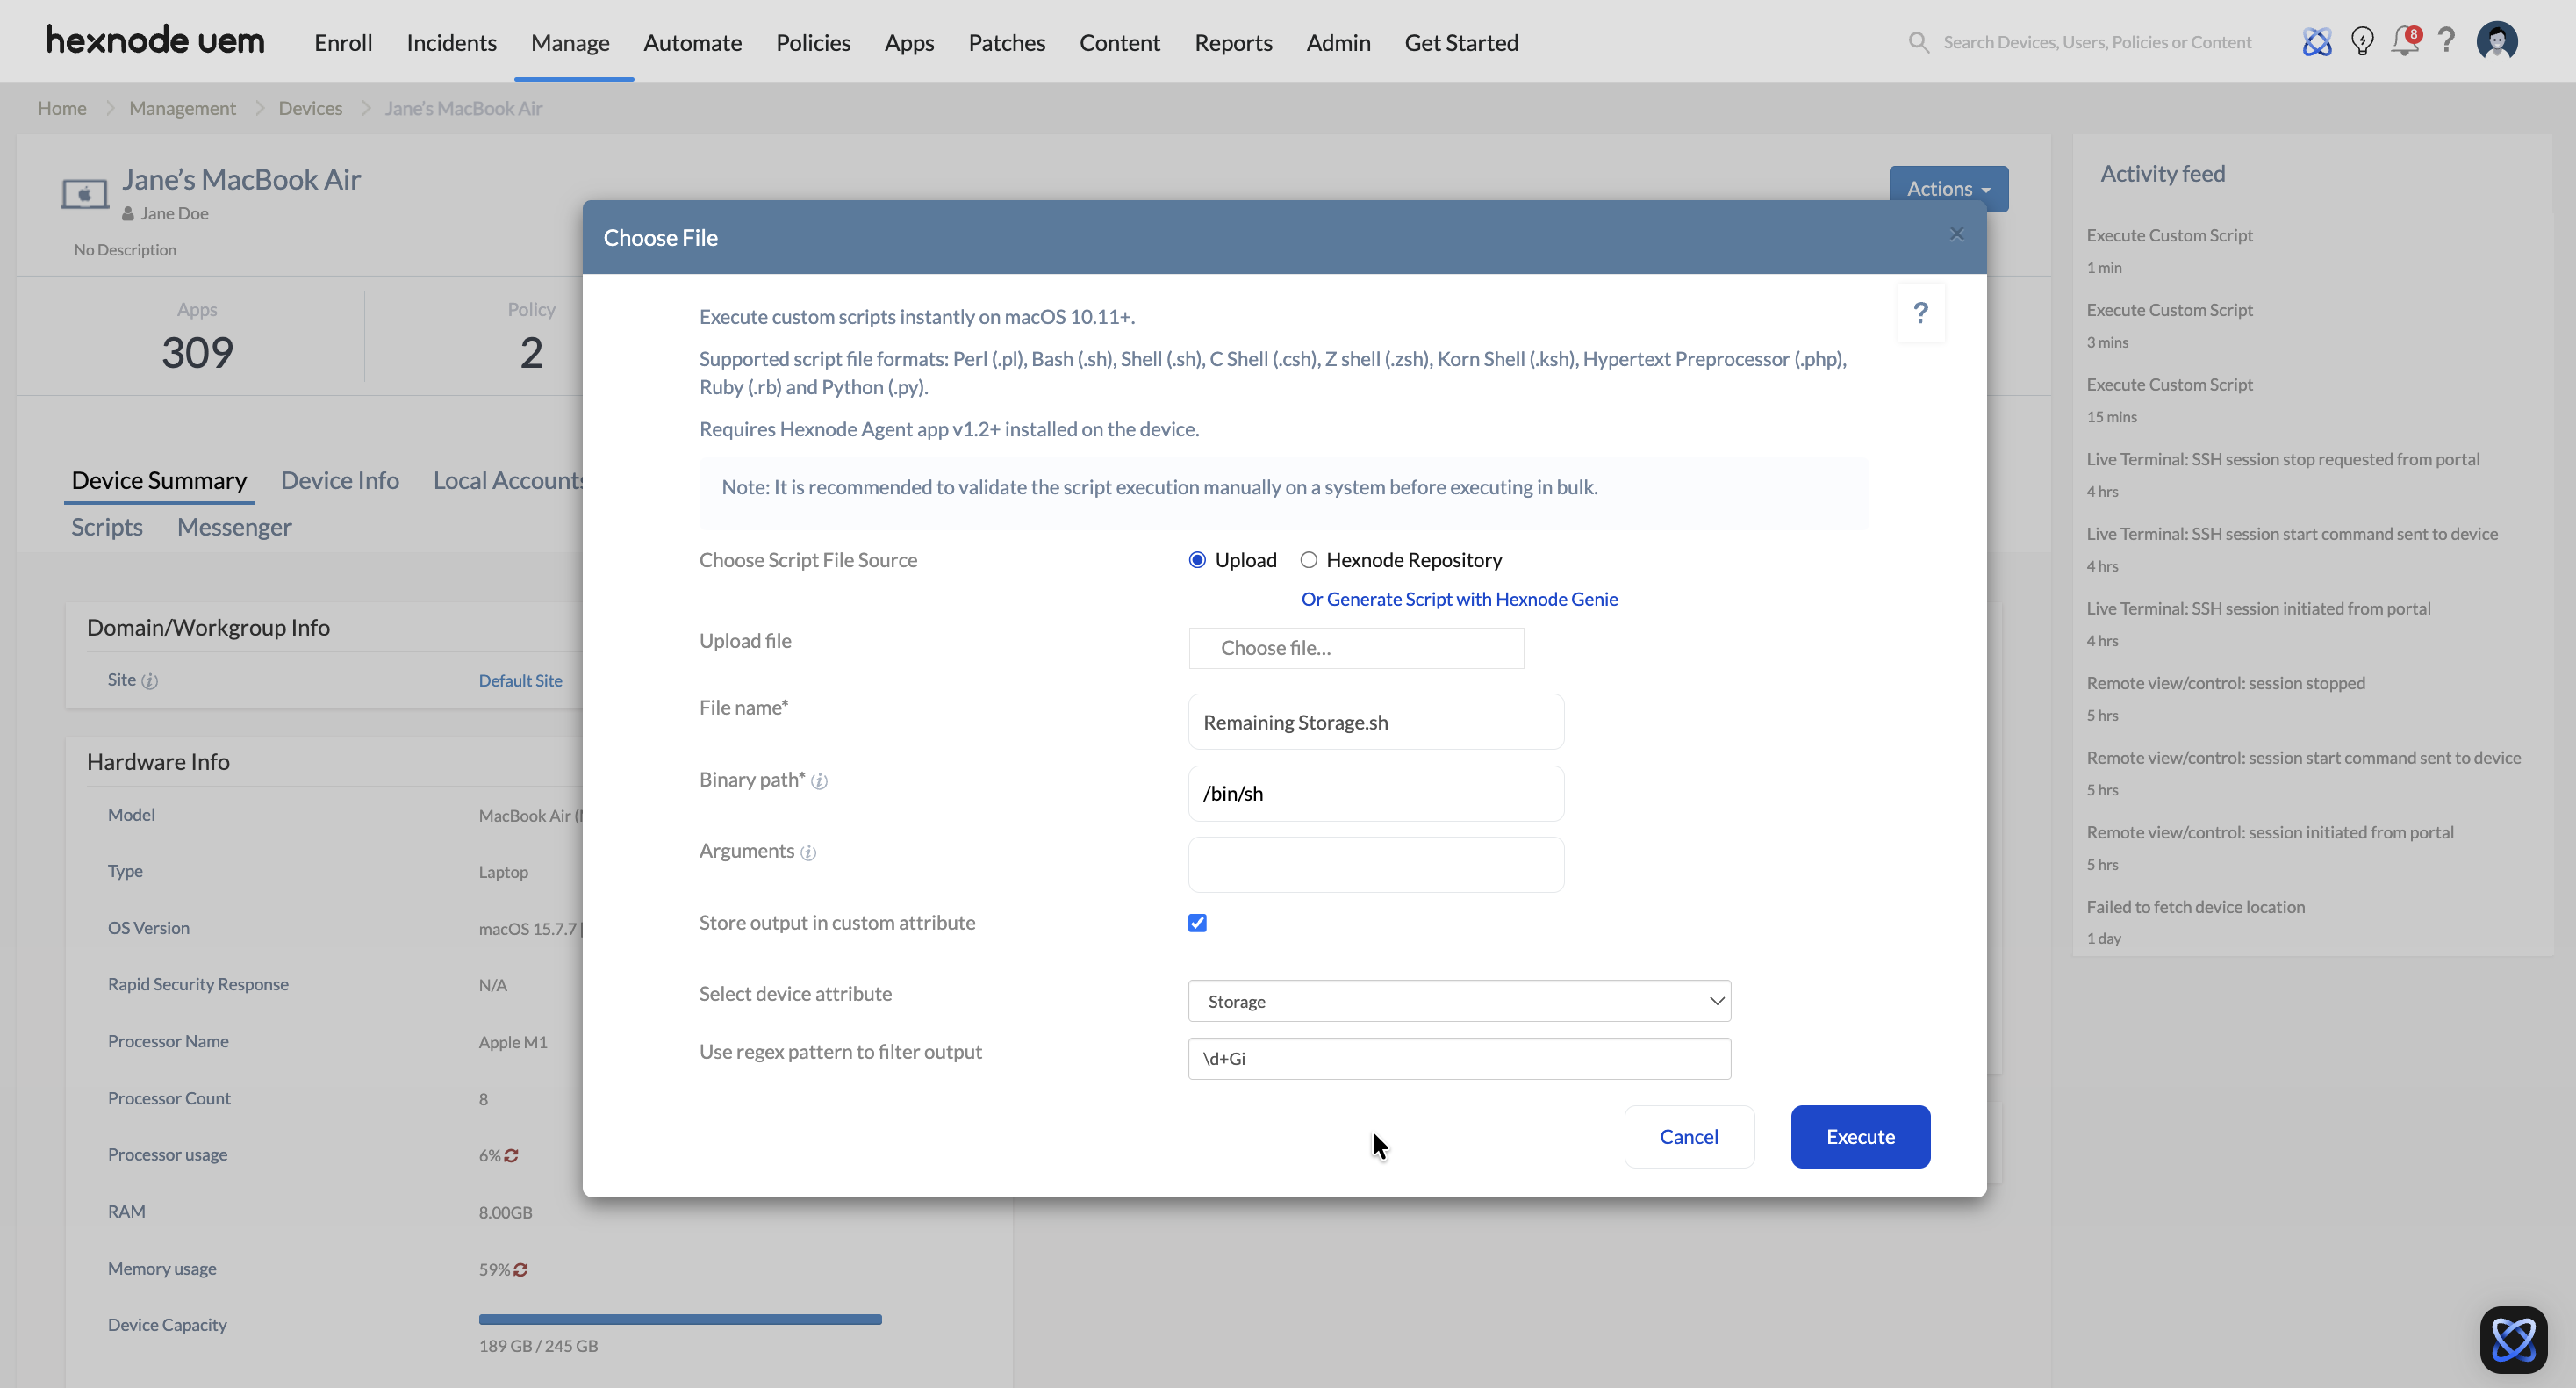
- Configure Script Parameters:
- Choose script file source: Upload a file, select from Content > My Files, or use Hexnode Genie.
- Binary Path: Auto-fills based on file extension. (Note: If /bin/sh appears for Bash, update it to /bin/bash).
Standard Binary Paths for macOS
- Bash: /bin/bash
- Python: /usr/bin/python
- Zsh: /bin/zsh
- Ruby: /usr/bin/ruby
- Perl: /usr/bin/perl
- Arguments: Enter arguments separated by spaces. Use single quotes for multi-word arguments (e.g., ‘William Alexander’).
Supported Argument Wildcards
Variables like %devicename%, %serialnumber%, and %username% can be used as arguments to pull real-time device data into the script.
- Store output in custom attribute: Enable this option to save the script’s output to a selected custom attribute. Once the script executes, the captured output for the custom attribute can be viewed by navigating to the Device Info > Custom Attributes section on the device details page.
- Select device attribute: Choose the specific custom attribute from the dropdown list where the script output should be mapped. Custom attributes must first be configured under Admin > Custom Attributes (Devices).
- Use regex pattern to filter output: Apply a regular expression to extract a specific string from the script’s output. This ensures only the necessary data is saved to the custom attribute rather than the entire output.
Example: If a script deployed to fetch remaining storage in a macOS device return:
- Script Output: Remaining Storage: 177Gi
- Regex Pattern used: \d+Gi
- Stored Value in Custom Attribute: 177Gi
The phrase “Remaining Storage: ” is excluded from the stored value.
- Click Execute.
- Monitor status in Action History. Click Show Output to view logs.
Troubleshooting Guides
| Problem | Resolution |
|---|---|
| Script fails with “Permission Denied” | Ensure the script was converted to an executable using chmod 700 before upload. |
| Bash script fails on modern macOS | If the binary path defaults to /bin/sh, manually change it to /bin/bash in the Hexnode prompt. |
| Arguments with spaces failing | Wrap multi-word arguments in single quotes: ‘Sample Argument’. If you need a single quote inside an argument, use two: William”s. |
| Wildcards not resolving | Ensure the wildcard name is correct (e.g., %udid%). If the device hasn’t synced that specific info, the wildcard may return null. |
Frequently Asked Questions (FAQs)
What level of permission do scripts have when run via Hexnode?
All scripts executed through the Execute Custom Script action run at the root level, providing the highest level of system access.
Can special characters be used in the script filename?
No. While uploading, avoid using / : ? < > \ * | “ [ ] @ ! % ^ # in the filename to ensure compatibility with the UEM repository.
How to verify if a script ran successfully?
Navigate to the Action History tab on the Device Summary page. Successful scripts will show a “Completed” status. Click Show Output to see the actual Terminal results.
Does Hexnode host the scripts uploaded?
Yes. Any script uploaded during the action is automatically saved to Content > My Files for future use.


