Category filter
How to migrate Mac devices from another MDM to Hexnode?
Switching your mobile device management solution is thought to be a challenging process. But you can simplify the process with proper preparations and planning. This guide will assist you in migrating your Mac devices from another MDM solution to Hexnode.
Migration steps
These steps will guide you through the process of migration:
- Remove assets from current MDM and back up required data.
- Create ADE and VPP accounts (if your organization doesn’t have one).
- Migrate certificates and tokens to Hexnode UEM.
- Sync users from directory services to Hexnode UEM.
- Disenroll devices from current MDM.
- Enroll devices into Hexnode UEM.
Step-1: Remove assets from current MDM and back up required data
When migrating devices, you might have to wipe all the content from the devices. Prior to doing so, decide what all data needs to be kept. Back up the required data to your preferred cloud storage service. Export device and user details from the current MDM to use them for the enrollment process. Delete the ADE and VPP accounts configured in the current MDM.
Step-2: Create ADE and VPP accounts
Go to https://business.apple.com/ and sign up for an Apple Business account if your organization doesn’t have one. Automated Device Enrollment (ADE) and Volume Purchase Program (VPP) are seamlessly integrated into Apple Business.
Step-3: Migrate certificates and tokens to Hexnode UEM
APNs certificate
– Create a new Apple Push Notification service certificate and add it to your Hexnode UEM portal. APNs certificate is required for Apple devices to communicate with MDM. So, this is a mandatory step.
- Download the self-signed certificate from the Hexnode UEM portal.
- Go to Apple Push Certificates Portal, upload the self-signed certificate and download the APNs certificate generated by Apple.
- Upload the APNs certificate back to the Hexnode UEM portal.
If your organization is already using ADE and VPP with the current MDM, you can continue using the services with Hexnode UEM. Move ADE and VPP tokens to Hexnode UEM. Your ADE token is a record of your organization’s devices and your VPP token keeps track of all app purchases.
ADE server token
In your ADE portal, create a new MDM server for Hexnode and move all the devices from the previous MDM server to the newly created Hexnode UEM server.
- Create a new MDM server in Apple Business using the public key downloaded from your Hexnode UEM portal.
- Get the server token and upload it to your Hexnode portal to link Hexnode and ADE.
- Create a ADE profile in Hexnode which need to be applied during the ADE configuration.
- Assign your ADE devices to the Hexnode UEM server.
VPP token
Revoke all app licenses and remove any of the previous VPP tokens from the current MDM. Link your VPP account with Hexnode UEM
- Download a new VPP token.
- Configure VPP in Hexnode by uploading this token.
Step-4: Sync users from directory services to Hexnode UEM
You can sync the users from various directory services such as Active Directory (AD), Microsoft Entra ID and Google Workspace (formerly G Suite) to the MDM console.
Unbind your current MDM vendor from the directory services and configure Hexnode UEM with them.
- Active Directory
- Configure Active Directory settings under Admin tab to get the users synced from the AD account to the Hexnode portal.
- Microsoft Entra ID
- Configure Microsoft Entra ID under Admin tab to get the users synced from the Microsoft Entra ID account to the Hexnode portal.
- Google Workspace
- Configure Google Workspace under the Admin tab to get the users and user groups synced from the Google Workspace account to the Hexnode portal.
Step-5: Disenroll devices from current MDM
Disenroll all your devices from the current MDM.
- Perform disenroll action using the current MDM.
- Manually remove enrollment profiles from your devices. This can’t be done if the MDM enrollment profile is made non-removable.
Step-6: Enroll devices into Hexnode UEM
Your devices can be enrolled in Hexnode using different methods. Choose the method that suites your organization’s requirements.
Automatic enrollment via Apple ADE
Use ADE enrollment for eligible devices. If you haven’t assigned devices to the Hexnode UEM server you have created, assign them by providing the serial number, order number or uploading a CSV file containing the serial numbers of all devices. Devices will automatically enroll upon their initial set up.
Bulk enrollment with CSV import
Use the device and user details downloaded in Step-1 to enroll devices in bulk.
- Bulk user import – Upload the user details as a CSV file and send enrollment requests to the users in bulk.
- Pre-approved enrollment – Bulk import a list of devices based on their serial numbers via a CSV file. You can proactively assign device management policies to these devices and the policies automatically take effect upon enrollment.
Self-enrollment
Allow users to authenticate with their AD credentials or usernames and passwords set in the portal.
Open enrollment
Allow users to enroll without authentication using only the enrollment URL.
Email/SMS enrollment
Admin can send enrollment requests with the server address, username and password to the users via email/SMS, and they can enroll using them.
Migration Without Device Wipe
The following section details the standard operating procedure for migrating organization-owned Apple devices to a new device management platform server without initiating a factory reset.
1. Eligibility Requirements
To perform a migration without a factory reset, a device must meet the following strict conditions:
- Supported Operating Systems:
- macOS 26
- Ownership: The device must be organization-owned.
- Enrollment Type: The device must be enrolled in the current device management platform using Automated Device Enrollment (ADE).
- Out-of-the-box devices: Devices onboarded into Apple Business/ASM on macOS 26 (out of the box) can migrate between device management services without requiring a device reset.
- Upgraded devices: If a device was initially added to Apple Business/ASM on a lower OS version and later upgraded to macOS 26, a one-time device reset is required to re-register it. Once this reset is complete, any future migrations will not require a wipe.
- Workaround for Mac: Alternatively, you can bypass the reset requirement for upgraded devices by running the command
sudo profiles renew -type enrollmentin Terminal to migrate the device to Hexnode. - Devices running macOS 26 can also migrate if they are disenrolled and subsequently re-enrolled using profile-based enrollment.
Note:
To migrate without a factory reset, devices must be added to Apple Business or Apple School Manager (ASM) while running macOS 26.
2. Administrator Workflow & Enforcement
Administrators manage the migration process via Apple Business.
- Authorized Roles: Administrator, Device Enrollment Manager, and Site Manager.
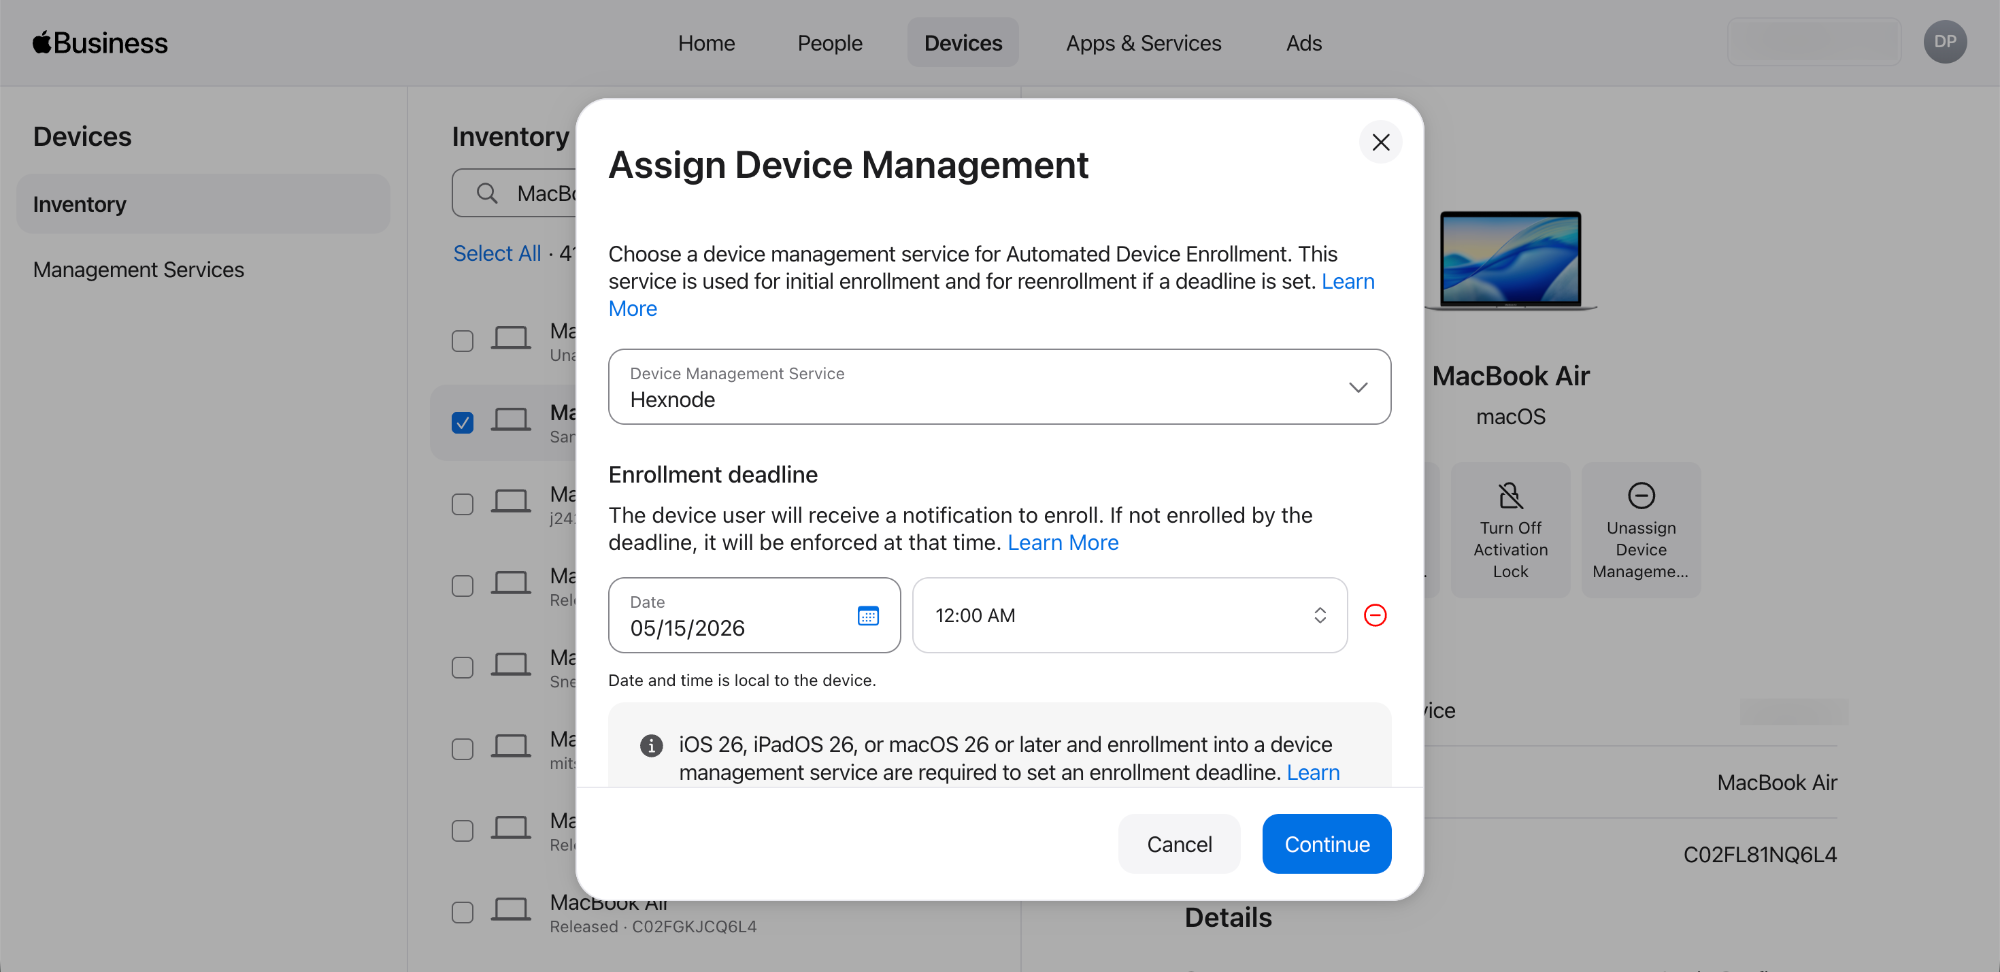
- Server Reassignment Workflow: To initiate the migration, administrators must reassign the devices to the new device management platform server (Hexnode) using the following steps:
- Log in to the Apple Business or ASM portal.
- Go to the Devices section in the top navigation menu, and select the desired device from the Inventory.
- Click the Assign Device Management button.
- Select the device management service (Hexnode) from the dropdown list to confirm the assignment.
- Deadline Configuration: Authorized roles can set a migration deadline and monitor pending migrations directly from the device page.
- Notification Protocol: Once a deadline is set, users receive on-device system notifications prompting them to begin migration. The frequency of these reminders increases automatically as the deadline approaches.
- Enforcement Mechanisms: If a user fails to migrate before the deadline, the organization can enforce mandatory re-enrollment:
- Mac: Enforcement displays a non-dismissible, full-screen re-enrollment prompt.
3. System Behavior & Post-Migration Status
- Activation Lock Management: Upon successful re-enrollment, the new device management platform service assumes full control of the Activation Lock. The operating system invalidates existing bypass codes and generates new ones, which are then escrowed by the new device management platform (Hexnode) to maintain uninterrupted administrative control.
4. Additional Conditions
Migration without a factory reset is subject to the following edge cases and restrictions:
- Apple Configurator: For devices manually enrolled via Apple Configurator, migration is only supported after the mandatory 30-day provisional enrollment period expires.
- Return to Service: Migration is strictly not supported for devices enrolled via ADE utilizing the flag is_return_to_service=true.
- Apple Business Essentials: Migrating to or from the Apple Business Essentials device management service is not supported.
5. End-User Workflows
5.1 macOS Migration Steps
- Prompt: A notification banner displays migration details and the deadline. Simultaneously, an actionable item appears in the Settings App.
- Initiate: User clicks Start Enrollment.
- Remote Management: The Remote Management screen appears. User clicks Enroll.
- Authentication: The system prompts for user credentials to authorize the process.
- Execute: User enters credentials and clicks Enroll to begin the process.
- Completion: Upon finishing, a success message confirms enrollment is complete. User clicks Quit to close the window.
6. Outcome
Upon successful completion of the migration process, the device will be enrolled as supervised and successfully added to Hexnode’s device management server.
