Category filter
How to configure Nokia devices with OEMConfig
OEMConfig is an application used to configure OEM-specific policies on devices enrolled under the Android Enterprise Program. OEMConfig apps are built by their corresponding vendors and are uploaded to the Google Play Store. They use managed configurations to configure the device functionalities specifically allowed by the OEM.
You will only be able to configure the device settings which are specifically allowed by the OEM vendor from the Hexnode portal.
Configuring the Nokia device with OEMConfig App
Approve and add the OEMConfig app to the app inventory
- Navigate to the Apps tab.
- Click on +Add Apps button and select Managed Google Apps from the dropdown list.
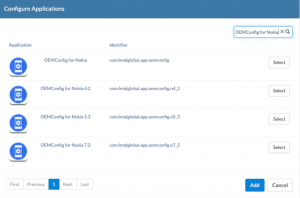
- Search for “OEMConfig for Nokia” in the search bar and select the required app depending on the device in use.
- Click on Add.
- A popup shows up on the screen which displays the permissions required by the app. Click on Approve.
- Next, the Approval Settings page shows up, where you will have to choose the method by which the new permissions requested by the application is to be handled in its upcoming updates.
- Keep Approved when app requests new permissions – Select this option to ensure that the app is automatically approved even when new permissions are requested by the app.
- Revoke app approval when this app requests new permissions – Select this option for the app to be removed from the inventory when it requests new permissions. The app remains revoked till you re-approve the app again.
- Right beside the Approval Settings tab, click on the notifications tab where you will be able to add email addresses to subscribe for email notifications when the apps you have approved request for new permissions. Enter the email address and click on Add. Any number of email addresses can be added.
- Click Save.
The required OEMConfig App for Nokia will be approved and added to the app inventory on following the above steps.
Installing the OEMConfig application in the target devices
- Install apps via Remote Actions.
Two ways to install any previously added app(s):
- Go to Manage > Devices, select devices > Actions > Install Application. Select the apps from the list and click Done.
- Go to Manage > Devices and click on a device name. This will take you to the Device Summary page. Go to Actions > Install application. Select the apps from the list and click Done.
- Install apps via Policies.
You can install the application via Policies in two ways:
Apply OEM-specific configurations
- Go to Policies tab.
- Create a New Policy or select an Existing Policy.
- Select Android -> App Management -> App Configurations.
- Click on Configure and select +Add New Configuration button.
- Select OEMConfig for Nokia from the list of approved apps.
- The list of all available configurations for the OEMConfig app is displayed. Configure the required settings from the list and click on Done.
List of all available configurations for Nokia’s OEMConfig app
| Category | Configuration | Description |
|---|---|---|
| Display | Accelerometer rotation | Control whether the accelerometer will be used for automatic screen rotation. |
| Screen brightness | Set the screen brightness of the device from 0 – 100%. | |
| Enable PureDisplay mode | Transforms all footages to High Dynamic Range (HDR), thus giving more vibrant colours and a clearer picture. | |
| Screen off timeout | Select the amount of time in seconds before which the device goes to sleep after a period of inactivity:
|
|
| Sound – These can be used in conjunction with enterprise policy adjustVolumeDisabled. | Ring Volume | Set ring volume from 0 – 100%. |
| Call | Set in-call volume from 0 – 100%. | |
| Notification | Set notifications volume from 0 – 100%. | |
| Media | Set the media volume from 0 – 100%. | |
| Alarm | Set alarm volume from 0 – 100%. | |
| Touch sounds | Enable/Disable touch sounds. | |
| Location | Bluetooth scanning | Enable this option to allow apps and services scan for nearby devices at any time, even when Bluetooth is turned off. These can be used to improve the location-based features and services. Disable, if not required. |
| Wi-Fi scanning | Enable this option to allow apps and services to scan for Wi-Fi networks at any time, even when Wi-Fi is off. These can be used to improve the location-based features and services. Disable, if not required. |
|
| Location | Enable/Disable location services on the device. | |
| System | Block system OTA to be triggered by Google | Enable/Disable Google from installing OTA updates in the device. |
| Low power/battery saver mode | Enable/Disable Low power/battery saver mode in the device. | |
| Set hour format presentation to 12 or 24 | You can set the hour format presentation to 12 hours or 24 hours. | |
| Fetch time automatically from network | Enable/Disable the device from automatically fetching the date, time and time zone from the network. | |
| Google Assistant Button | Enable/Disable the Google Assistant Button on the device. | |
| Set System Locales (System Languages) | Enter System Locales separated by commas: zh-Hant-TW,en-US,ja-JP. Leave the space empty if you want to keep the user settings (Supported only on Android 10 and above). | |
| Allow Changing System Locales | Enable/disable the user from changing the System Locales. | |
| OEMConfig Settings | Status | Enable this option to show log reports when application settings are changed. Disable, if not required. |
| Logging | Enable/Disable OEMConfig Application logging. Application log is a file which contains information about the events which occurs within an application. The events can be errors, warnings or even informational events. |
Associate the policy
- Associate the policy to the Target Devices in the Policy Targets tab.
- Select the required Devices/Device Groups/Users/User Groups/ Domains with which the policy is to be associated.
- Click on Save.
The applied configurations will be pushed to the specified device.
