Category filter
Supervise iOS devices without data loss
What is supervision?
Supervision is a deployment strategy introduced by Apple to manage corporate-owned iOS, macOS and tvOS devices. Since its inception with iOS 5, businesses have taken up “Supervision” as an effective method for iOS device management. Supervision indicates that an organization owns the devices and exercises complete control over them. The users can access a supervised device as determined by the organization. The organization can decide the features to be used on the devices by enforcing advanced restrictions or customizing device settings remotely from a Unified Endpoint Management console.
Hexnode provides two methods to enable supervised mode on iOS devices while enrolling them to the UEM console.
Challenges faced by organizations while enabling supervision
Supervision provides various advantages to enterprises. For instance, setting up supervised mode prevents users from dismissing the device management profile installed on corporate devices (except for the 30-day provisional period in case the devices are added to DEP via Apple Configurator). Hence, even if users accidentally wipe the device (a device wipe operation unintended by the organization), endpoints are re-enrolled, and the device ownership holds on to the organization.
With supervision, organizations find it easier to provision corporate devices even before the employees begin to use them. It helps you prepare the endpoints depending on the enterprise requirements.
Though there are many benefits associated with iOS supervision, it does have a few cons as well. Most importantly, it is essential to recognize that the device undergoes reset during the supervising process. Hence, the data stored on the device will be lost.
Therefore, organizations look for feasible methods to preserve confidential data while supervising iOS devices. It would not be a trouble in the case of newly purchased devices.
But for the devices already deployed for corporate use, data loss incurred during supervision is a matter of great concern.
Supervising iOS devices without data loss
Even though data gets erased while supervising a device, performing a few additional steps helps you prevent data loss during the process. Whether or not the devices were already enrolled in the Hexnode UEM, these steps help enable supervision without data loss.
Backup using a Mac
- Back up the Primary device.
- Connect the Primary device to the Mac.
- Open Finder on the macOS device.
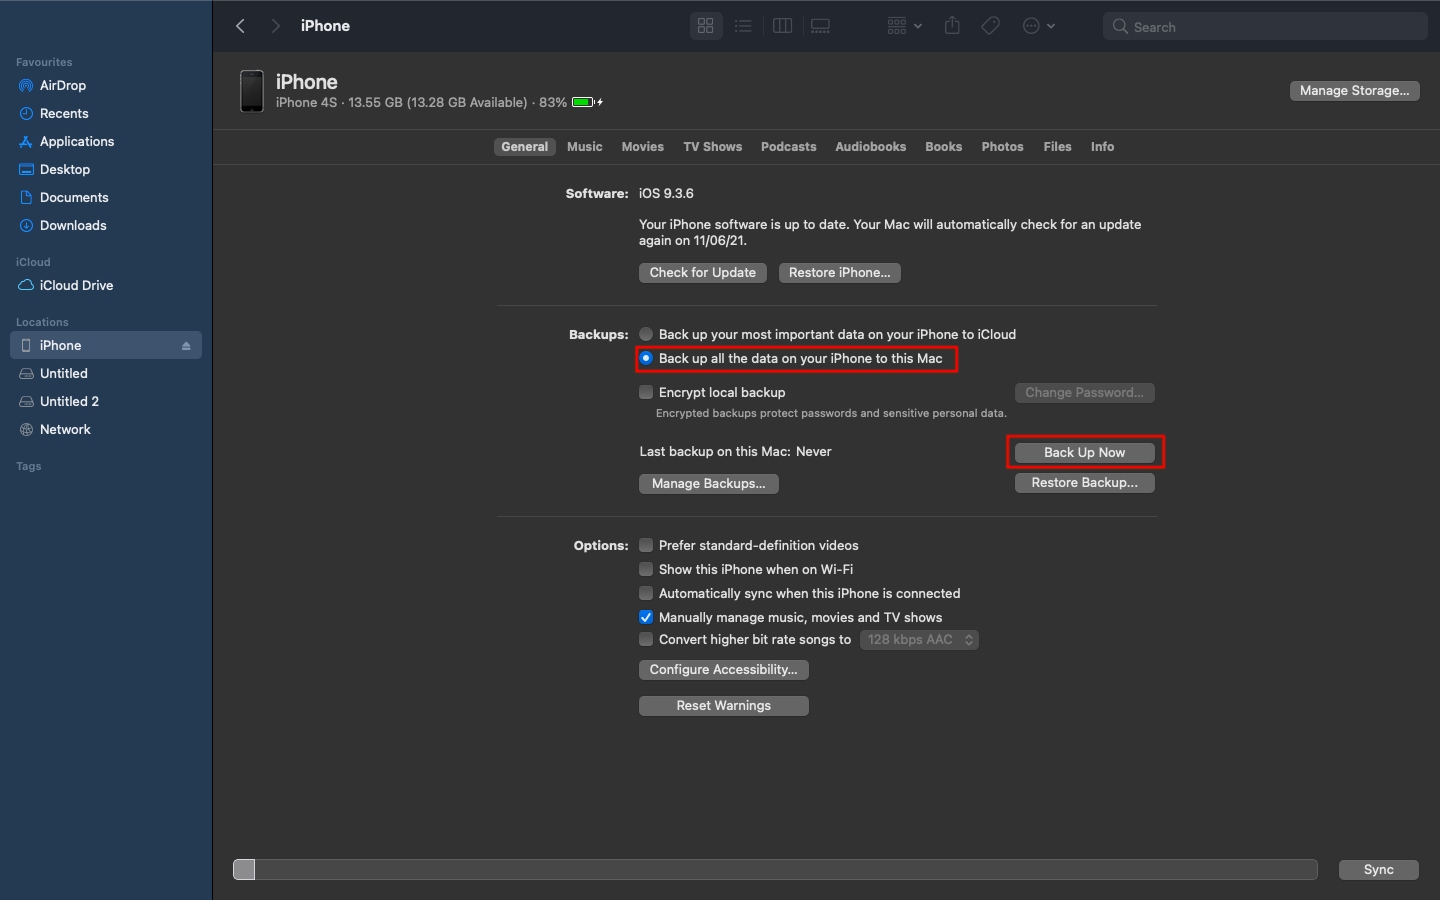
- Under Locations, identify the Primary device.
- Both the Mac and Primary devices show a prompt to enable trust. Click Trust on each device.
- After establishing the trust, the device details page of the connected Primary device will be displayed on the macOS device.
- Under the General sub-tab, enable the Back up all of the data on your iPhone to this Mac option.
- Click on Back Up Now.
- While backing up the device, note down the timestamp. It will help you identify the right backup when you need a restore.
- Restore the backup to the Temporary device.
- Connect the Temporary device to the Mac.
- Open Finder.
- Enable Trust on the Mac and the temporary iOS device.
- Identify the Temporary iOS device under Locations.
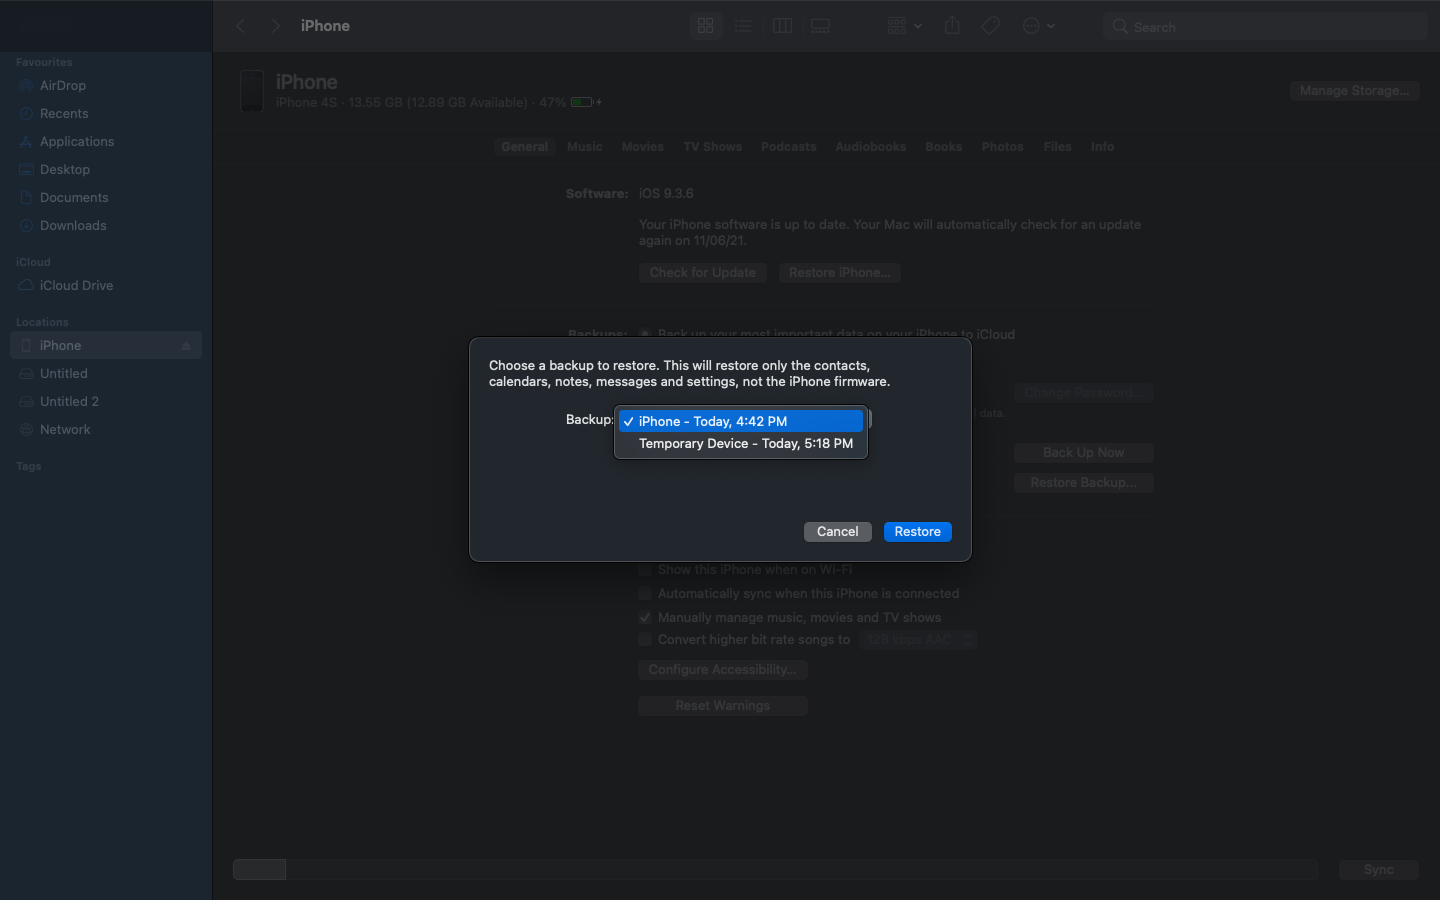
- Under the General sub-tab, click on Restore Backup.
- From the list of backups choose the backup that matches the timestamp in the above step.
- Click Restore.
- Wait for some time until the process is complete. You can disconnect once the device restarts and syncs with the Mac.
- Also, back up the Temporary device following the same procedure. Make a note of the backup timestamp.
- If you use Apple Configurator to supervise the Primary device:
- Connect the Primary device to the Mac.
- Go to Finder and restore the last backup of the Temporary device on to the primary device (Follow step 2).
- Enroll the device using the steps mentioned here.
- Create a Profile.
- Create a Blueprint and add the profile.
- Prepare the Blueprint.
- Apply the Blueprint.
- Create a Profile.
- Ensure that the Primary device remains connected to the Mac.
- Once the blueprint is applied, the supervision profile will be associated with the device.
- When the device prompts whether to apply the configuration, click on Apply Configuration.
- The device will be enrolled in Hexnode in the supervised mode. It will have the data restored from the backup.
- To supervise the Primary device using Apple DEP,
- Follow the steps to supervise the device using Apple DEP. The device will be enrolled in Hexnode in supervised mode as you turn on the device.
- Integrate DEP with Hexnode.
- Assign the device to the Hexnode server.
- Initiate a sync with DEP.
- Integrate DEP with Hexnode.
- Connect the Primary device to the Mac device.
- Open Finder.
- Click on Restore Backup and identify the last backup of the Temporary device.
- The data will be restored to the newly enrolled device.
- Follow the steps to supervise the device using Apple DEP. The device will be enrolled in Hexnode in supervised mode as you turn on the device.
Backup iOS using iCloud
- Create a backup of the Primary device.
- Connect the Primary device to a Wi-Fi network.
- On the Primary device, go to Settings > [Username] > iCloud > iCloud Backup. Select Back Up Now.
- Use a Temporary device to restore the backup.
- Go to Settings > General > Reset on the temporary device, then tap Erase All Content and Settings.
- Set up the device.
- Select Restore from iCloud Backup when the Apps & Data pane appears.
- Once the restoration is complete, you may backup the Temporary device.
- Reset the Primary device to factory settings.
- Go to Settings > General > Reset, then tap Erase All Content and Settings.
- Add the Primary device to DEP using Apple Configurator. While preparing the blueprint, do not forget to select the following steps to be shown to the user:
- Apps & Data
- Apple ID
- Restore Completed
- Set up the Primary device. Under Apps & Data setup pane, select Restore from iCloud Backup. Enter the Apple ID associated with the old device to restore the iCloud backup.
Restoring data from a DEP enrolled device to a new device and then enrolling the new device in Hexnode
You might already be using Hexnode UEM to provision iOS devices with DEP. However, if you have recently bought a new iOS device and want to restore the data from a previously enrolled device and enroll the new device, follow the steps given below:
- Backup data of your enrolled device to iCloud.
- Go to Settings > [Username] > iCloud > iCloud Backup.
- Select Back Up Now.
- On the Hexnode portal, go to Enroll > Platform-Specific> Apple Business/ School Manager> DEP Configuration Profiles > Configure DEP Profile.
- Now, set up your DEP profile. Configure the profile in such a way that the steps, Apple ID and Restore from iCloud Backup are not skipped during the setup.
- Add the new device to the Hexnode server.
- Associate the DEP Configuration profile to the new device.
- Switch on the new device and follow the on-screen instruction to set up the phone. Select the “Restore from iCloud Backup” option when the “Apps and Data” page comes up on the device. Enter the Apple ID associated with the old device to restore iCloud backup.
- After the initial setup, the DEP profile configured in the portal will be associated with the device. The data from the old device will also be available on this device.


