Category filter
Deploy Bitdefender on Windows Devices using Hexnode UEM
Prerequisites
- Administrator access to the Bitdefender GravityZone Control Centre.
- Target Windows devices must be enrolled in Hexnode UEM.
Step 1: Retrieve the Bitdefender GravityZone Package ID
Before deploying Bitdefender via Hexnode UEM, retrieve the package ID associated with the Bitdefender installation package:
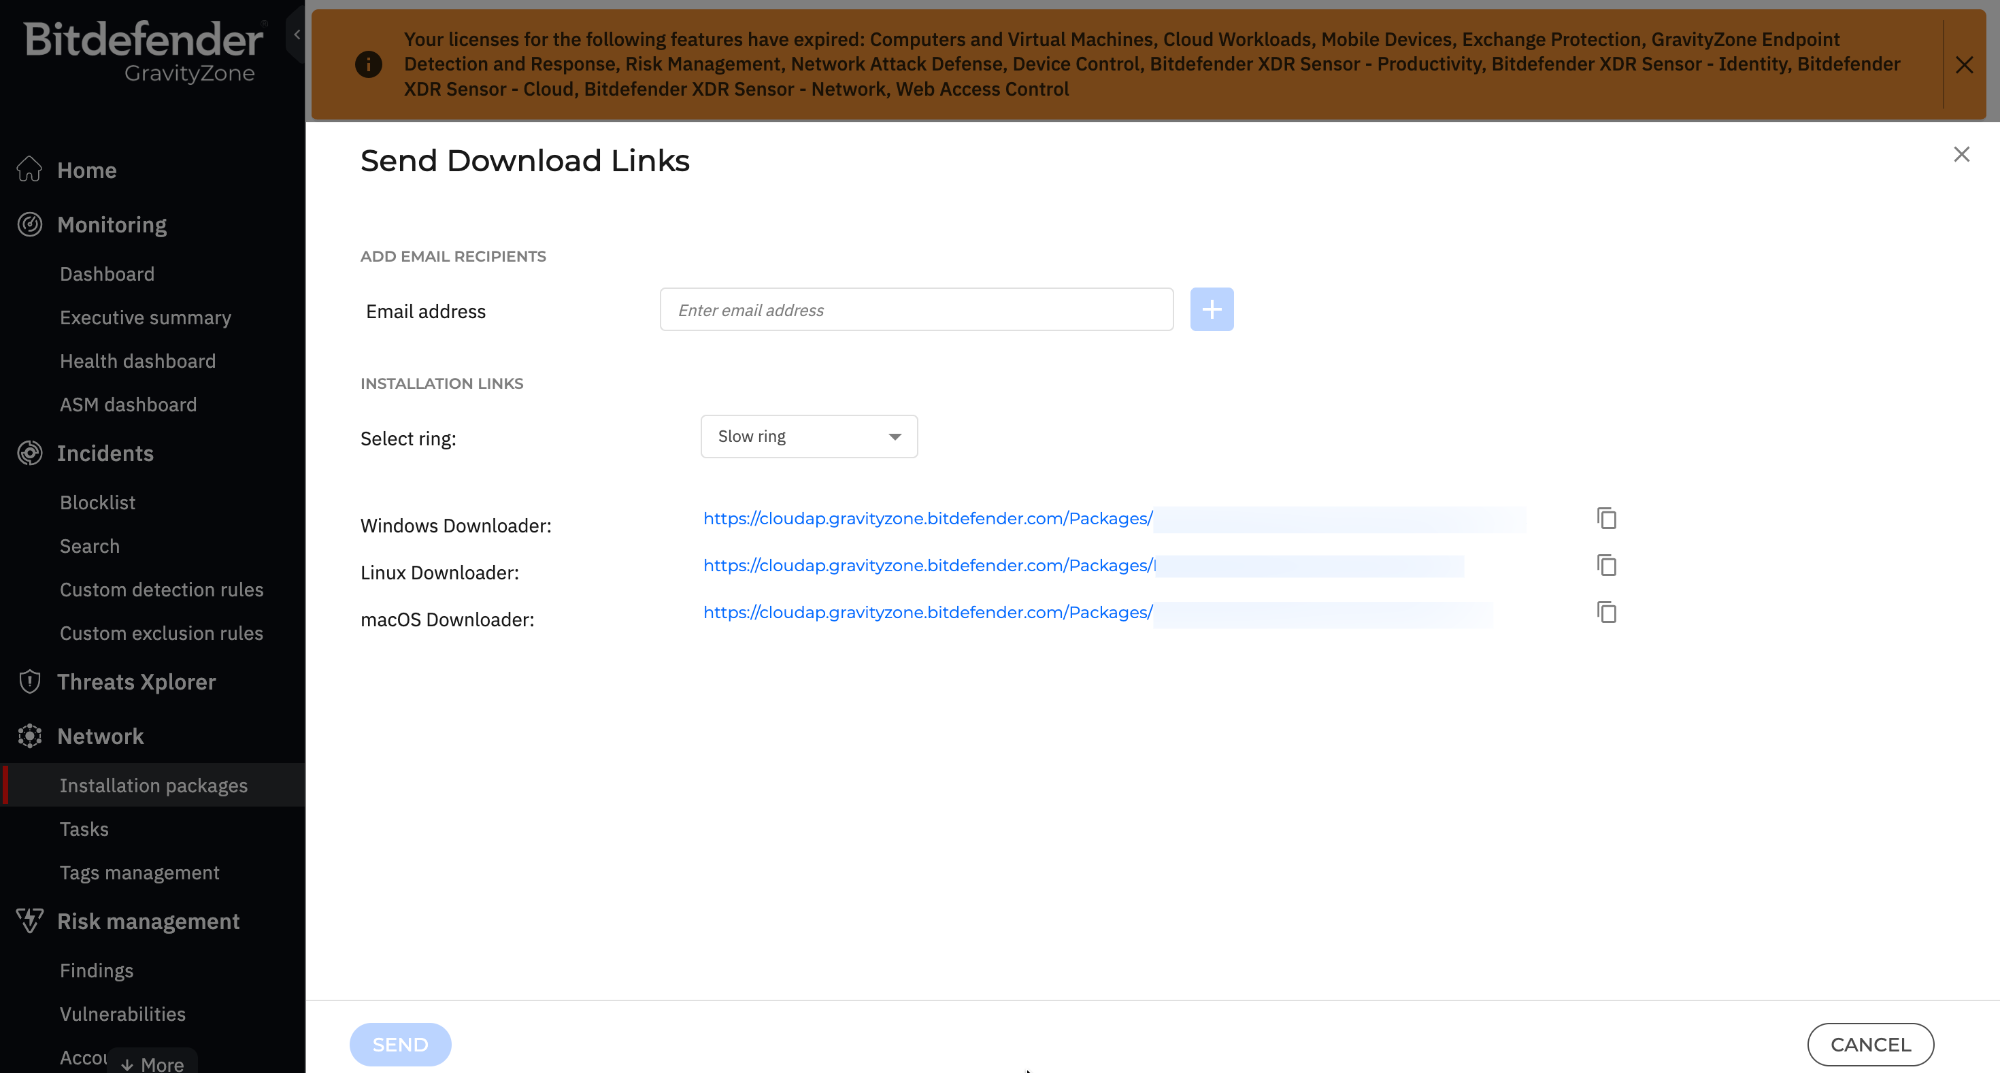
- Generate Package: Log in to BitDefender GravityZone Control Centre portal and navigate to Network > Packages > Installation Packages. Click Create to configure your specific security modules.
- Save & Export: After saving, select your package and click Send Download Links.
- Extract ID: In the download window, locate the Windows Downloader URL and copy the alphanumeric string enclosed in square brackets. This value is the GravityZone Package ID.
- Example URL: https://cloudap.gravityzone.bitdefender.com/Packages/BSTWIN/0/setupdownloader_[aHR0cHM6Ly9jbG91ZGFwLWVj==].exe
- Extracted ID: aHR0cHM6Ly9jbG91ZGFwLWVj==
Step 2: Prepare the PowerShell Script
To deploy the BEST agent through Hexnode UEM, create a PowerShell script using the following code, and save it as a .ps1 file on your device/upload it to the Hexnode Script Repository. Ensure you replace “$GZ_Package_ID ” with the GravityZone Package ID from Step 1.
|
1 2 3 4 5 6 7 8 9 10 11 12 13 14 15 16 17 18 19 20 21 22 23 24 25 26 27 28 29 30 31 32 33 34 35 36 37 38 39 40 41 42 43 44 45 46 47 |
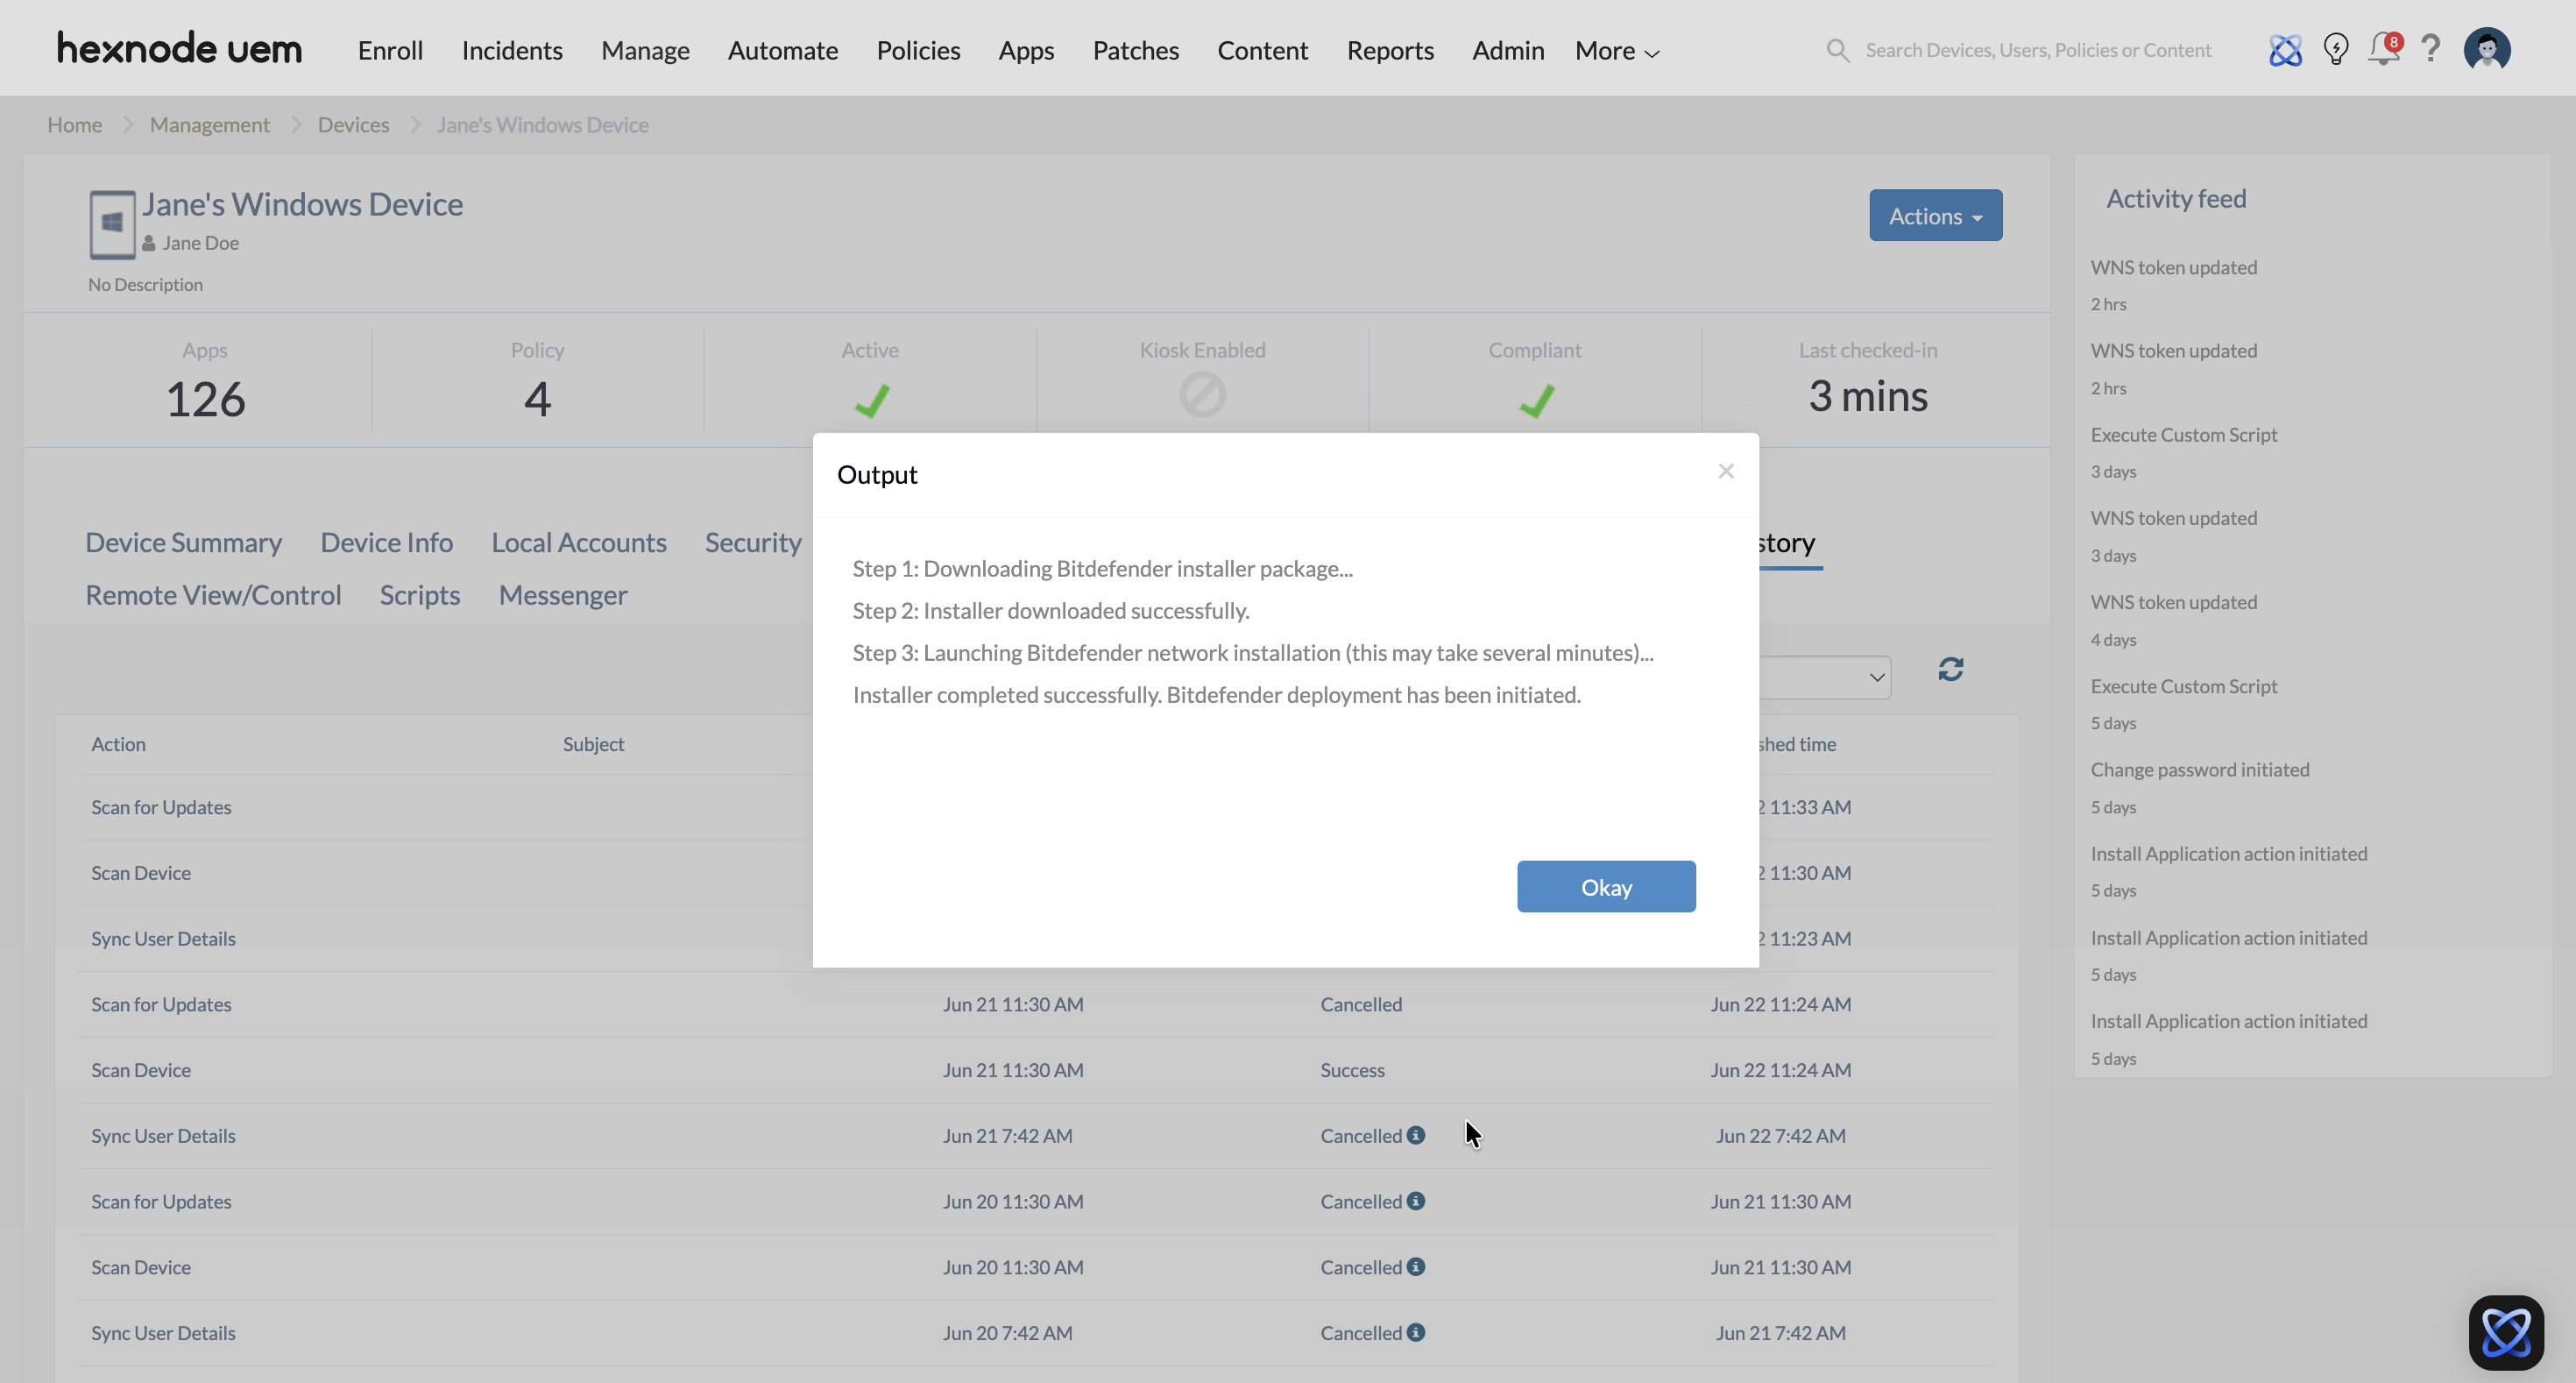
# Bitdefender BEST Network Installer (Simple + Clear Messaging) $ErrorActionPreference = "Stop" $DownloadUrl = "https://download.bitdefender.com/SMB/Hydra/release/bst_win/downloaderWrapper/BEST_downloaderWrapper.msi" $MsiPath = Join-Path $env:TEMP "BEST_downloaderWrapper.msi" try { Write-Host "Step 1: Downloading Bitdefender installer package..." Invoke-WebRequest -Uri $DownloadUrl -OutFile $MsiPath if (!(Test-Path $MsiPath)) { throw "Download failed: Installer file was not created." } Write-Host "Step 2: Installer downloaded successfully." Write-Host "Step 3: Launching Bitdefender network installation (this may take several minutes)..." $Process = Start-Process -FilePath "msiexec.exe" -ArgumentList @( "/i" "`"$MsiPath`"" "/qn" "GZ_PACKAGE_ID= $GZ_Package_ID" "REBOOT_IF_NEEDED=1" ) -Wait -PassThru switch ($Process.ExitCode) { 0 { Write-Host "Installer completed successfully. Bitdefender deployment has been initiated." } 3010 { Write-Host "Installer completed successfully. A system reboot is required to finalize setup." } default { Write-Host "Installer finished with exit code $($Process.ExitCode). The network deployment may not have started correctly." } } exit $Process.ExitCode } catch { Write-Host "Installation failed: $($_.Exception.Message)" exit 1 } |
Step 3: Deploy via Hexnode UEM
- Log in to your Hexnode UEM portal.
- Navigate to Manage > Devices and select your target Windows endpoints.
- Click Actions > Deployments > Execute Custom Script, select the PowerShell script, and execute it.
Hexnode UEM executes the script remotely, initiating the BEST installation on the selected Windows devices.
Frequently Asked Questions
Does the Bitdefender installation trigger any user prompts or notifications?
No. The deployment runs completely as a silent background process via Hexnode UEM. The Bitdefender Endpoint Security Tools (BEST) agent installs quietly without triggering any pop-ups, security prompts, or user interruptions, allowing employees to continue working without downtime.
How to verify that the Bitdefender agent deployed successfully?
A successful installation can be verified through:
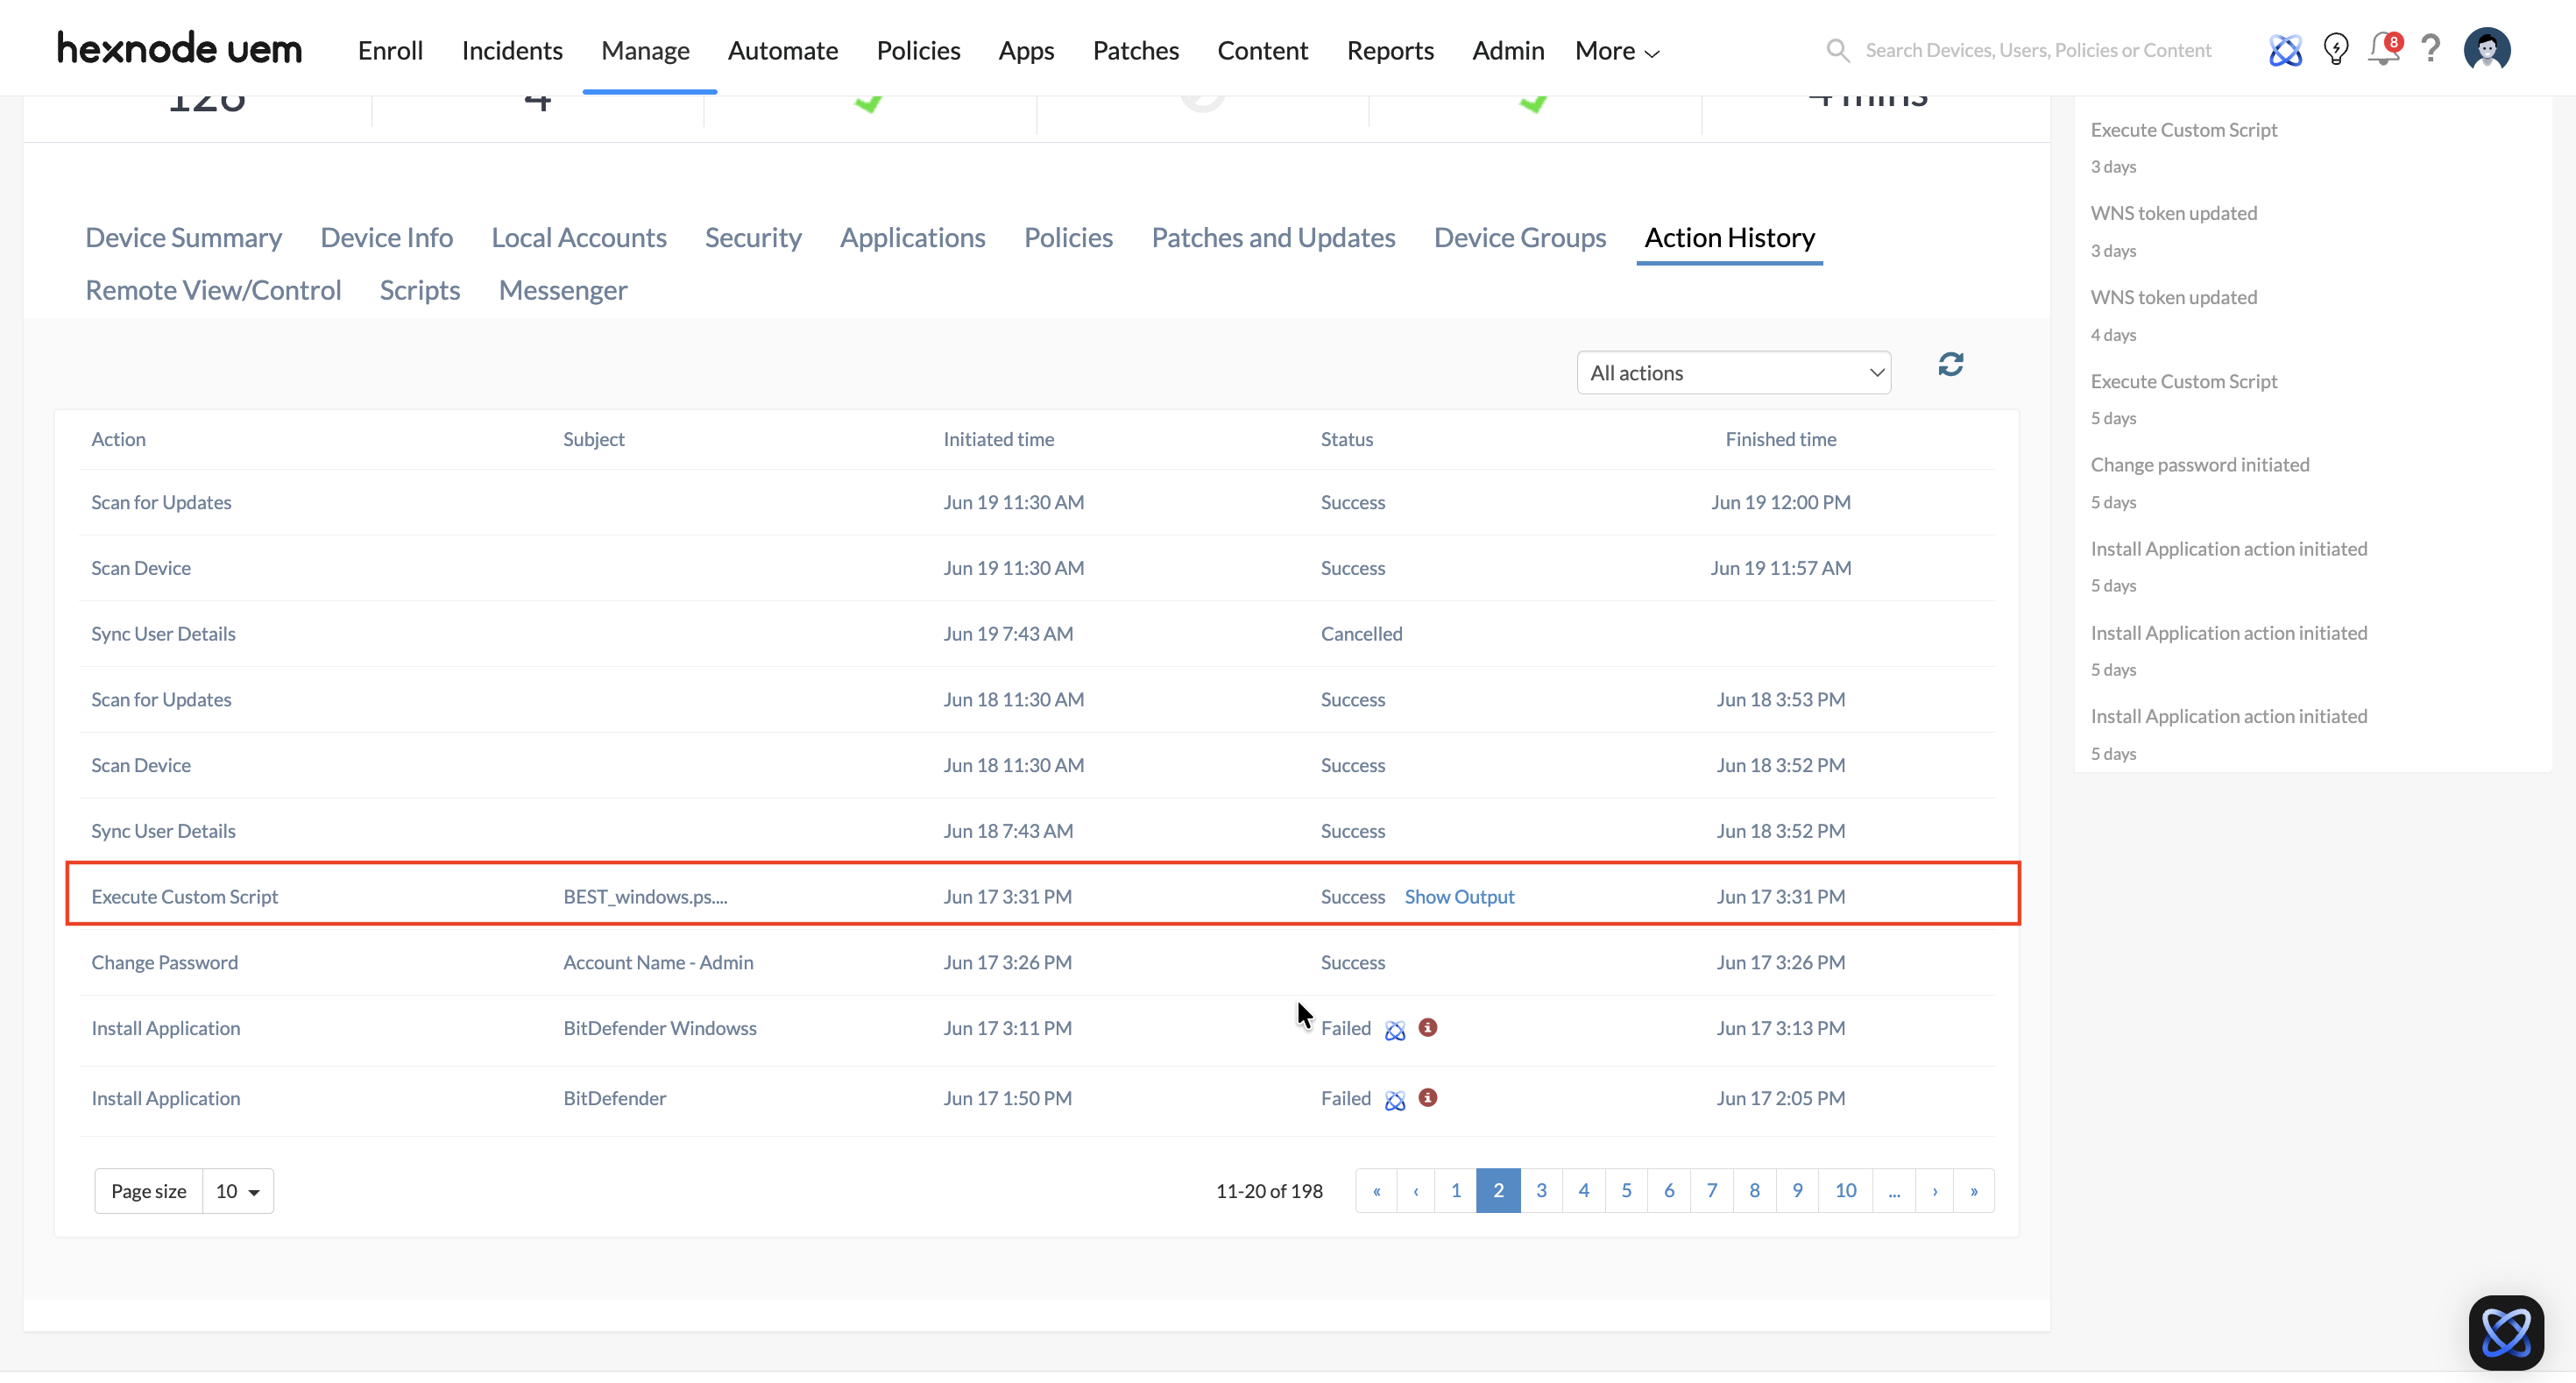
- Hexnode UEM: Navigate to Manage > Devices > select the device > open the Action History sub-tab. Verify that the custom script execution is marked as successful, indicating that the Bitdefender deployment was initiated on the device.
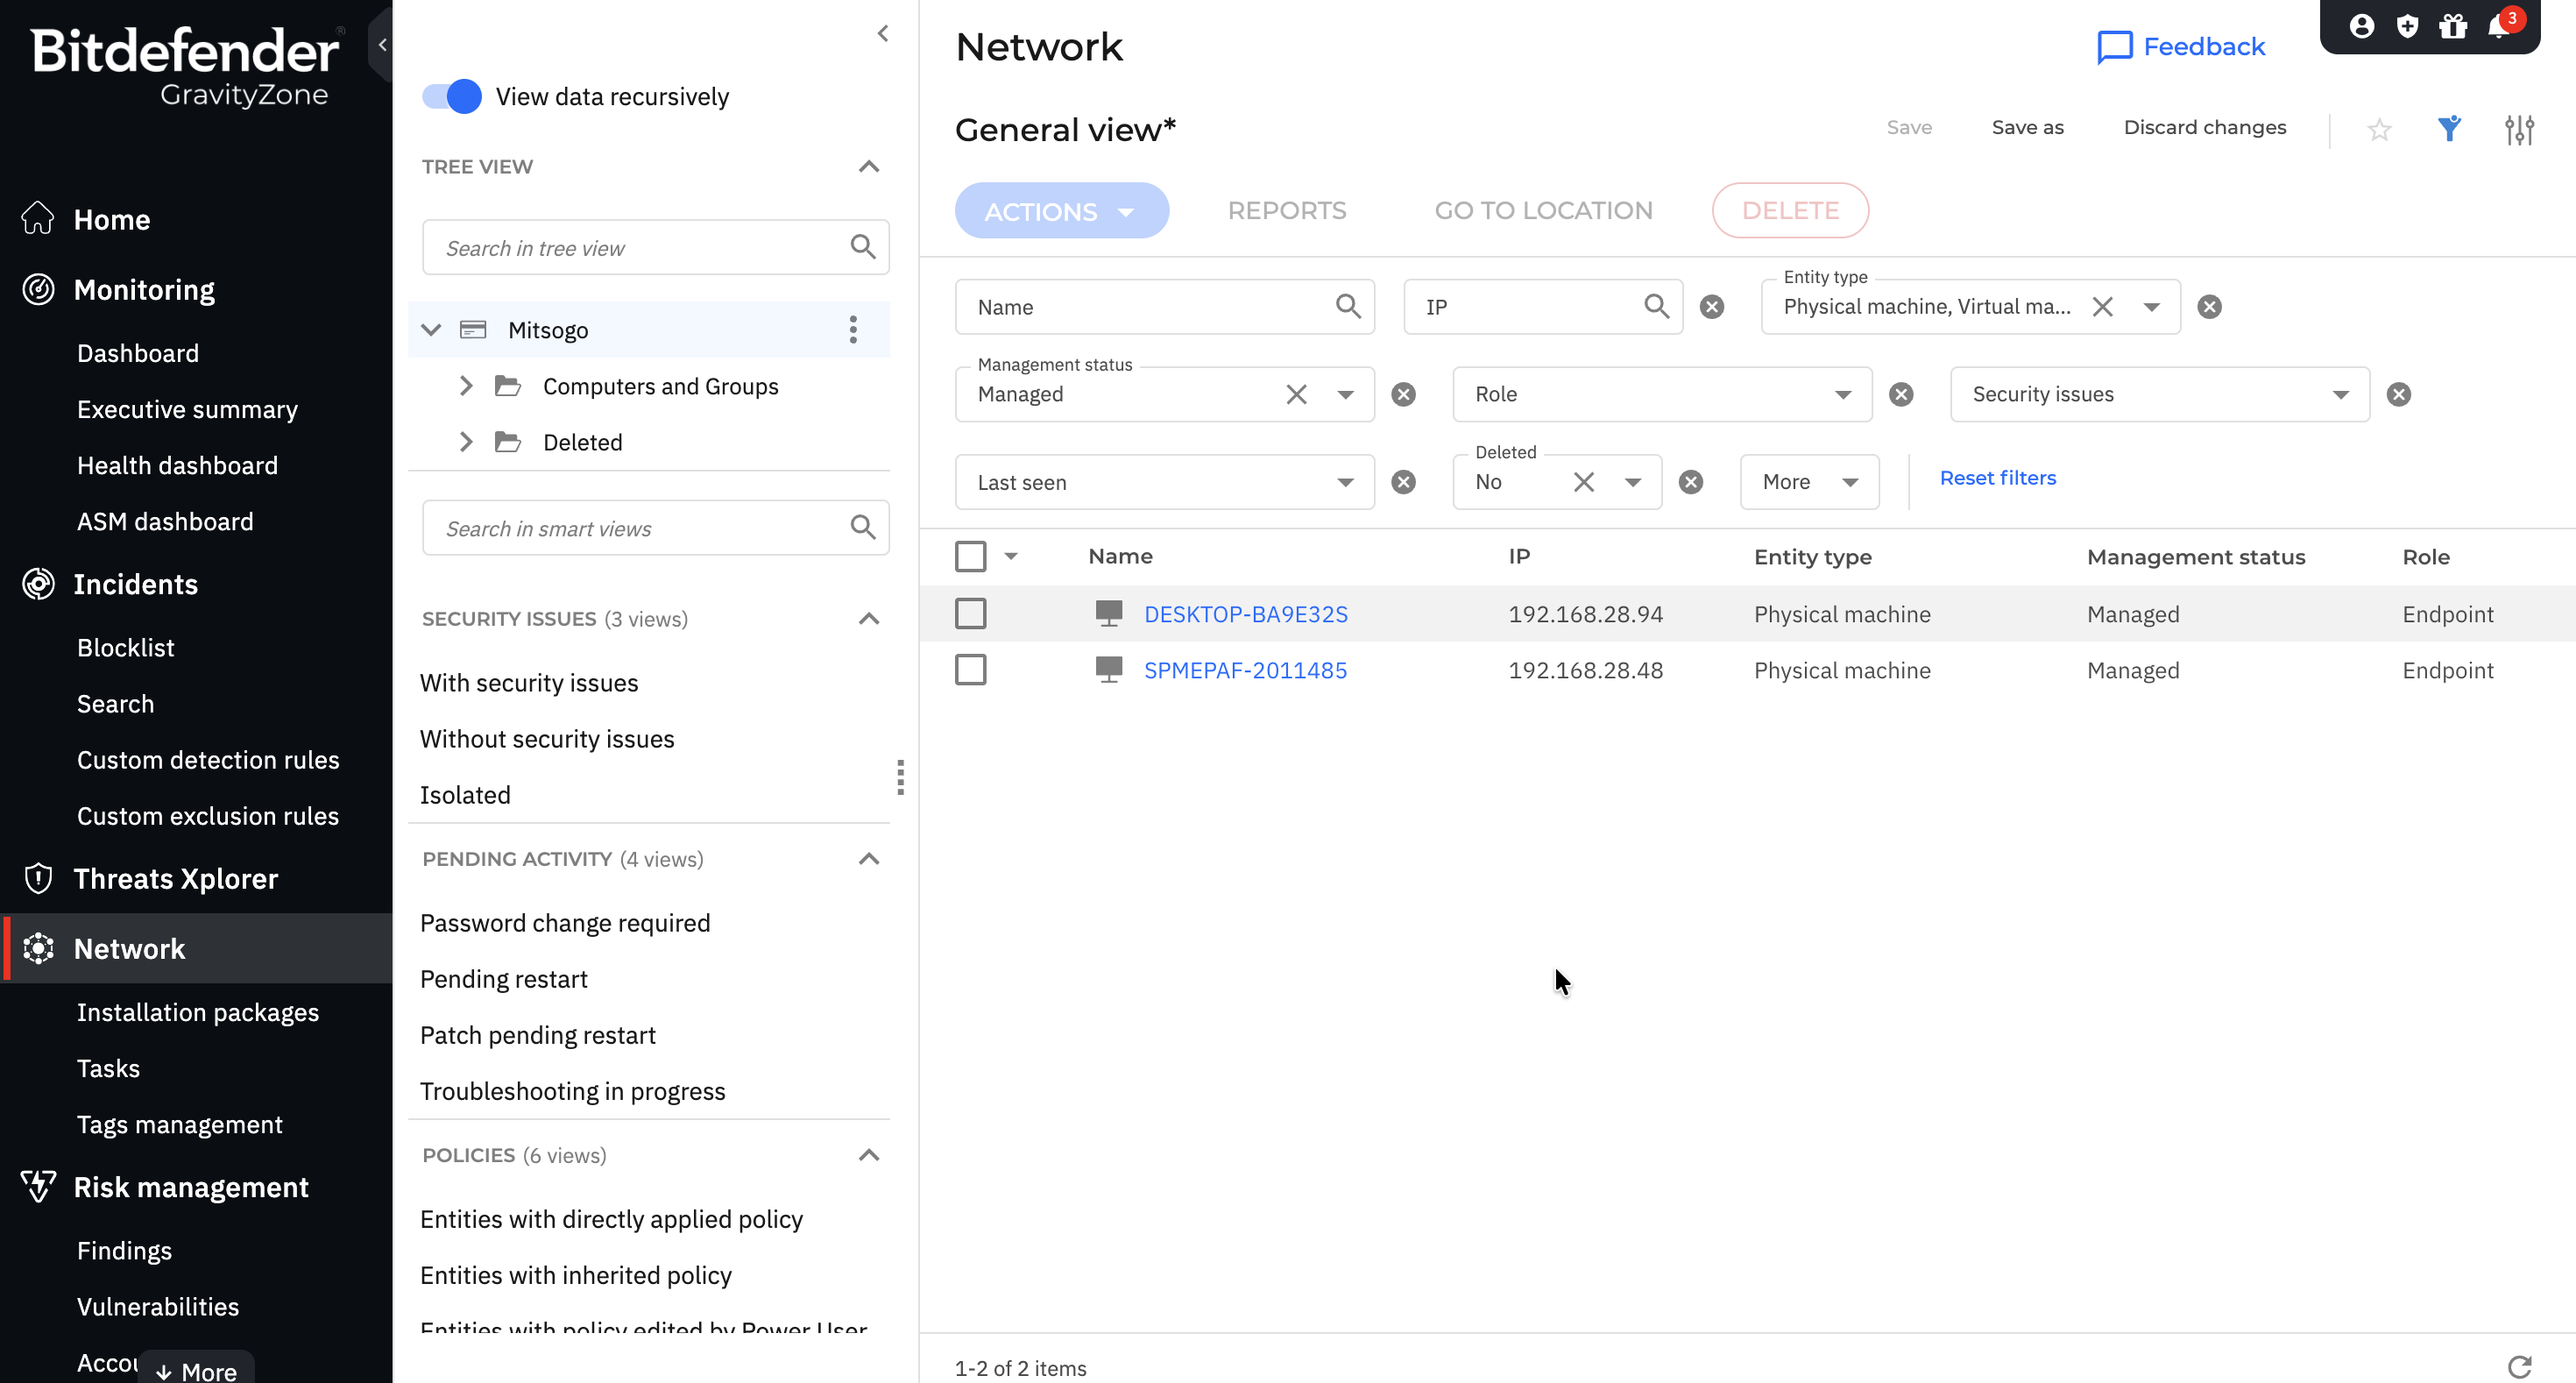
- Bitdefender GravityZone Control Centre: Check the Network tab in the Bitdefender GravityZone Control Center to ensure the endpoint appears online, managed, and active.