Category filter
Configure Manual Patch Deployment for Windows
Manual patch deployment in Windows (including co-managed Windows) allows administrators to selectively install updates for the operating system and applications, helping with a controlled rollout. Whether an update needs to be installed immediately or tested on a specific set of devices before a wider deployment, Hexnode UEM’s manual patching provides an efficient solution.
The Automation feature streamlines the update process by allowing you to handpick, schedule, and define target devices/users for desired updates/patches.
Steps to configure manual patch deployment on Windows devices
- Log in to Hexnode UEM.
- Navigate to the Automate tab, click on New Automation, and select Windows as the platform.
- Automation Name: Enter a name for the automation.
- Description: Provide a brief description to clarify the automation intent or scope (optional).
-
Choose update categories to target
You can select the type of updates to deploy, either Windows or Apps.

Windows Updates
When choosing Windows, you can specify the type of updates to deploy:
- Quality Updates – Includes security and non-security fixes such as security patches, critical updates, servicing stack updates, and certain driver updates.
- Feature Updates – Introduces new features and enhancements to the Windows OS.
- Driver Updates – Covers updates for third-party drivers essential for device functionality.
- Other Updates – Includes non-critical and non-security updates that help maintain and optimize system performance.
App Updates
When selecting Apps, you can define the type of applications to be updated:
- Hexnode Store – Updates for applications installed via Hexnode Store. The Hexnode Store is an app store that contains a curated set of applications uploaded by Hexnode.
- Windows Store – Updates for applications installed via the Microsoft Store.
- Enterprise Apps – Updates for internally developed apps deployed and managed through Hexnode.
-
Select updates to automate
This section displays available Windows OS updates retrieved from Microsoft servers and app updates retrieved from the Windows Package Manager.
For Windows updates, you can search using:
- Update name
- GUID
- KB number
For Apps updates, you can search using:
- Update name
- App identifier
- Publisher
Additionally, you can choose how updates are applied by selecting one of the following automation actions:
- Download: Downloads the selected updates for installation at a later time (applicable only to App updates).
- Install: Installs the selected updates immediately on the target devices.
- Uninstall: Removes the selected updates from the target devices. (applicable only to Windows updates).
-
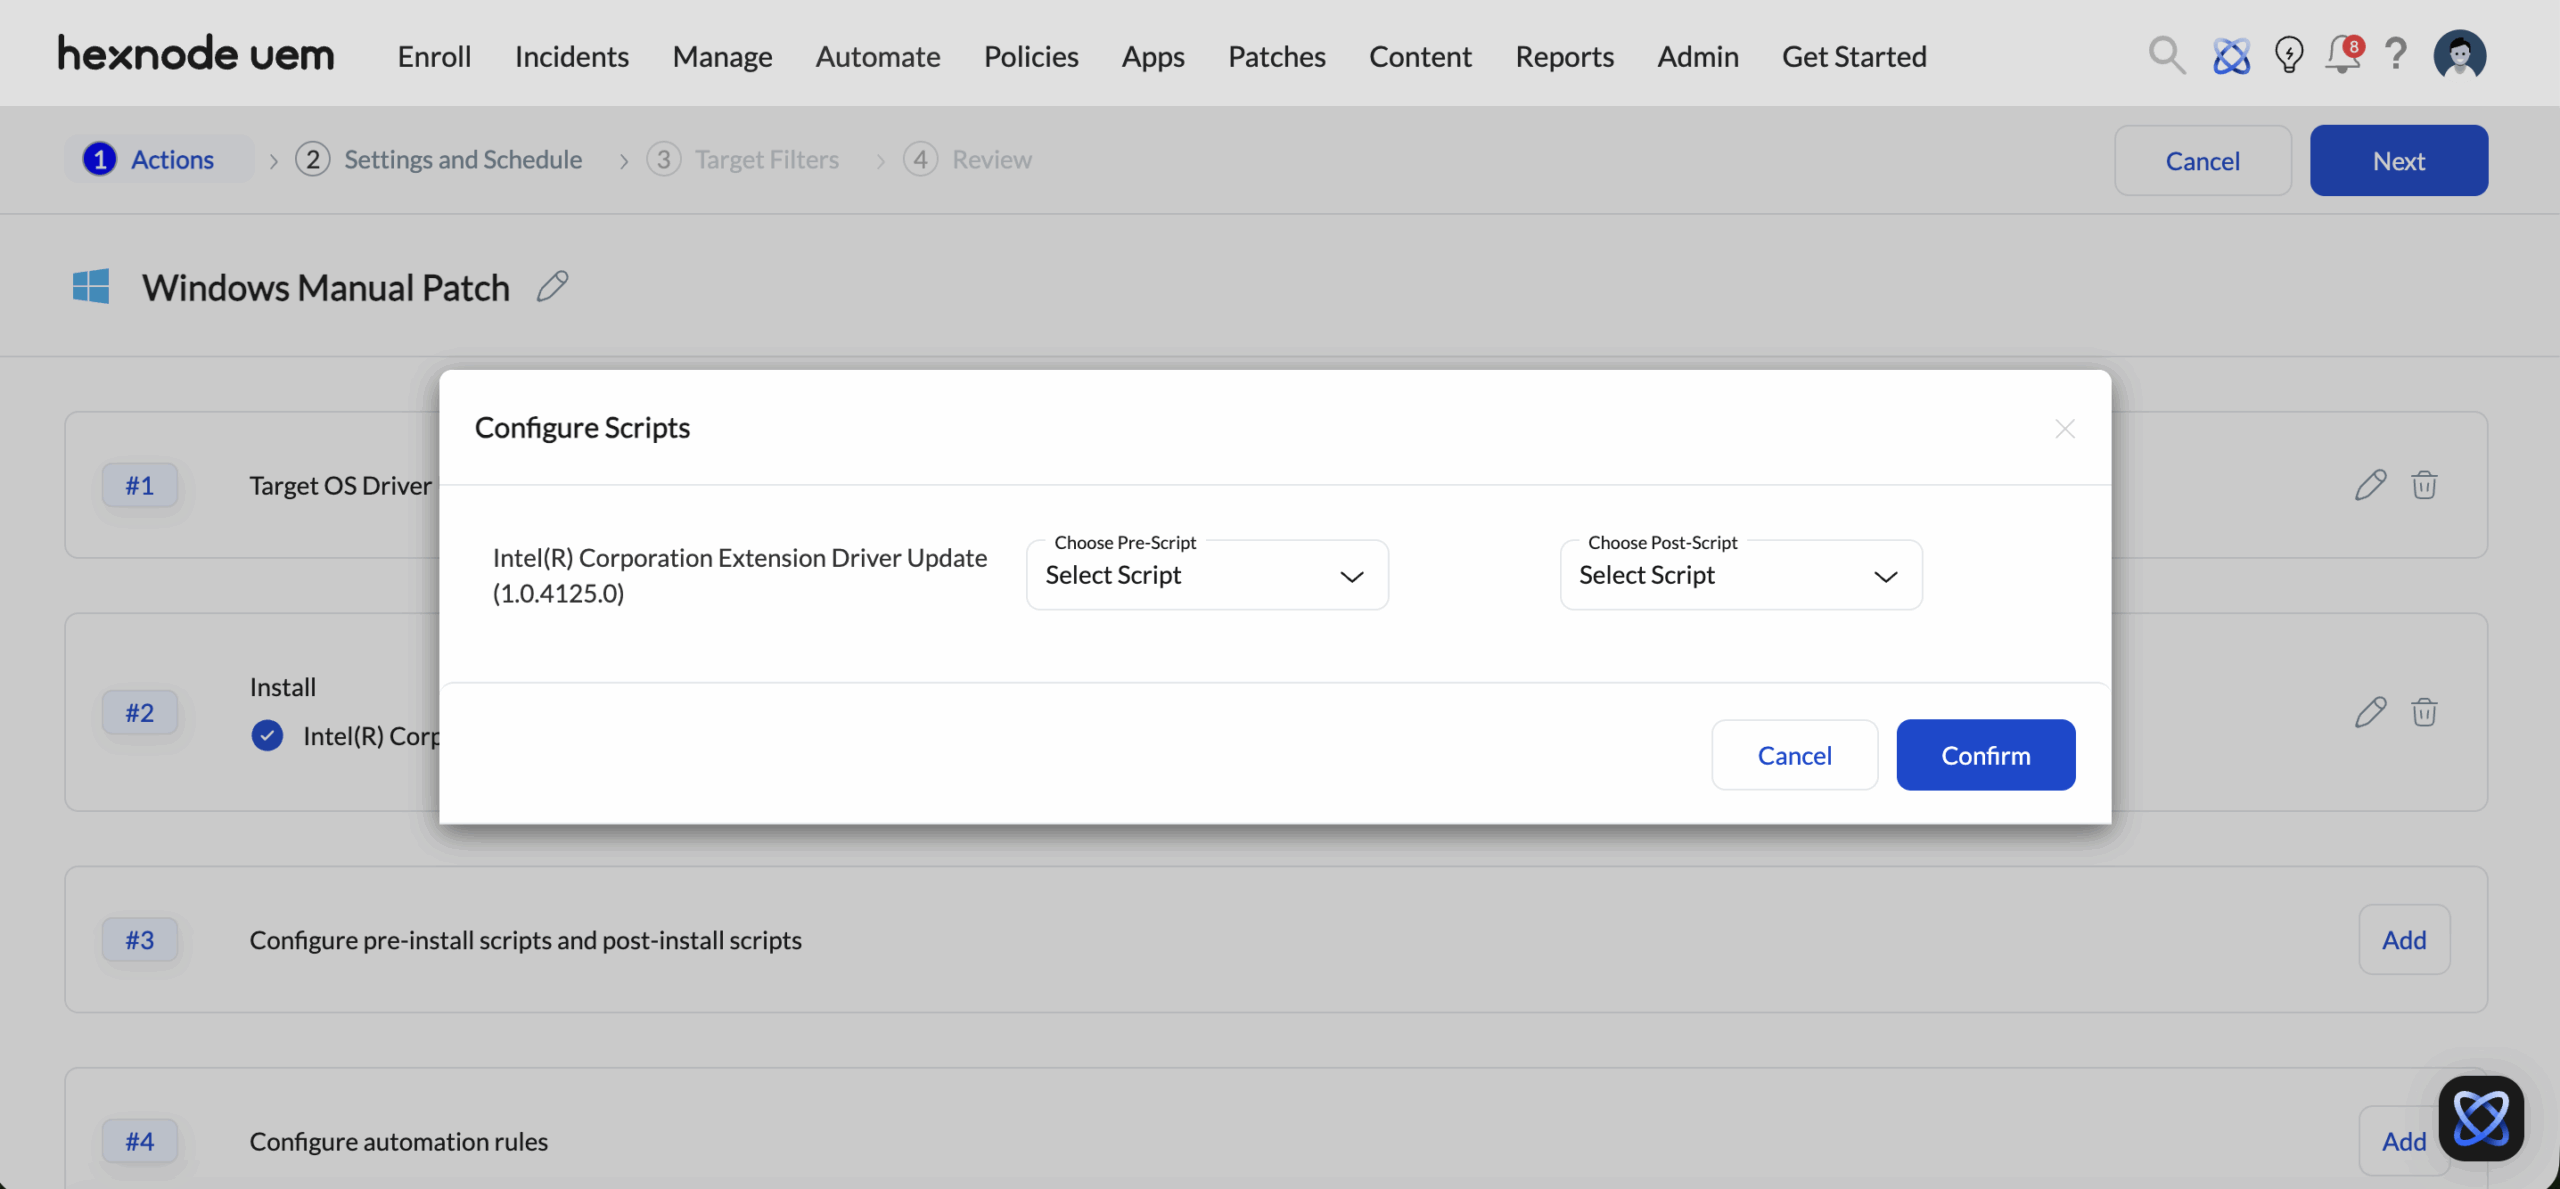
Configure pre-install and post-install scripts
Administrators can assign custom scripts to execute immediately before an automation action begins or after it completes. This allows you to run additional platform-specific tasks tailored to your deployment requirements.
To assign scripts to selected patches or apps:
- Click Add next to Configure pre-install scripts and post-install scripts.
- A Configure Scripts modal window will appear, listing your targeted updates.
- For each targeted patch or application, use the dropdown menus to map your scripts:
- Choose Pre-Script: Select a script from your repository to execute before the chosen automation action (Download, Install, or Uninstall) begins.
- Choose Post-Script: Select a script from your repository to execute after the chosen automation action finishes executing.
- Click Confirm to lock in your script sequence.
-
Configure automation rules
This section allows you to add installation parameters, manage the order of update downloads and installations, set reboot behaviour after installation, define success criteria for update automation, and define retry parameters for failed automation actions.

- Additional Installation Parameters – Enable this option to specify custom parameters for app installations (e.g., /S for silent installation).
- Update Sequence
Arrange the updates in the preferred automation order.
- Reboot After Installation
Choose from the following reboot options:
- Reboot once after all installations are complete – The device reboots only after all updates have been installed.
- Reboot once after every successful installation – The device reboots after each update installation.
- Reboot once after specific update installations – The device reboots after installing selected updates. Multiple updates can be chosen for this option.
- Configuring Success Criteria
Success criteria define the conditions for determining whether an update was successfully deployed.
- OS Version – Define success by selecting the Windows product (Windows 10 or Windows 11) and specifying the desired OS version.
- OS Build Number – Define success by specifying the OS build number.
- Script Output – Execute a script on the target device and use its output to verify update success.
- Select Script – Choose a script from your script repository.
- Enter Value – Define the expected output (e.g., OK, TRUE, or the update version number).
- Enter Arguments – Optional parameters that customize the script’s behaviour without modifying its code.
- Script Output – Works similarly to Windows updates, using a script to verify success. This option also includes the same additional attributes for configuring success criteria, as seen in the Windows ‘Script Output’ section.
- App Identifier –The App Identifier will be auto filled if it is defined under the success criteria while uploading the file (for MSIX/EXE) or from the Apps tab (for MSI).
This identifier, which can be a GUID or product code from the Windows Installer, or an app publisher’s name (e.g., {56DDDFB8-7F79-4480-89D5-25E1F52AB28F} or HexnodeUEM), is used to determine whether the app is installed on the target device.
If the App Identifier is not defined yet, you will need to go to the Apps tab and define it there first.
- File Path – The File Path will be auto filled if it is defined under the success criteria while uploading the file (for MSIX/EXE) or from the Apps tab (for MSI). It verifies app installation by checking for the presence of a specific file on the target device.
If not auto filled, the file path can be specified here (e.g., C:\Program Files\AppName\FileName.exe). This could be the path of any file that is created upon the successful installation of the app on the device.
- Registry Path – The Registry Path will be auto filled if it is defined under the success criteria while uploading the file (for MSIX/EXE) or from the Apps tab (for MSI).
It is the path of a registry key to be checked on the target device. This can be any registry key that is created when the app is successfully installed on the device. For eg: HKEY_LOCAL_MACHINE\SOFTWARE\MyCompany\MyApplication.
If the Registry Path is not defined yet, you will need to go to the Apps tab and define it there first.
Success Criteria for Windows Updates
Success Criteria for App Updates
- Configure retries
Enable this option to automatically retry the automation action if it fails.
Once enabled, configure the following settings:- Number of retries: Specify the maximum number of retries the system should make if the initial execution fails. You can choose a value from 1 to 3.
- Retry delay in minutes: Specify the time delay between subsequent retries. The allowed value range is from 10 to 180 minutes.
-
Device end notifications
This section allows IT administrators to configure how and when users are notified about an upcoming device restart after a patch has been installed. These notifications ensure users are informed in advance, giving them time to save their work and prepare for the restart.
- Restart notifications: Enable this option to notify end users that their device will restart after a patch installation. When enabled, a notification will appear on the user’s device at the scheduled time before the reboot takes place. This helps minimize disruption by giving users a heads-up about the restart.
- Notification schedule: Specify when the restart notification should appear before the system restarts. You can select from the following time intervals: 5, 15, 30 minutes and 1 or 2 hours before the restart.
- Notification message: Admins can customize the message shown to the user as part of the restart notification. By default, the following message is used:
- Title: System will restart in 15 minutes!
- Message Body: Your device requires a restart to install important updates. Please save any unfinished work.
This message can be fully customized to match your organization’s requirements or to include more specific instructions. Keeping the message clear helps users understand the reason for the restart and take immediate action.
- Allow user to postpone restart: Enable this option to allow users to delay the system restart if they are actively working and need more time. This gives users greater flexibility and helps avoid potential data loss or workflow interruptions during critical tasks.
- Postpone timeout: Set the duration after which the user will be reminded again to restart the device if they choose to postpone the initial notification. Available intervals include: 5, 15, 30 minutes and 1 or 2 hours.
- Maximum postpone attempt: Define how many times a user can delay the restart before the system enforces it. The allowed range is from 1 to 5 attempts. Once the user reaches the maximum number of allowed postponements, the device will proceed with the restart without showing any further notification prompts.
After configuring all the options, click Confirm to proceed.
- Restart notifications: Enable this option to notify end users that their device will restart after a patch installation. When enabled, a notification will appear on the user’s device at the scheduled time before the reboot takes place. This helps minimize disruption by giving users a heads-up about the restart.
- Once the actions are selected, click Next.
- Trigger: Defines the condition that initiates the automation. For deploying patches and updates, only the “Time” trigger is available.
- Initiate: Set the automation initiation frequency. Choose from:
- Once, ASAP – Executes the automation immediately after creation.
- Once – Runs the automation at a specified date and time.
- Repeat at a set schedule – Repeats the automation based on a defined frequency.
- Scheduled Date (for the Once option) – Select a specific date for automation initiation in MM/DD/YYYY format.
- Scheduled Day (for the Repeat at a set schedule option) – Choose how often the automation repeats:
- Everyday – Triggers the automation daily.
- Selected days – Runs on specific days of the week.
- Monthly – Executes on a specific day each month (e.g., the 10th).
- Scheduled Time (for both Once and Repeat at a set schedule options) – Set the exact time for automation execution in HH:MM format and select the time zone.
- Once you have configured the Settings and Schedule, click Next. On the following page, you can define the target filters.
- Device – Attributes specific to the device.
- User – Attributes related to users assigned to the devices.
- Network – Attributes related to the device’s network.
- Device Status – Attributes concerning compliance and operational status.
- Select Column – Choose a category for filtering. Relevant sub-categories appear based on your selection.
- Select Comparator – Define the comparison method.
- Select Value – Specify the filtering criteria.
- Apple DEP
- Asset tag
- Available internal storage
- Battery level
- BitLocker Policy Compliance
- Department
- Device ID
- Device model
- Device notes
- Device type
- Encryption Status
- Enrolled time
- Enterprise Management Type
- Installed RAM
- Last checked-in time
- Manufacturer
- MEID
- OS name
- OS version
- Ownership
- Platform
- Processor name
- Serial number
- Supervision
- Total internal storage
- TPM version
- UDID
- Used internal storage
- Alternate email
- Department (AD)
- Domain name
- Office location (AD)
- sAMAccountName
- Title (AD)
- User type
- Username
- Bluetooth MAC address
- Current carrier network SIM 1
- Current carrier network SIM 2
- Current MCC
- Current MNC
- Ethernet IP Address
- Ethernet MAC address
- Home carrier
- Home country
- ICCID SIM 1
- ICCID SIM 2
- IMEI SIM 1
- IMEI SIM 2
- IMSI
- International data roaming
- Last connection date
- Personal Hotspot
- Phone number SIM 1
- Phone number SIM 2
- Roaming enabled
- SIM carrier network
- Subscriber carrier network (iOS)
- Subscriber MCC
- Subscriber MNC
- Wi-Fi IP Address
- Wi-Fi MAC address
- Wi-Fi SSID
- Activity status
- Application compliance status
- Compliance status
- Enrollment status
- Geofence compliance status
- Jailbroken
- Kiosk mode
- Lost mode
- MDM profile
- Password compliance status
- Rooted
- After selecting the desired sub-category, a comparator must be chosen.
- After selecting the comparator, the value for comparison must be chosen or entered.
- After setting the filters, click Next.
- Review the configured automation settings. Click Edit to modify any section if needed.
- Once you have reviewed the automation, click Save.
After selecting the platform, click on the Edit icon next to the Untitled Automation and provide the following information to rename the automation profile.
Once the details are provided, click Save.
Select Patches and Updates to deploy OS and app updates to Windows devices.
Configuring manual patches deployment involves three steps:
Configure automation scheduling and related settings here.
Scheduling options:
Configure target filters in this section. Specify options for Included groups, Excluded groups, and custom filters by selecting the Filters option.
Included groups
Select device or user groups to apply the automation. Click Add Groups to view and choose from the available device and user groups in your Hexnode UEM portal.
Excluded groups
Select device or user groups to exclude from the automation. Click Add Groups to display the available groups for exclusion.
Filters
Create custom filters based on the following categories:
Configuring Filters
Set the following fields to define filter conditions:
Below is a list of available filter categories and their corresponding sub-categories:
| Main category | Sub- categories |
|---|---|
| Device |
|
| User |
|
| Network |
|
| Device Status |
|
View, Edit, and Track Patch Automation
Once saved, you can access your automation either by going to the Automate tab and selecting Active Automations, or by visiting the Patches tab and selecting Automations. Clicking on the automation from the list opens its summary page, where the Configuration sub-tab allows you to view your saved settings, and the Edit button at the top right lets you modify them. To track the execution status and check the logs of the pre-install and post-install scripts pushed during the automation, switch to the Reports sub-tab.
