Category filter
SMS Integration
SMS Integrations enables you to send enrollment requests as text messages to the user’s devices using SMS service providers like Twilio, Nexmo, and Sinch. The administrators can add their vendor accounts to the portal and send enrollment SMS to the users. You can also use the SMPP server configuration instead of vendor account credentials.
Configure SMS Settings
Follow the steps below to configure SMS Settings on your Hexnode portal.
- Go to Admin > SMS Settings.
- Select an SMS vendor from the list, for which you’ve signed up for, and fill in the credentials you obtained from the SMS vendor.
- Login to your Twilio Account.
- Go to Dashboard. The Account SID, AuthToken, and sender phone number will be shown.
- Now login to your Hexnode portal and configure the following settings.
- Limited to a maximum of 15 digits.
- Should be prefixed with a leading + (plus) sign, Country Code, Local Area Code, Local Phone number.
- Cannot contain spaces, special characters such as (,),–.
- Click Save to add the account.
- Login to your Nexmo Account.
- Go to Get Started. The API Key and API Secret will be displayed here.
- Now login to your Hexnode portal and configure the following settings.
- Limited to a maximum of 15 digits.
- Can include a string of up to 11 supported characters.
- Cannot contain spaces, special characters such as (,),–.
- Cannot include leading + and access codes such as 00 or 001.
- Click Save to add the account.
- Login to your Sinch Account.
- Under Communication APIs navigate to SMS > API’s. The Service Plan ID, API Token, and phone number linked will be shown here.
- Now login to your Hexnode portal and configure the following settings.
- Limited to a maximum of 15 digits.
- Should be prefixed with a leading + (plus) sign, Country code, Local Area Code, Local Phone number.
- Cannot contain spaces, special characters such as (,),–.
- Click Save to add the account.
- Login to your Hexnode portal and configure the following settings.
- Click Save to add the account.
SMS Vendor
Twilio
To integrate your Twilio account,
| Settings | Description |
|---|---|
| Account SID | Enter the Account SID of your Twilio account. It acts as a username. |
| AuthToken | Enter the AuthToken of your Twilio account. It acts as a password. |
| Sender Phone number |
The phone number from which you wish to send an enrollment SMS. The number must satisfy the below conditions: |
Nexmo
To integrate your Nexmo account,
| Settings | Description |
|---|---|
| API Key | Enter the API Key of your Nexmo account. It acts as a user ID. |
| API Secret | Enter the API Secret of your Nexmo account. It acts as a password. |
| Sender Phone number |
The phone number from which you wish to send an enrollment SMS. The number can contain numeric or alphanumeric values that must satisfy the below conditions: |
Sinch
To integrate your Sinch account,
| Settings | Description |
|---|---|
| Key | Enter the Service Plan ID of your Sinch account. |
| Secret | Enter the API Token of your Sinch account. |
| Sender Phone number |
The phone number from which you wish to send an enrollment SMS. The must satisfy the below conditions: |
SMPP
You can also activate SMS settings using SMPP server configurations.
| Settings | Description | SMSC ID | Enter the SMSC ID to which the SMPP SSU routes the message. |
|---|---|
| SMPP Host | Provide the SMPP host address. |
| SMPP Port | Enter the SMPP port number. |
| Sender Phone number | The phone number linked with your SMPP, from which you wish to send enrollment SMS. The Sender Phone No cannot contain special characters except white spaces, +, ( , ) ,–. |
| Password | Enter the password of your SMPP account. |
The Test SMS button lets you send a test SMS to any given number and see if the vendor account is added successfully.
The Remove button is used to remove the vendor account currently linked with the portal.

After saving the SMS settings
After saving SMS settings, you need to enable Text/SMS to start sending enrollment SMS to devices. To do this,
- Go to Enroll tab > Settings.
- Check Text/SMS under Request Modes.
Sending Enrollment Requests
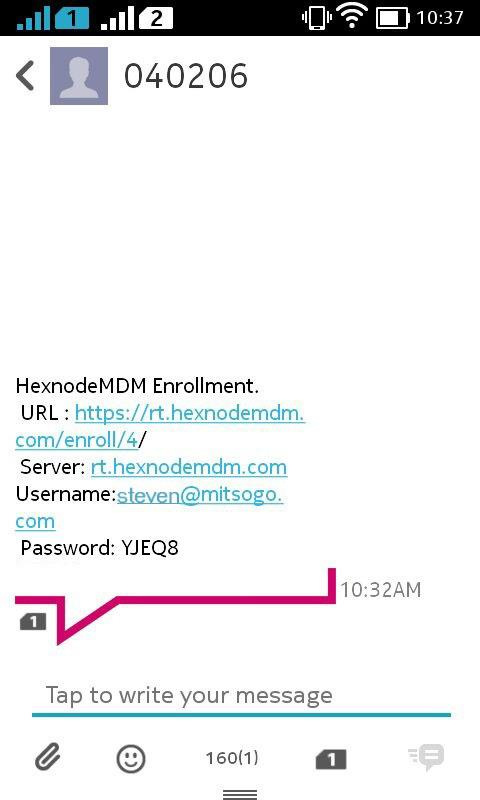
After successfully syncing your vendor account, you can start sending enrollment requests via SMS to users.
For already existing users,
Method-1
- Go to Enroll > All Enrollments > Invite > SMS or Enroll > Platform specific > Android / iOS / macOS > Email or SMS.
- Select the type of users to be enrolled and set Ownership.
- Click Continue.
- Select the Domain.
- To send a request to a single user, select the user from the list of users and click Send. For multiple users, switch to Bulk user and upload a CSV file with valid entries and click Next. Now choose Send enrollment SMS and click Send.
Method-2
To send enrollment requests to selected users,
- Go to Enroll > Status.
- Select the user(s) to whom enrollment request is to be sent.
- Click on Manage > New Enrollment.
- Click Send to send enrollment requests as SMS messages.
Method-3
To send enrollment request to selected users,
- Go to Manage > Users.
- Select the user to whom enrollment request is to be sent.
- Click on Manage > New Enrollment.
Enrollment request will be sent to the selected user.
Method-3
To send enrollment requests to selected AD domains, OUs, or groups.
- Go to Manage > Directory Services.
- Select the domain or OUs, or groups.
- Go to Actions and select New Enrollment
- Click Send.
If the user doesn’t exist, create a new user
Method 1
- Go to Manage > Users.
- Click on New User.
- Enter Display name, Domain, Email, Mobile number.
- Check Send enrollment request and Save.
This sends an Enrollment request to the user’s phone and Email inbox.
Method 2
- Go to Enroll > All Enrollments > Invite > SMS. or Enroll > Platform-specific > Android / iOS / macOS > Email or SMS.
- Select the type of users to be enrolled and Ownership status.
- Click Continue.
- Select the Domain.
- To send the request to a single user choose Select user, click on +Add New User and provide the user details. But for multiple users, switch to Bulk user, click on Choose file and upload the CSV file with the user details.
- Map the keys and Submit.
- In the case of Bulk users, click on Next and verify the details of the CSV uploaded.
- Choose Send enrollment SMS and click Send.