Category filter
Automate the execution of custom scripts on Mac
Automation is crucial in any organization, especially those consisting of a multitude of devices to manage. It streamlines repetitive and time-consuming tasks, allowing IT administrators to focus on other important responsibilities that require manual intervention and more attention. When it comes to device management, custom scripts prove invaluable in automating processes, as they are specifically tailored to meet the requirements of a particular task or system.
Hexnode already offers the option to deploy scripts to automate app deployment on macOS devices. Now, with Hexnode UEM’s Scripts policy, IT admins can automate the execution of scripts during every device startup, shutdown, log on, and log off on macOS devices effortlessly. Learn how these custom scripts benefit an organization and how to configure the policy to automate script execution via Hexnode.
How does the automation of script execution help an IT administrator?
Scripts are often used by IT administrators for a variety of reasons: to streamline tasks, improve efficiency, and enhance overall system management. Hexnode offers a dedicated Sample Script Repository from which IT admins can access hundreds of scripts that can be modified and executed on macOS, and Windows devices managed via Hexnode. A few reasons illustrating how automating script execution helps an organization are listed below, along with some use case scenarios:
Delegating repetitive tasks:
Automating script execution is particularly beneficial for automating routine and repetitive tasks, such as checking disk usage, or launching apps automatically on device startup. Apart from these examples, system maintenance-related configuration scripts like checking FileVault encryption status can also be executed. This helps save time and reduces the risk of manual errors.
Effective utilization of time & resources:
Automation allows administrators to perform tasks more quickly than manual execution, enabling them to handle a larger volume of tasks effectively. For example, executing a script each time manually on the device to carry out disk utility operations might take a considerable amount of time. The administrator might need to allocate specific time and set reminders to do it daily. In such cases, automation helps them schedule the execution of these scripts at regular intervals, reducing the time spent on such tasks.
Managing system configurations:
Custom scripts are valuable for configuring and maintaining system settings, ensuring that standard configurations are applied and are in compliance with organizational policies. For example, enforcing Wi-Fi, Firewall or Bluetooth settings during every device startup.
Troubleshooting and Auditing:
Custom scripts can be designed to detect errors and exceptions. It helps administrators fetch detailed reports and logs for troubleshooting. Additionally, they help maintain audit trails. For example, IT admins can automate the execution of a script to fetch system/app logs regularly, collecting logs for performance monitoring, security auditing, and troubleshooting purposes.
Updates and Patch Management:
Automation of script execution is useful for managing and applying software updates, ensuring that systems are kept up to date with the latest patches and security fixes. For example, IT admins can schedule a script during every device shutdown to list all available updates for a device. Therefore, whenever there’s a new update, they would be notified and can proceed to enforce OS updates accordingly.
Overall, script automation empowers administrators to manage their endpoints more effectively, reduce manual effort, enhance precision, and the overall reliability and performance of the devices they oversee.
Automating the execution of custom scripts via the Scripts policy
From the Hexnode UEM dashboard, navigate to Policies > New Policy. Assign a suitable name and description for the policy, or you can choose to continue with an existing policy.
- Choose macOS > Configurations > Scripts. Click Configure.
- Click on the Choose Scripts button to add and configure a script.
- Clicking on the Choose Scripts button opens the Choose File dialog box. You can either upload a custom script or utilize the Hexnode Repository to add scripts that you have already uploaded. The available fields for a selected script are listed below
- You may use any number of arguments for executing the scripts, each of which must be separated by a space. For example, specifying the following string Alexander Sam Richard in the argument field takes in three arguments Alexander, Sam, and Richard, respectively.
- Hexnode allows the usage of single quotes while providing the arguments. It helps you include multiple words for a single argument. For instance, the following string, ‘William Alexander’ ‘Sam Anderson’, specifies two arguments containing multiple words.
-
It also supports the use of the following wildcards:
- %devicename%
- %model%
- %serialnumber%
- %deviceid%
- %udid%
- %phonenumber%
- %wifimacaddress%
- %name%
- %email%
- %username%
- %domain%
- %netbiosname%
- %ssid%
- %assettag%
- %department%
- %devicenotes%
- %alternateemail%
- %newline%
- %null%
For example, specifying the string %name% %email% in the arguments field retrieves the name and email address of the user as the two arguments.
- Once you have uploaded/chosen the script file from the repository, the File name and Binary path fields will be auto populated. While there’s a provision to add arguments, if any, in the Arguments field, this field also supports the use of wildcards.
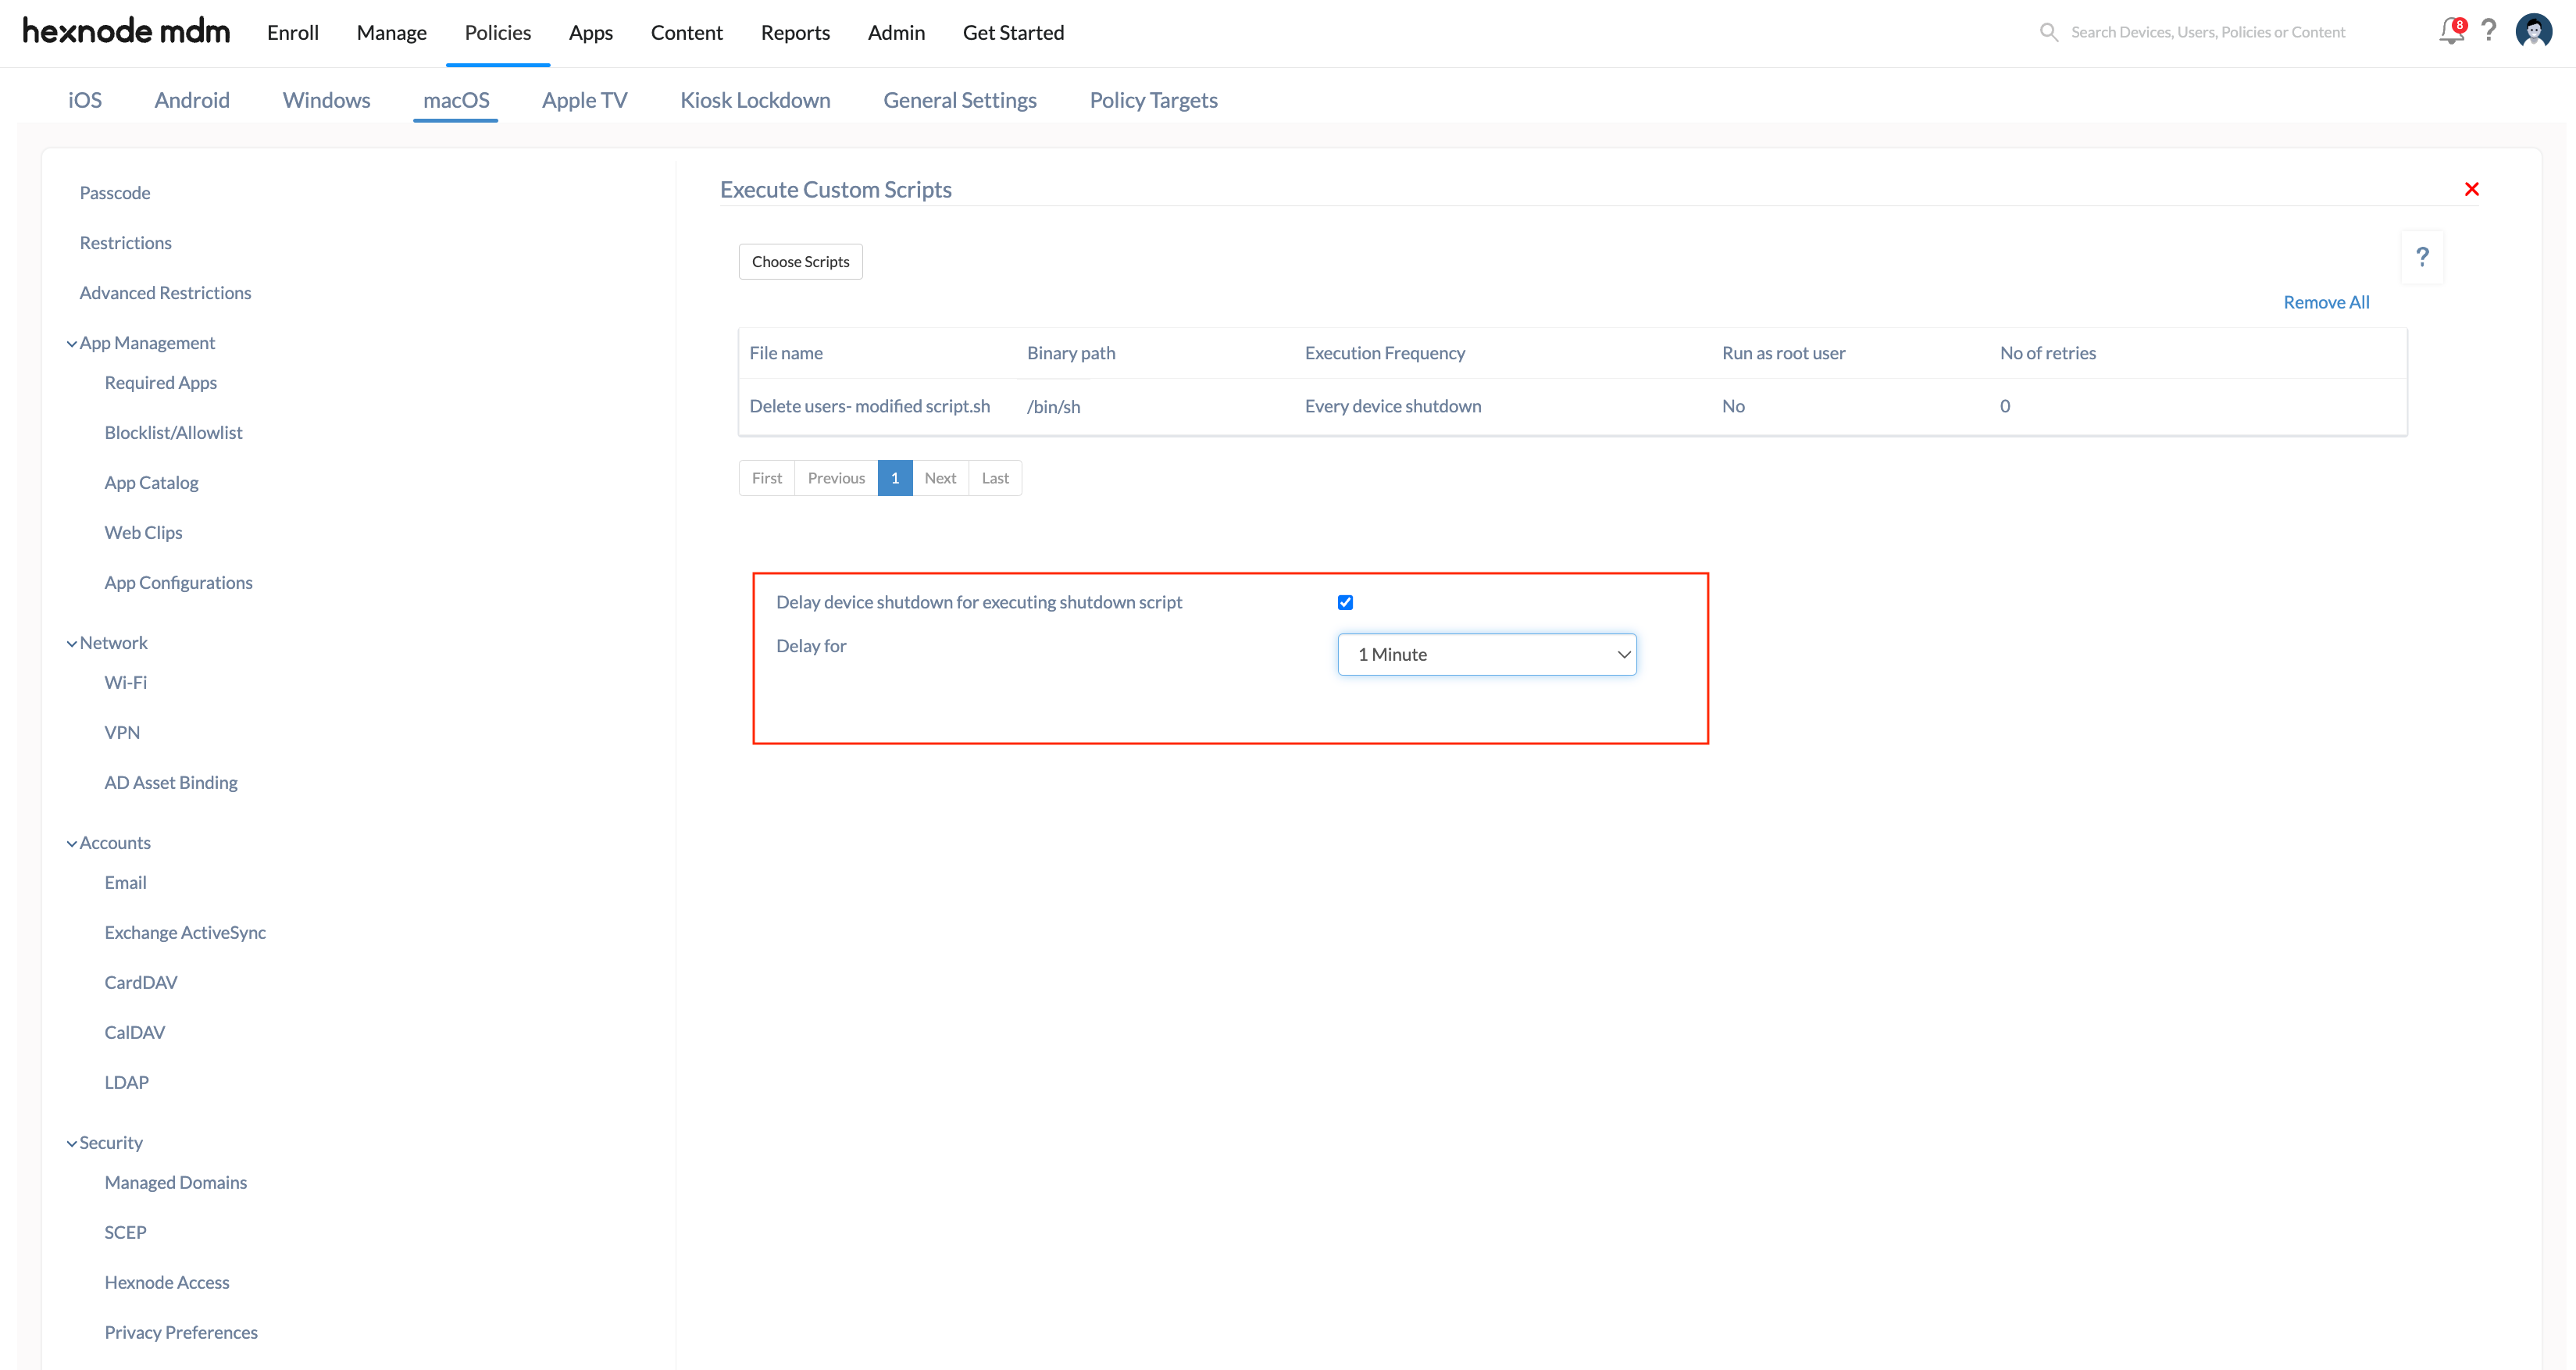
- Once you have verified that the details filled in the Binary path and Arguments fields are correct, proceed to click on Configure, which will navigate you to the Script Configurations window. This window consists of multiple options related to automation of script execution which can be configured accordingly. The available configurable settings are listed below.
- Daily: Selecting this option enables daily script execution. There are two sub-options: “Once” and “Multiple times.”
If “Once” is chosen, the admin can specify the exact time (in HH:MM AM/PM) for the script to execute.
If the “Multiple times” option is selected, the script can be scheduled to run between two specified time intervals (in HH AM/PM), with an additional option to set the frequency (in HH:MM) at which the script will execute. For example, admins can schedule scripts to run between 10 AM and 6 PM, with the option to repeat execution every hour within that specified time frame.
- Weekly: With this option, the admin can choose one or more days of the week for the script to execute. The exact time (in HH:MM AM/PM) for the script to run on the selected day(s) can also be set.
- Monthly: When this option is enabled, the admin can specify the month, day, and time (in HH:MM AM/PM) for the script to run. The script will then be executed at the scheduled day and time within the selected month.
Alternatively, the admin can set the script to run on recurring days such as the First Monday or Third Saturday of the month.
- After configuring the settings for the script, click on Add. The script gets listed in the table from where you have the option to modify or delete the script.
- Once you have confirmed that the configurations and scripts added are correct, proceed to associate the policy with the target device by clicking on Policy Targets > +Add Devices.
- Choose the target device and click OK to confirm.
- Click Save.
| Field | Description |
| Choose script file source | You can choose the script file either by uploading it or selecting it from the Hexnode repository if the file is already added to Content > My Files. You can also generate a script with the help of Hexnode Genie and save them into Hexnode content repository. |
| File name | The file name will be auto-populated based on the uploaded script or the script chosen from the Hexnode repository. |
| Binary path | The binary path gets auto-filled based on the type of added script. The binary paths for various types of scripts are listed below:
Perl: /usr/bin/perl Bash: /bin/bash Shell: /bin/sh Non-compiled Applescript: /usr/bin/osascript C Shell: /bin/csh Zsh: /bin/zsh Korn Shell: /bin/ksh Python: /usr/bin/python Hypertext Preprocessor: /usr/bin/php Ruby: /usr/bin/ruby |
| Arguments | Specify the arguments, if needed, while executing the script.
|
| Setting | Description | |
| Timeout | This setting is used to define the timeout for script execution, after which the process will be terminated. The timeout period can be set within the range of 15 to 90 minutes. | |
| Execute scripts on | This setting is used to specify the event for which the script should be executed. The available options are User log on, User log off, Device startup, Device shutdown and Custom. If the Custom option is selected, an option will be provided to specify whether the script should run at the root user level or the signed-in user level. By default, the Custom option is enabled and disabling it will cause the script to execute at the signed-in user level. | |
| Script frequency | The frequency for script execution can be configured using this setting. There are two available options: Every (User log on/User log off/Device startup/Device shutdown) and Subsequent (User log on/User log off/Device startup/Device shutdown).
If the Every option is chosen, the admin is provided with a checkbox Execute until. By clicking on it, the admin can specify until when (mm/dd/yyyy) the script should be executed. For example, if the admin selects Every Device shutdown and checks the Execute until checkbox, setting the date as 11/28/2023, the script will execute for every device shutdown until November 28, 2023, after which the script won’t be executed. On the other hand, if the Subsequent option is chosen, the admin is provided with the option to choose how many subsequent log on/log off/startup/shutdown events should trigger script execution. The value for this setting can be set from 1 to 100. For example, if the admin selects Subsequent User log on and chooses For the next 2 Log on, the script will execute only during the next two user log ons. For the Custom option, there are three available script frequency settings: |
|
| Choose Timezone | The admin can specify the time zone for script execution, either by selecting the device’s time zone (default value) or choosing a different time zone from the drop down that aligns with the organization’s needs. | |
| Retry if the script execution fails | This setting is only available if the Log on or Device startup option is chosen in the Execute scripts on field. The admin can choose to enable or disable this option, determining whether to retry script execution if the script fails. | |
| Maximum number of retries | This setting is available when the Retry if the script execution fails checkbox is enabled. The admin can determine how many times the script execution can be retried, with the possible number of retries ranging from 1 to 5. | |
| Retry | This setting is available when the Retry if the script execution fails checkbox is enabled. The admin can determine the duration after which the retry of script execution should be initiated if the script fails. The possible values for this field are immediately, after 1,2 5, 10, 15, 30, 60 or 90 minutes. |
Associating Policies with target devices
If you are editing an existing policy and wish to associate the policy to more targets,
- Navigate to the Policies tab, select the policy and click on Manage > Associate Targets.
- Add the target entities and click Associate.
You can also associate the policy from the Manage tab, in two ways.
- Select the devices and click on Manage > Associate Policy.
- Click on the target device, Actions > Associate Policy.
As soon as the policy gets associated with the device, the scripts would get executed accordingly based on the configurations applied.
How to check the script execution status via the Hexnode UEM portal?
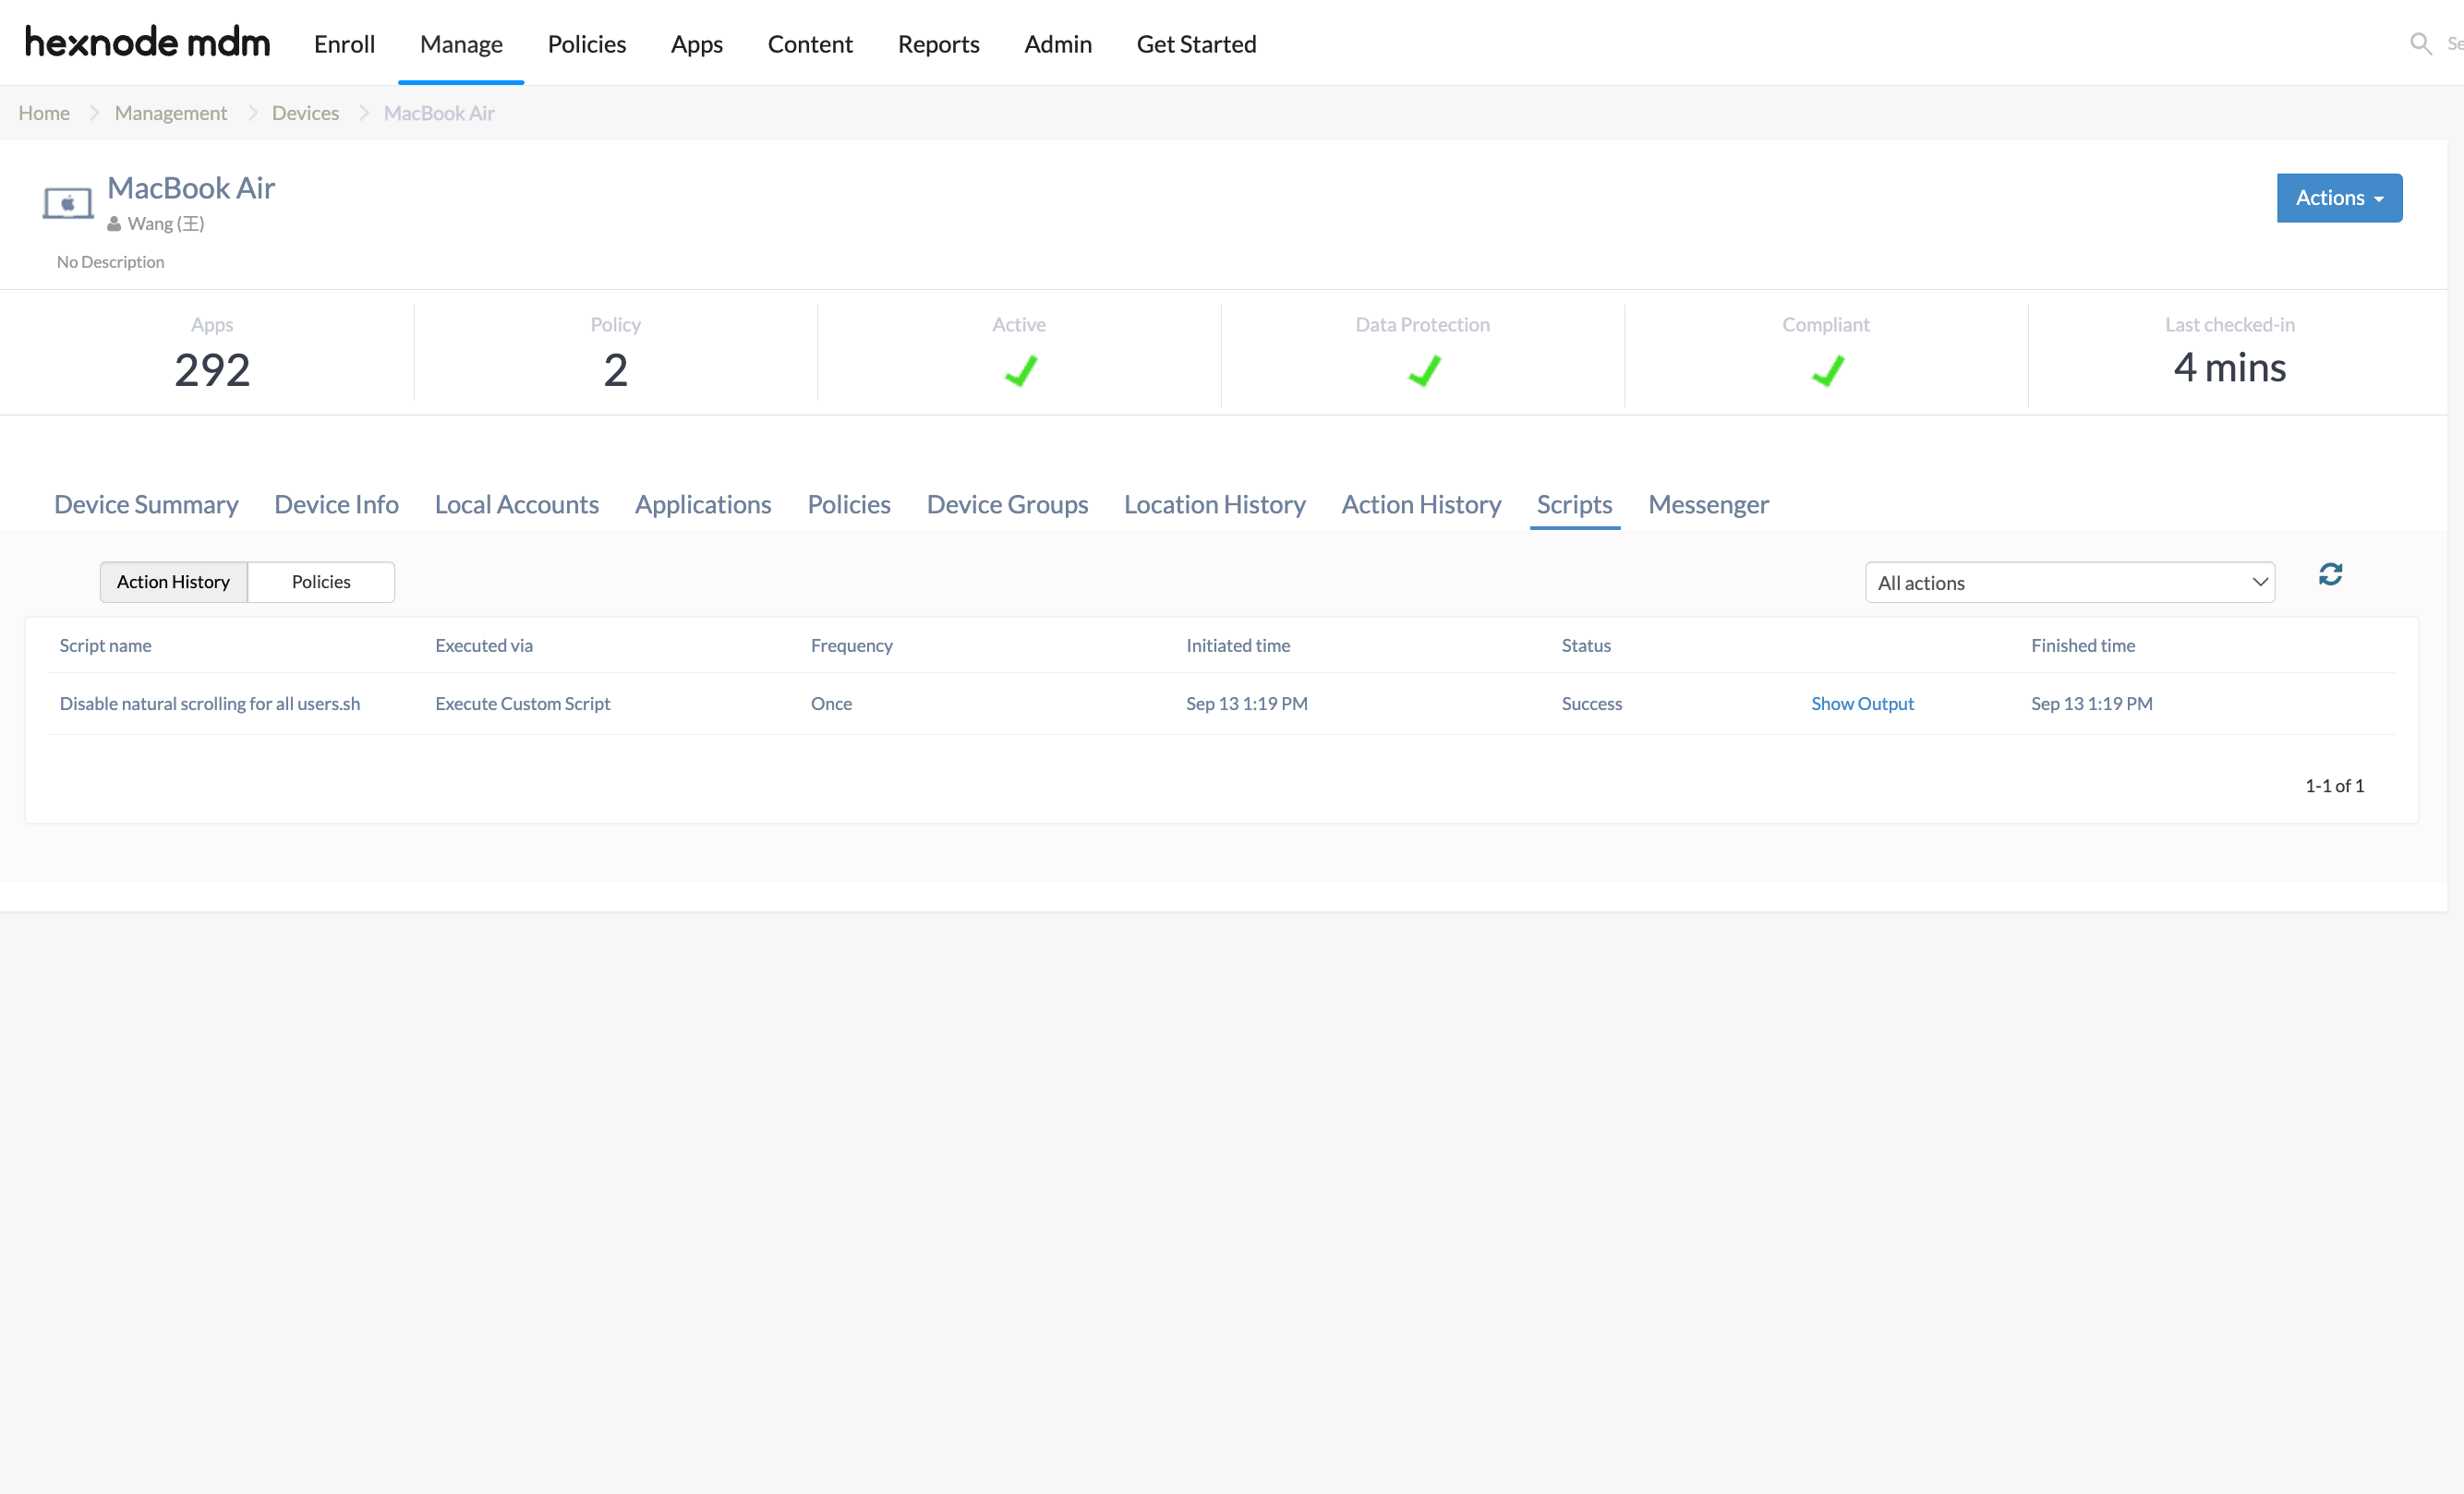
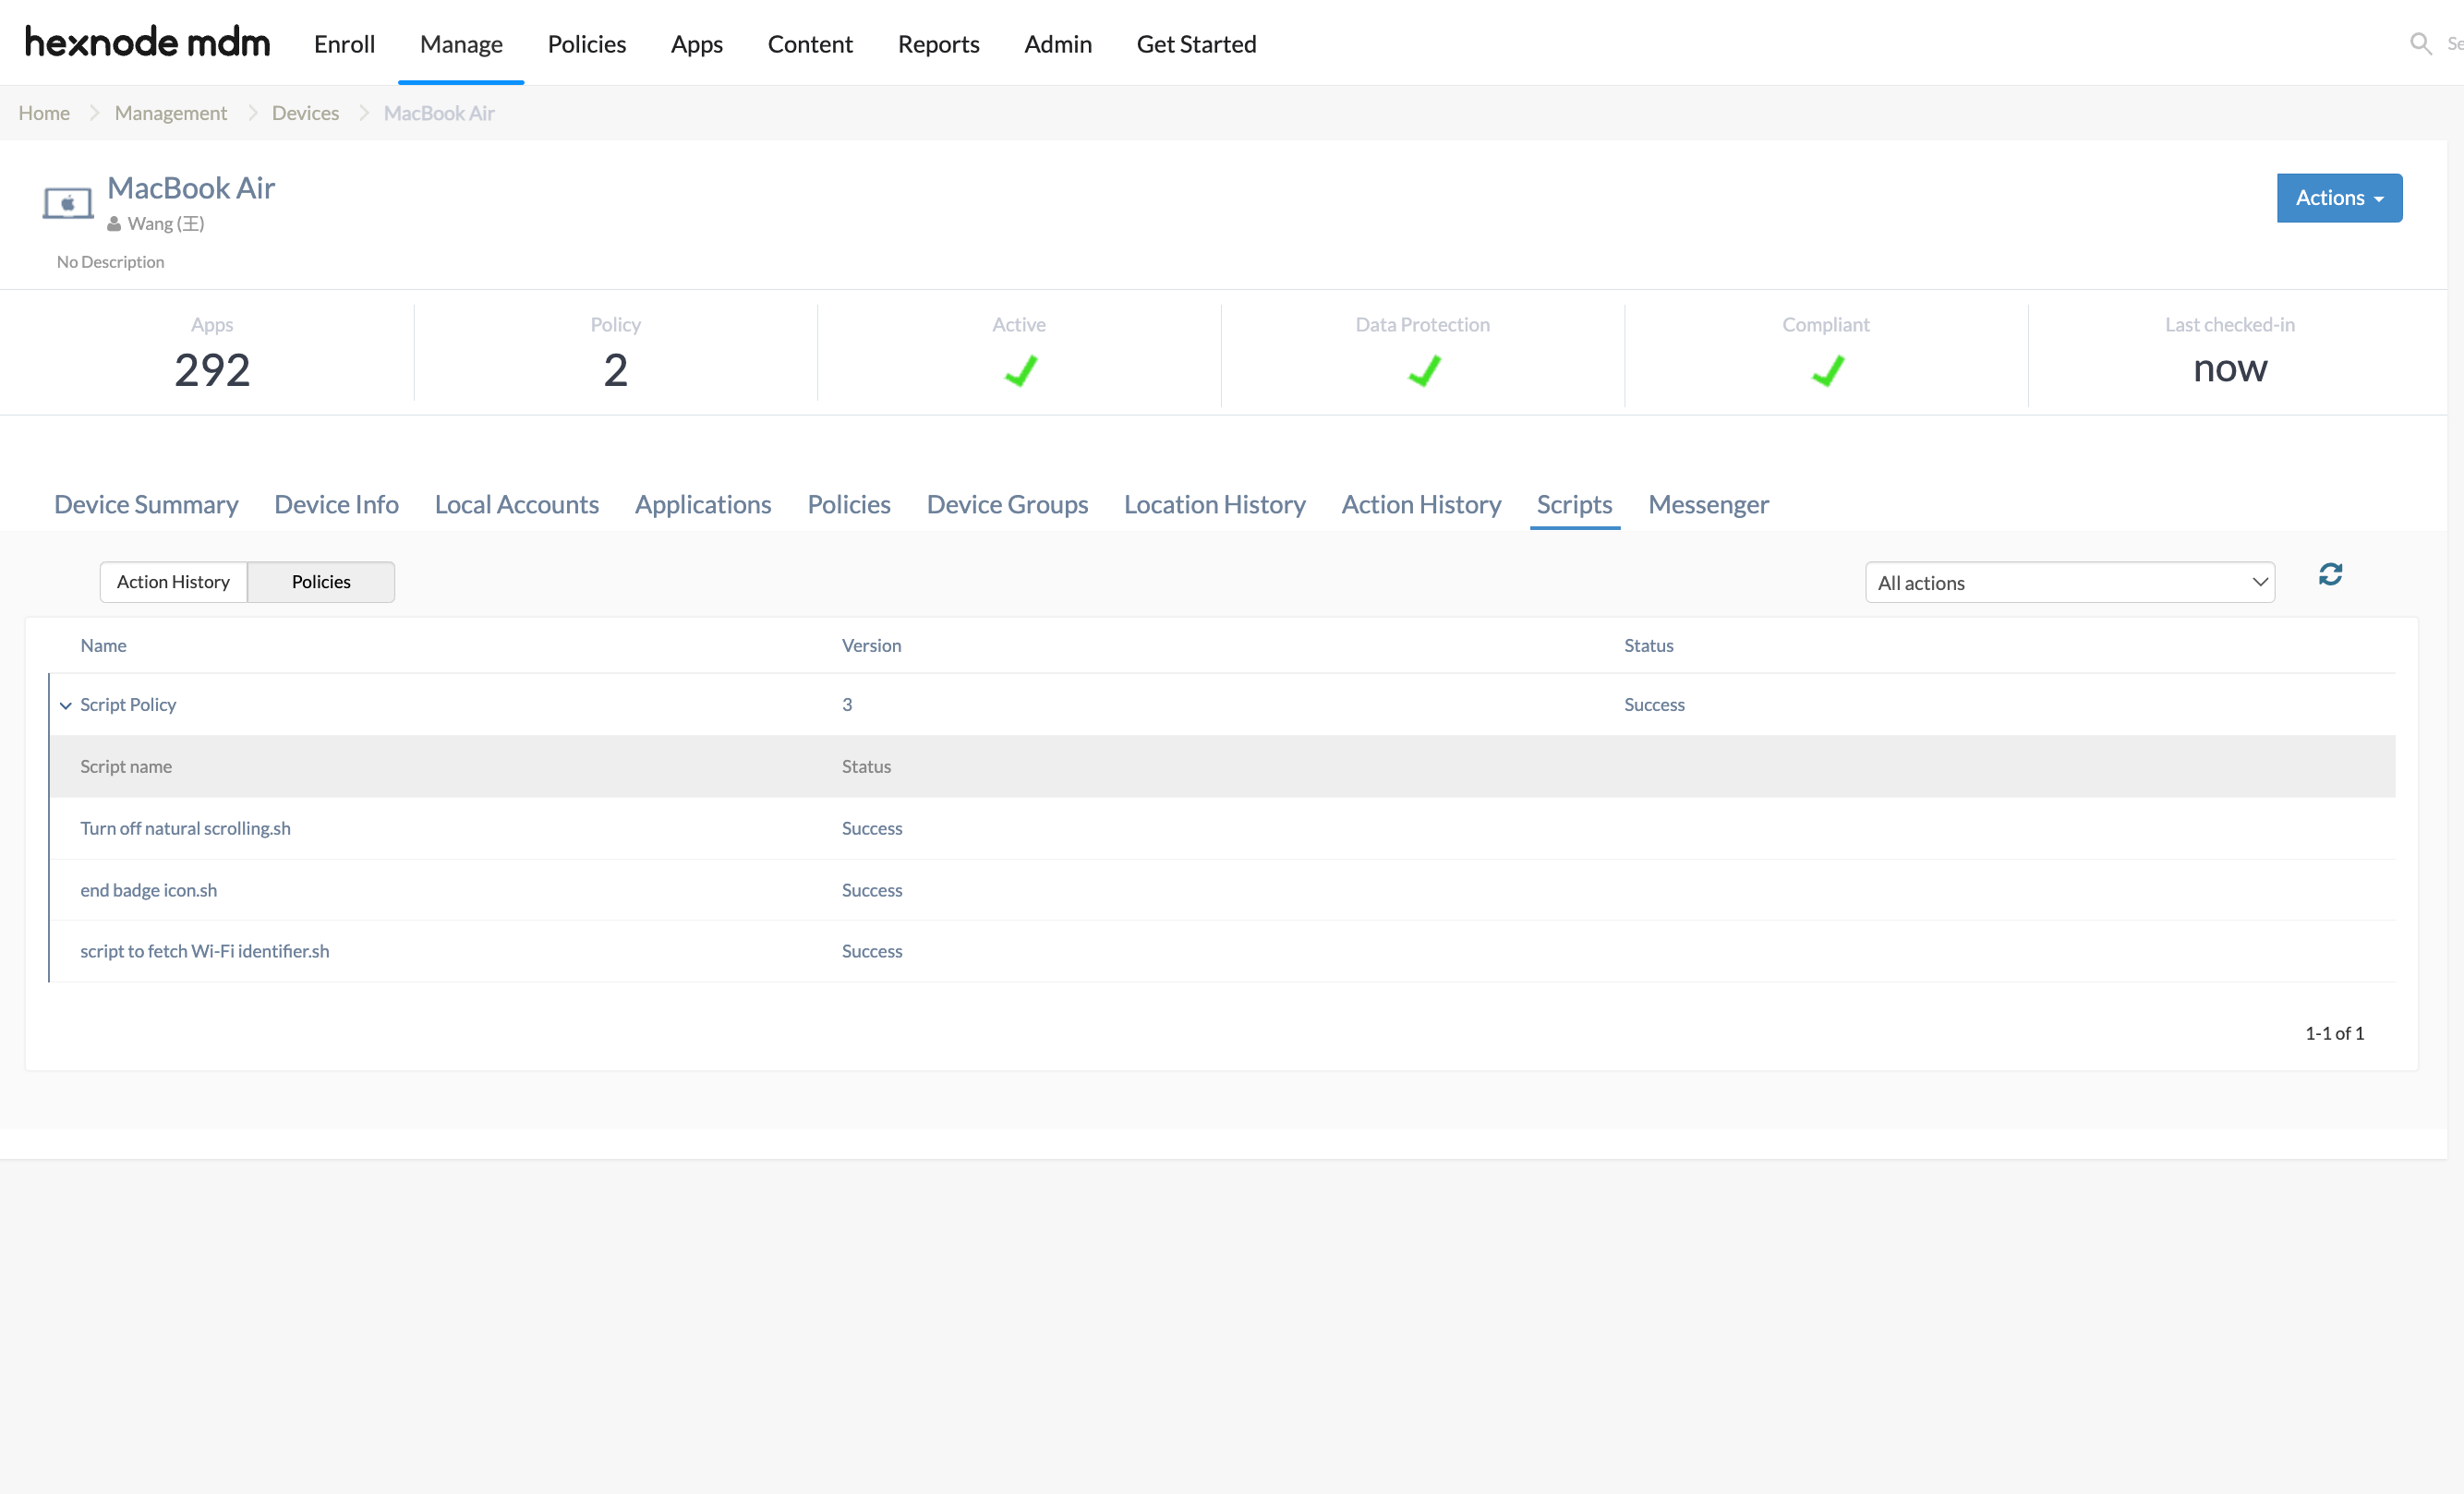
The Scripts tab on the device details page (Management > Devices > Select your macOS device) displays the status of the script execution. In the Scripts tab, the following fields are specified in a table format listing the details related to script execution. The “Scripts” tab is divided into two subsections: one for the script execution history (Action History) and the other for the script policies associated with the device (Policies).
For Action History:
| Column name | Description |
|---|---|
| Script name | The name of the script file that has been executed. |
| Executed via | This column lists whether the script is executed via the Scripts policy for macOS or the Execute Custom Script action. |
| Frequency | This column specifies the frequency (Every device shutdown, Subsequent User log off) as it’s mentioned in the policy. |
| Initiated time | This column specifies the time when the script execution has been initiated. |
| Status | This column specifies the status of the initiated script execution. The statuses are In Progress, Success or Failed. The admin has the option to filter and sort the script actions based on this status. |
| Finished time | This column specifies the time when the script execution was completed. |
For Policies:
| Column name | Description |
|---|---|
| Name | Displays the name of the applied script policy. |
| Version | Indicates the version of the script policy. |
| Status | Shows the current status of the script execution. Possible statuses include Downloading, In Progress, Success, Failed, and Partially Successful. |


