

Category filter
How to assign ADE devices to Hexnode?
There are many ways to enroll an Apple device in a UEM. One of the ways is to register the Apple device via the Automated Device Enrollment (ADE) method and then assign the device to the UEM server. For that, you should first enroll your organization in ABM.
To add devices to Apple ABM, make sure that you have:
- A device bought directly from Apple or an authorized dealer after 1 March 2011 and running at least iOS 7.0.4, iPadOS 13.1, visionOS 2.0, macOS 10.9 or tvOS 10.2.
- An iOS or iPadOS devices can be directly added to ABM using Apple Configurator regardless of where and when the device is purchased.
- An APNs certificate setup for the UEM server to communicate with the device.
Steps to Enroll devices via ADE
Step 1: Add devices to Apple Business Manager
You will need the Apple Customer Number, or the Reseller ID associated with the purchased devices to add them to ABM. To add the purchased device to the ABM portal, associate the number or ID obtained from the device suppliers to ABM.
- Log in to your Apple Business Manager account.
- Click your name at the bottom of the sidebar and go to Preferences > MDM server assignment.
- Click on Edit next to Customer Number.
- Enter your Apple Customer Number or Reseller Number and click Add.
- Click on Done.
If you have purchased devices from more than one entity, you have to add all the numbers and ID via this method.
Apple Customer Number
If the devices were directly purchased from Apple, Apple would assign your organization an Apple Customer Number. Contact your finance department or Apple Sales for your Apple Customer Number. If the devices were purchased from Apple Store, contact the Business Team for the Customer Number.
Reseller ID
If the devices were purchased from Apple Authorized Reseller or a wireless carrier, you would need to enter their Reseller ID in your ABM portal. Also, you should provide your Organization ID to the reseller or carrier.
To find your Organization ID,
- Log in to your Apple Business Manager account.
- Click on your name at the bottom of the sidebar and go to Preferences > Organization Information.
- Your Organization ID will be displayed under Organization Information.
To get the Reseller ID, contact the Apple Authorized Reseller or carrier via which the devices were purchased. The devices can be enrolled in the MDM only if the reseller or the carrier supports the device enrollment feature in Apple Business Manager.
Step 2: Configure Enrollment Profile
An ADE Enrollment profile defines the initial setup experience and management configurations for your Apple devices. By configuring an enrollment profile in the Hexnode console, you can customize device settings, choose authentication methods, skip specific Setup Assistant screens, set up Shared iPads, and automatically deploy apps and policies during the initial setup.
For a complete, step-by-step guide on creating and configuring all available settings, refer to our dedicated documentation on ADE Enrollment Profiles.
Step 3: Create an ADE Account in Hexnode
To add devices in the ABM program, you need to obtain a server token from Apple.
- In the Hexnode UEM portal, go to Enroll > All Enrollments > No-Touch > Apple Business/School Manager > Devices.
- Then, click on Add ADE Account.
- Provide an Account Name and download the certificate file Hexnode_Apple_DEP_cert.pem.
- Sign in to Apple Business Manager account.
- Click your name at the bottom of the sidebar. Then, go to Preferences, and click on the Add button next to Your MDM Servers.
- Name the MDM server and upload the public key (the certificate file previously obtained in Step 4) and click Save.
- Click on Download MDM Server Token.
- Go back to your Hexnode UEM console and upload the server token in the field Upload ADE server token file.
- Check the box Add as a Pre-approved device if you want to pre-approve the devices that you are planning to enroll using Hexnode.
- Choose a Default Configuration Profile. By default, the Default ADE profile will be selected. If you want to attach a different configuration profile with the ADE Account, choose it from the drop-down.
- Click on Next.
Step 4: Assign devices to the MDM server
You can either assign Apple devices individually to the respective device management server or bulk assign devices to the same management server.
Individual Device Assignment
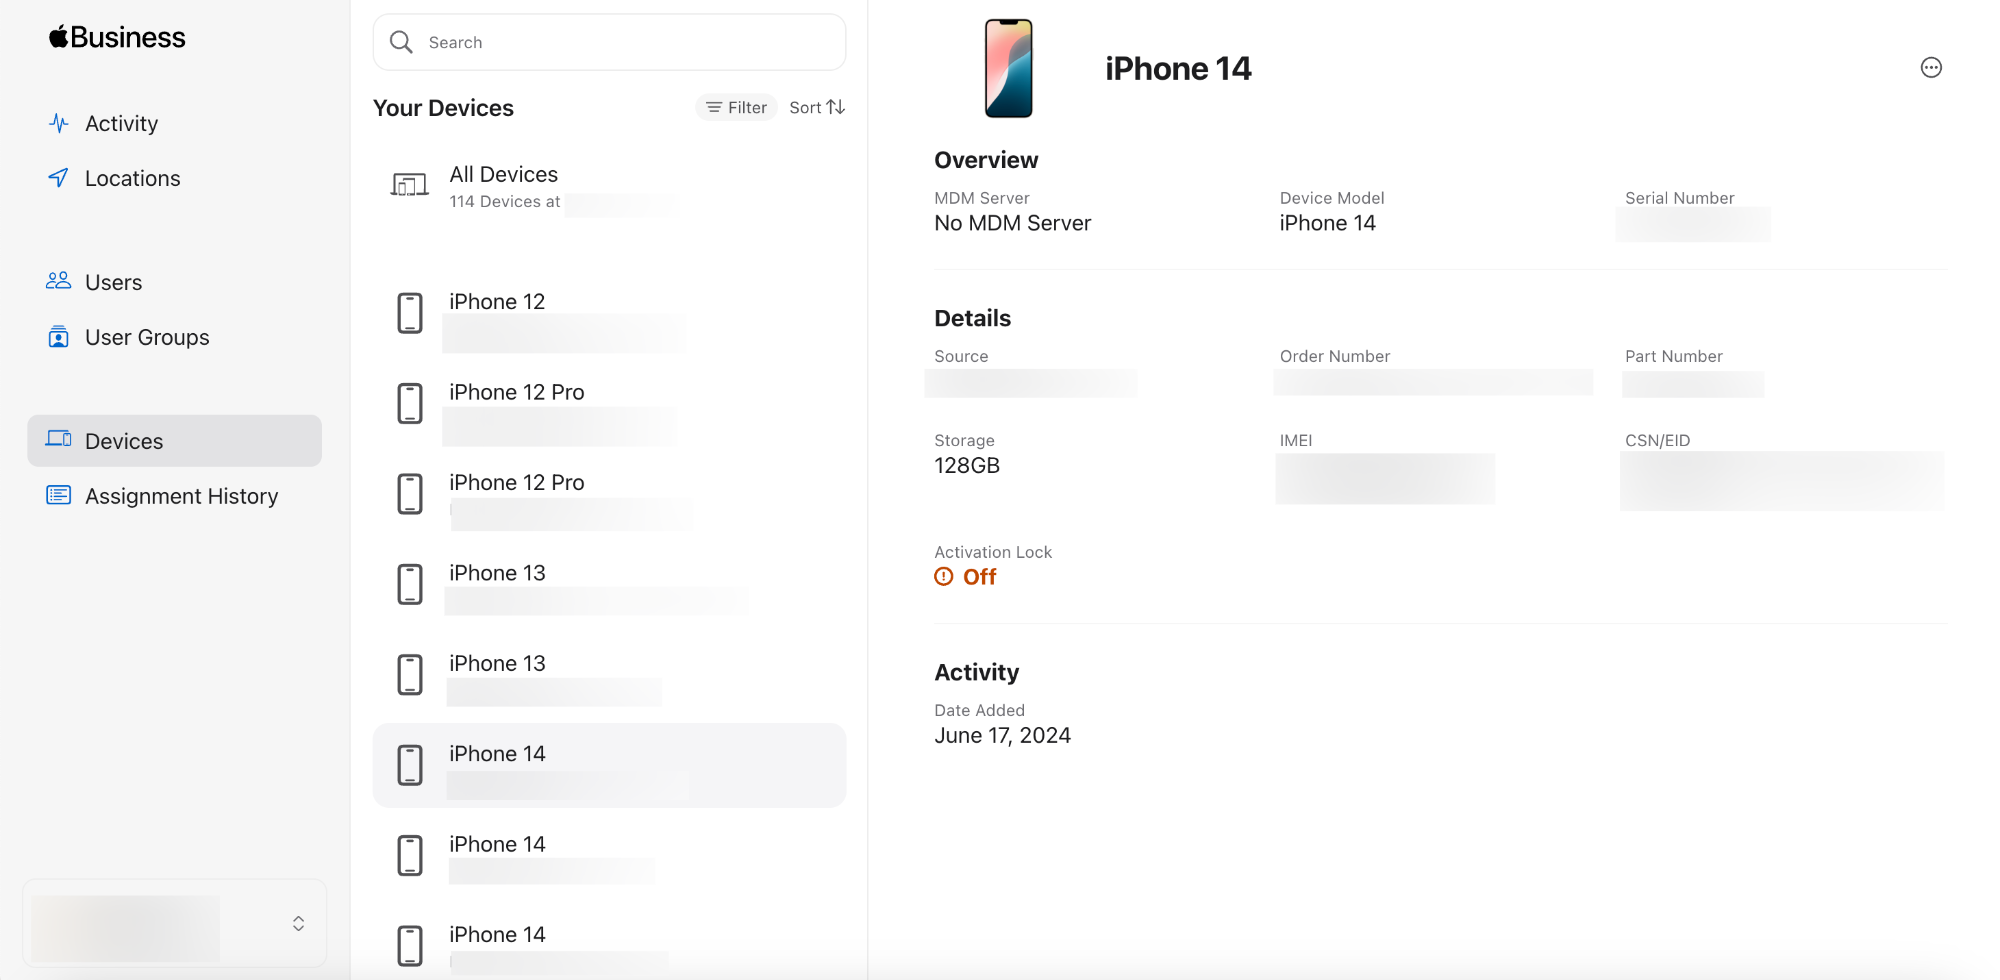
- From the Devices page, select the required device.
- On the top-right portion of the screen, click on the horizontal ellipsis button. Then, click on Edit MDM Server.
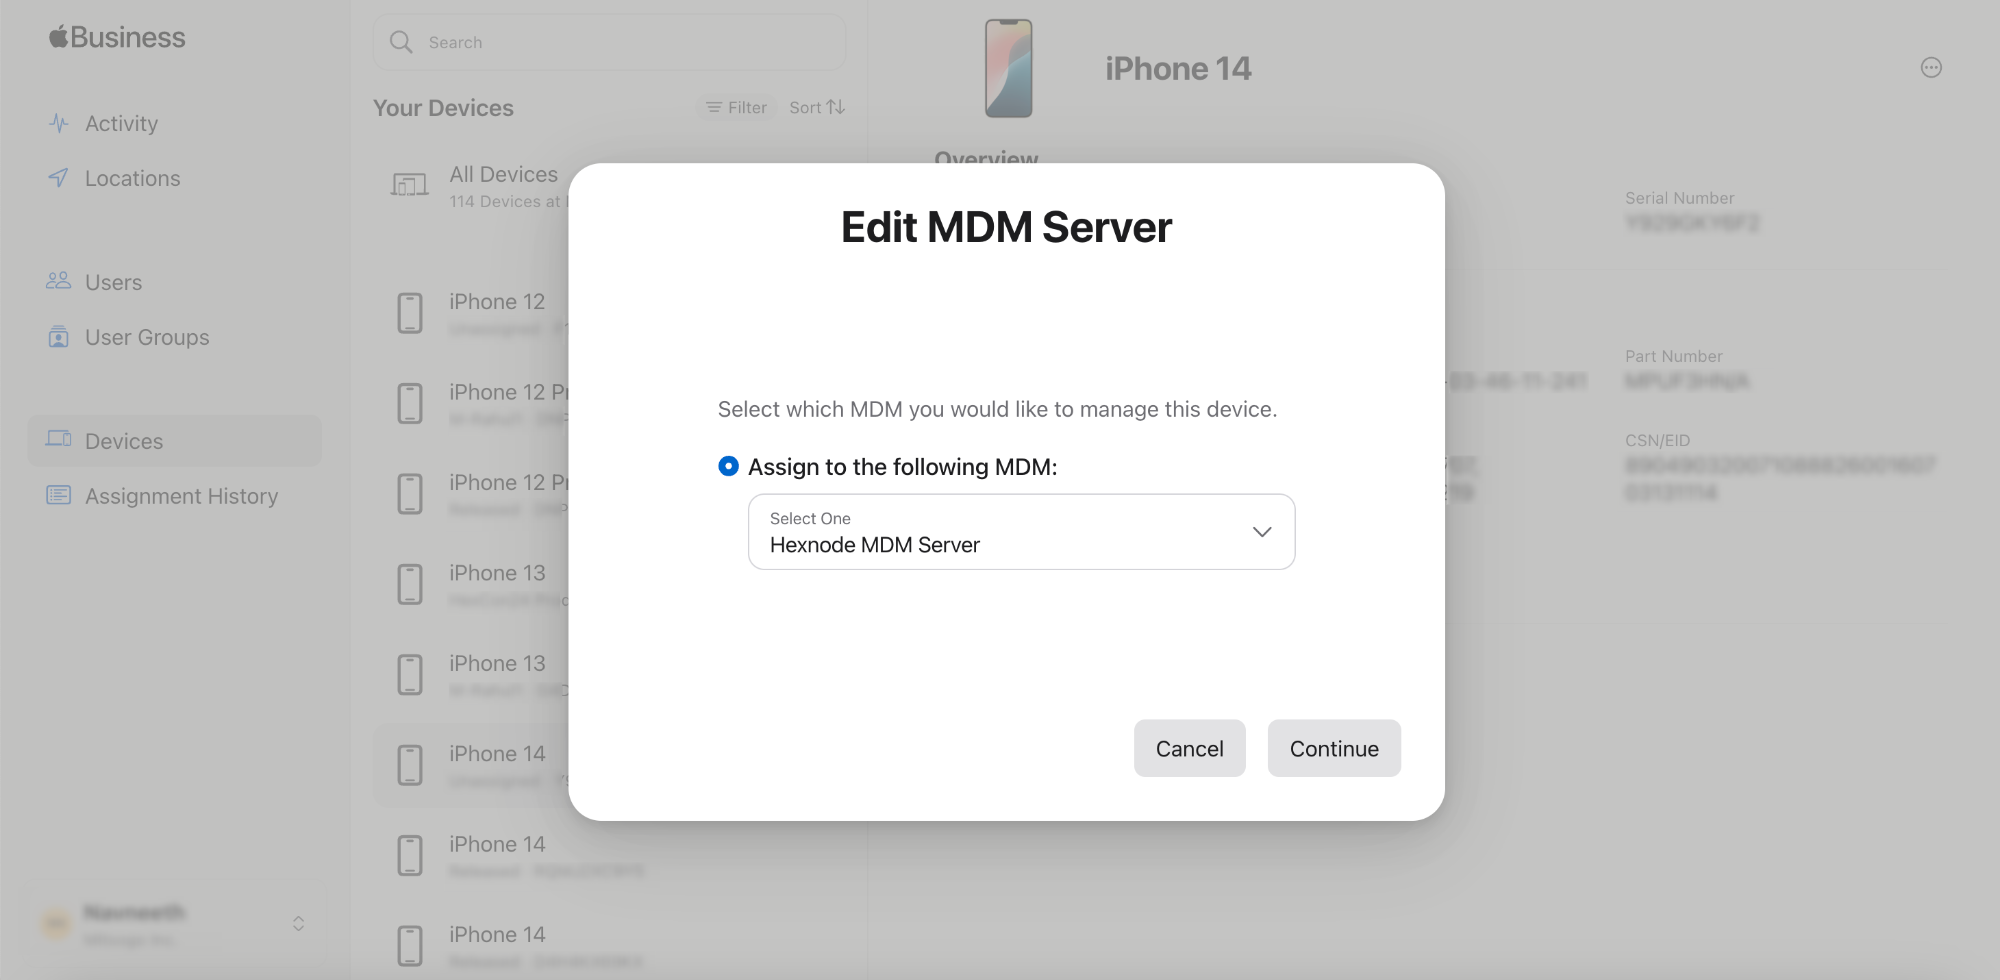
- Tap Assign to the following MDM. Now select the server from the drop-down. Tap Continue.
- Click on Confirm to assign the device to the management server.
Bulk Device Assignment
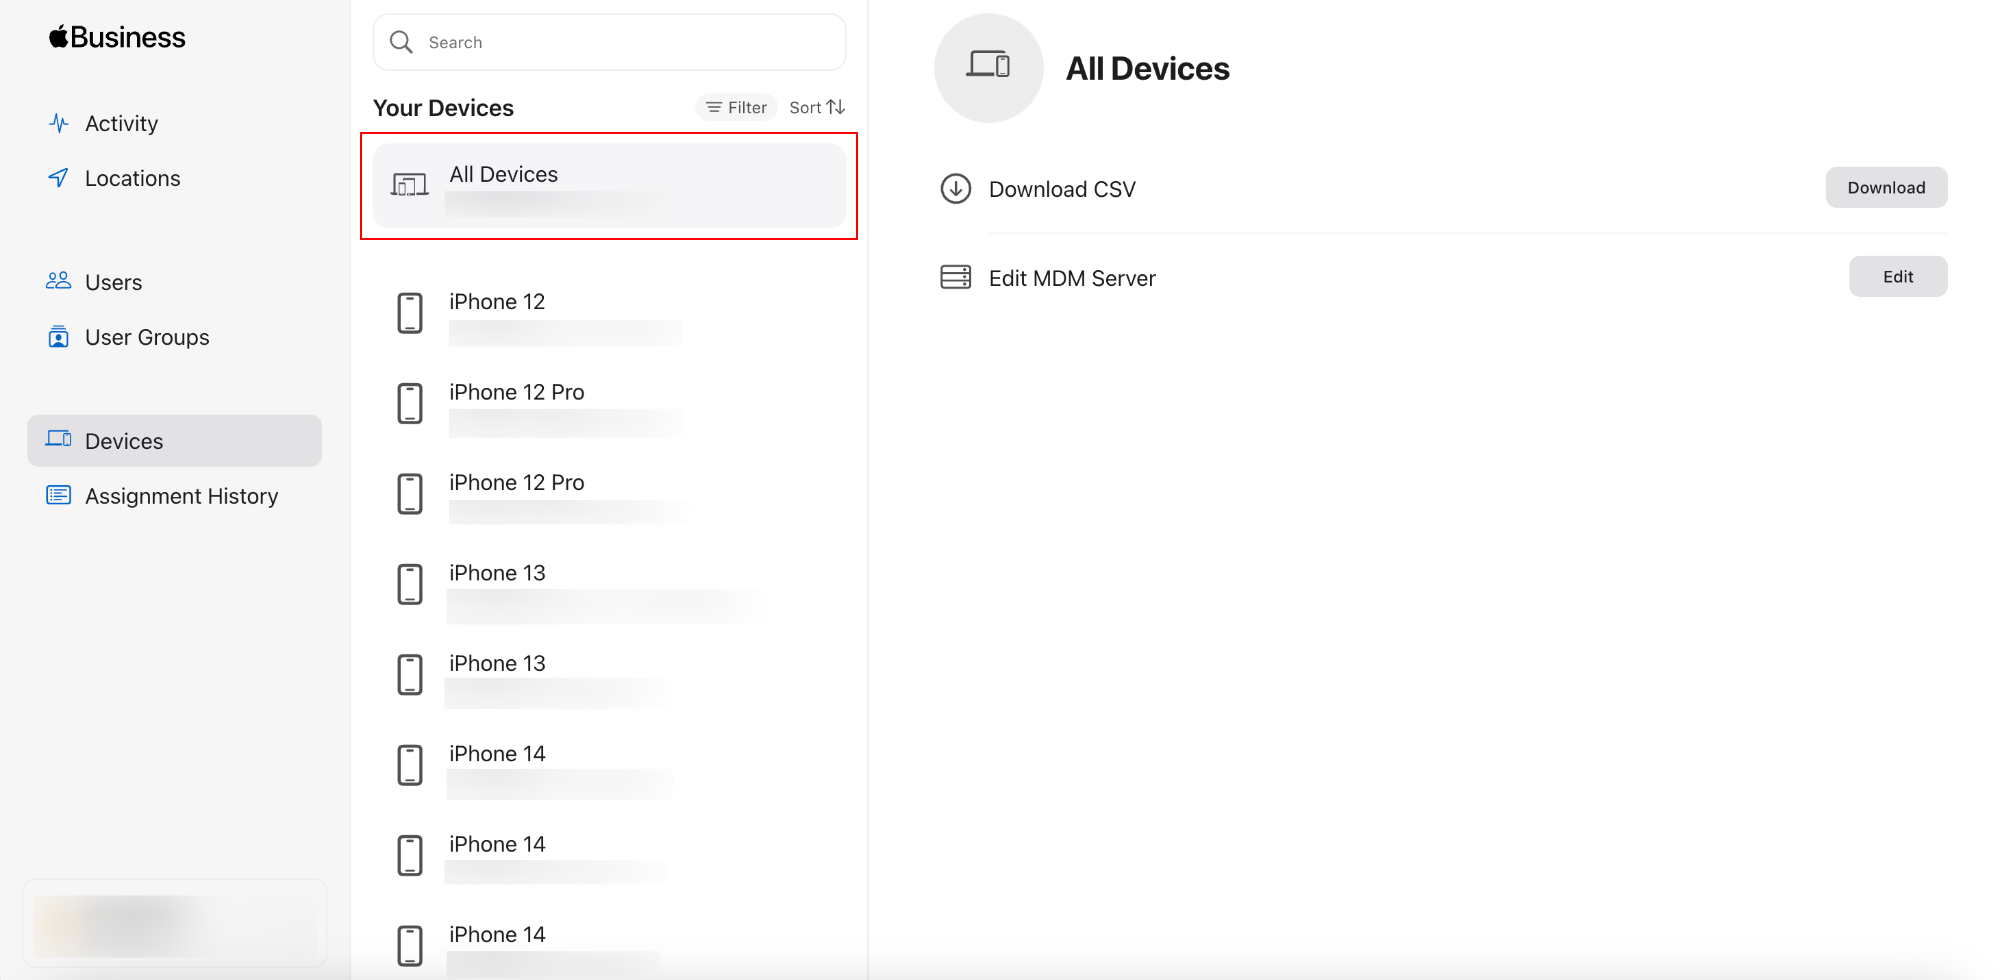
- From the Devices page, either
-
- Manually select the devices that you require. On Mac, press Command key in the keyboard and click on the device names to make the selection. On Windows, use the control CTRL key.
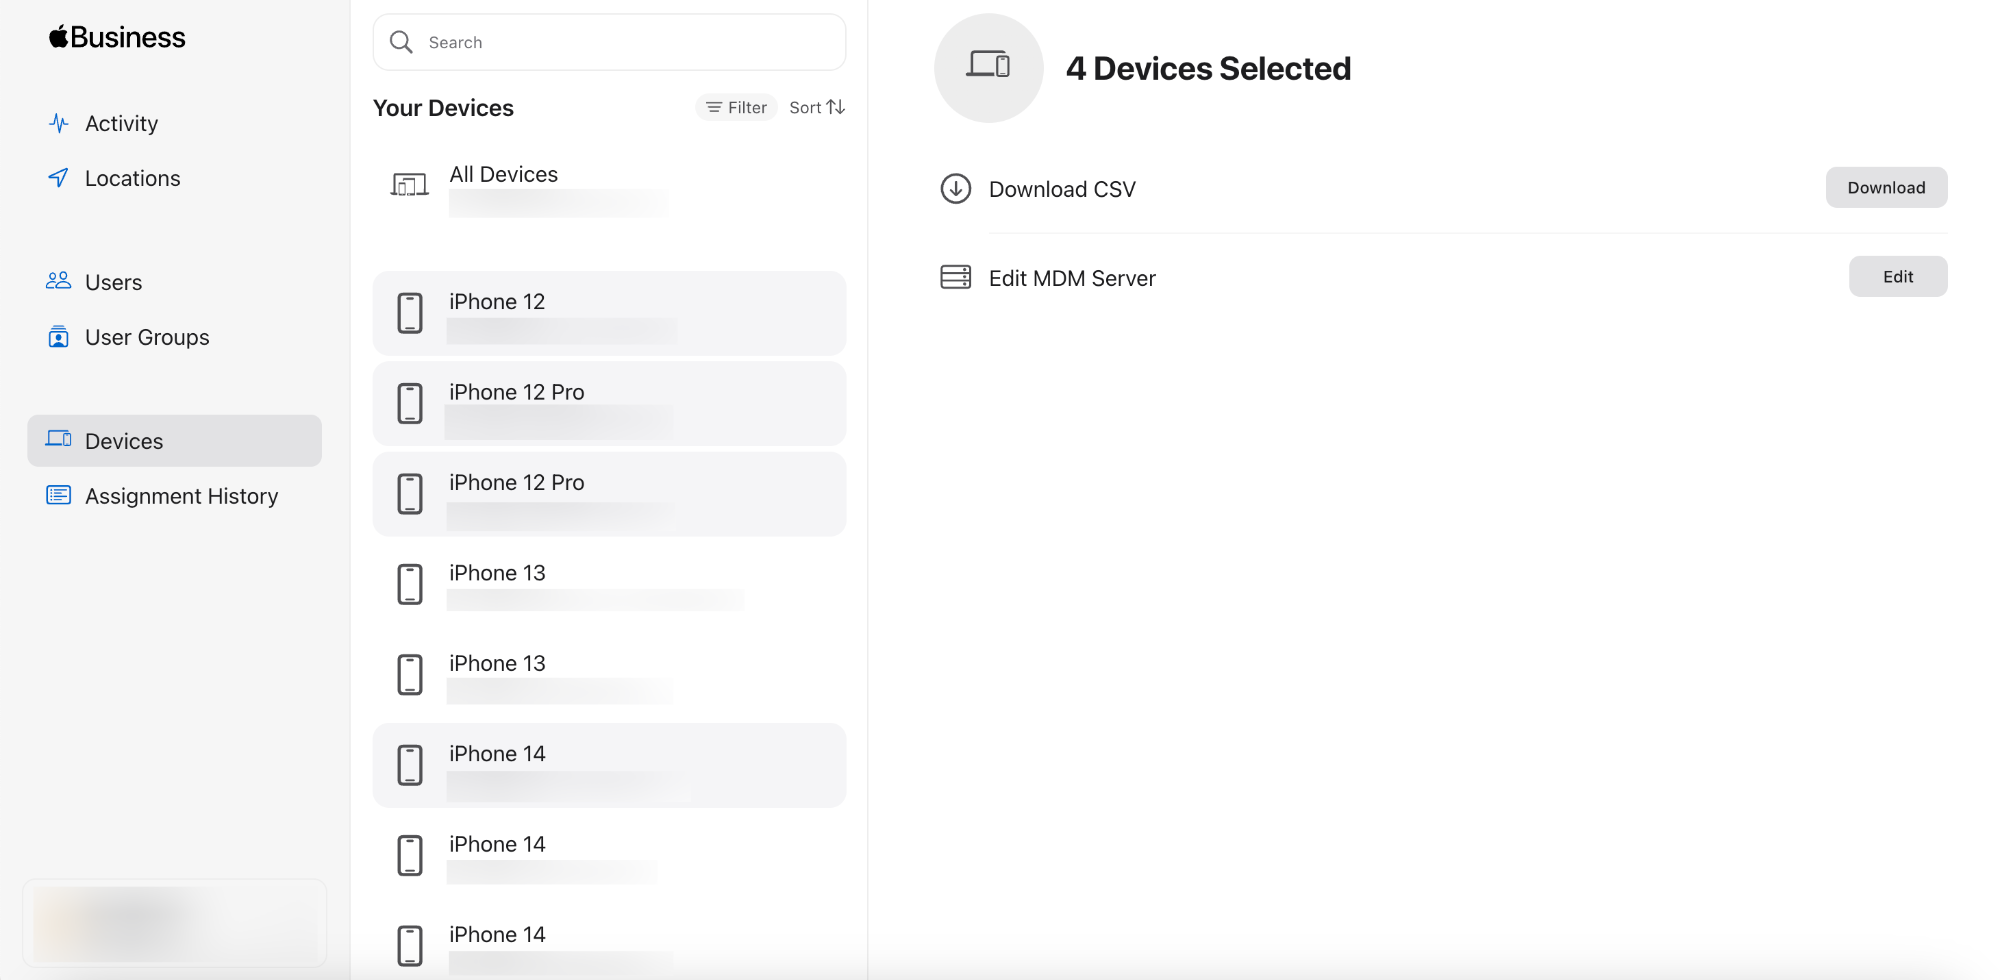
- Manually select the devices that you require. On Mac, press Command key in the keyboard and click on the device names to make the selection. On Windows, use the control CTRL key.
Or
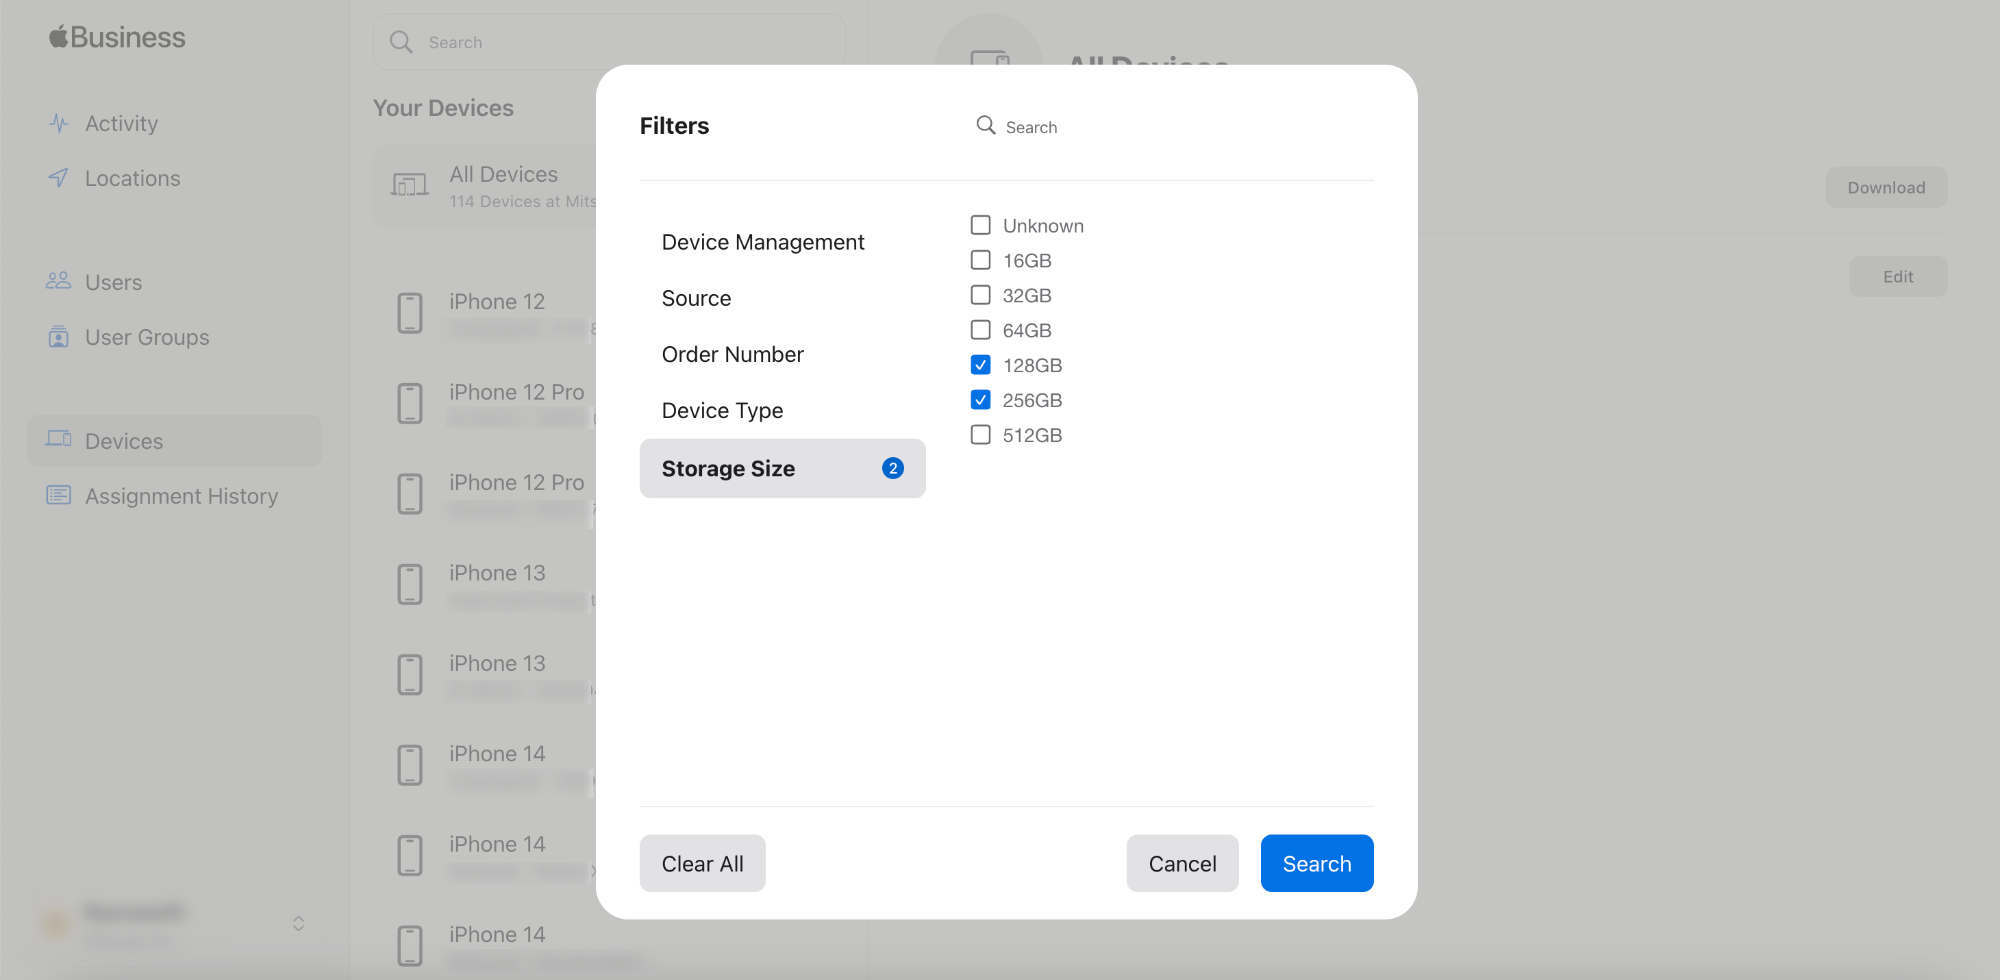
- Apply the device filters to streamline the device list. The available filters are Device Management, Source, Order number, Device type, Storage size. To add a filter criterion, click Filter below the Search bar and check in the relevant boxes corresponding to each filter option. Then, click on Search to sort out devices according to the criterion. From the filtered device list, you can either select All devices or click on the device name for a specific device.
-
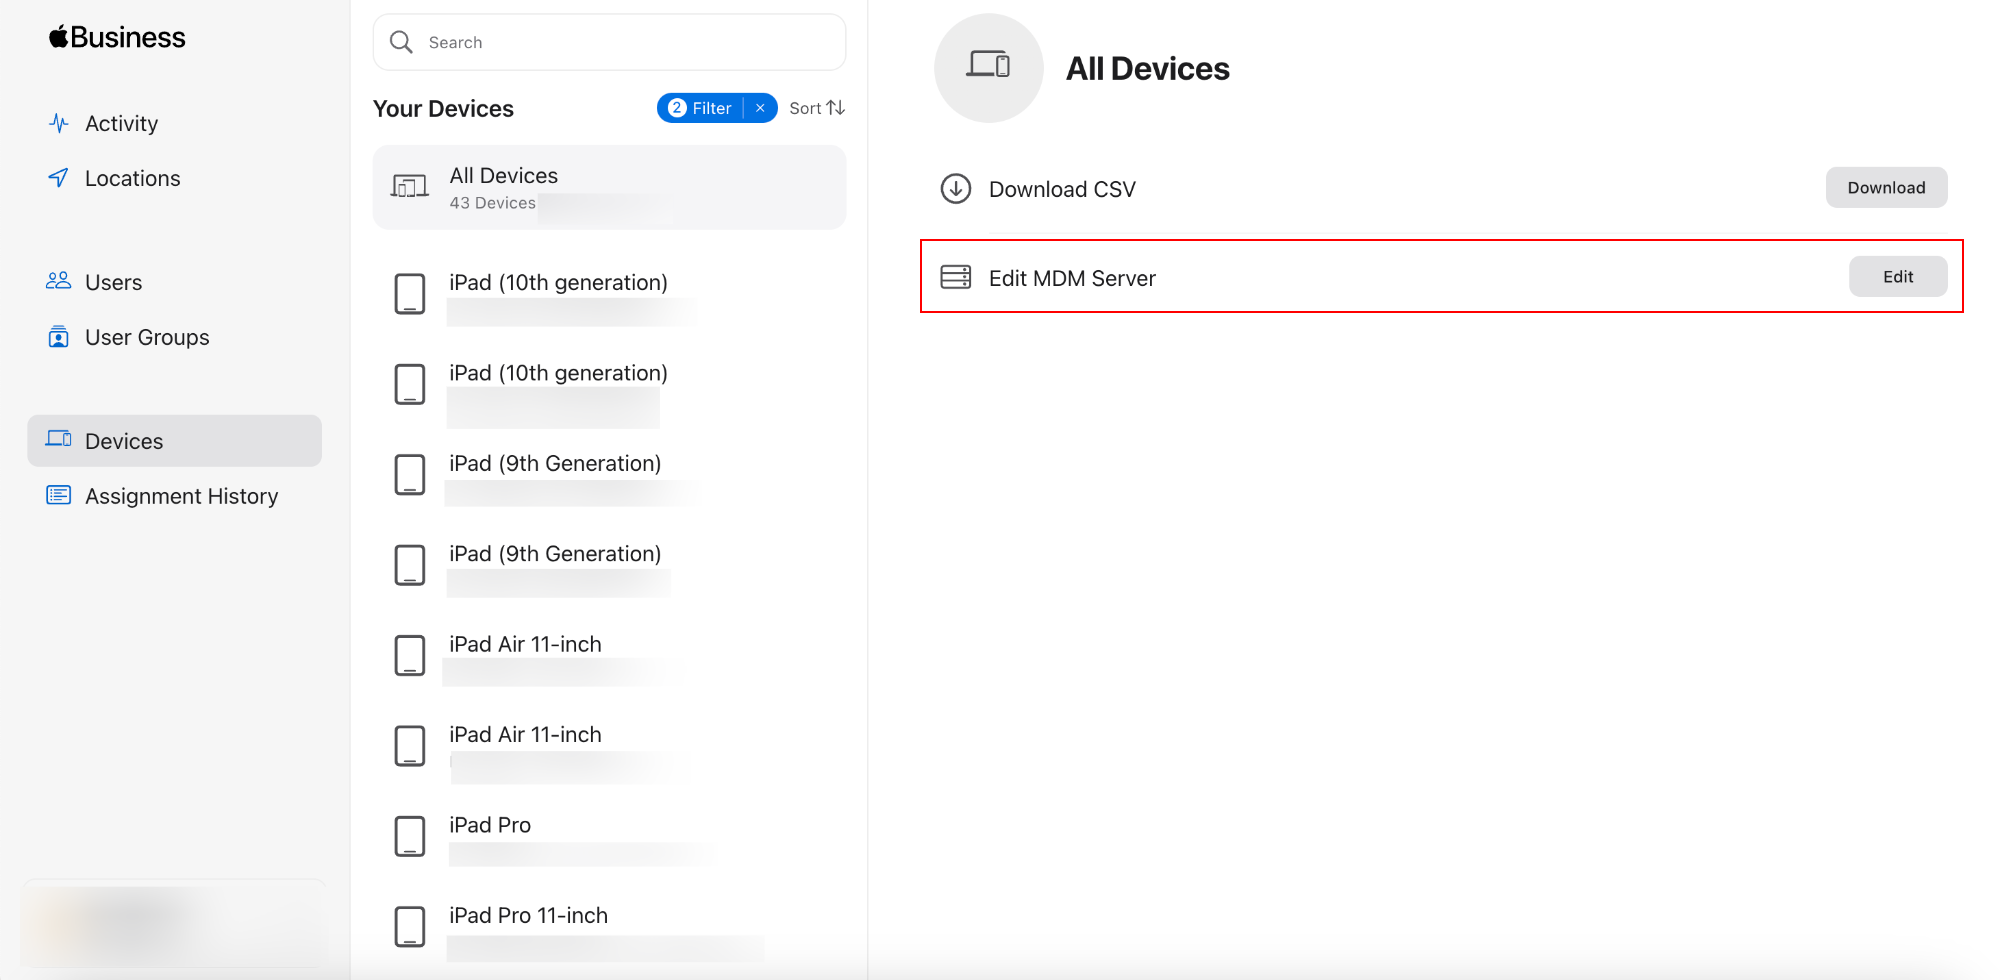
- Click on Edit corresponding to the Edit MDM server option.
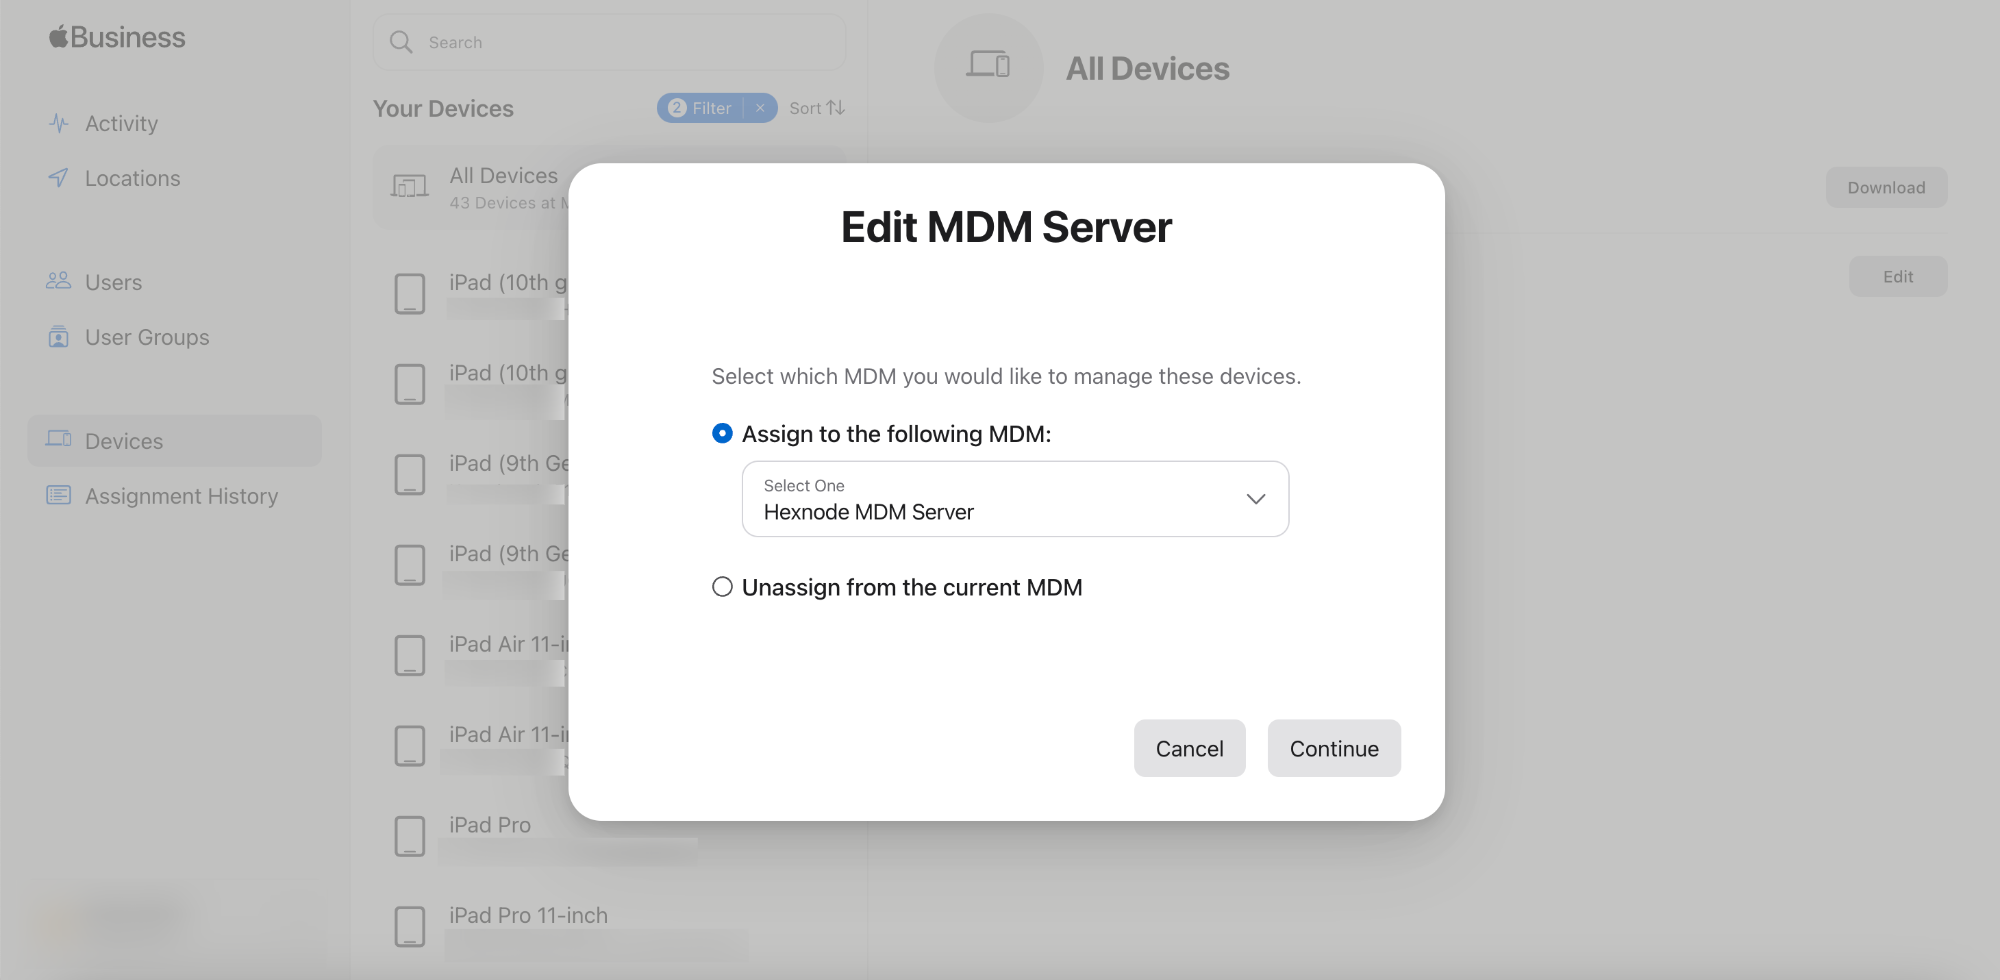
- Select Assign to the following MDM option. From the drop-down, select the MDM server. Click on Continue.
- Click on Confirm to assign the device to the management server.
The details of assigned devices can be seen in the device Assignment History, including the order number, the MDM server to which the device is assigned, assignment date and the device type.
Step 5: Sync devices with Hexnode
The devices added under the MDM server created for Hexnode in the Apple Business Manager portal have to be synced with Hexnode. This synchronization will import the details of the added devices to the corresponding ADE Account in Hexnode. To sync devices to Hexnode,
- On your Hexnode UEM console, go to Enroll > All Enrollments > No Touch > Apple Business/School Manager > Accounts.
- Click on Sync all ADE accounts.
Navigate to Devices to view all devices synced from the MDM server in the ABM portal.
Change the device filter from Show all devices to the required ADE Account to list the devices assigned to that particular ADE Account.
Step 6: Associate the Enrollment Profile with individual devices
ADE Enrollment Profile assists the MDM in streamlining the device enrollment and set up on ABM added devices. If you want to attach a different Enrollment Profile (other than the one attached with the ADE Account) with an individual device,
- On your Hexnode UEM console, navigate to Enroll > All Enrollments > No Touch > Apple Business/School Manager > Devices.
- Select the device and click on Associate Enrollment Profile.
- Select the profile and click Assign.
All ADE Devices
| SetUp Assistant Options | Supported versions | Description |
|---|---|---|
| Apple ID |
|
Skip Apple ID setup. |
| Biometric |
|
Skip biometric setup. |
| True Tone Display |
|
Skip True Tone Display pane. |
| Apple Pay |
|
Skip Apple Pay setup. |
| Restore |
|
Disable restoring from backup. |
| Screen Time |
|
Skip the Screen Time pane. |
| Appearance |
|
Skip the Choose Your Look window. |
| Diagnostics |
|
Skip sending diagnostic information to Apple. |
| Location Services |
|
Skip setting up Location Services. |
| Privacy |
|
Skips the privacy pane. |
| Siri |
|
Disable users from configuring Siri. |
| Terms and Conditions |
|
Hide terms and conditions from the user. |
iOS Devices Only
| SetUp Assistant Options | Supported versions | Description |
|---|---|---|
| Move from Android | iOS 9.0+ | Remove Move from Android option from the Restore pane. |
| Keyboard | iOS 11.0+ | Skip the Keyboard pane. |
| Watch Migration | iOS 11.0+ | Skip the screen for watch migration. |
| iMessage and Face Time | iOS 12.0+ | Skip the iMessage and FaceTime screen. |
| Passcode | iOS 7.0+ | Hides and disables the passcode pane. |
| SIM Setup | iOS 12.0+ | Skip the add cellular plan pane. |
| Onboarding | iOS 11.0+ | Skip on-boarding informational screens. |
| Software Update | iOS 12.0+ | Skip the mandatory software update screen. |
| Home Button Sensitivity | iOS 10.0+ | Skip the Home Button screen. |
| Device to Device Migration | iOS 13.0+ | Skip Device to Device Migration pane. |
| Zoom | iOS 8.3+ | Skip the Zoom pane which shows larger text and controls. |
| Welcome/Get Started | iOS 13.0+ | Skip the Get Started pane. |
macOS Devices Only
| SetUp Assistant Options | Supported versions | Description |
|---|---|---|
| FileVault | macOS 10.10+ | Disable FileVault Setup Assistant screen. |
| iCloud Storage | macOS 10.13.4+ | Skip iCloud Documents and Desktop screen. |
| iCloud Analytics | macOS 10.12.4+ | Skip the iCloud Analytics screen. |
| Registration | macOS 10.9+ | Prevent users from filling out the registration form and sending it to Apple. |
tvOS Only
| SetUp Assistant Options | Supported versions | Description |
|---|---|---|
| Screen Saver | tvOS 10.2+ | Skip setting up screen saver. |
| TV Home Screen Sync | tvOS 11.0+ | Skip TV home screen layout sync screen. |
| Where is this Apple TV? | tvOS 11.4+ | Prevent user from selecting the room for the Apple TV. |
| Set up your Apple TV | tvOS 10.2+ | Prevent users from configuring their Apple TV. |
| Sign In to your TV provider | tvOS 11.0+ | Skip the TV provider sign in screen. |
visionOS Only
| SetUp Assistant Options | Supported versions | Description |
|---|---|---|
| Intelligence | visionOS 26+ | Skips the Apple Intelligence setup pane. |
| Software Update | visionOS 26+ | Skips the mandatory software update screen. |
| Passcode | visionOS 26+ | Hides and disables the passcode pane. |
| Tips | visionOS 26+ | Skips the Tips pane. |
| Welcome/Get started | visionOS 26+ | Skips the Get Started pane. |
What happens at the device end?
If you have a device that is not yet activated, switch on the device and connect it to the internet. The Apple server will push the Enrollment Profile previously attached to the devices via the MDM server on the ABM. This will enroll the device in the MDM. However, if you have an already activated device, reset it to its factory settings to get it enrolled in the MDM.
If no enrollment authentication is enforced via the MDM, the device will get directly enrolled in the MDM. However, if enrollment authentication was turned on, the device will get enrolled only after user authentication.
Troubleshooting
1. Issue: The enrollment profile configurations are not reflected on the macOS device.
Probable Cause:
The macOS device has either failed to fetch the latest enrollment profile configurations from Apple’s servers or acknowledged an outdated profile that does not include the recent changes made in the Hexnode UEM portal.
Solution:
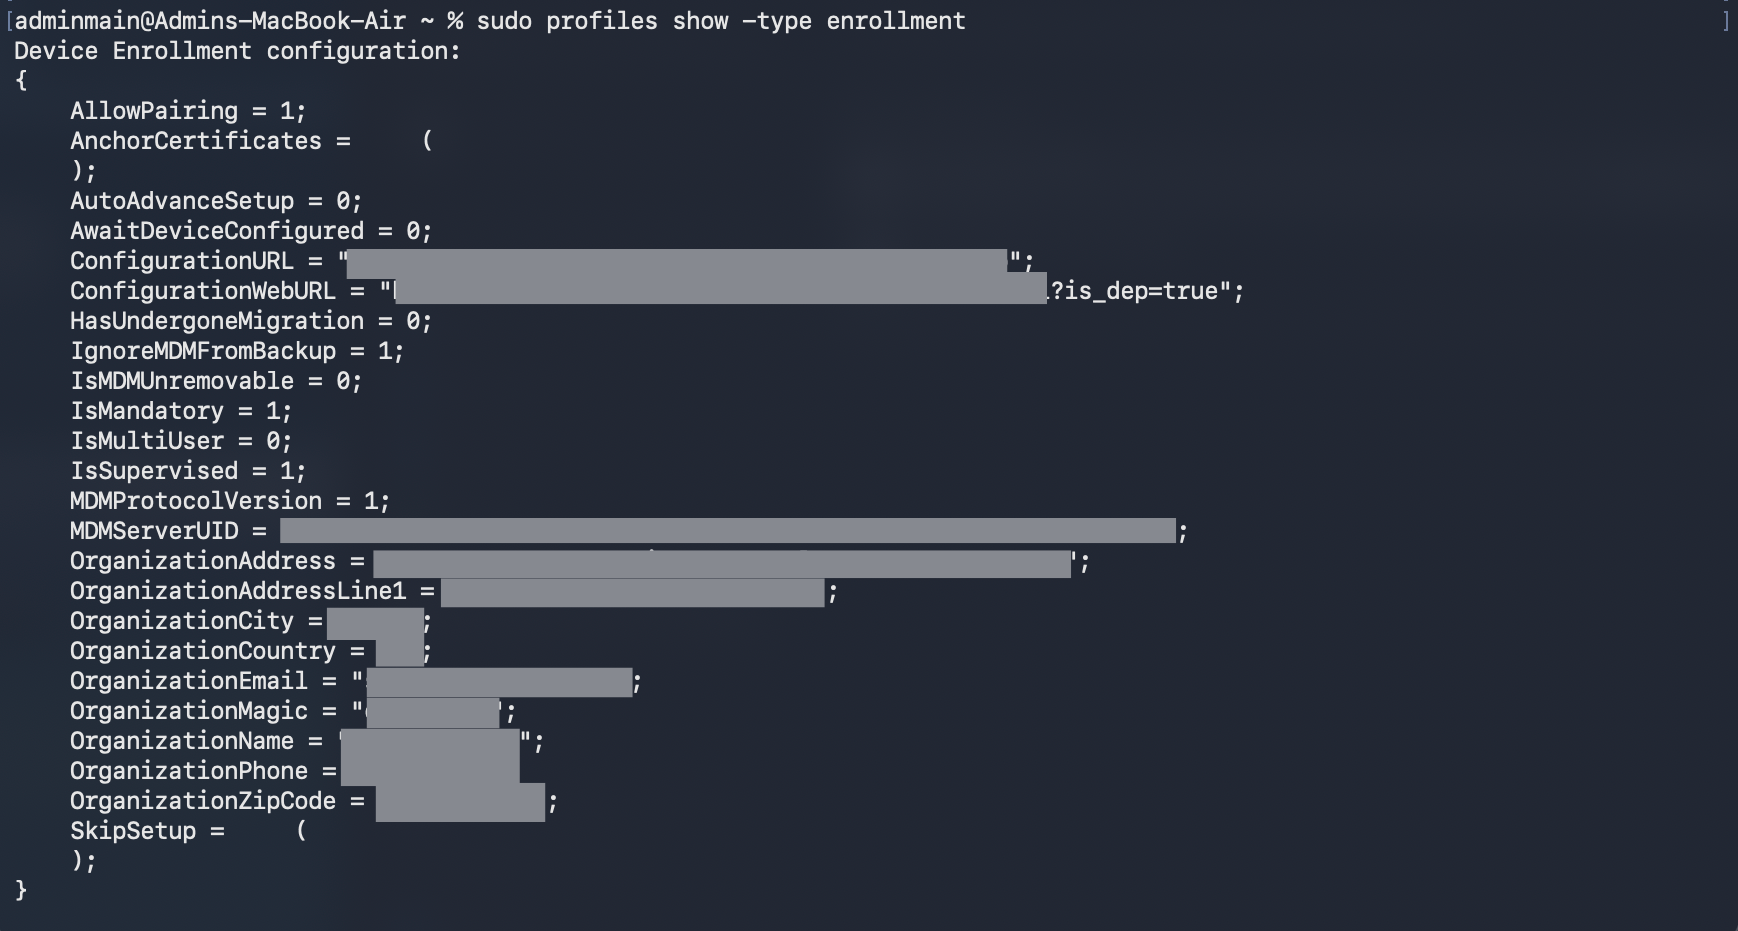
To audit the current enrollment profile settings and confirm they match the latest configurations, execute the following command in the device Terminal:
sudo profiles show -type enrollment
If the command returns the error “No enrollment configuration found,” or if the parameter values do not reflect your latest profile configurations (for example, if the MDM profile set to be non-removable in the portal but the Terminal returns IsMDMUnremovable = 0; instead of IsMDMUnremovable = 1;), the device has not successfully pulled the updated profile.
In such cases, re-enroll the macOS device via Terminal to force the device to fetch the latest enrollment profile settings.
https://cdn.hexnode.com/mobile-device-management/help/wp-content/uploads/2026/05/macOS-Terminal-output-of-the-applied-enrollment-profile-configurations.png