


Category filter
How to Install Patches from the Patches Tab
TL;DR
The Install action within the Patches tab enables rapid patch deployment across Windows and macOS devices. Selecting your required OS or third-party updates here automatically builds a ready-to-deploy automation scheduled for immediate execution. All you have to do is assign your target devices and hit save. If you need granular control, you can step back through the automation set-up window to add custom scripts, or define specific reboot and retry rules before finalizing the patch rollout.
The Patches tab in Hexnode UEM includes a native repository of available OS and third-party patches for Windows, macOS devices and Linux devices. The Install action in the Patches tab enables IT admins to install patches directly from this repository, bypassing manual automation profile creation.
Clicking Install for one or more patches creates a pre-populated automation profile and routes you directly to the Assignments step to define target devices or groups. This bypasses the patch-selection step in the standard automation workflow because the required updates were already selected in the Patches tab.
Key capabilities
- Direct deployment from patch data – Patches can be selected from the Scanned, Missing, Critical, or Unscheduled sections for the corresponding platforms under Patches and deployed without configuring a new automation from scratch.
- Pre-filled automation profile – The patches selected in the Patches tab automatically populate a new automation profile, eliminating the need to reselect them during setup.
- Reduces time between detection and deployment – Particularly relevant for critical or zero-day patches identified through scans, where speed of rollout matters.
The Install action is best suited for one-off or urgent patch deployments — for instance, pushing a critical patch flagged in a scan without delay. For patch rollouts that need to be defined in advance or repeated on a schedule, building the automation profile manually is the better fit.
How it works
- Admin selects patches in the Patches tab of the Hexnode UEM console.
- Admin triggers Install from the Actions dropdown.
- Hexnode generates an automation profile with the selected patches and opens it at the Assignments step in the automation profile.
- Admin configures targeting (included/excluded groups, filters).
- Admin reviews and saves the automation triggering the installation in the target devices.
Steps to deploy patches via the Patches tab
- Log in to the Hexnode UEM portal and navigate to Patches > Patches.
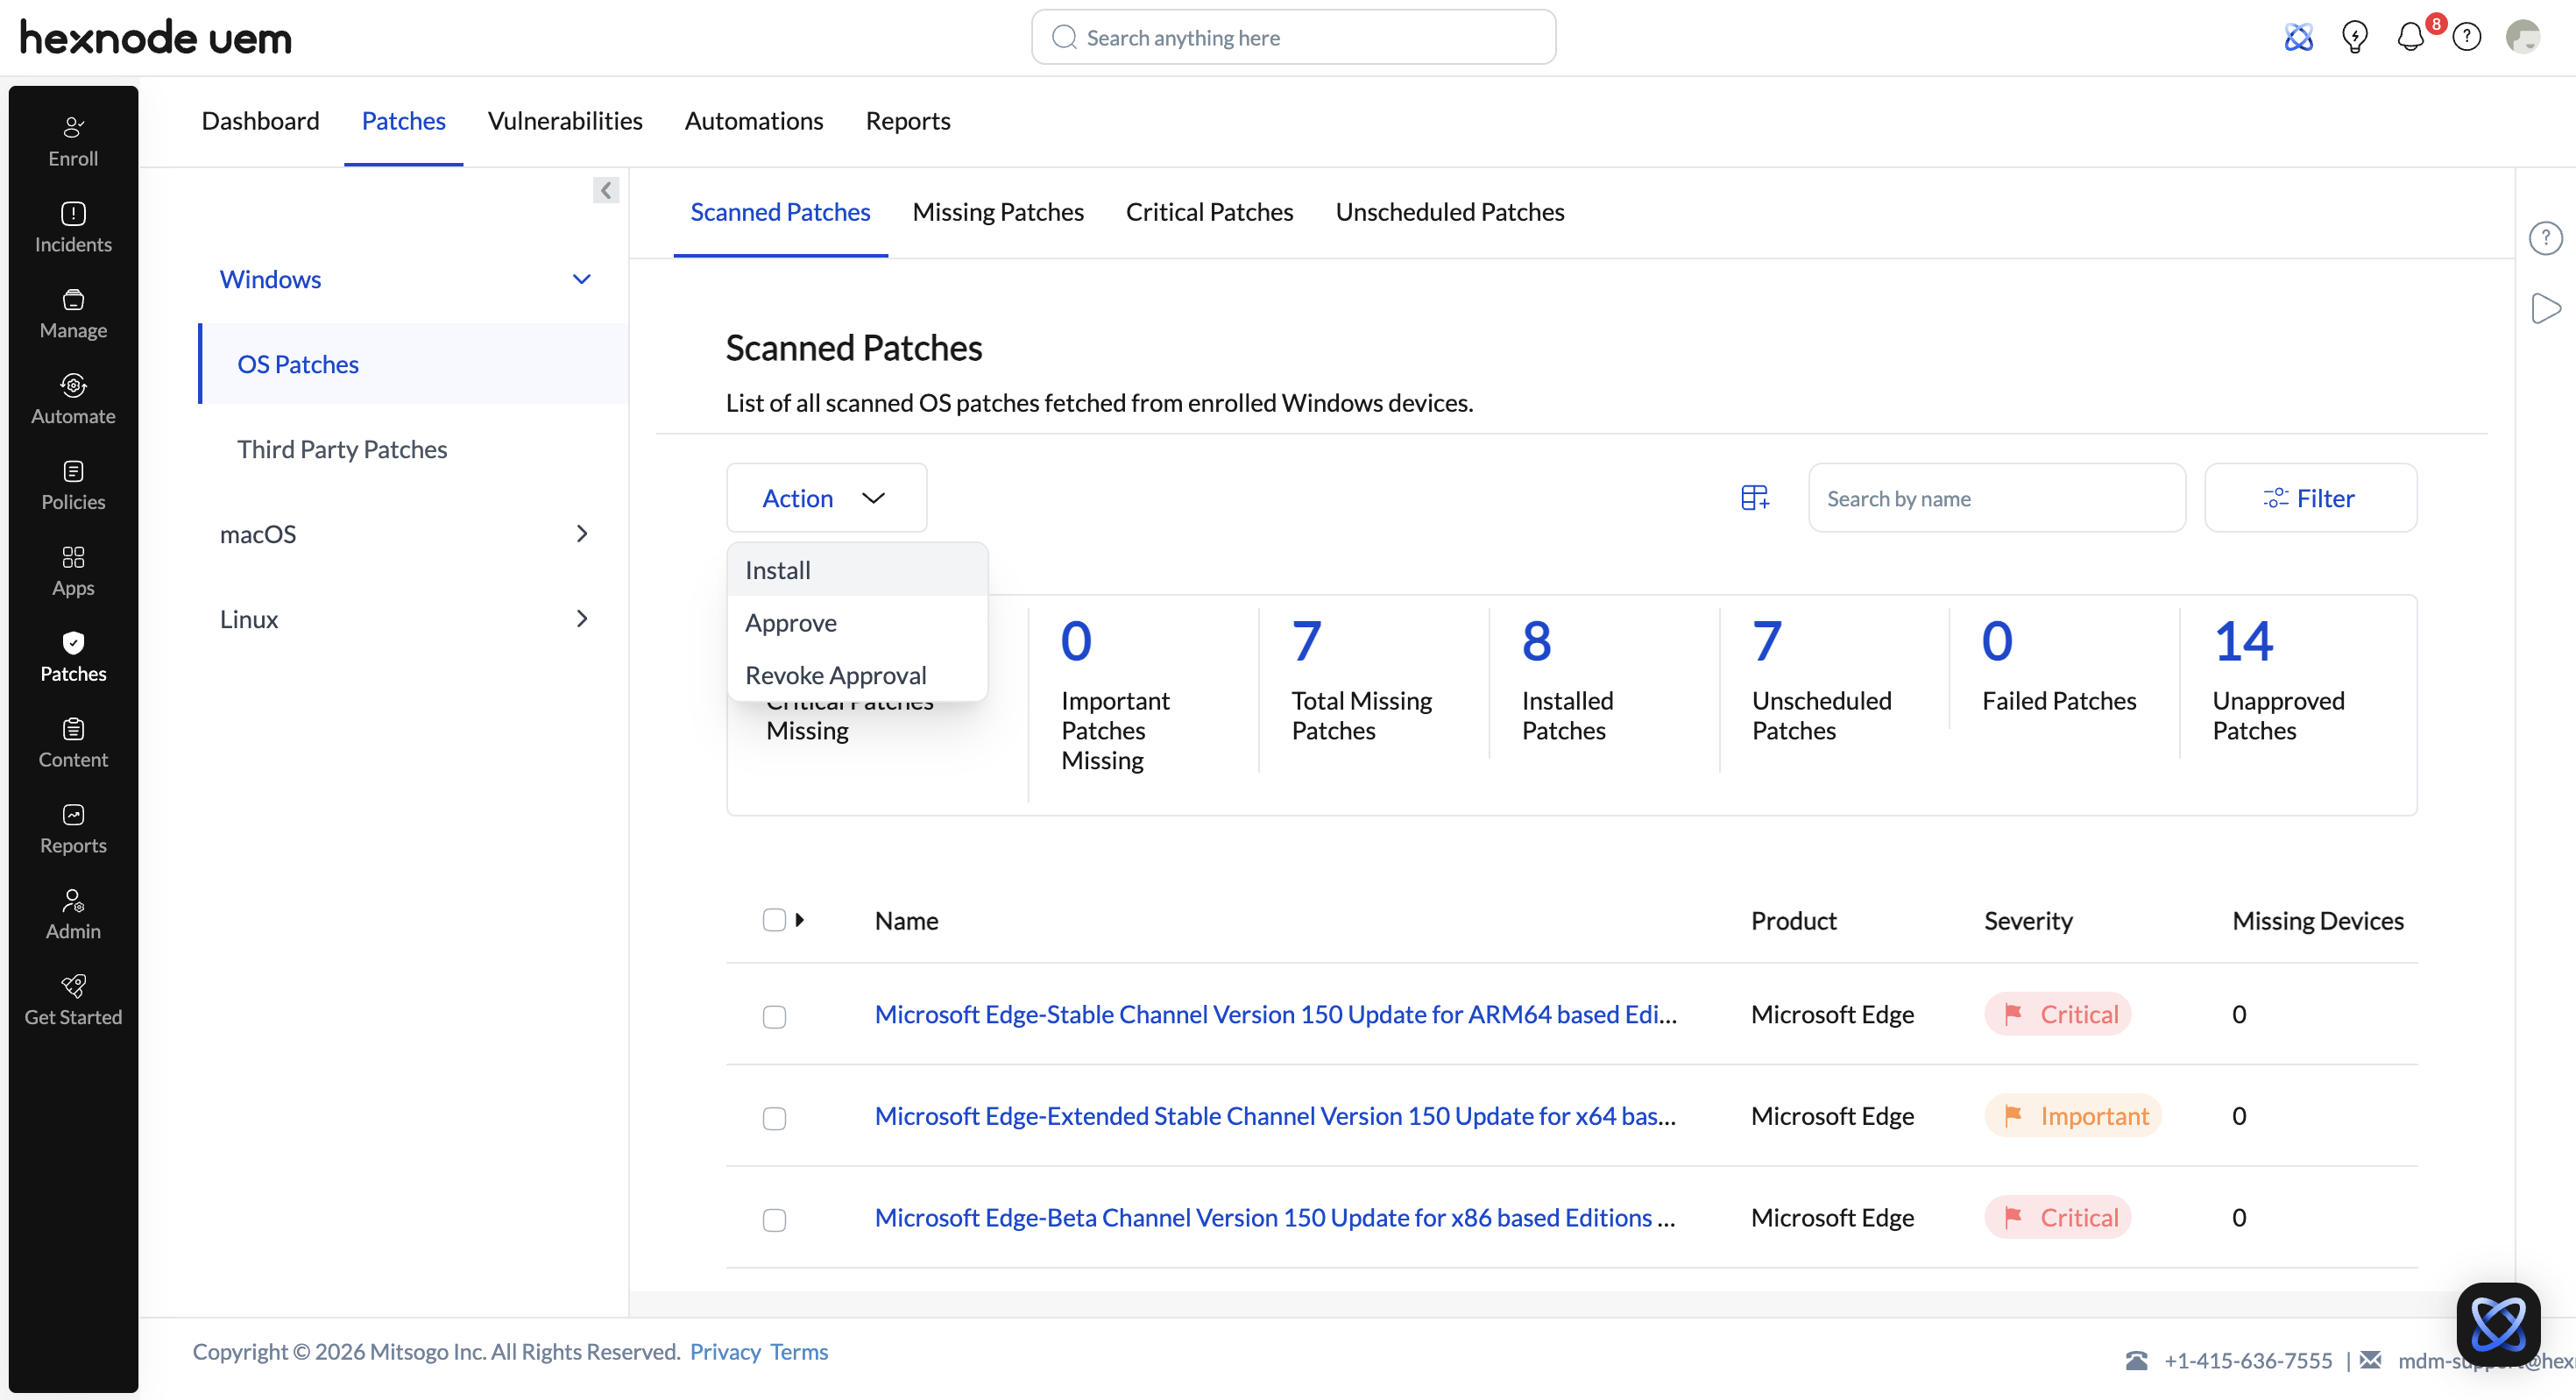
- Select the device platform (Windows or macOS), then choose OS Patches or Third Party Patches.
- Browse the relevant sub-tab (Scanned, Missing, Critical, or Unscheduled Patches) and check the boxes next to the patches to deploy.
- Open the Action dropdown and select Install.
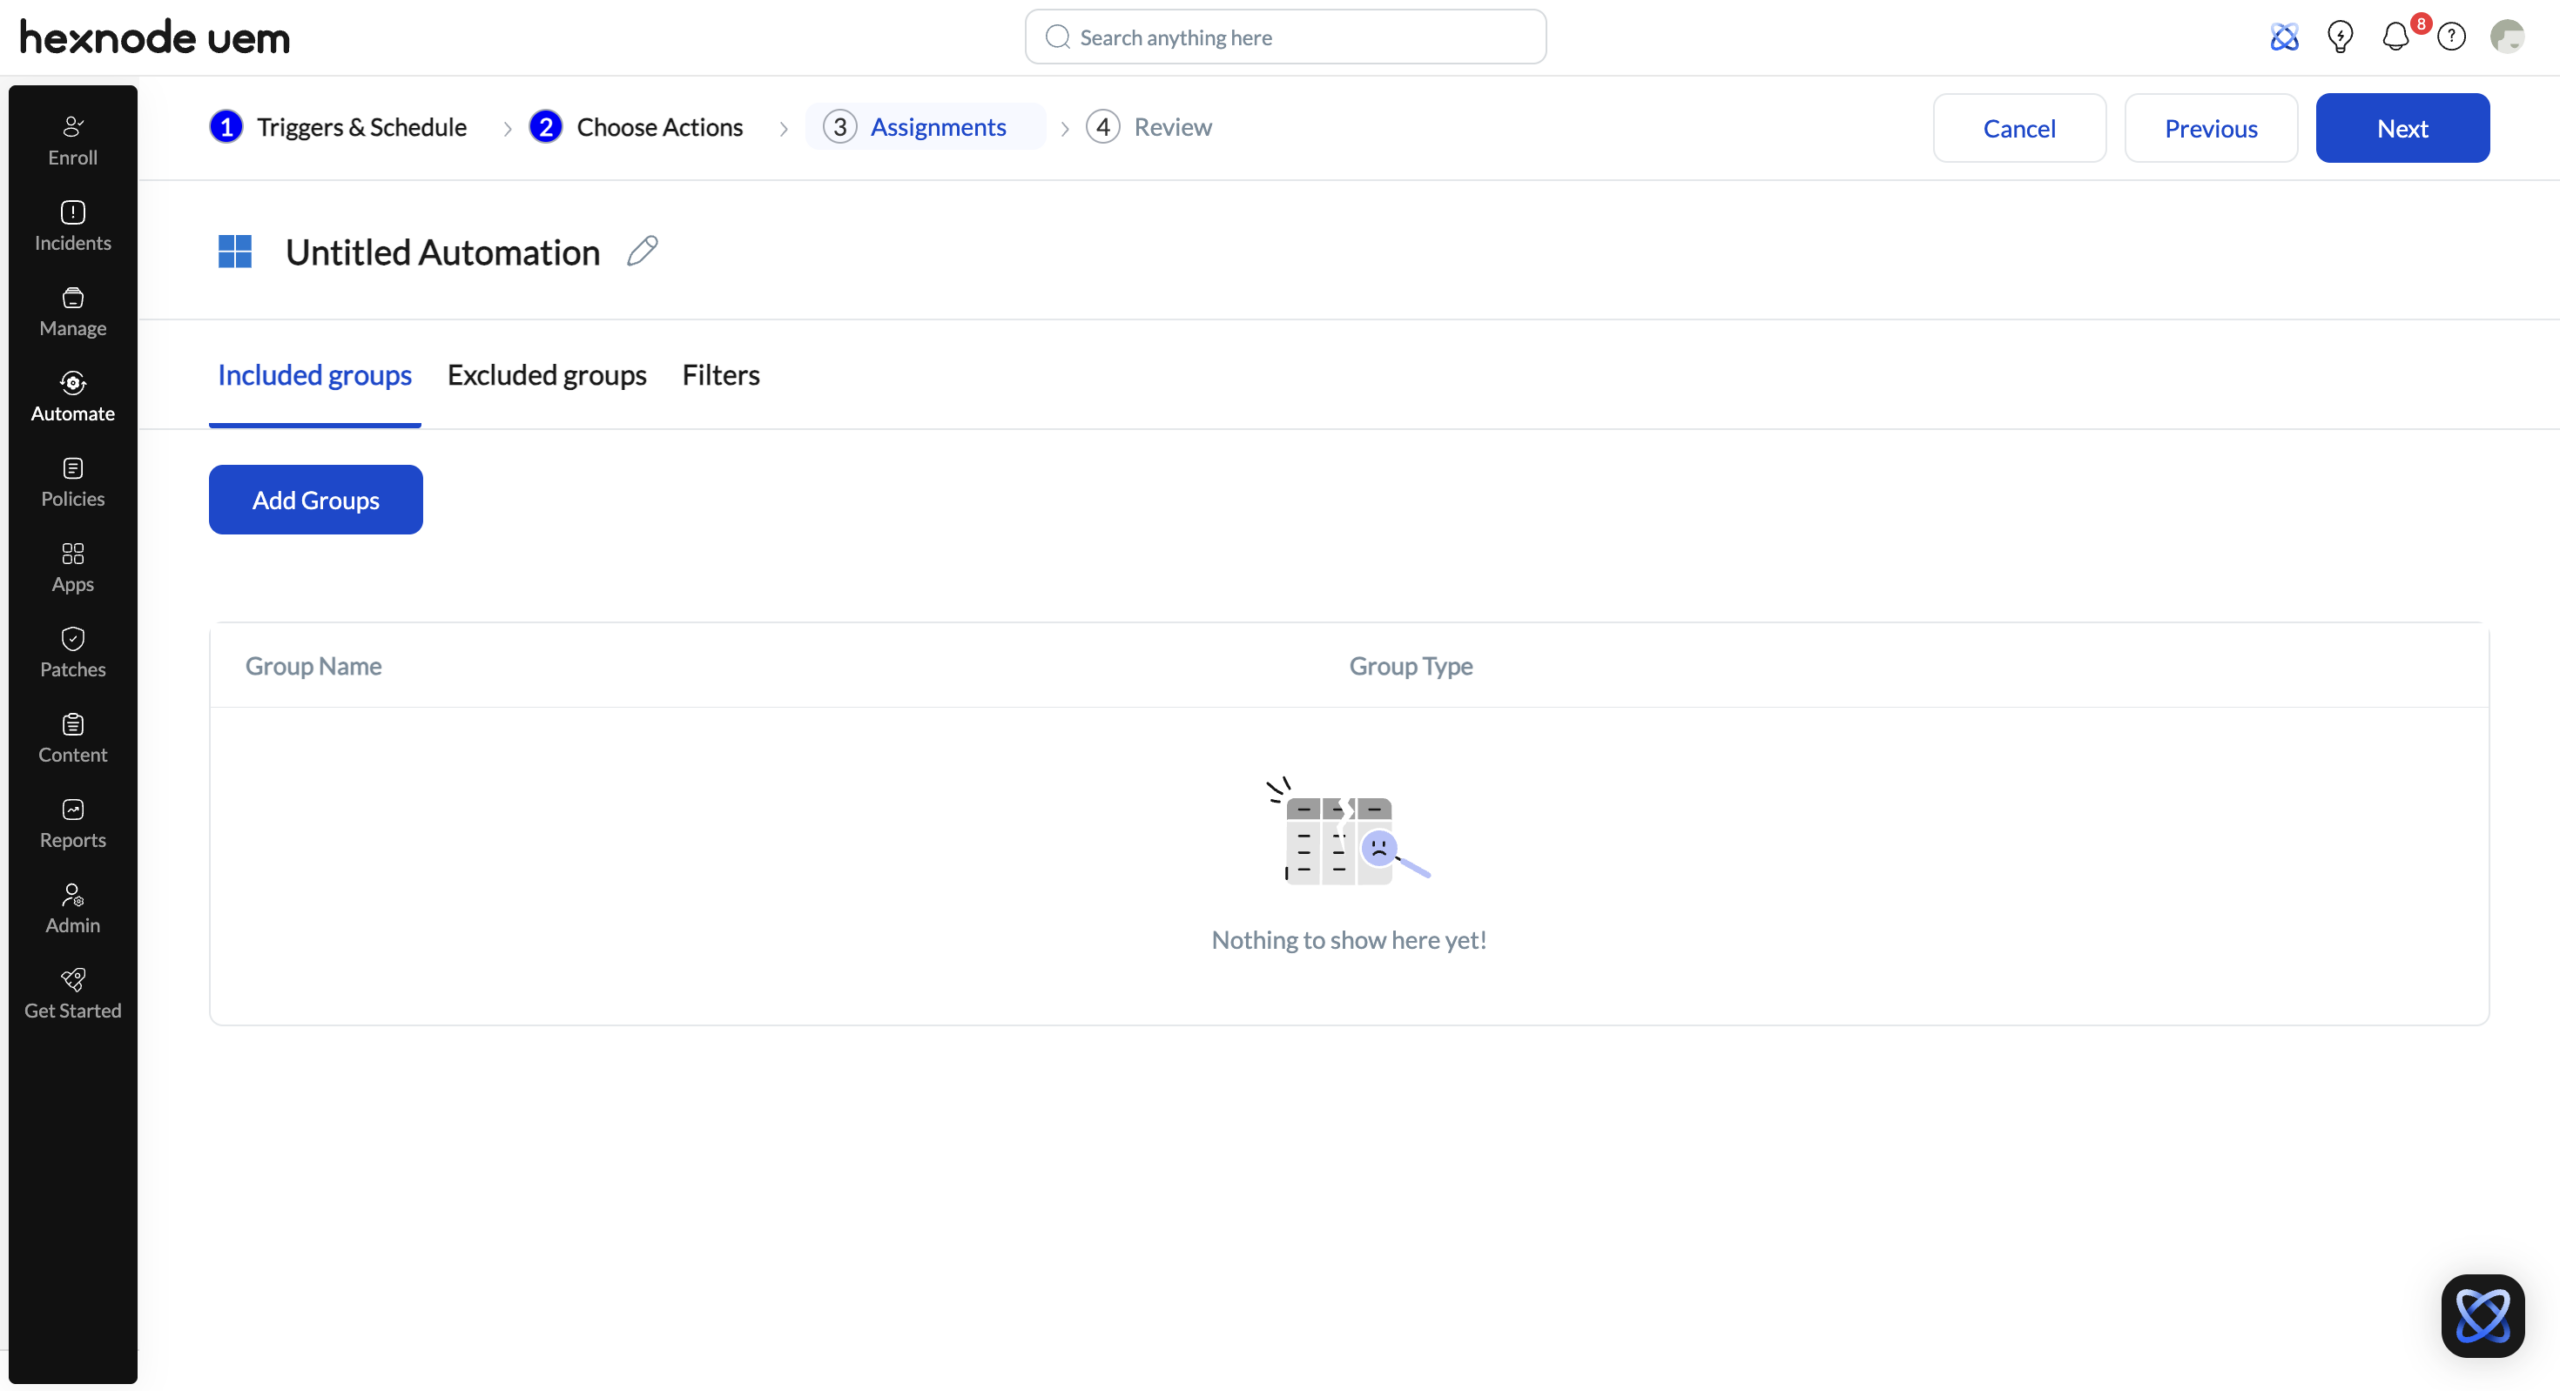
- You are redirected to the Assignments section of the generated automation profile.
Configuring target assignments
Use the Assignments section to determine the exact devices and users that will receive the patches. Options are available for Included groups, Excluded groups, and custom filters.
Included groups
Select device or user groups to apply the automation. Click Add Groups to view and choose from the available device and user groups in your Hexnode UEM portal.
Excluded groups
Select device or user groups to exclude from the automation. Click Add Groups to display the available groups for exclusion.
Filters
Create custom filters based on the following categories:
- Device – Attributes specific to the device (e.g., OS version, model, encryption status, enrolled time, serial number).
- User – Attributes related to users assigned to the devices (e.g., department, email, username, user type).
- Network – Attributes related to the device’s network (e.g., Wi-Fi SSID, IP address, carrier network, roaming status).
- Device Status – Attributes concerning compliance and operational status (e.g., compliance status, enrollment status, jailbroken/rooted, kiosk mode).
Configuring Filters
Set the following fields to define filter conditions:
- Select Column – Choose a category for filtering. Relevant sub-categories appear based on your selection.
- Select Comparator – Define the comparison method (e.g., equals, contains, greater than).
- Select Value – Specify the filtering criteria.
Filters can be nested using the + icon along with the AND operator; a filter can be removed using the trash icon next to it. When using multiple filters, two operators are available:
- AND – The device must meet all the conditions set by the filters.
- OR – The automation applies to devices that meet at least one of the filter conditions.
After setting the filters, click Next. Review the configured automation settings — use Edit to modify any section if needed — then click Save. Saving the automation executes it immediately, and the automation profile installs the selected patches on the targeted devices.
Frequently Asked Questions
Which operating systems are supported for direct patch deployment using the Install action?
The Install action can be used to deploy patches directly to Windows and macOS devices.
What types of patches can be installed using this method?
The Install action is used to deploy specific operating system (OS) patches and third-party application updates on devices.
Does the patch install immediately after clicking the Install action?
By default, the patches selected for deployment are executed immediately upon saving the automation profile. However, Hexnode UEM first redirects to the Assignments section in the automation profile set-up, where target devices must be defined before the deployment is finalized.
How can IT admins decide which devices receive the patch?
The Assignments section enables IT admins to determine exact targets by configuring Included groups, Excluded groups, and custom filters based on Device, User, Network, and Device Status attributes.


