Category filter
Co-management of Windows devices
Windows 10 Co-management is a configuration that enables the concurrent management of devices running Windows 10 or later that are already enrolled in a third-party UEM solution.
While a device enrolled in another UEM/MDM cannot be fully enrolled in Hexnode simultaneously, co-management allows Hexnode to coexist on the device. This provides conditional access to Hexnode’s management functionalities, allowing administrators to fetch device details, deploy automations, and perform remote actions. This is often used as a primary method to streamline migration from other vendors to Hexnode.
Supported Platforms
Co-management is supported on the following operating systems:
- Windows 10 v1803+
- Windows 10 v1703 to Windows 10 v1709 (requires .NET Framework v4.7.1+ installed)
- Windows 11
How Windows Co-management Works
Co-management allows two management authorities to reside on a single device. The process follows this logic:
- Detection: When the Hexnode Installer is run, it checks if the device is managed by another UEM.
- Verification: If a third-party UEM is detected and Co-management is enabled in the Hexnode portal, the user is offered the option to co-manage.
- Status: A co-managed device displays an Enrolled (Limited) status under Device Summary > Enrollment details. Available data is confined to Device Summary, Device Info, Applications, Device Groups, and Action History.
Step 1: Enable Co-management in Hexnode Portal
Before users can enroll, an administrator must enable the feature in the enrollment profile.
- Log in to your Hexnode UEM console.
- Navigate to Enroll > Platform-Specific > Windows PCs & Tablets > Information.
- Under Enrollment profile, select an existing profile and click View.
- Go to General Settings and locate the Co-management section.
- Click the Enabled button.
Step 2: Enrollment Instructions for the User
Once enabled, the user can initiate co-management directly from the device:
- Open a web browser on the Windows device and enter your organization’s enrollment URL.
- Click Download to get the Hexnode Installer app.
- Open the downloaded file to install the app.
- Launch the app and tap Agree and Enroll (after reviewing the EULA).
- Click Proceed to initiate co-management.
- If Authenticated Enrollment is required, enter your credentials in the Authentication window.
- Follow the on-screen prompts to install the agent and complete the setup.

Remote Actions for Co-managed Devices
Even with limited enrollment status, Hexnode allows you to execute a wide range of remote actions on co-managed Windows devices:
Scanning: Scan Device, Scan for Updates, Scan for Apps , Scan Device Location.
Security: Lock Device, Wipe Device, Force BitLocker Encryption, Enable Lost Mode, Disable Lost Mode.
Management: Power off Device, Restart Device, Join/Unjoin AD Domain, Change Owner, Set Friendly Name, Change Ownership.
Application and User Management: Install Application, Uninstall Application, Create User Account, Sync Local Accounts .
Location: Enable Location Tracking, Delete Location History.
Utilities: Broadcast message, Execute Custom Script, Edit Device Attributes, Export Device Details.
Termination: Disenroll Device.
Advanced Co-management Features
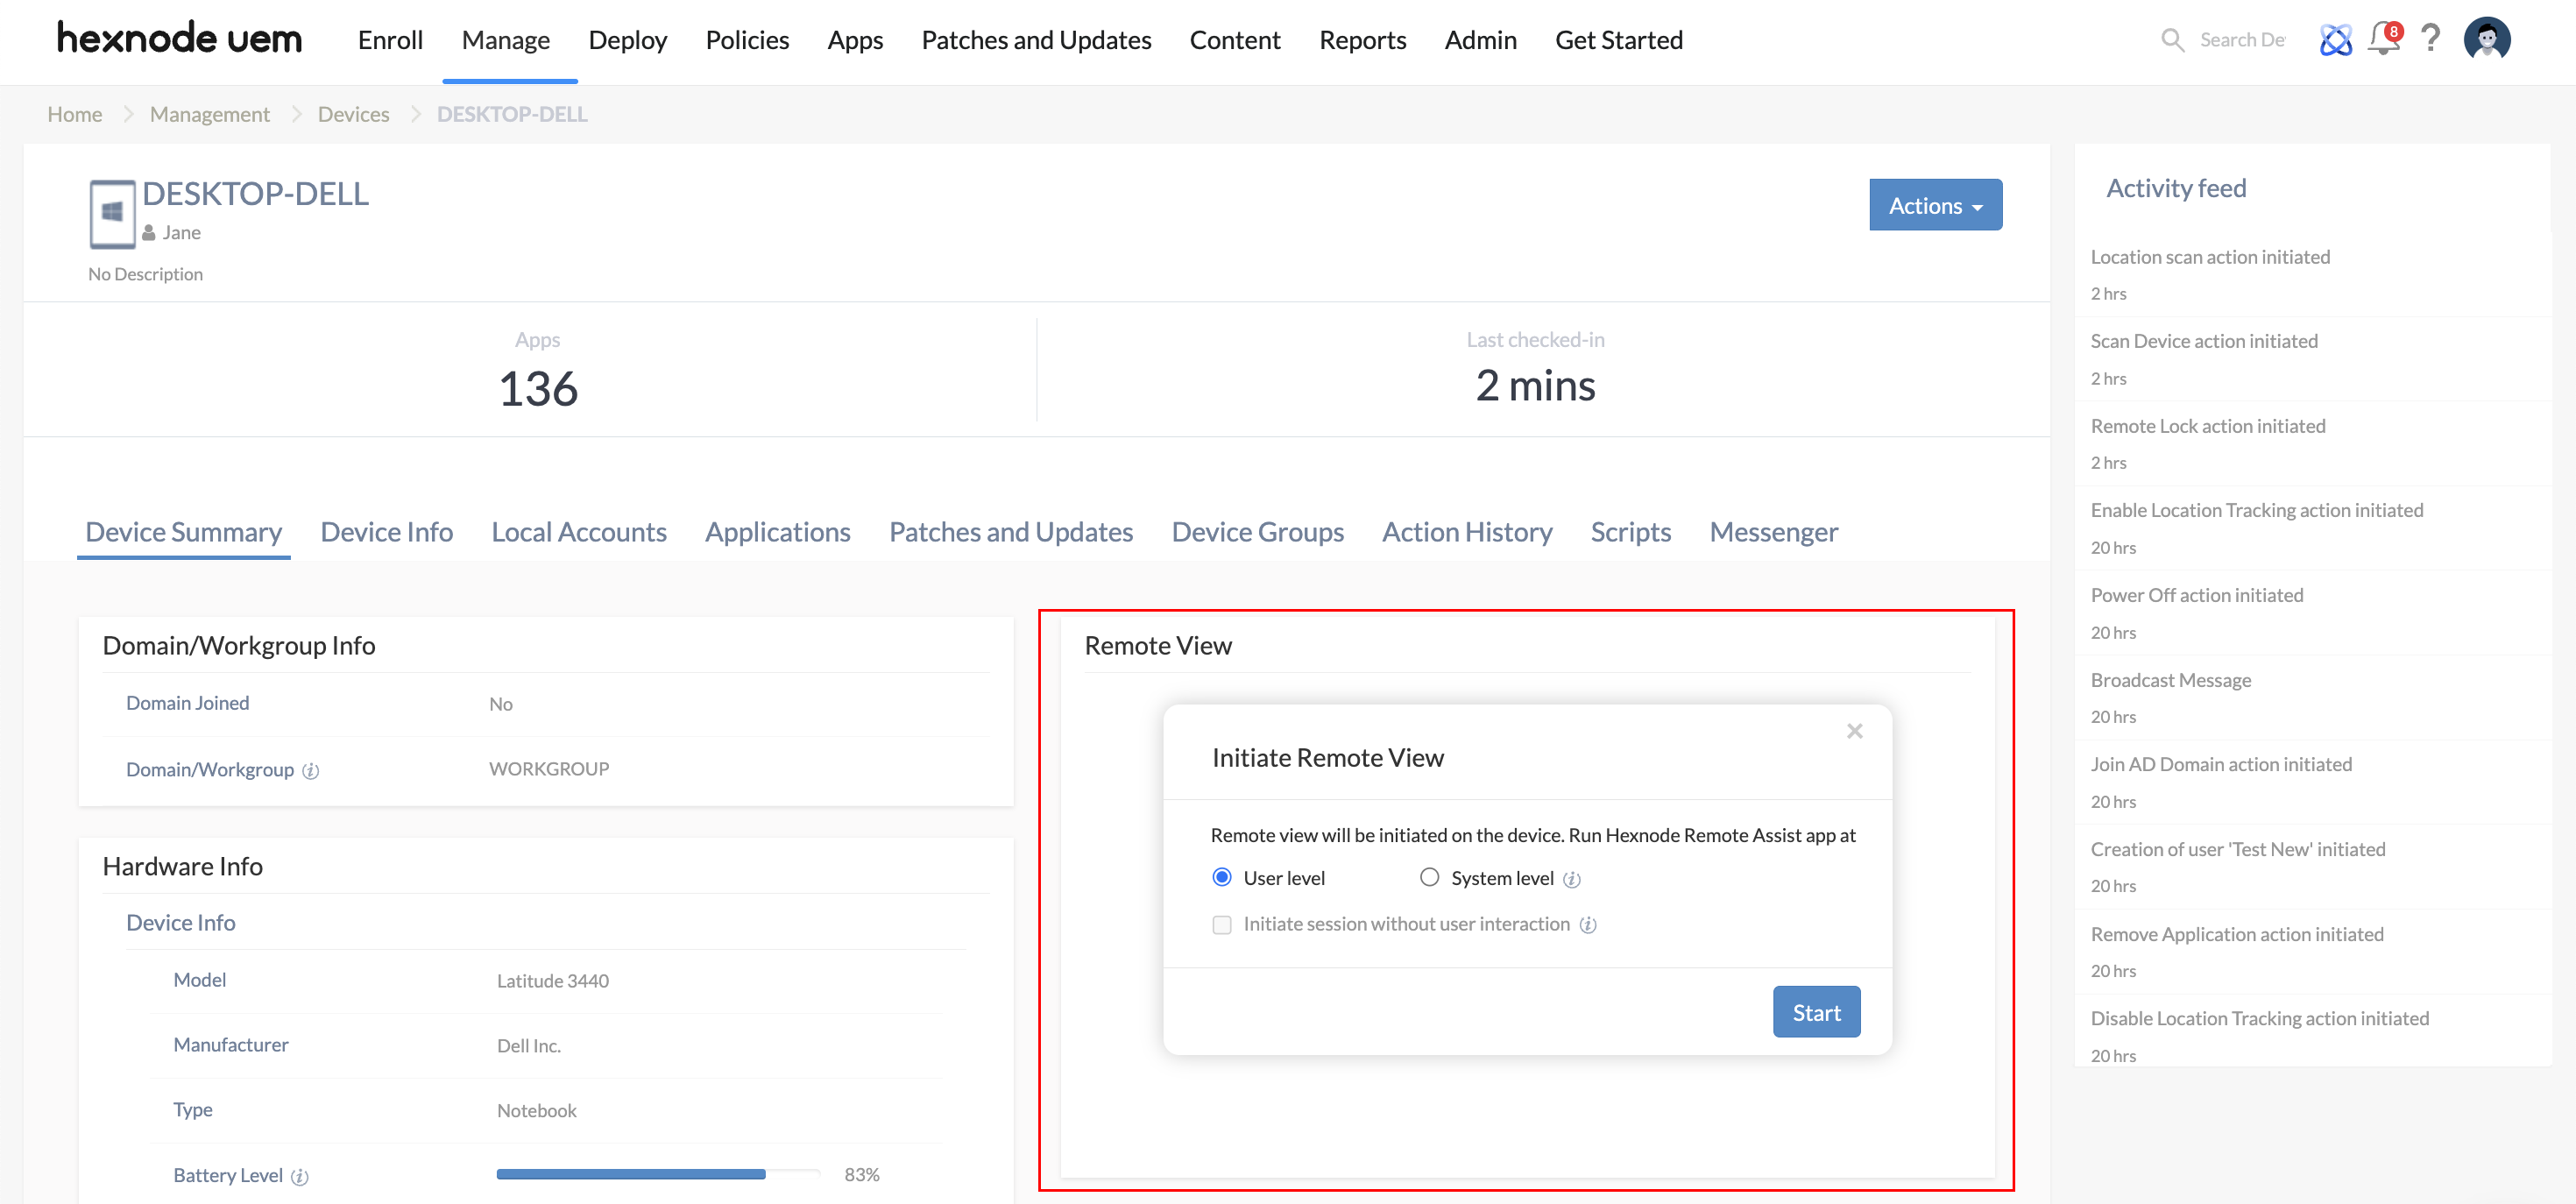
Remote View and Control
Hexnode enables real-time Remote View and Remote Control for co-managed devices. The Hexnode Remote Assist application, installed during enrollment, facilitates unattended remote access, allowing admins to view the screen and control the device directly from the portal.
Patch Management and Updates
Manage OS and application updates over-the-air via the Patches tab. You can monitor available updates and choose to deploy them either automatically or manually.
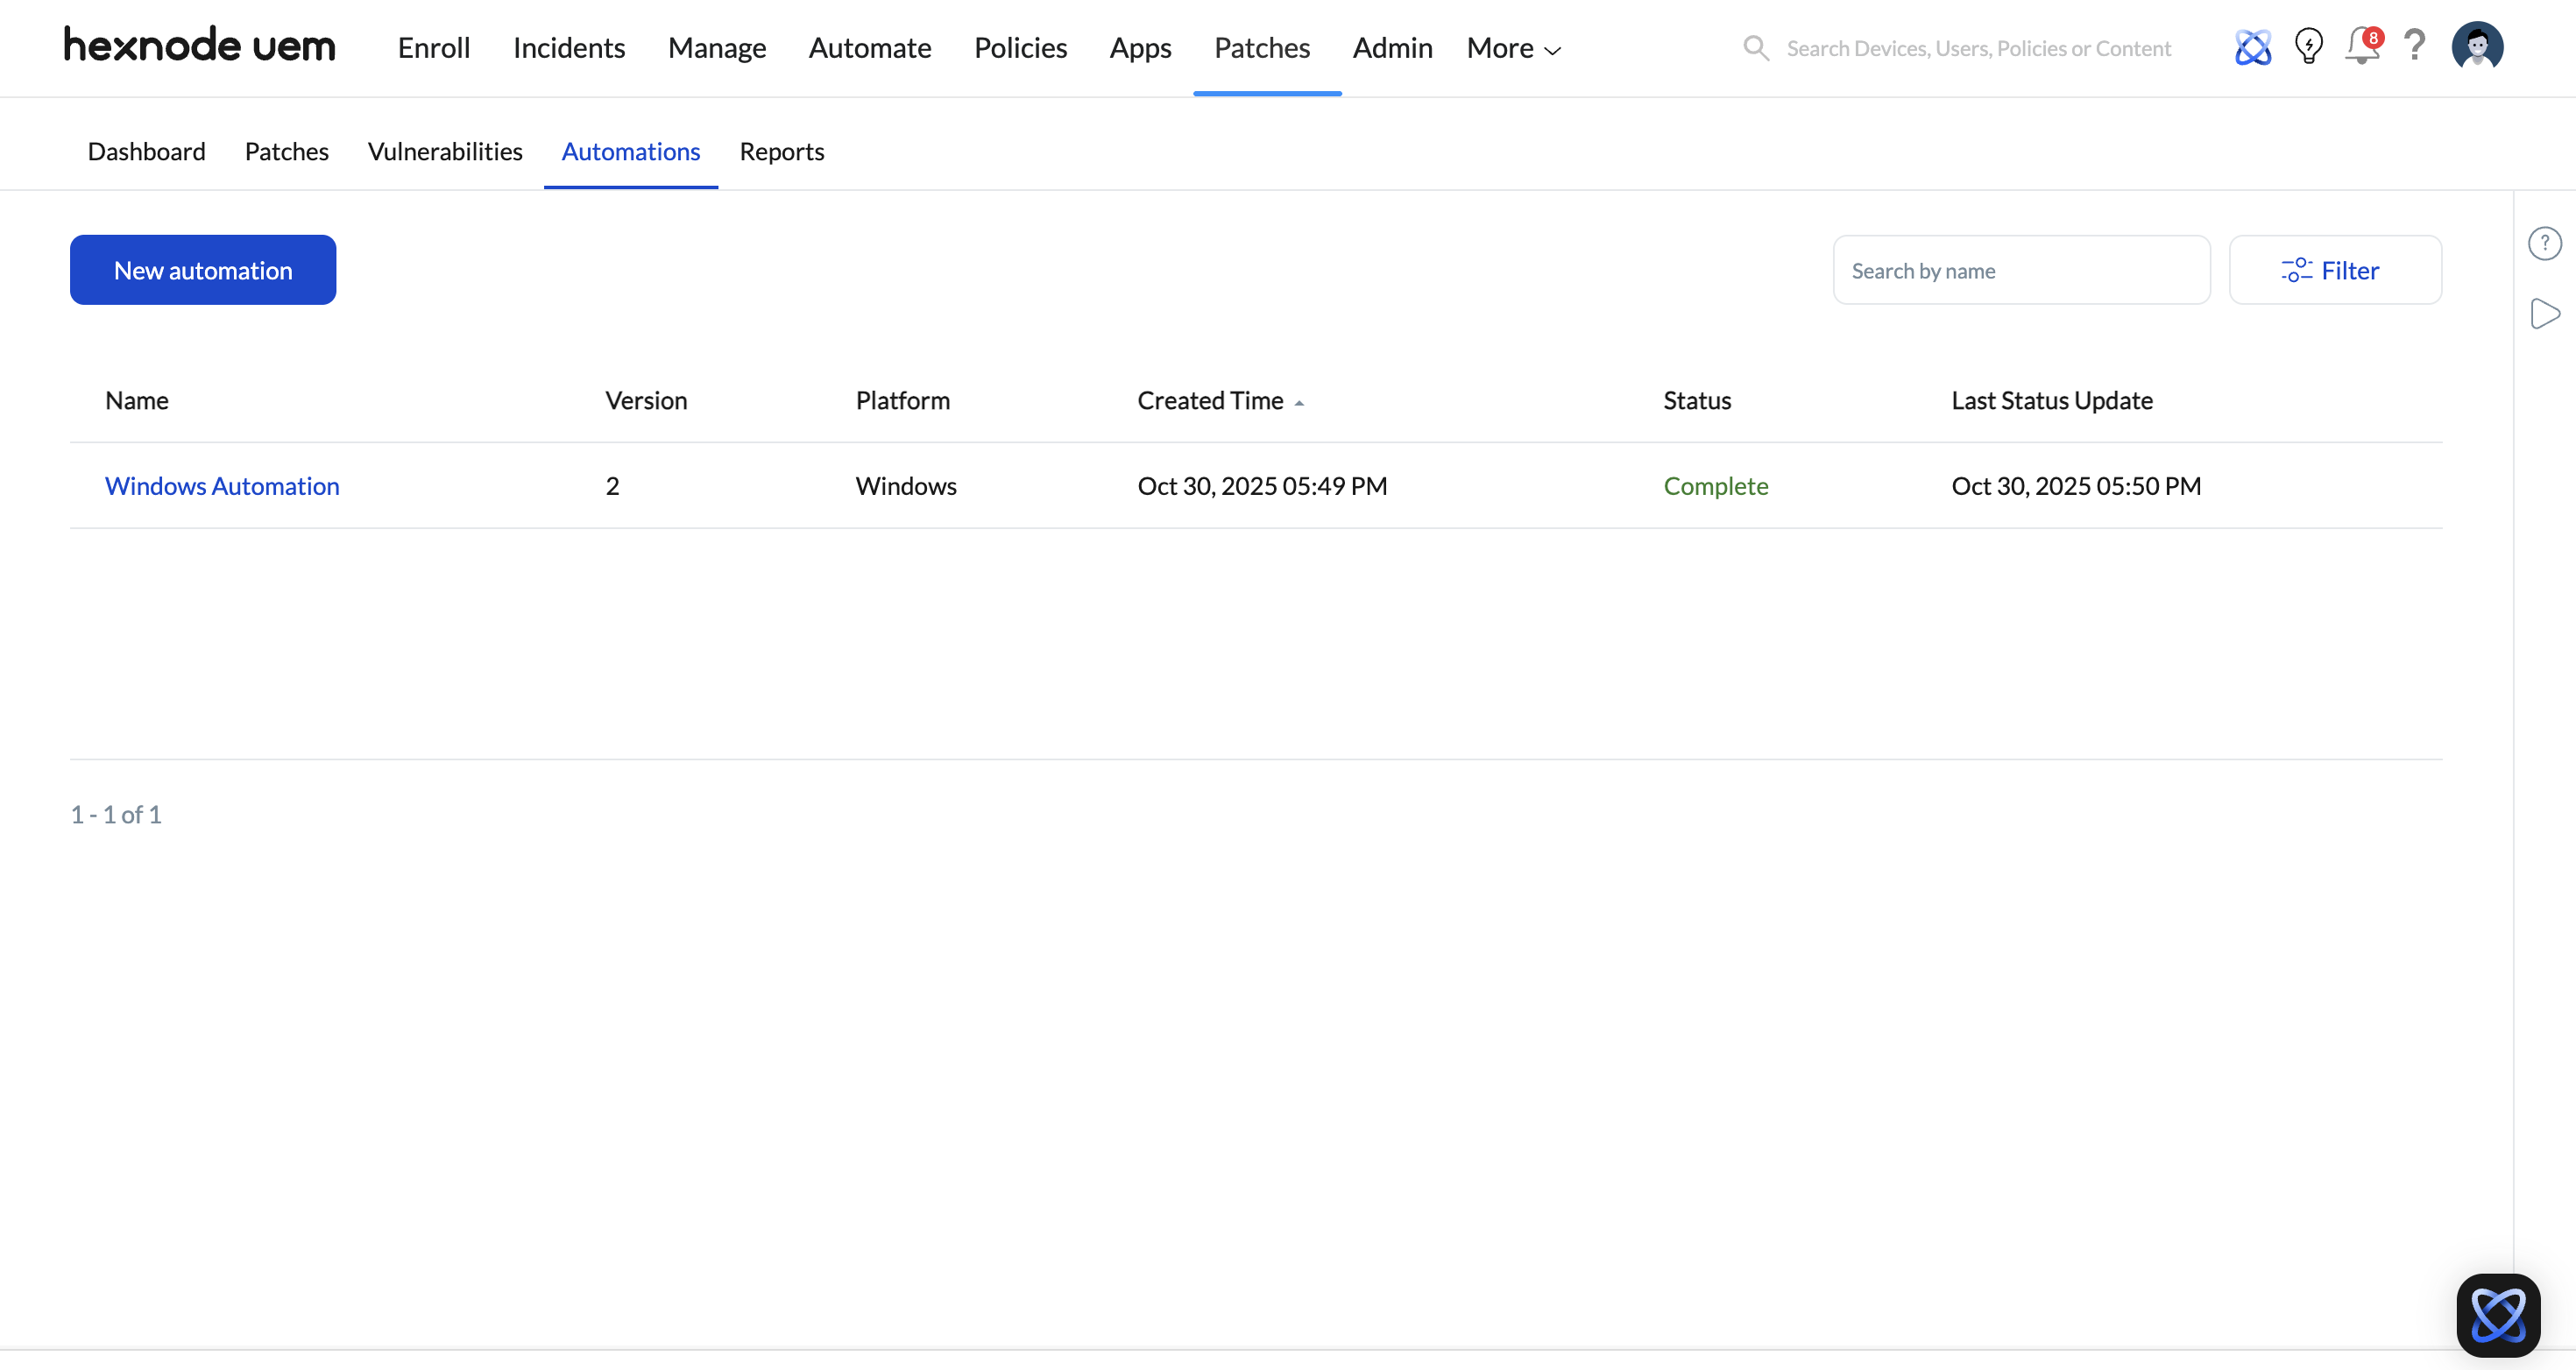
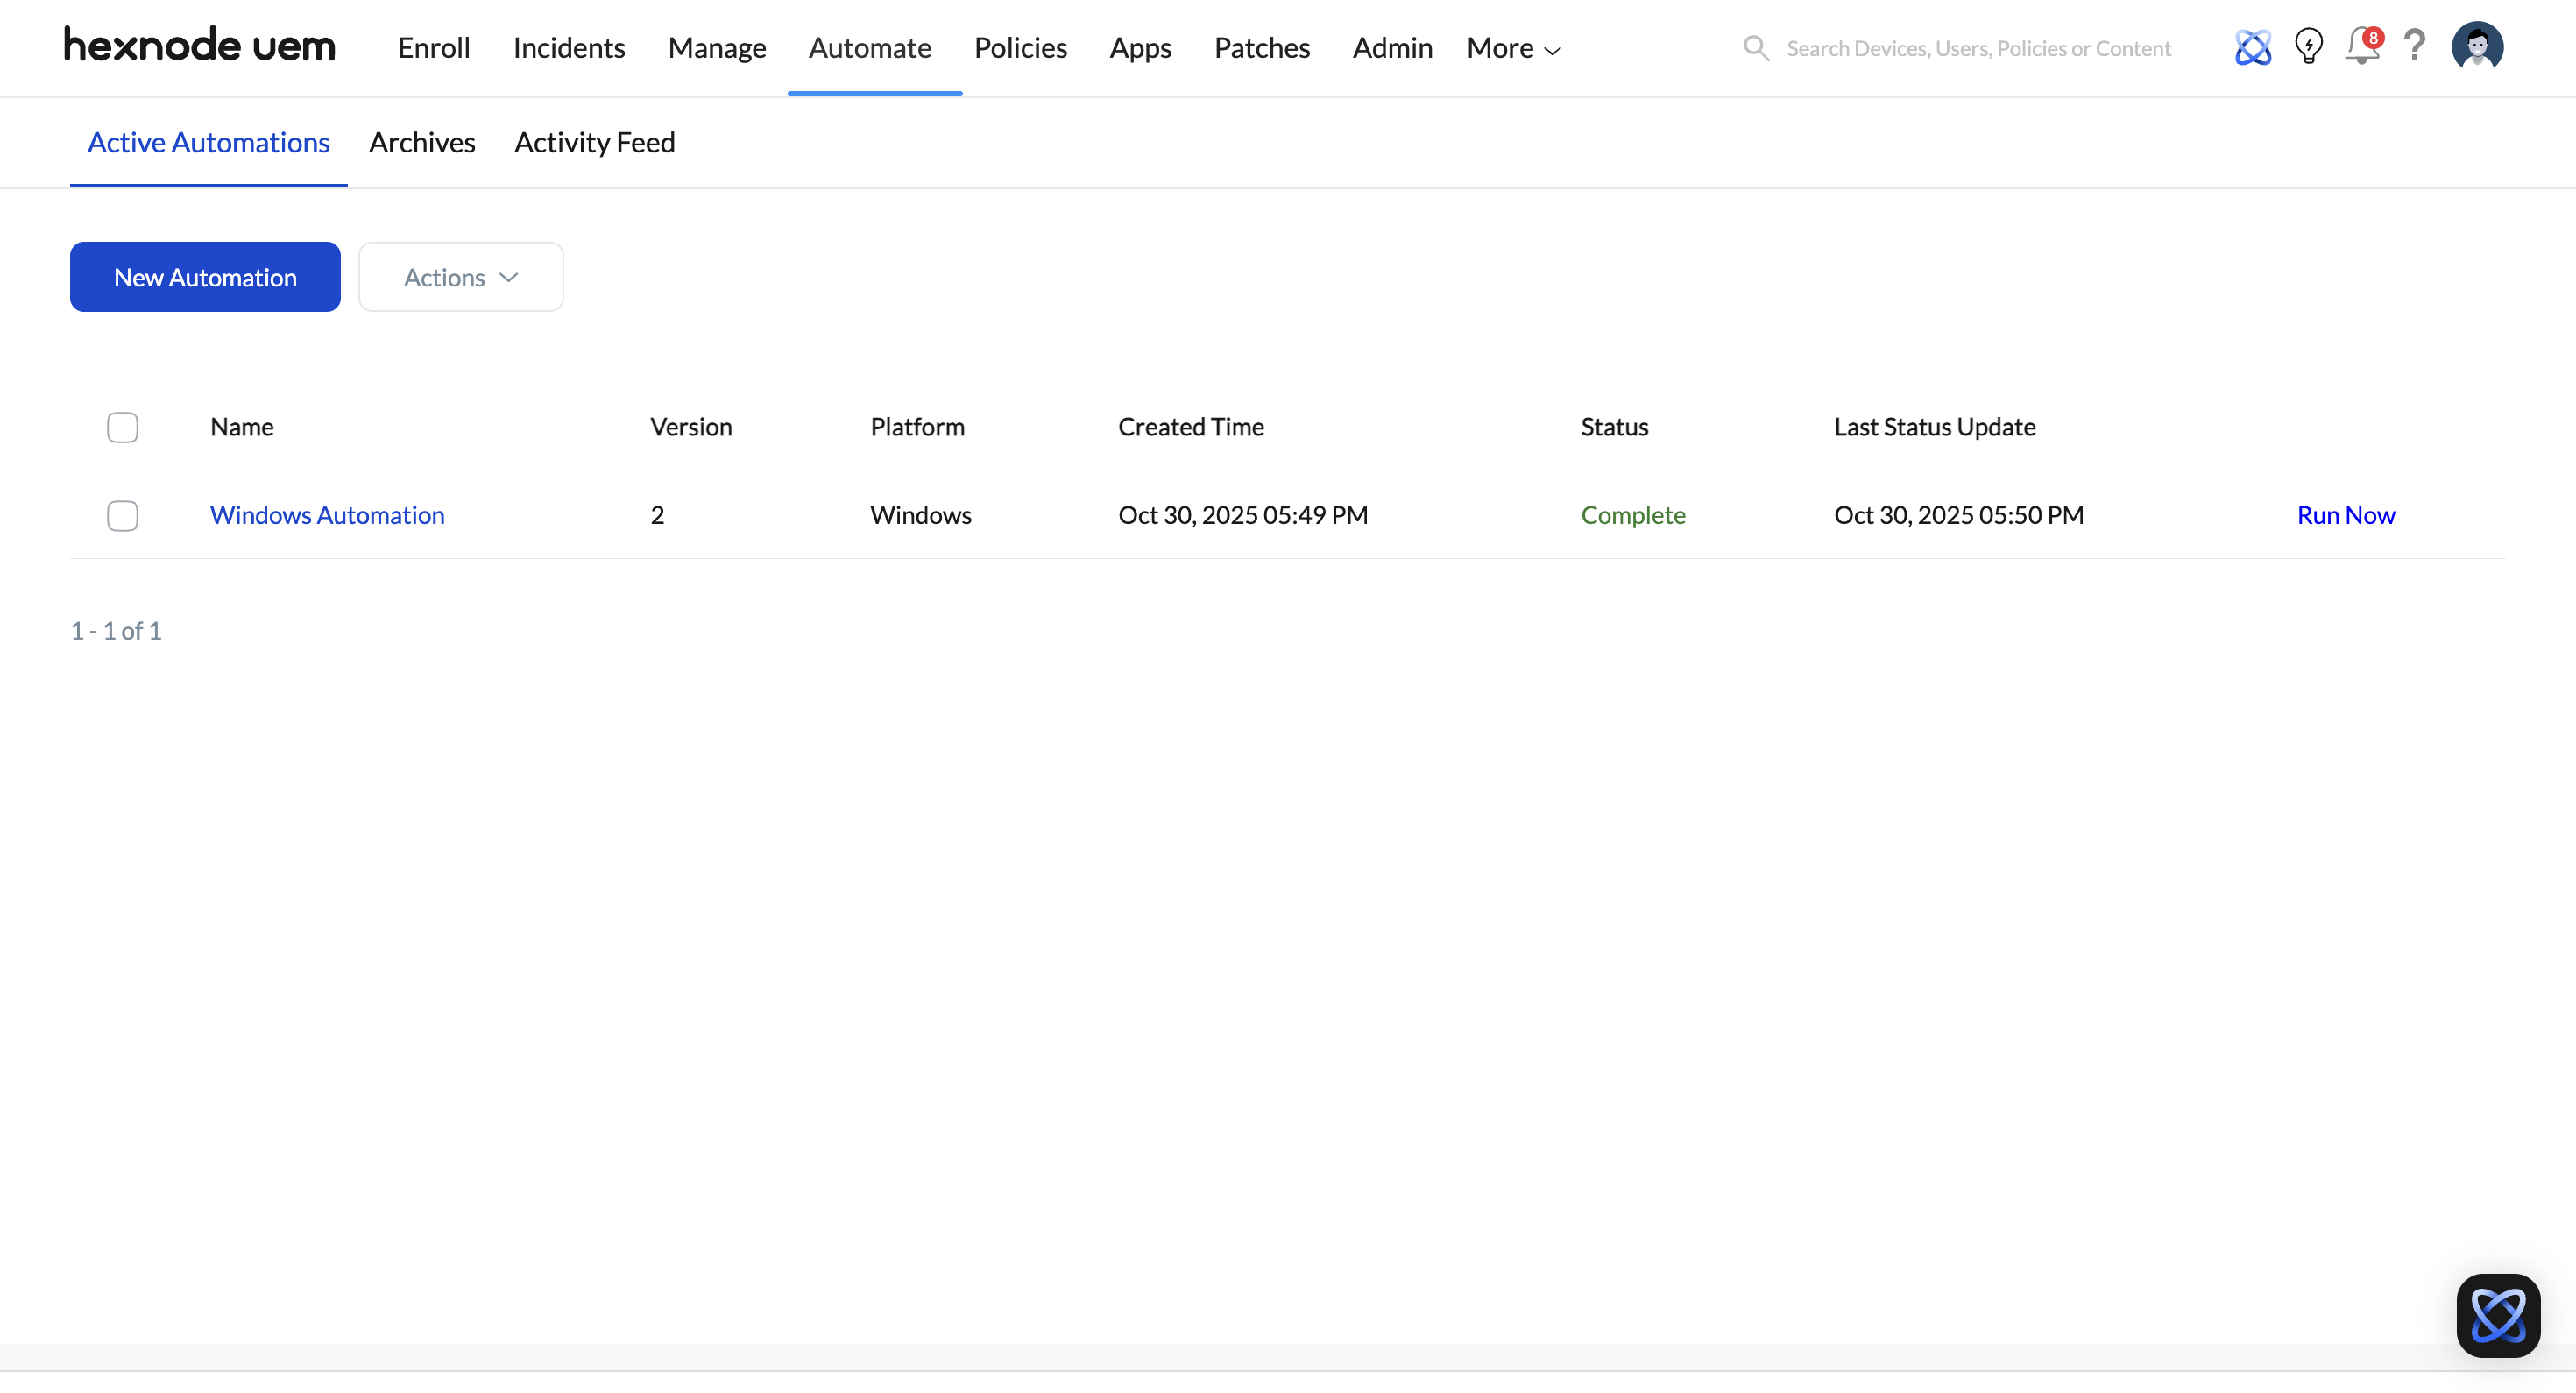
Automation
Schedule bulk actions or trigger deployments based on device behavior (e.g., enrollment or compliance status) via the Automate tab. Supported automated actions include:
- Execute Custom Script
- Scan Device
- Sync Local Accounts
- Scan Device Location
- Broadcast message
- Power off Device
- Restart Device
- Lock Device
- Enable Lost Mode
- Disable Lost Mode
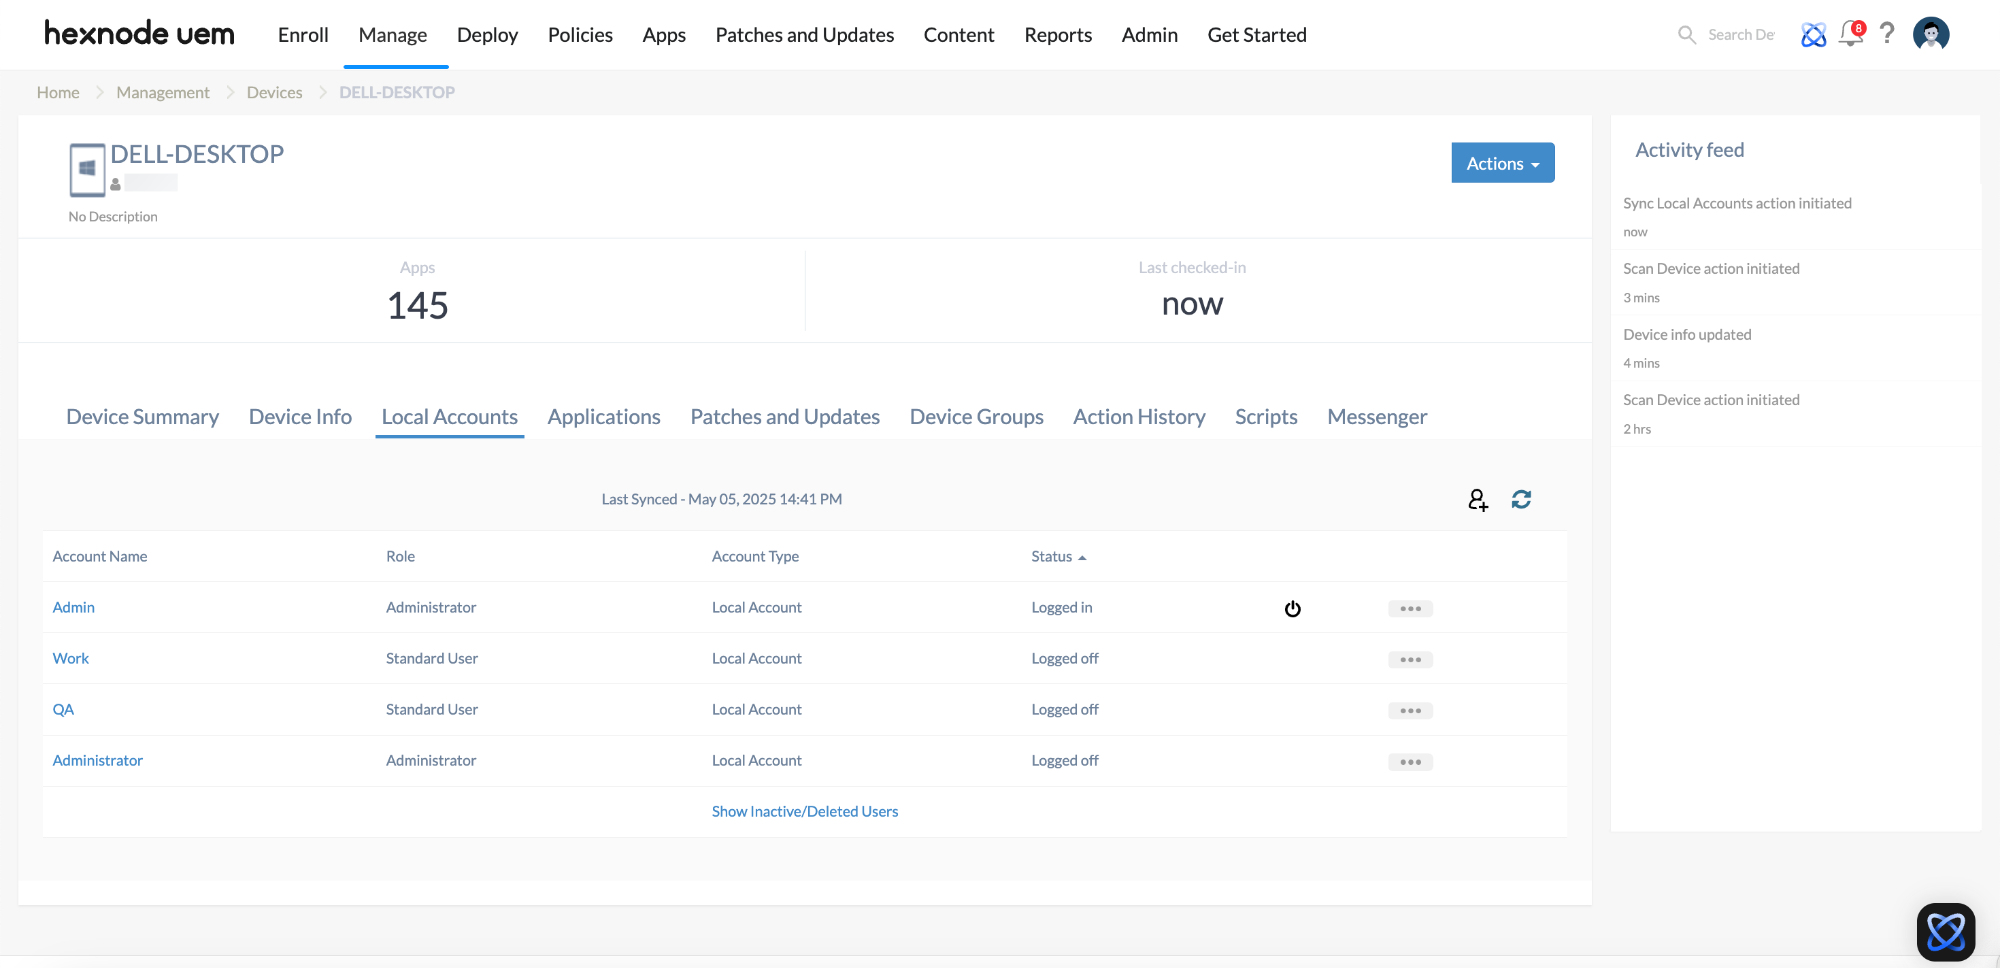
Local User Account Management
Manage local accounts via the Local Accounts sub-tab. Capabilities include:
- Create new user accounts
- Change password
- Change user role to standard user or administrator
- Sync user accounts with the Hexnode portal
- Disable/enable user accounts
- Delete user accounts
- Force logout a user
To ensure the Hexnode portal reflects the most current user data, execute the Sync Local Accounts remote action on the device.
Once synchronized, you can view and manage these accounts via the portal:
- Navigate to the specific Device Details page of the co-managed device.
- Select the Local Accounts sub-tab.
Policies supported on Co-Managed Devices
Configure and deploy essential device settings, security protocols, and app management rules directly through the Policies tab. Hexnode lets you configure the following policies:
App Management: App Catalog
Security: Hexnode Access, Hexnode LAPS
Configurations: Scripts, Wallpaper, Screensaver, Browser Settings, Self Service
Patches & Updates: Windows Update Experience (Patch maintenance window, and active hours configuration), App Updates
Tracking & Fencing: Geofencing
Troubleshooting: Unattended Remote Access
Customizations: Hexnode App Settings
Hexnode Settings: DAFS
Migration: Fully Enrolling a Co-Managed Device
To unlock all Hexnode features, you may wish to transition from co-management to full enrollment. This requires removing the previous UEM vendor.
1. Remove Existing MDM
- Open Settings on the Windows device.
- Navigate to Accounts > Access work or school.
- Select the account associated with the current (third-party) MDM vendor.
- Click Disconnect.
2. Re-enroll in Hexnode
Rerun the Hexnode Installer or initiate enrollment.
- No Authentication: The device fully enrolls and is assigned to the current user. Admins can change the owner later.
- Enforce Authentication: The device fully enrolls and assigns to the existing owner only if the same user authenticates. If a different user authenticates, enrollment will fail.
Frequently Asked Questions (FAQs)
Q1: When will Co-management enrollment fail?
Co-management will fail in the following instances:
- Disabled Feature: If Co-management is disabled in the Admin tab of the portal.
- Existing Hexnode Enrollment: If the device is already enrolled in another Hexnode portal.
- Same Portal Conflict: If the device is already fully enrolled in the current Hexnode portal. You must disenroll it first before attempting to co-manage.
Troubleshooting
1. The user is unable to download the Hexnode Installer application when using the enrollment URL (e.g., /enroll).
Symptom: The download fails, and the user encounters the following error message:
“According to your corporate policy, only the following device types can be enrolled and can access the corporate resources: iPad, iPhone, iPod, macOS, tvOS and Android. Contact your company’s IT administrator for more information.”
Cause: Enrollment restrictions are active in the Hexnode portal, and Windows has not been selected in the list of Allowed Device Models. Consequently, the system blocks the download for Windows devices.
Resolution:
- Log in to the Hexnode UEM portal.
- Navigate to Admin > Enrollment > Enrollment Restrictions.
- Locate the Device Models allowed list.
- Check the box next to Windows to allow enrollment for this platform.
- Save the policy and retry the download.
