Category filter
iOS Supervised Mode
What is iOS Supervision?
Supervision is a specialized mode for institutionally owned iOS devices that grants administrators deeper control over device configurations. It unlocks advanced restrictions, enables silent app installations, and supports specific features like Autonomous Single App Mode (Kiosk) and Global Proxy that are unavailable on unsupervised devices.
Why supervise iOS devices?
Supervision is essential for corporate environments requiring strict compliance and automation.
- Silent Installations: Deploy apps without user interaction.
- Advanced Restrictions: Allowlist/blocklist apps, force web content filtering, and prevent account modification.
- Kiosk Mode: Lock a device to a single application.
- Global Proxy: Route all device traffic through a specific proxy server.
Methods to supervise iOS devices
There are two primary methods to enable supervision:
- Apple Configurator: Requires a Mac and a physical USB connection. Best for small batches.
- Automated Device Enrollment (ADE) / Apple Business Manager (ABM): Entirely over-the-air. Best for bulk deployments and “zero-touch” configuration.
Method 1: Supervision via Apple Configurator 2 (Mac Only)
This method involves physically connecting devices to a Mac.
Step 1: Create a Wi-Fi Profile
- Open Apple Configurator.
- Navigate to File > New Profile.

- Enter a profile name. Set Security Type to “With Authorization” and provide a password. Also, set Automatically Remove Profile to “Never”.

- Select Wi-Fi from the left menu and click Configure.

- Enter the Service Set Identifier (SSID) and select Auto Join.
- Configure Proxy Setup and Security Type.
- Enter the Wi-Fi password.
- Select Network Type as Standard.

- Go to File > Save to save the profile.


Step 2: Create a Blueprint
- Click File > New Blueprint.

- Name the blueprint.

- Select the new Blueprint and click Add > Profiles, select the Wi-Fi profile created in Step 1, and click Add.


Step 3: Prepare the Device
- Select the Blueprint and click Prepare.
- Set Configuration type to Manual and click Next.

- Select New server and click Next.

- Enter the Server name and Server URL:

- Go to Hexnode portal: Enroll > Platform-Specific > iOS > Apple Configurator.

- Copy the URL from the portal and paste it into Apple Configurator, and click Next.

- Go to Hexnode portal: Enroll > Platform-Specific > iOS > Apple Configurator.
- Anchor certificates are added automatically. Click Next.


- Enter organizational details to create an organization and click Next.

- Select Generate a new supervision identity and click Next.

- Choose which iOS Setup Assistant steps to show or hide, then click Prepare.


Step 4: Apply Blueprint
- Connect the iOS device to the Mac via USB.
- In Apple Configurator, right-click the device.
- Select Apply > [Your Blueprint Name].

- Click Apply.


- Result: The device will reboot with MDM enrollment, Wi-Fi, and Supervision settings applied.

Method 2: Supervision via Automated Device Enrollment (ADE)
This method automates supervision over-the-air during the initial device setup (out-of-the-box experience). It requires the organization to be enrolled in Apple Business Manager (ABM) or Apple School Manager (ASM).
Step 1: Configure ADE Profile in Hexnode
- Log in to Hexnode UEM.
- Navigate to Enroll > All Enrollments > No-Touch > Apple Business/School Manager > Enrollment Profiles.
- Select Create Enrollment Profile.
- Configure the parameters in the enrollment profile.
- Click Save.
Step 2: Create an ADE Account (Link Hexnode to ABM)
- On the Hexnode UEM portal, go to Enroll > All Enrollments > No-Touch > Apple Business/School Manager.
- Click Add ADE Account.
- Enter an Account Name and download the certificate file (Hexnode_Apple_DEP_cert.pem).
- Log in to Apple Business Manager.
- Go to Preferences > MDM server assignment > Add MDM Server.
- Upload the Hexnode certificate (public key) and click Save.
- Click Download Token to get the server token.
- Return to Hexnode and upload the token in the Upload ADE server token field.
- Optionally, you can enable Add as Pre-approved device to pre-approve the ADE devices that you want to enroll using Hexnode.
- Select the Default Configuration Profile. Either use the default ADE profile or choose another from the dropdown.
- Configure the User Authentication Mode:
- Use global authentication settings: Follows the settings under Admin > Enrollment > Authentication Modes.
- No authentication: Allows enrollment without user verification; specify the user to assign the device to.
- Domain: Choose the directory domain (Hexnode local or an integrated directory).
- Default user: Assigns all ADE devices in this account to the selected user in that domain.
- Click Next to finish.
- Use global authentication settings: Follows the settings under Admin > Enrollment > Authentication Modes.
- No authentication: Allows enrollment without user verification; specify the user to assign the device to.
- Domain: Choose the directory domain (Hexnode local or an integrated directory).
- Default user: Assigns all ADE devices in this account to the selected user in that domain.
Step 3: Assign Devices to the MDM Server
Once the ADE configuration is complete, you can assign Apple devices individually or in bulk to the device management server.
Individual Device Assignment
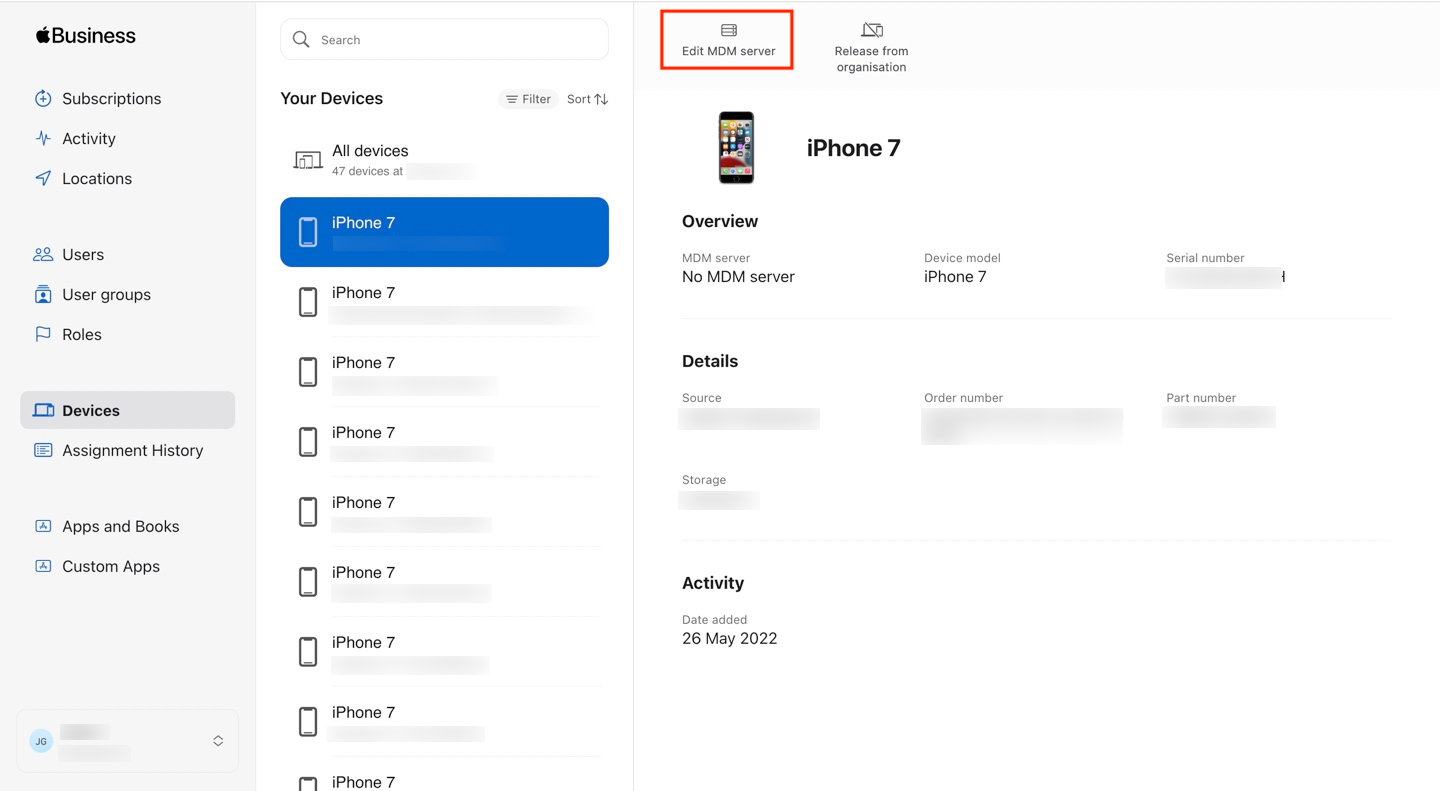
- On the Devices page, select the device to assign, and click on Edit MDM server.
- In the dropdown, choose Assign to the following MDM and select the desired server. Click Continue.

- Click Confirm to finalize the assignment.
Bulk Device Assignment
Option 1: Manually select devices
- On the Devices page, hold the Command key (Mac) or Control key (Windows) to select multiple devices.

Option 2: Apply Filters
- Use filters like Device Management, Source, Order number, Device type, and Storage size to narrow down your device list.
- Click Filters below the search bar, select the criteria, and click Search.

- From the filtered list, select All devices or individual devices.

- Click Edit next to Edit MDM server.

- Select Assign to the following MDM from the dropdown and choose the MDM server.

- Click Continue, then click Confirm to assign the devices to the management server.
The assigned device details, including order number, MDM server, assignment date, and device type, will be visible in the Assignment History.
Step 4: Sync Devices with Hexnode
Devices added to the Hexnode-specific MDM server in the Apple Business Manager (ABM) portal need to be synced with Hexnode. This process imports information about newly added devices into the integrated ADE account.
- On the Hexnode UEM portal, go to Enroll > All Enrollments > No-Touch > Apple Business/School Manager > Accounts.
- Click Sync all ADE accounts.
- Verification: Check Devices to see the synced list. To filter devices by a specific ADE Account, change the device filter from All Devices to the desired ADE Account.
Renew ADE Server Token
The ADE server token is valid for one year. After the token expires, there is no need to upload a new public key to Apple ADE, as the public key is permanently stored. To renew the token, simply click Generate new token.
Device End-User Experience
- New/Wiped Devices: Upon boot and internet connection, the device detects the ADE profile. It will automatically enroll in Hexnode and apply Supervision settings.
- Provisional Period: Devices added to ABM manually (via Apple Configurator) have a 30-day provisional period. Users can remove management via Settings during this time. After 30 days, management can become permanent.
- Renewing Token: The ADE server token expires yearly. Use Generate new token in ABM and upload it to Hexnode to renew without re-enrolling devices.

When the user opens the Settings app, a banner will appear showing your organization’s name, along with a link to the Device Supervision manual.
