Category filter
How to enroll iOS devices?
Before enrolling an iOS device, please make sure that you have configured the APNs certificate in your server. This is a mandatory requirement for Apple device management.
Available Enrollment Methods
- Enrollment without authentication
- Email/SMS enrollment
- Self enrollment
- Apple Configurator enrollment
- DEP enrollment
- DEP enrollment using Apple Configurator
- Google Workspace Enrollment for iOS.
- User Enrollment
1. Enrolling iOS devices without Authentication
This method allows users to enroll devices without entering specific credentials, using only the portal’s enrollment URL.
- Open the Safari browser and enter your enrollment URL: https://
.hexnodemdm.com/enroll/. - On the enrollment screen, agree to the terms and conditions and click Enroll.
- Allow the prompt to download the configuration profile.
- Install the Profile:
- iOS 15+: Navigate to Settings > General > VPN & Device Management.
- Below iOS 15: Navigate to Settings > General > Profile.
- Select Profile Service under the Downloaded Profile tab.
- Click Install, then select Trust to allow remote management. Click Done when finished.
-
Hexnode UEM App Installation:
- Below iOS 15: The app installs automatically.
- iOS 15+: A prompt will appear; click Install.
- Open the app and grant permissions for location, camera, microphone, photos, and notifications. Click Agree & Continue.
2. Email or SMS Enrollment
Authenticated enrollment can be enabled under Admin > Enrollment on the Hexnode UEM console. Enrollment with authentication delivers an enrollment request via email or SMS to the users which includes the enrollment URL, username, password, and a QR code.
Once the enrollment credentials are received:
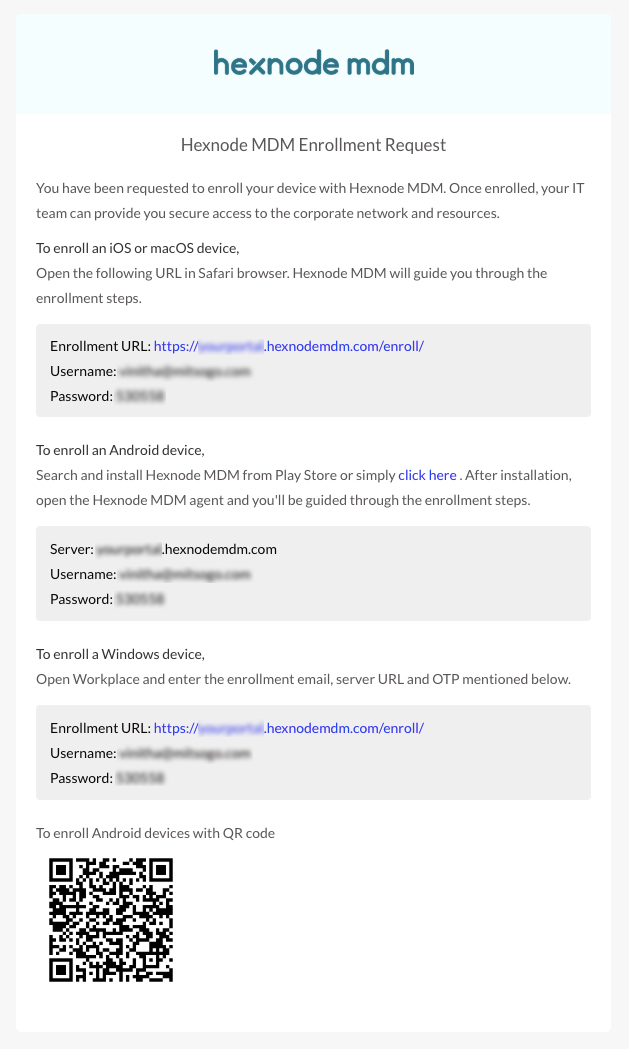
- Open the Safari browser and enter the enrollment URL. It would look something like this: https://
.hexnodemdm.com/enroll/. - This will take you to the enrollment screen. Enable the checkbox to agree with the terms and conditions and click Enroll.
- Enter the username and one-time password specified in the enrollment request and click Authenticate.
- Provide the necessary permissions to allow the profile download.
- Install the Profile: After the profile gets downloaded, the navigation depends on your iOS version:
- For devices running iOS 15+: Navigate to Settings > General > VPN & Device Management.
- For devices running iOS versions below 15: Navigate to Settings > General > Profile.
- Choose Hexnode UEM under the DOWNLOADED PROFILE tab.
- Click Install to install the configuration profile and certificate.
- Click Trust to allow remote management.
- When the profile is installed, click Done.
App Installation & Permissions:
- Hexnode UEM App Setup:
- For devices running iOS 15+: A prompt will be shown to install the Hexnode UEM app. Click Install.
- For devices running iOS versions below 15: The Hexnode UEM app will start installing automatically once enrollment is complete.
- Once the app is installed, open it and allow the UEM to access the location, camera, microphone, and photos, and enable it to send notifications.
- After allowing the permissions, click Agree & Continue.
3. Self Enrollment
Self-enrollment is a type of authenticated enrollment where users enroll their devices using their preassigned passwords (for local users) or their directory credentials (for AD, Microsoft Entra ID, Okta, and Google users). Unlike other methods, users will not receive a specific enrollment request email or SMS if they opt for self-enrollment.
Enrollment Process:
- Access your enrollment URL through the Safari browser. The URL will look something like https://
.hexnodemdm.com/enroll/. - On the enrollment screen, enable the checkbox to agree with the terms and conditions and click Enroll.
- Authentication: Select your domain or choose to authenticate via Microsoft, Google, or Okta.
- Enter your username and password, then click Authenticate.
- Provide the necessary permissions to allow the profile download.
Installing the Profile:
- Once the profile is downloaded, follow the path based on your device’s OS version:
- For devices running iOS 15+: Navigate to Settings > General > VPN & Device Management.
- For devices running iOS versions below 15: Navigate to Settings > General > Profile.
- Choose Profile Service under the DOWNLOADED PROFILE tab.
- Click Install to install the configuration profile and certificate.
- Click Trust to allow remote management.
- When the profile is installed, click Done.
Hexnode UEM App Setup:
-
App Installation:
- iOS 15+: A prompt will be shown to install the Hexnode UEM app. Click Install.
- Below iOS 15: The app will start installing automatically once enrollment is complete.
- Once the app is installed, open it and allow the UEM to access the location, camera, microphone, and photos, and enable it to send notifications.
- After allowing the permissions, click Agree & Continue.
4. UEM Enrollment with Apple Configurator
Apple Configurator is a macOS application that allows you to create configuration profiles and blueprints for iPad, iPhone, Apple TV, and iPod Touch. It is a powerful tool for deploying devices in a business or school environment.
System Requirement: Apple Configurator is only supported on devices running macOS 10.15.6 or later.
Step 1: Assign a User in the Hexnode Portal
Before connecting devices to your Mac, you must assign a user in the portal:
- Navigate to Enroll > Platform – Specific > iOS > Apple Configurator.
- Select a user from the list and click Save.
Note: You can change the assigned user later via Manage > [Device Name] > Actions > Change Owner.
Step 2: Configuration on the Mac
Create a Wi-Fi Profile
Devices need immediate internet access to complete enrollment.
- Open Apple Configurator.
- Go to File > New Profile > Wi-Fi > Configure.
- Enter your Wi-Fi details and save the profile.
Note: Ensure you configure the same Wi-Fi network that your Mac is currently using.
Create and Prepare a Blueprint
Blueprints act as templates that apply multiple settings to devices at once.
- Navigate to Blueprint > Edit Blueprints and create a new blueprint.
- Select the blueprint, click the Add button (or right-click > Add > Profiles), and select the Wi-Fi profile you just created.
- Click the Prepare button (or right-click > Prepare) and follow the wizard:
- Configuration: Select Manual configuration and click Next.
- Server: Select New Server. Provide a name and enter the Enrollment URL found in your Hexnode portal under Admin > Configurator Enrollment.
- Certificates: Once certificates are fetched, click Next.
- Organization: Select New Organization. You can choose to sign in to the Device Enrollment Program or click Skip.
- Identity: Provide organization details and select Generate a new Supervision identity.
- Setup Assistant: Choose which steps to show or skip during the device startup. Select “Don’t show any of these steps” for a faster setup.
- Click Prepare and enter your Mac’s admin password to finalize the blueprint.
Step 3: Apply the Blueprint to Devices
- Connect your iOS devices to the computer via USB.
- Click on Blueprints at the top, select your prepared blueprint, and click Apply.
- Warning: A prompt will appear stating the device could be erased or modified. Click Apply.
Note: If the device was previously prepared, click Erase to proceed.
- For devices below iOS 15: A prompt will appear on the device asking to apply or skip remote management. Select Apply Configuration and click Next.
Apple Account & Activation Lock: Ensure the device is not linked to an Apple Account before starting. If “Find My iPhone” is active, you will receive an “Unable to activate the device” error. Disable “Find My” in iCloud settings or remove the Apple Account via iTunes/Finder before applying the configuration.
Frequently Asked Questions (FAQs)
Q1. What is “Supervision,” and why should I enable it in Apple Configurator?
Supervision is a mode for corporate-owned devices that gives the MDM deeper control. It allows you to enforce stricter restrictions (like disabling the App Store or forcing a specific wallpaper) and perform remote actions like silent app installation that aren’t possible on standard devices.
Q2. Can I use my personal Gmail or Outlook account for Self-enrollment?
Self-enrollment is designed for organizational credentials. You must use the account associated with your company’s directory (e.g., AD, Microsoft Entra ID, Okta, and Google users) or a local user account created by your administrator in the Hexnode portal.
Q3. What should I do if the “VPN & Device Management” option doesn’t show the profile?
Ensure the profile download was successful. If it was, you have a limited window (8 minutes) to install the profile before iOS automatically deletes it. If it’s missing, return to the Safari enrollment URL and initiate the download again.
Troubleshooting Enrollment Errors
Issue 1: Device Type Restrictions
Probable Cause: The device type you are trying to enroll is currently restricted in your Hexnode workspace. Depending on the operating system, you may see one of the following error messages:
| Device Type | Common Error Message |
|---|---|
| iOS | “According to your corporate policy, only the following devices can be enrolled and can access the corporate resources… Contact your IT administrator for more information.” |
| iPadOS 13 | “A connection to the server could not be established.” |
| macOS | “Could not download the identity profile from the Encrypted Profile Service. The credentials within the Device Enrollment profile may have expired.” |
Solution: Update your enrollment restrictions in the Hexnode portal to allow the specific device type.
- Log in to the Hexnode portal and navigate to Enroll > Settings.
- Scroll down to Enrollment Restrictions > Device Models allowed.
- Select the checkbox corresponding to your device type (iPhone, iPad, or macOS).
- Click Save to apply the changes.
Issue 2: Existing MDM Profile Conflict
Description: Error message stating “The new MDM payload does not match the old payload” while enrolling an iOS device.
Probable Cause: The device likely already has an active MDM profile installed on it.
Solution: Remove the existing MDM profile from the device settings.
- On the iOS device, go to Settings > General.
- Scroll down and select VPN & Device Management.
- Tap Hexnode MDM (or the name of your previous MDM provider, if applicable).
- Scroll down and tap Remove Management.
Warning: Users cannot manually remove the existing MDM profile if:
- The profile was created by Apple Configurator and is password-protected.
- The device is currently enrolled through Apple’s Device Enrollment Program (DEP).
