Category filter
Windows Virtual Machine Enrollment UEM: Managing VMs with Hexnode
Virtualization is essential for testing and development, allowing you to run multiple operating systems on a single host. This guide explains how to perform virtual machine enrollment by setting up a Windows VM using VirtualBox and enrolling it in Hexnode UEM for remote management and monitoring. This method is often utilized as a workaround for managing Bring Your Own Device (BYOD) scenarios.
What is a Virtual Machine (VM)?
A Virtual Machine acts as a complete, separate computer running within a window on your physical (host) machine. VMs are “sandboxed,” meaning they are isolated from the host OS, preventing operations inside the VM from affecting the host system.
Phase 1: Create the Windows ISO File
To install the Windows OS inside the VM, you first need the Windows installation media as an ISO file.
- Download Tool: Download and run the official Media Creation Tool for either Windows 10 or Windows 11.
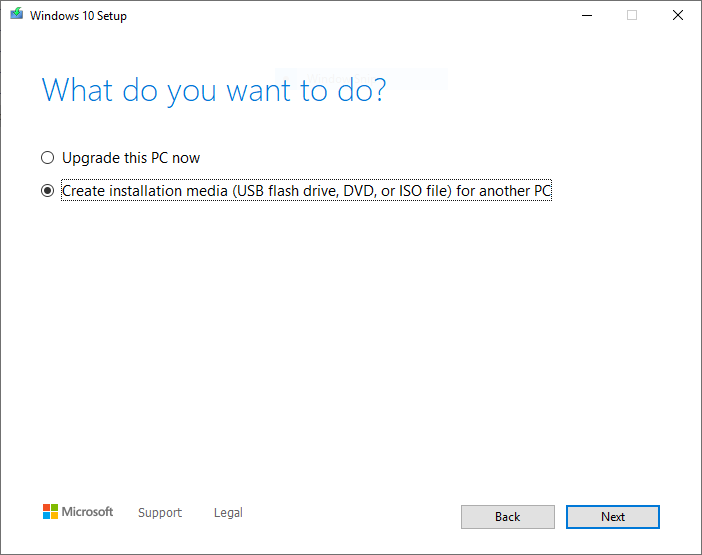
- Select Media Type: Choose the option Create installation media (USB flash drive, DVD, or ISO file) for another PC. Click Next.
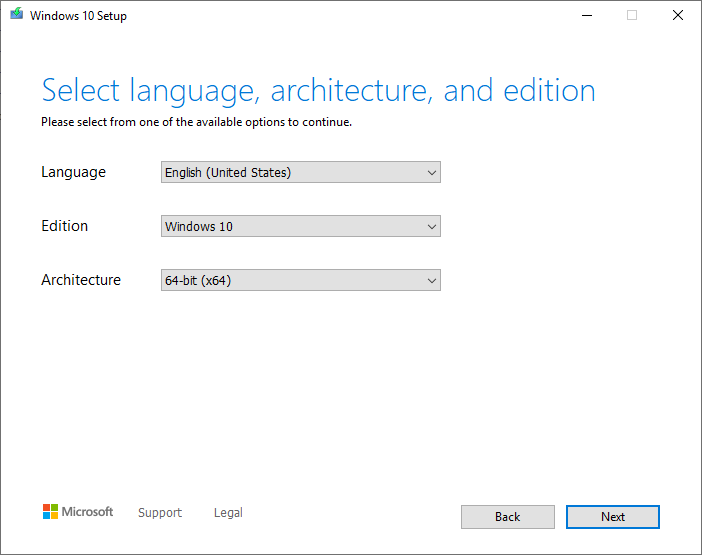
- Define Windows: Select your preferred language, edition, and architecture (32-bit/x86 or 64-bit/x64). Click Next.
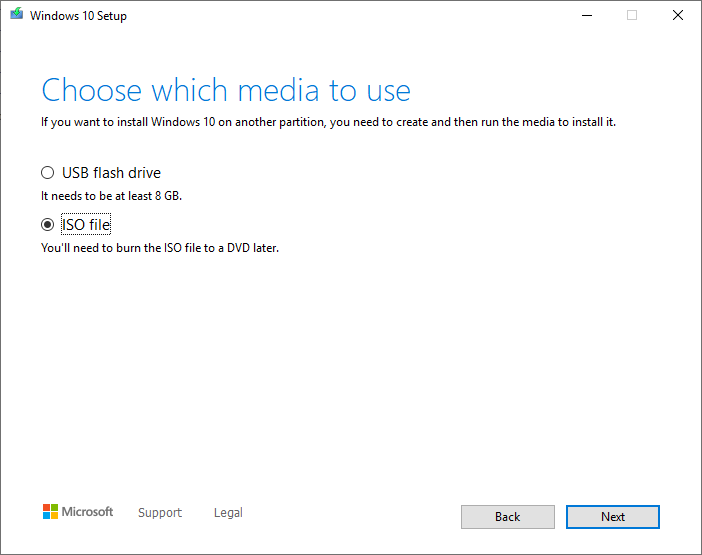
- Choose ISO: Select ISO file as the media type to use for installation. Click Next.
- Save: Choose a save location, and the Media Creation Tool will create the Windows ISO file.
Phase 2: Set Up and Install OS on VirtualBox
This guide uses VirtualBox, a popular, free VM program, though the principles apply to most VM apps.
2.1 Install and Create the Virtual Machine
- Download: Download and install the latest version of Oracle’s VirtualBox.
- Launch: Open the Oracle VM VirtualBox Manager.
- New VM: Click the New icon at the top of the window.
- Basic Settings: Provide the following:
- Name for the VM (e.g., Hexnode-Test-VM)
- Machine Folder location.
- Type and Version
Note: Ensure you use an x64 version for a 64-bit VM and an x86 version for a 32-bit VM.

- Memory (RAM): Allocate the accessible memory size for the VM. Click Next.
Note: Avoid allocating excessively high RAM values to prevent performance issues on the host computer.
- Hard Disk: Select Create a virtual hard disk now. Click Create.
- Disk File Type: Choose VDI (VirtualBox Disk Image). Click Next.
- Allocation: Select the desired allocation:
- Dynamically allocated: The file size grows as needed, up to the maximum limit.(Recommended)
- Fixed size: The hard disk file is created immediately at its maximum specified size.
- Finalize Disk: Provide a name and confirm the size of the virtual hard disk file. Click Create.
![]()


2.2 Install the Operating System
- Start VM: In the VirtualBox Manager, select the newly created VM and click Start.
- Select Startup Disk: In the ‘Select start-up disk‘ window, browse and choose the Windows 10/11 ISO file created in Phase 1.
- Launch Installer: Click Start to begin the Windows installation process. Follow the standard on-screen instructions for Windows setup (language, partitions, etc.).

Note: If the VM is incompatible with your PC, you may need to update your BIOS or disable Hyper-V on your host device.

Phase 3: Manage the Virtual Machine using Hexnode UEM
Virtual Machines (VMs) offer a flexible way to manage corporate resources on personal devices. Hexnode UEM can remotely manage VMs set up on personal computers, making it an effective Bring Your Own Device (BYOD) workaround.
- Enroll the VM: To establish the connection, enroll the Virtual Machine in the Hexnode UEM portal.
- Remote Management: Once enrolled, you can manage the VM remotely using Hexnode UEM.
For detailed enrollment instructions, please consult our guide on Enrolling Windows PCs.
Frequently Asked Questions (FAQs)
Q1. Can I enroll a VM created with VMware or Hyper-V?
Yes. While this guide uses VirtualBox, the underlying principle is the same. As long as the VM is running a supported Windows OS (Windows 10/11) and can access the internet, it can be enrolled in Hexnode UEM.
Q2. Does the VM require a separate Windows license?
Yes, generally, installing a full Windows OS (like Windows 10/11) in a VM requires a separate, valid product license key, just as a physical machine would.
Troubleshooting
1. Slow Performance in the VM
Symptom: The virtual machine feels slow or unresponsive, even though it appears to have adequate resources.
Cause: The VM does not have enough RAM allocated, or the host machine does not have enough free memory to support the assigned RAM.
Resolution: Close unnecessary applications on the host to free up resources. You can also increase the VM’s RAM allocation when creating it or later through the VM settings, provided the host has sufficient available memory.
