Category filter
How to enroll Android devices?
Enrolling Android devices into Hexnode UEM is the process of bringing smartphones and tablets under centralized management to enforce security policies and distribute apps. Hexnode supports multiple enrollment workflows categorized into Android Enterprise (AE) for advanced control and Standard Enrollment for basic management. The fastest manual method is QR Code enrollment, while Zero-touch and Samsung KME are used for automated, bulk deployments.
Enrollment Methodology Overview
Hexnode categorizes enrollment based on device ownership and management depth:
| Enrollment Type | Best For | Management Depth |
|---|---|---|
| Android Enterprise (AE) | Corporate & BYOD | High: Separate work profiles or full device control. |
| Standard Enrollment | Basic Security | Moderate: Standard MDM features (lock, wipe, apps). |
| Automated (ZTE/KME) | Bulk Deployment | Total: Out-of-the-box enrollment, non-removable MDM. |
Available Enrollment Methods
Choose the method that best fits your security requirements and device ownership model:
- Standard Enrollment:
- Advanced & Enterprise Enrollment:
- Automated (Zero-Touch) Enrollment:
Download the Hexnode UEM App
To begin enrollment, install the Hexnode UEM agent on your device:
Method 1: Enroll Android Devices Without Authentication
This is the fastest enrollment method. It requires only the server name, and no user credentials are needed. Devices enrolled this way are automatically assigned to a default user.
Steps to Enroll:
- Open the Google Play Store and install the Hexnode UEM application.
- Launch the app and enter your server name (e.g., <portalname>.hexnodemdm.com).
- You will be prompted to grant several system permissions. Tap Allow/Enable for each:
- Device Administration
- Usage Access
- Draw Over Apps
- Write System Settings
- Notification Access
- App Installation
- Finally, tap Allow on the pop-ups requesting access to Location, Storage, and Phone.
- The device is now enrolled.
Note: If the option Prompt to activate VPN is enabled in your portal (under Admin > General Settings > Data Restriction (Android)), you will see a prompt to activate a VPN connection during this process.
Method 2: Enroll Android Devices With Authentication
This method requires the user to verify their identity using credentials sent to them via email or SMS.
Steps to Enroll:
- Open the Google Play Store and install the Hexnode UEM application.
- Launch the app and enter your server name (e.g., <portalname>.hexnodemdm.com).
- Enter the Username and Password provided in your enrollment email or SMS.
- Tap Next.
- Grant the required system permissions:
- Device Administration
- Usage Access
- Draw Over Apps
- Write System Settings
- Notification Access
- App Installation
- Tap Allow on the pop-ups for Location, Storage, and Phone permissions.
- The device is now enrolled and assigned to the authenticated user.
Here is the optimized content for the Self Enrollment and QR Code Enrollment sections.
Method 3: Self Enrollment (Directory Credentials)
Self-enrollment allows users to enroll devices using their corporate credentials (Active Directory, Microsoft Entra ID, Google, Okta). For other users, the admin may create a default user and a dedicated password manually or assign a common password or individual passwords for the users and sends it to them as a bulk mail.
Steps to Enroll:
- Open the Google Play Store and install the Hexnode UEM application.
- Launch the app and enter your server name (e.g., <portalname>.hexnodemdm.com).
- Choose your authentication method based on your organization’s setup:
- Local Users: Tap Authenticate with Hexnode, select Domain as ‘Local’, and enter your username and password.
- Active Directory (AD) Users: Tap Authenticate with Hexnode, select your AD Domain from the dropdown, and enter your credentials.
- Note: If the domain is not selected, use the format NetBiosName\SAMAccountName. If the domain is selected, just use SAMAccountName.
- Microsoft Entra ID (Azure AD) Users: Tap Authenticate with Microsoft and sign in with your Entra ID credentials.
- Google Users: Tap Authenticate with Google and sign in with your Google Workspace credentials.
- Okta Users: Tap Authenticate with Okta and complete the on-screen login procedure.
- Tap Next.
- Grant the required system permissions:
- Draw Over Apps
- Usage Access
- Device Administration
- Tap Next and then Grant for any additional permissions.
- Tap OK and Allow on the pop-ups to grant access to GPS, Storage, and Phone.
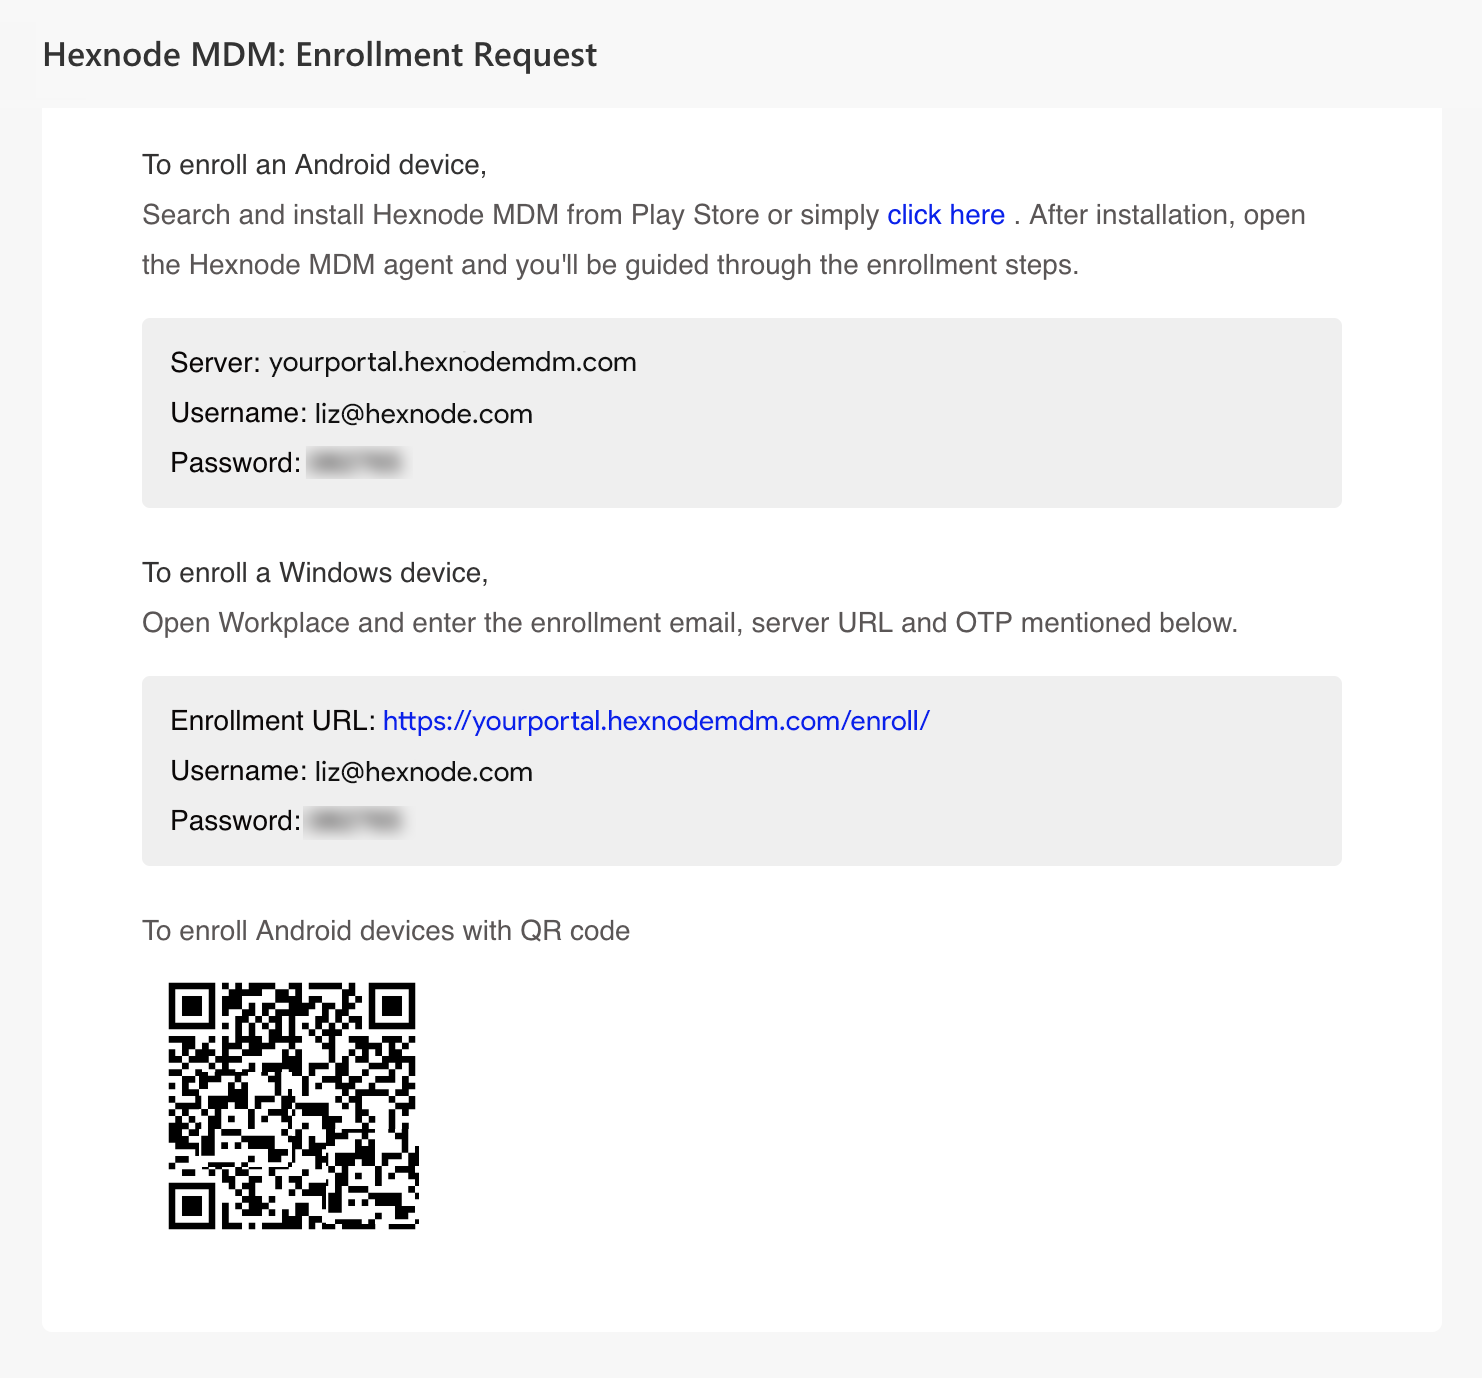
Method 4: QR Code Enrollment
QR Code enrollment simplifies the process by removing the need to manually type server names or usernames. Hexnode supports both Open Enrollment (Generic QR) and Authenticated Enrollment (User-Specific QR).
Option A: Open Enrollment (Generic QR Code)
This method uses a generic QR code available directly in the Hexnode console.
- Get the QR Code:
- Log in to your Hexnode UEM portal.
- Navigate to Enroll > Platform-Specific > Android > Android TV & Standard Device.
- Keep this screen open.

- On the Device:
- Download and open the Hexnode UEM app.
- Tap the QR Code icon located at the bottom left of the screen.
- Scan & Enroll:
- Scan the QR code displayed on your portal screen.
- Follow the on-screen instructions to complete the enrollment.
Note: You can also send this QR code to users via email, or send the Server Name via email/SMS for them to enter manually.
Support for Virtual Devices
Hexnode UEM also supports the enrollment and management of virtual Android devices (emulators). You can manage devices emulated using tools like BlueStacks, Android Studio, and Samsung Remote Test Lab using these enrollment methods.
Option B: Authenticated Enrollment (User-Specific QR Code)
In this method, a unique QR code is generated for a specific user and sent to them via email. This ensures that the device is automatically assigned to the correct user upon enrollment.
- Prerequisites
Before sending the request, ensure your portal is configured to support email authentication:
- Navigate to Enroll > Settings.
- Under Request Modes, check Email.
- Under Authentication Modes, check Enforce authentication.
- Click Save.
- Send the Enrollment Request
- Log in to your Hexnode UEM portal.
- Navigate to Enroll > Platform-Specific > Android TV & Standard Device.
- Set the Enrollment Request Mode to Email.
- Select the target user(s) from the list and click Send.
- The user will receive an email containing a unique QR code.
- Enroll the Device
- On the device, download and install the Hexnode UEM app from the Google Play Store.
- Open the app and tap the QR Code icon located at the bottom left of the screen.
- Scan the QR code found in the enrollment email.
- Tap Agree.
- Grant the required permissions:
- Device Administration
- Usage Access
- Draw Over Apps
- Write System Settings
- Notification Access
- Tap Next and Grant/Allow for any additional pop-ups.
- The device is now enrolled.
Note: This QR Code is for one-time use only. Once scanned and used for enrollment, it becomes invalid.
Device-Specific Warning: Xiaomi (MIUI) Devices
Critical Issue: On Xiaomi devices running MIUI, clearing “Recent Applications” (swiping away the app) can kill the background process, stopping communication between the Hexnode app and the server. This breaks device sync, remote actions, and data management.
The Fix: Users must manually enable the “Autostart” permission for the Hexnode app to ensure it stays active:
- Go to Settings > Apps > Permissions > Autostart.
- Find Hexnode UEM and toggle the switch to ON.
Frequently Asked Questions (FAQs)
Q1: Can I enroll a device without a Google Play Store account?
Yes. You can download the Hexnode APK file directly from the portal and install it manually (“sideloading”) to enroll the device.
Q2: Can I manage virtual devices (Emulators)?
Yes. Hexnode supports enrolling virtual Android devices emulated via tools like BlueStacks, Android Studio, or Remote Test Lab for testing purposes.
Troubleshooting
1. Error: “Certificate error occurred”
Problem: After entering the server name in the Hexnode app and tapping Next, the enrollment fails with a “Certificate error occurred” message.
Possible Causes:
- Incorrect Date/Time: If the device clock is significantly out of sync, the SSL certificate validation will fail.
- Incorrect Server Name: A typo in the portal address.
- Outdated OS: The device lacks critical security root certificates.
Solution:
- Check Date & Time: Go to Settings > System > Date and time. Ensure the date and time are correct (set to “Automatic” if possible). Restart the device to apply changes globally.
- Verify Server Name: Double-check the URL entered (e.g., <portalname>.hexnodemdm.com) for typos.
- Update Device: Go to Settings > System > System updates and install the latest security patches.
2. Error: “Device limit reached!”
Problem: During the enrollment process, the device displays: “Device limit reached! Please contact your administrator!”
Possible Causes:
- License Cap: The organization has enrolled the maximum number of devices allowed by the current subscription plan.
- Expired License: The Hexnode UEM subscription has expired.
Solution:
- Check License Count: Log in to the Hexnode portal and navigate to Admin > License. Verify if the “Enrolled Devices” count matches your “Total Licenses”.
- Resolve: If the limit is reached, you must either purchase additional licenses or delete old/inactive devices from the portal to free up slots.
Need more help?
Then you can check out Hexnode’s dedicated troubleshooting guide for enrollment:
