Category filter
How to automate device management tasks in Hexnode?
The Automations feature in Hexnode UEM provides a streamlined solution for automating the deployment of files, certificates, custom scripts, device restrictions, and updates to managed devices. This feature stands out with its scheduling capability, allowing automation actions to be initiated at designated times or triggered at device enrollment.
Though “automation” might seem similar to “policies” in terms of functionality, it differs with regards to flexibility.
The Automate tab is designed for automating the scheduling and execution of various operations on devices, while the Policy tab enables administrators to create and manage individual policy settings that can be applied directly to devices.
This guide walks you through the steps to create, schedule, and manage automations within Hexnode UEM. Follow these instructions to efficiently automate and customize your device management processes.
Steps to create an automation
Follow the below steps to create an automation to instantly apply policies to a group of devices.
- Navigate to Automate > New Automation.
Or
Navigate to Automate > Active Automations > New Automation > Choose from templates and select the template.

- Choose the platform for which you want to create the automation.
 Actions
After selecting the platform, click on the Edit icon next to the Untitled Automation and provide the following information to rename the automation profile.
- Automation Name: Enter a name for the automation.
- Description: Provide a brief description to clarify the automation intent or scope (optional).
Once the details are provided, click Save.

Before proceeding with the automation process, let’s understand what “Actions” in the automation correspond to:
Under the Actions section, you have the following actions to automate:
Patches and Updates
- Auto Patch
- How to configure automatic patching on Windows devices.
- How to configure automatic patching on macOS devices.
- Manual Patch
Automatic patching streamlines the process of keeping Windows and macOS devices secure and compliant by ensuring timely updates with minimal manual intervention. It’s especially beneficial for organizations with strict security mandates or large device fleets. IT admins can configure automated update rules to control when and how patches are applied.
Manual patching gives IT admins the flexibility to apply only the necessary updates based on specific organizational needs. Whether managing Windows or macOS devices, this method is ideal for environments where software compatibility is critical, such as those using legacy systems or custom applications. Manual patching allows admins to filter available updates by category and identify which ones need to be installed on devices.
- How to configure manual patching on Windows devices.
- How to configure manual patching on macOS devices.

App Distribution
The App Distribution option enables seamless deployment of applications to Windows and macOS devices, while allowing you to customize and configure installation settings. It supports store apps (Windows) and enterprise apps (both Windows and macOS), giving IT admins full control over the deployment flow, including scripting, return code handling, installation sequence, support packages, and validation checks.

Policy
Currently, there are two options to automate under the Policy section. You can either Associate Policy (to apply a policy to the devices) or Remove Policy (to remove a policy from the devices). Only one policy can be selected at a time for either option, but additional policies can be added by selecting Add New Action.

Scripts
The Scripts section allows you to automatically deploy custom scripts on macOS, Windows, Linux devices, and Zebra printer. To schedule a script, select the Execute Custom Script option and choose the desired script from the Hexnode content repository. If required, you can use the Arguments field to specify script inputs. This field also supports wildcards. Once you’ve configured the script, click Add to finalize the action.

Scans
The Scans section provides the following actions:
- Scan Device: This action retrieves basic details of the enrolled devices, such as battery percentage, installed apps, and device information. These details are then updated in the Hexnode UEM console.
- Sync Local Accounts: This action synchronizes user accounts with the Hexnode UEM console to retrieve detailed information about each account.
- Scan Device Location: This action fetches the real-time location of the device. It can only be performed if a location tracking policy is applied to the device.
- Scan for Updates: This action remotely scans enrolled devices to identify available updates, including their type, download size, installation size, and status. These details are then updated in the Hexnode UEM console.
- Scan for Apps: This action remotely scans enrolled devices to retrieve detailed information about applications installed on the device. These details are then updated in the Hexnode UEM console.

Alerts
In the Alerts section, you can send custom messages to end-user devices, with the option to include wildcards that display device or user details within the message. The Alerts action is not available for Apple TV, Linux, and Zebra printer.

Device Controls
This section includes basic device control actions such as:
- Power Off: Allows the admin to remotely shut down devices.
- Restart Device: Allows the admin to remotely restart devices.
- Set Friendly Name: Allows the admin to assign or modify user-friendly names to devices for easier identification.
- Rename Device: Allows the admin to replace the name of the device.
- Set Password: Allows the admin to remotely configure a password on devices.
- Clear Password: Allows the admin to remotely remove the password from devices.
- Clear Media: Allows the admin to remotely remove all media content from devices.
- Change Owner: Allows the admin to change the user assigned to the device.
- Import Contacts: Allows admin to import contacts by deploying the VCF file to the target devices.
- Change Ownership: Allows admin to change the ownership of the device.
- Change Ringtone: Allows admin to set up a custom incoming call ringtone for the device by uploading an
.mp3audio file. - Update OS: Allows admin to deploy OS updates to managed devices.
- Clear App Data: Allows admin to remotely clear app data on managed devices.
- Enable Device Owner: Admins can set the Hexnode Agent as the Device Owner in rooted Android devices, granting the Agent complete control over the device.
- Clear Activation Lock: Allows admin to clear activation lock on devices.
- Edit Device Attributes: Allows admin to edit specific device details such as Device Name, Asset Tag, Department, Ownership Type, and Notes only to be presented as the device attributes in the Hexnode console, either individually or in bulk via CSV upload.
Security
This section includes security actions such as:
- Lock Device: Lets the admin lock devices so only those with the device password can unlock them.
- Enable Lost Mode: Locks down the device and tracks its location, ensuring it can’t be used if lost or stolen, and aids in quicker recovery.
- Disable Lost Mode: Once the device is retrieved, the admin can disable Lost Mode and return the device to normal functionality.
- Wipe Device: Remotely erases all data from the device, ensuring that sensitive information is securely deleted if the device is lost, stolen, or compromised.
- Rotate Local Admin Password: Allows the admin to force an immediate password change for local administrator accounts on Windows devices.
- Remote Ring: Allows the admin to remotely ring the device, helping locate a lost or misplaced device by emitting a loud sound, making it easier for the user to find it nearby.
- Enable Location Tracking: Activates tracking on co-managed Windows devices immediately, bypassing the need to configure a separate location tracking policy.
- Disable Location Tracking: Stops location services on the device to cease all tracking activities.
- Grant Secure Token: Authorizes a local user account on macOS devices to perform essential cryptographic operations, such as enabling FileVault encryption.
- Hexnode App logs: Retrieves agent logs from macOS devices to help diagnose and troubleshoot issues with the Hexnode UEM application.
- Request Bug Report: Remotely compiles device logs, stack traces, and diagnostic data from Android devices to assist in error resolution.
- Delete Location History: Permanently removes the recorded location data for selected devices from the Hexnode UEM console to ensure privacy or compliance.
Kiosk (for Android devices)
This section includes kiosk mode actions such as:
- Enable Kiosk Mode: Allows the admin to remotely activate kiosk mode from the Hexnode console, locking the Android device to a single app or a set of apps.
- Disable Kiosk Mode: Allows the admin to remotely deactivate kiosk mode from the Hexnode console, restoring normal device functionality and access to all apps and settings.

App Management
This section includes app management actions such as:
- Install Application: Allows the admin to remotely install apps on managed devices through the Hexnode console, using sources such as the Hexnode Store, Local Apps, or the Public Store.
- Uninstall Application: Allows the admin to remotely uninstall an app from managed devices via the Hexnode console.
- Request Application Feedback: Fetches the status and log information of installed managed Google Play apps directly to the Hexnode console, aiding in remote troubleshooting.
- Remote App Launch: Opens a specific application remotely on Android devices from the console, with options to keep it open for a set of duration or until the user manually exits.

Groups and Domains (for Windows devices)
This section includes groups and domains actions such as:
- Join AD Domain: Allows the admin to join a Windows device to an Active Directory (AD) domain remotely via the Hexnode console.
- Unjoin AD Domain: Allows the admin to remove a Windows device from an Active Directory (AD) domain remotely via the Hexnode console.

Network (for iOS devices)
This section includes network actions such as:
- Enable Data Roaming: Allows the admin to enable data roaming on iOS devices remotely via the Hexnode console, allowing the device to use mobile data while outside the home network.
- Disable Data Roaming: Allows the admin to disable data roaming on iOS devices remotely via the Hexnode console, preventing the device from using mobile data outside the home network.
- Enable Personal Hotspot: Remotely switches on the Personal Hotspot setting on the device, allowing it to share its cellular data connection with other devices via Wi-Fi, Bluetooth, or USB.
- Disable Personal Hotspot: Admin can disable the Personal Hotspot on the device from sharing its cellular data.
- Update eSIM: Queries the carrier’s server (SM-DP+) to download and install or refresh cellular plan profiles directly for the device’s embedded SIM (eSIM).

User Controls
This section enables the creation of both admin and standard accounts remotely from the Hexnode UEM console using the automate feature.
Device Encryptions (for Windows devices)
The available options to configure are:
- Force BitLocker Encryption: Enforces the activation of BitLocker encryption on the operating system drive and all other drives, ensuring the device data is encrypted.
- Force BitLocker Decryption: Forces the deactivation of BitLocker encryption, decrypting the operating system drive and all other drives.
- Unlock BitLocker: Allows the admin to unlock a BitLocker-encrypted drive remotely, providing access to the data if locked.
- Rotate BitLocker Recovery Password: Automatically rotates and escrows the recovery password for the operating system drive and all other drives.
- Rotate recovery password for all drives: Selecting this option will automatically rotate and escrow the recovery password for all drives.
- Rotate recovery password for specific drives: Enter the names of the drives whose recovery passwords should be automatically rotated and escrowed. Use commas to separate multiple drive names.

File Management
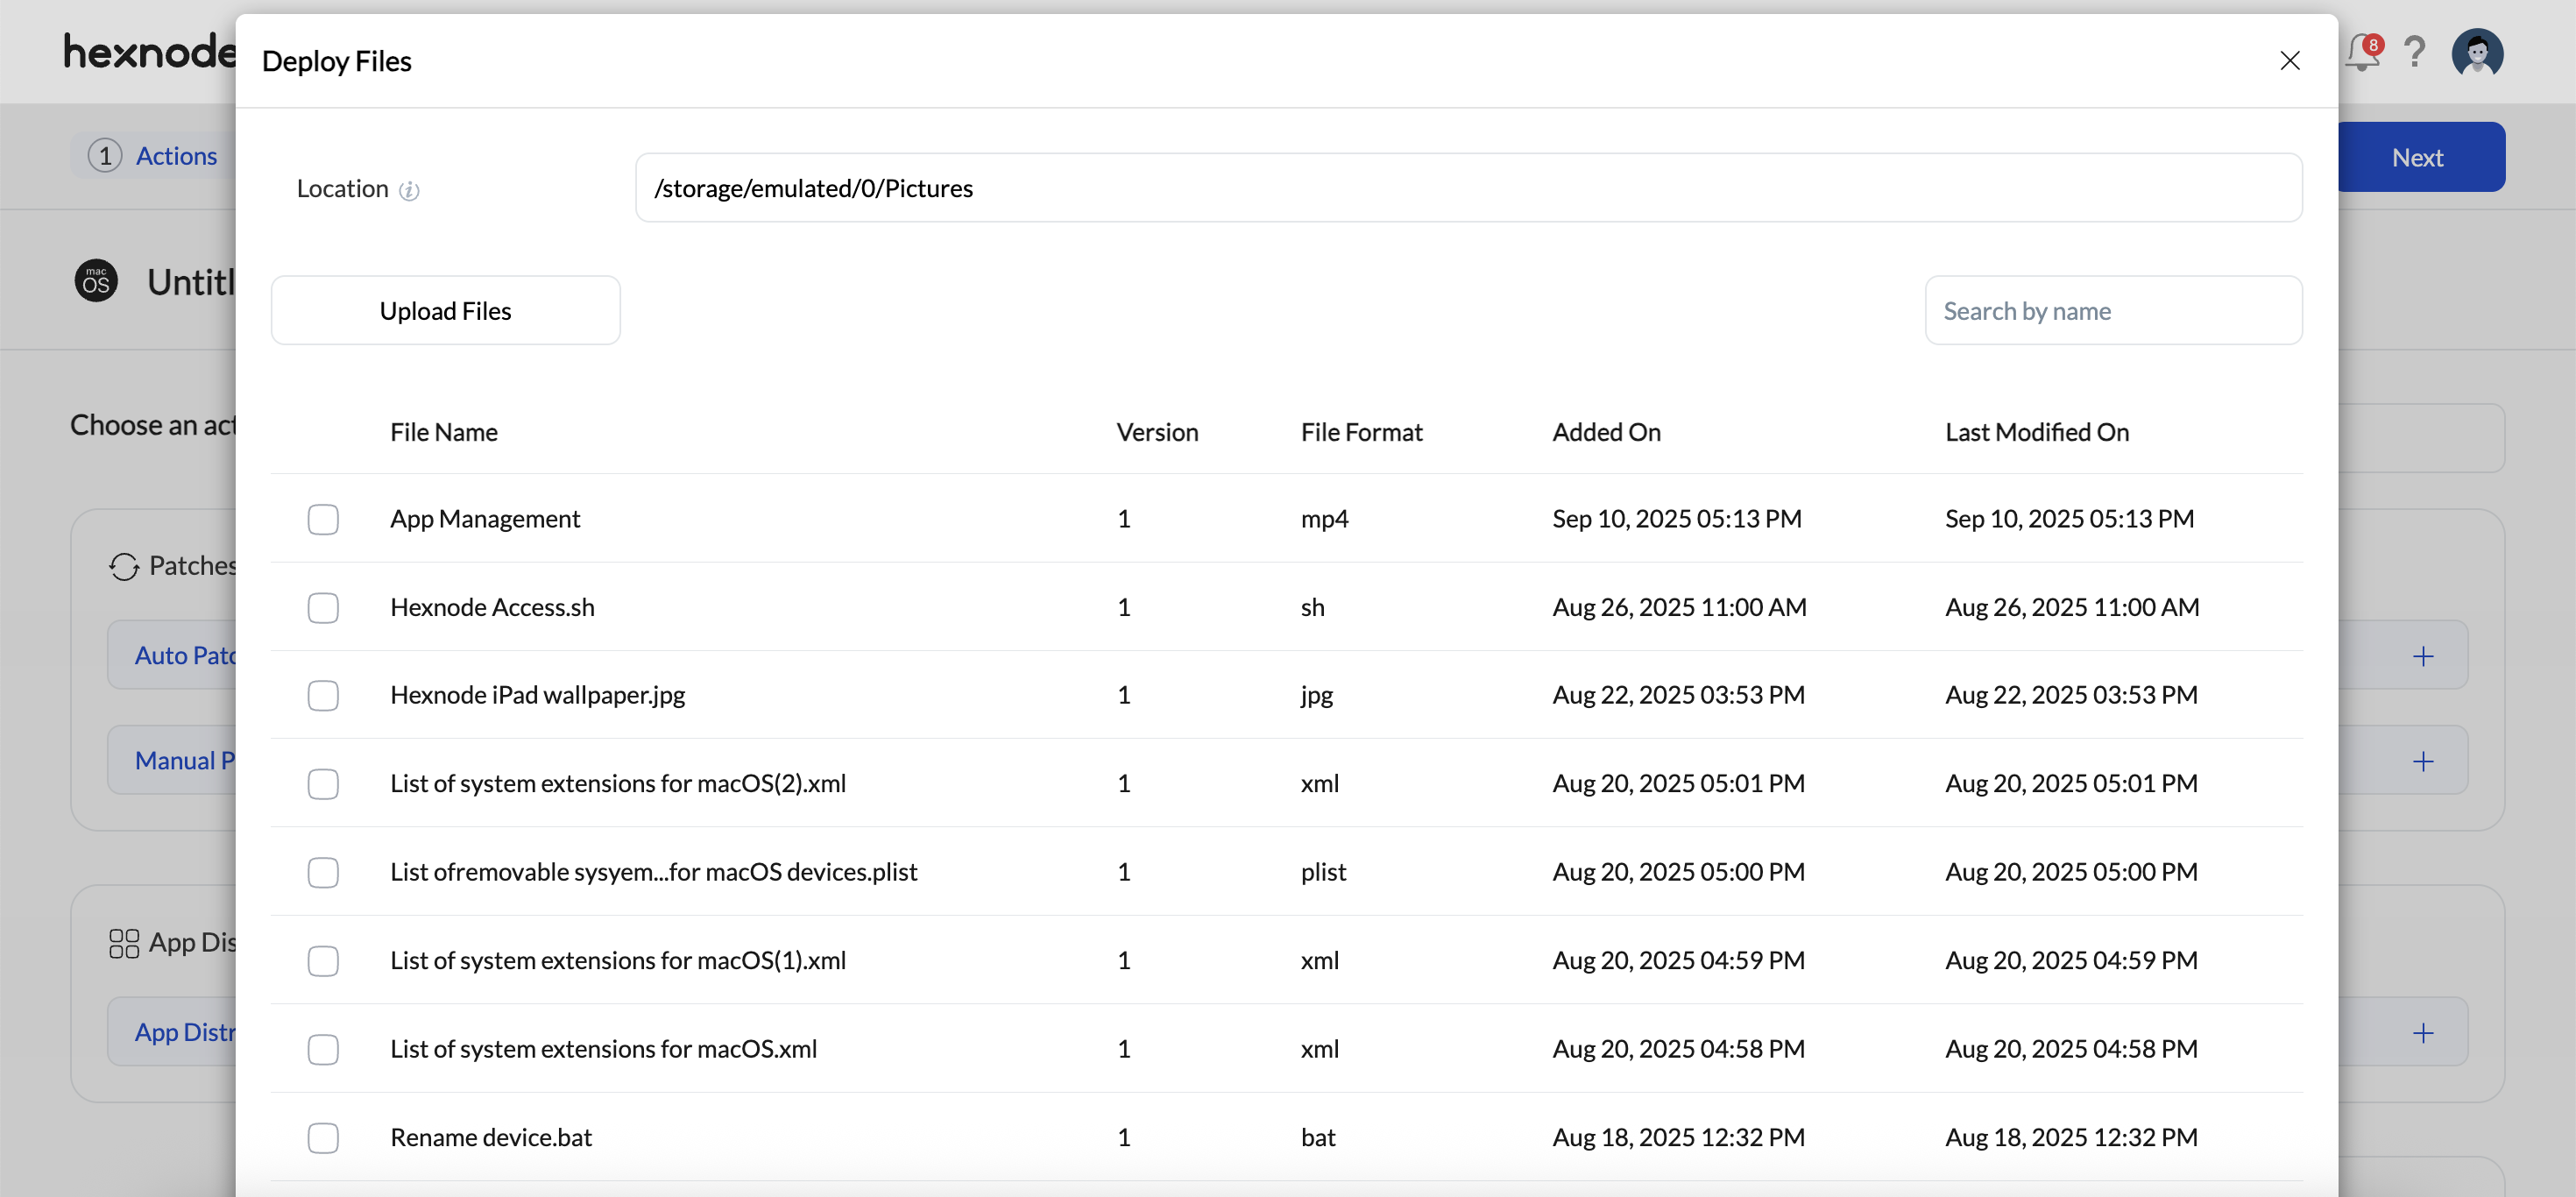
The File management action (supported on Android and macOS devices) is a remote management feature that lets IT admins deploy or delete files on enrolled devices directly from the Hexnode portal.
- Deploy Files – This option deploys files to a specific location on the device. You can upload the files available in the Hexnode repository.
- Remove Files – This option removes files from a specific location on the device. Enter the full file path with the file name.

Registry Configurations (for Windows devices)
The Registry Configuration feature helps IT admins easily manage Windows Registry settings. You can add or remove keys, create or update values, and choose the required data types and formats using the Registry Editor option. Configurations can be set up manually or imported from a .reg file to apply registry updates efficiently. To ensure safety, you can take a registry snapshot before applying edits, making it easy to restore if needed. This feature streamlines system customization, enforces policies, and keeps devices consistent without manual effort.
Files (for Zebra printer)
The Files (supported on Zebra printer) section helps IT admins to efficiently manage custom files on Zebra printer.
The available options to configure are:
- Deploy Fonts: This action remotely deploys the font to the device end. It supports only the .ttf or .otf script formats to the printer.
- Deploy Templates: This action deploys the template and store it in the device end. It supports only .zpl, .nrd, .txt, .lbl, .zbi script formats to the printer.
Updates (for Zebra printer)
The Updates (supported on Zebra printer) section helps the IT admins to maintain and update the Zebra printer.
The available option to configure is:
- Update Firmware: This action is used to update the firmware on the Zebra printer. The supported script file format is .zpl file.
- Once the actions are selected, click Next.
Settings and Schedule
Configure the automation scheduling and related settings here. You can trigger the action based on two criteria:
Time:
You can define the exact time when the action will be executed on the device.- Initiate: You can configure the action initiation frequency. Choose between three options: Once, ASAP (instant action triggering will happen), Once or Repeat on a set schedule.
- Scheduled Date: Set the action initiation date in MM/DD/YYYY format (for the Once option).

- Scheduled Day: Specify the day for action initiation (for Repeat at a set schedule option). Three sub-options available:
- Everyday: The action will trigger daily.
- Selected days: Select specific days of the week for the action to trigger.
- Monthly: Specify the day of the month for action initiation, such as the 10th of every month.

- Scheduled Time: Set the time on which the action should take place on the devices, in HH/MM format and you can select the time zone also.
Activity: Define the device activity that will trigger the action on the device. You can select from the following four activity types:
- On Device Enrollment: Triggers the automation action when a device is newly enrolled and completes its initial device scan. Devices that are already enrolled are unaffected, even if they meet the filter conditions.
- On SIM Insertion: Triggers the automation action when a SIM card is inserted into the device. Devices with a SIM already inserted remain unaffected.
- On SIM Removal: Triggers the automation action when a SIM card is removed from the device. Device with no SIM remain unaffected.
- On SIM Switch: Triggers the automation action when a SIM card is replaced with a different one. Devices that retain the same SIM remain unaffected.
- On Device Compliance: Triggers the automation action when a device becomes compliant with the defined policies. Devices that are already compliant remain unaffected.
- On Device Non-Compliance: Triggers the automation action when a device becomes non-compliant. Devices that are already non-compliant remain unaffected.
- On Location Compliance: Triggers the automation when a device becomes location compliant. A device is considered location compliant when it is located within a geofence defined in Hexnode.
- On Location Non-Compliance: Triggers the automation when a device becomes location non-compliant. Devices that are already location non-compliant remain unaffected.
- On Device Inactive: Triggers the automation action when a device becomes inactive, as it no longer communicates with the Hexnode server. Devices that are already inactive remain unaffected.
- On Device Inactive For: Triggers the automation action when the device remains inactive for a specified duration. You can define the inactivity period in minutes.

- Once you have configured the Settings and Schedule, click Next. On the following page, you can define the target filters.
Target Filters
Configure target filters in this section. You can specify options for Included groups, Excluded groups, and create custom filters by selecting the Filters option.
- Included groups: Select device or user groups to which the action will apply. Click Add Groups to view and choose from the available device and user groups in your Hexnode UEM portal.
- Excluded groups: Choose device or user groups to be excluded from the action automation. Click Add Groups to display the available groups for exclusion.

- Filters: Create custom filters based on the following categories:
- Device: This category encompasses various attributes specific to the device being managed.
- User: This category includes attributes related to the users who are using the devices.
- Network: This category relates to network attributes associated with the devices.
- Device Status: This category provides attributes associated with the compliance and operational status of the devices.
To configure filters, set the following fields:
- Select Column: Choose the category used for filtering. Once selected, the relevant sub-categories will be displayed under this dropdown.
- Select Comparator: Define the comparison method.
- Select value: Set the specific value for filtering.
Below is a list of available filter categories and their corresponding sub-categories:
Main category Sub- categories Device - Apple ADE
- Asset tag
- Available internal storage
- Battery level
- BitLocker Policy Compliance
- Department
- Device ID
- Device model
- Device notes
- Device type
- Encryption Status
- Enrolled time
- Enterprise Management Type
- Installed RAM
- Last checked-in time
- Manufacturer
- MEID
- OS name
- OS version
- Ownership
- Platform
- Processor name
- Serial number
- Supervision
- Total internal storage
- TPM version
- UDID
- Used internal storage
User - Alternate email
- Department (AD)
- Domain name
- Office location (AD)
- sAMAccountName
- Title (AD)
- User type
- Username
Network - Bluetooth MAC address
- Current carrier network SIM 1
- Current carrier network SIM 2
- Current MCC
- Current MNC
- Ethernet IP Address
- Ethernet MAC address
- Home carrier
- Home country
- ICCID SIM 1
- ICCID SIM 2
- IMEI SIM 1
- IMEI SIM 2
- IMSI
- International data roaming
- Last connection date
- Personal Hotspot
- Phone number SIM 1
- Phone number SIM 2
- Roaming enabled
- SIM carrier network
- Subscriber carrier network (iOS)
- Subscriber MCC
- Subscriber MNC
- Wi-Fi IP Address
- Wi-Fi MAC address
- Wi-Fi SSID
Device Status - Activity status
- Application compliance status
- Compliance status
- Enrollment status
- Geofence compliance status
- Jailbroken
- Kiosk mode
- Lost mode
- MDM profile
- Password compliance status
- Rooted
- After selecting the desired sub-category, a comparator must be chosen.
For example, if Apple ADE is chosen as the sub-category, the available comparators are Is and Is not.

- After selecting the comparator, the value for comparison must be chosen or entered.
In the case of the Apple ADE sub-category, the available options are Disabled and Enabled.

- After setting the filters, click Next.
Review
The next page leads to the Review section, where the configured automation settings can be viewed. If any adjustments are needed, click the Edit option to access the corresponding section and make changes as necessary.

- Once you have reviewed the automation, click Save.


Automate tab overview
After successfully creating an automation, you can easily monitor and manage it through the Automate tab. The Automate tab consists of the following sections:
- Active Automations
- Templates
- Archives
- Activity Feed
Active Automations
The created automations will be displayed in the Active Automations section on the home screen of the Automate tab. This section provides details such as the name, version, platform, creation date, status, and last status update for each automation.

Additionally, each automation includes a “Run Now” option that allows IT admins to instantly execute the selected automation on targeted devices.
Also, there are options to Archive, Pause, Resume and Delete the automations. To perform any of these, select the desired automation and click on Actions.

Templates
The Templates section provides both custom automation templates created by administrators and pre-configured automation templates provided by Hexnode.
Templates enable administrators to define reusable automation workflows that can be quickly converted into active automations, ensuring consistency and reducing repetitive configuration.
From this section, administrators can:
- Create new automation templates.
- Edit existing templates.
- Clone templates for reuse.
- Create new automations directly from templates.
The pre-configured templates simplify critical administrative tasks. These templates include recommended configurations and standardized workflows, allowing faster and more reliable automation deployment. These templates are system-protected, cannot be deleted or cloned, but can be reviewed and modified as needed.
Archives
Archived automations can be found in the Archives section, which shows the automation name, version, and archived time. From this section, automations can be deleted or restored.

Activity Feed
Detailed information about each automation can be viewed in the Activity Feed, including the automation name, version, activity type, and the time when the activity occurred.
Reports
To view specific automation details, select the desired automation and navigate to the Reports section. Here, you can see device-specific details related to the automation, such as the device name, platform, action, version, initiation time, completion time, and the automation status. You can also export and download the report in either PDF or CSV format from this section.

By following the outlined steps, you can streamline the automation process to meet your organization’s needs, allowing you to create an automation that instantly automates the deployment of a file, certificate, custom script, or an update to a group of devices or group of users.
