Category filter
How to manage FileVault
FileVault is a full disc encryption program in macOS 10.3 and later to protect your data and prevent unauthorized users from retrieving the information stored on your Mac. Once you encrypt your device, you can’t log in to your Mac without a password or recovery key. The data would be unrecognizable without entering the password. The details on the drive are made available only when the computer boots up and you sign in. All new files are encrypted automatically when saved on the device. It’s a good idea to use FileVault to avoid data being compromised if a Mac is misplaced or damaged.
Enable or Disable FileVault on your Mac
You can choose to allow your end-users to enable or disable FileVault on their work deployed devices.
- On your Hexnode console, navigate to Policies.
- Create a new FileVault policy or continue with an existing policy.
- Provide a suitable name and description for your policy.
- Go to macOS > Security > FileVault. And click on Configure.
- Tick the box Prevent FileVault from being disabled to disable the end-users from turning off FileVault encryption on the device.
- Tick the box Prevent FileVault from being enabled to disable turning on FileVault.
- Associate the policies to target devices by navigating to Policy Targets before saving the policy.
Note that the FileVault customizations in Hexnode will be unavailable if Prevent FileVault from being enabled is checked.
Difference between encryption and password protection
Encryption converts the data into a scrambled, unreadable format, thus ensuring that only authorized users receive access to the information. The primary purpose of encryption is to protect the confidentiality of the content. Password protection, on the other hand, ensures security by locking the data with a password. Possession of the password would allow access to the information which in turn adds-on to vulnerability.
When a disk is encrypted, even if the disk is removed from the Mac and connected to another device, the data remains encrypted and safe. If just password-protected, the data in the disk can be easily accessed by simply removing it from the Mac.
Enable FileVault on macOS devices
There are several ways to encrypt your macOS devices.
- Institutional Recovery Key
- Personal Recovery Key
- Institutional and Personal Recovery Key
Institutional Recovery Key
These are used by organizations or institutions that require a common key to decrypt all their devices.
If you lose or forget the password, the IRK certificate must be protected with a new password and downloaded once again. An advantage of using IRK is that if the key is lost or corrupted, a new key can be downloaded from the portal itself.
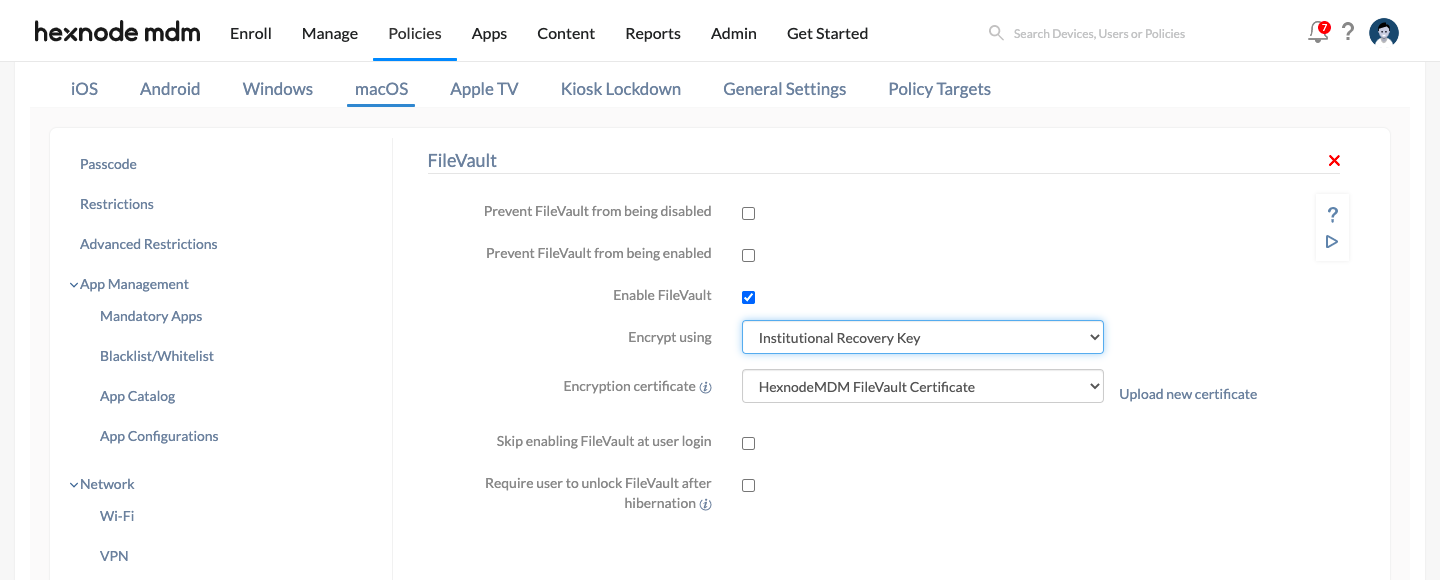
Encrypting Mac using Institutional Recovery Key
- Navigate to Policies > New Policy.
- Click on FileVault under macOS > Security. Click Configure.
- Select the Enable FileVault option to enable FileVault on Mac devices.
- From the drop-down list, select the Institutional Recovery Key option.
- By default, the encryption certificate used is HexnodeMDMFileVaultCertificate. Click on Upload New to upload a new Encryption certificate.
- Selecting the Skip enabling FileVault at user login option lets the admin set the number of times users can skip enabling FileVault when the user logs in to the Mac.
- Select the option Require user to unlock FileVault after hibernation to enforce a password to unlock the FileVault after hibernation and to restore the disk to its last saved state.
- Next, associate the policy to target devices by navigating to the Policy Targets tab.
- Select the required Devices/Device Groups/Users/User Groups/Domains to which the policy is to be associated.
- Click Save.
Creating an encryption certificate
To use a new encryption certificate, the administrator must first create the certificate and upload it to the UEM portal.
You can create and export the recovery key with or without a private key.
- On a macOS computer (10.8+), open Terminal and execute the command:
- You’ll be asked to enter a password for the new keychain. Re-enter the password again to confirm the password.
- A new keychain FileVaultMaster.keychain will be created on your desktop. You can use this file as the private recovery key to decrypt the startup disc of any FileVault-configured Mac. Therefore, store this file in a safe location such as an external drive or a disk image to use later during decryption.
- Open the Keychain Access by double-clicking on the FileVaultMaster.keychain file located on your desktop. From the left sidebar menu, choose FileVaultMaster. If multiple items are displayed on the right, choose another keychain from the left sidebar. Then, click on FileVaultMaster again to refresh the list to show only two items.
- A certificate (FileVault Recovery Key) and private key (FileVault Master Password Key) can be seen. Select only the certificate if you want to export the recovery key without the private key. Otherwise, select both.
- From File, select Export Items. Choose the file format as .p12 and specify the location where the file is to be saved and click Save.
- You will be asked to enter a password that will be used to protect the exported items. Enter and verify the password. Click OK. This password is required while uploading the certificate to the portal.
- Quit Keychain Access.
|
1 |
security create-filevaultmaster-keychain ~/Desktop/FileVaultMaster.keychain |
The FileVault recovery key and private key (only if exported) will be saved to the specified location. Upload this file to your Hexnode UEM portal.
Decrypting the device using Institutional Recovery Key
To decrypt a device using IRK,
- If a new encryption certificate is uploaded instead of the default Hexnode MDM FileVault Certificate while configuring the policy,
- From the system where the uploaded keychain was created, copy the FileVaultMaster.keychain along with the private key to an external drive.
- Navigate to step 3.
- If Hexnode MDM FileVault Certificate is selected as the encryption certificate,
- Navigate to Admin > General Settings.
- Under FileVault Settings, you have the option to download Hexnode MDM FileVault Certificate. Enter the password in the space provided and click on the download button on the right.
- On the OS X machine, navigate to Applications > Utilities and open Keychain Access.
- Create a new Keychain by navigating to File > New Keychain. Drag and drop the recovery key downloaded previously. You can see a private key and a certificate.
- Copy the new FileVault Keychain created to an external drive. This file resides in Users\User\Library\Keychains.
- Navigate to step 3.
- Decrypting the client machine
To unlock the keychain,
- Restart your client machine while holding Command and R keys.
- Connect the external drive containing the keychain file to the client machine.
- Select Terminal from the Utilities folder.
- Execute the following command to mount the disk image if the private recovery key was stored in a disk image:
1hdiutil attach /path to the disk image including .dmg extension
- Unlock the FileVault master keychain using the following command:
1security unlock-keychain /path to the FileVaultMaster.keychain on the external drive - Enter the master password to unlock the keychain.
To unlock the encrypted volume,
- Follow the steps below if your device is using Apple File System (APFS):
- Run the following command to unlock the encrypted volume:
1diskutil ap unlockVolume "Name of the startup volume" -recoveryKeychain /path to FileVaultMaster.keychain on the external drive or disk image
- Enter the master password to unlock the keychain and mount the startup disk.
- Now, you can retrieve files using command-line tools such as ditto or use Disk Utility after closing the Terminal.
- Run the following command to unlock the encrypted volume:
- Here are the extra steps that you must execute if your device is using Mac OS Extended:
- Run the below command to list the drives and core storage volumes:
1diskutil cs list
- Search for the UUID of the logical volume and copy the UUID.
- To unlock the encrypted volume, run the following command:
1diskutil cs unlockVolume "UUID" -recoveryKeychain /path to the keychain on the external drive or disk image
- Enter the master password to unlock and mount the encrypted volume.
- Now, you can retrieve files using command-line tools such as ditto or use Disk Utility after closing the Terminal. You can also run the following command to decrypt the volume:
1diskutil cs decryptVolume "UUID" -recoveryKeychain /path to the keychain
- Run the below command to list the drives and core storage volumes:
Personal Recovery Key
Personal Recovery Keys are alphanumeric strings that are generated at the time of encryption. These are automatically generated keys the user will receive before the encryption process. Each key is unique to the machine being encrypted. The user must note down this key as it is not automatically recorded anywhere. However, you can escrow the key to Hexnode for safekeeping. This enables you to retrieve the key from Hexnode if you lose it.
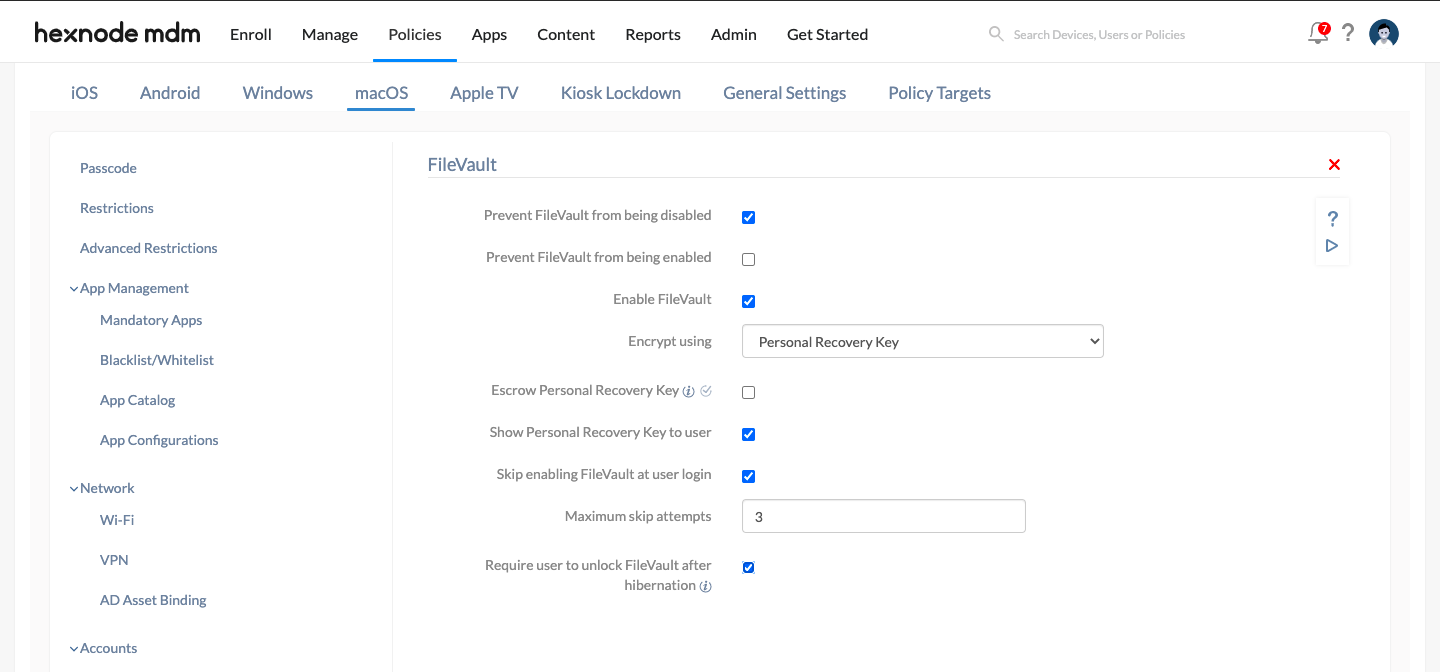
Encrypting Mac using Personal Recovery Key
- Navigate to Policies > New Policy.
- Click on FileVault under macOS > Security. Click Configure.
- Select the Enable FileVault option to enable FileVault on mac devices.
- Select the Personal Recovery Key option to encrypt the devices using a Personal Recovery Key.
- As this key is not automatically stored anywhere, you can encrypt the key with a certificate and report it to Hexnode for safekeeping. To do so, enable the option Escrow Personal Recovery Key and then set up the escrow key configurations.
- Select the Show Personal Recovery Key to user option to display the recovery key to the user. The user must make a note of this key as it is not recorded in the portal if the option Escrow Personal Recovery Key is not enabled. By default, this option is enabled.
- Choosing the option Skip enabling FileVault at user login allows the administrator to specify the number of times the user can skip the prompt to turn on FileVault as the user logs in to the device.
- Enable the option Require user to unlock FileVault after hibernation to mandate the device password to unlock FileVault after hibernation and to restore the disk to its last saved state.
- Go to Policy Targets. Select +Add devices to add the devices. Finally, click on Save to associate the policy with the devices.
After successfully pushing the policy to your device, you will need to restart your device and enter the password for your Mac, when prompted.
Now, you’ll get an alert informing you that FileVault is being enabled on your volume.
Within a few minutes, you’ll get the FileVault Recovery Key as a popup message. You’ve to note down this key as it will not be recorded elsewhere. Then you can click on Continue, so that your device will turn on after completing the boot process.
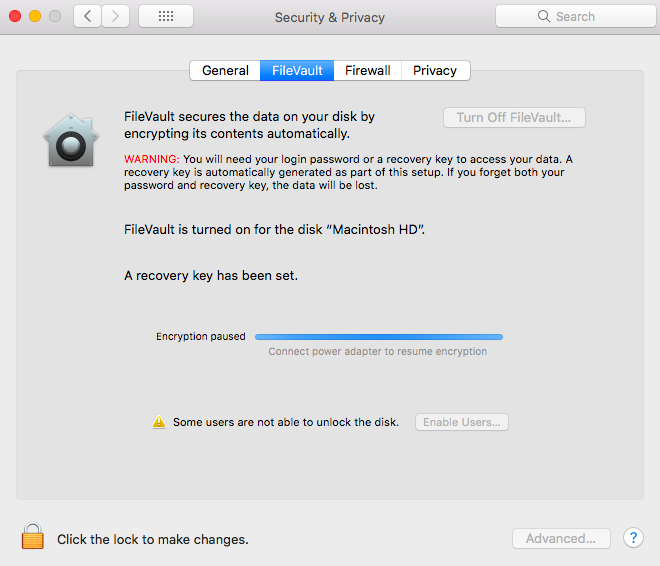
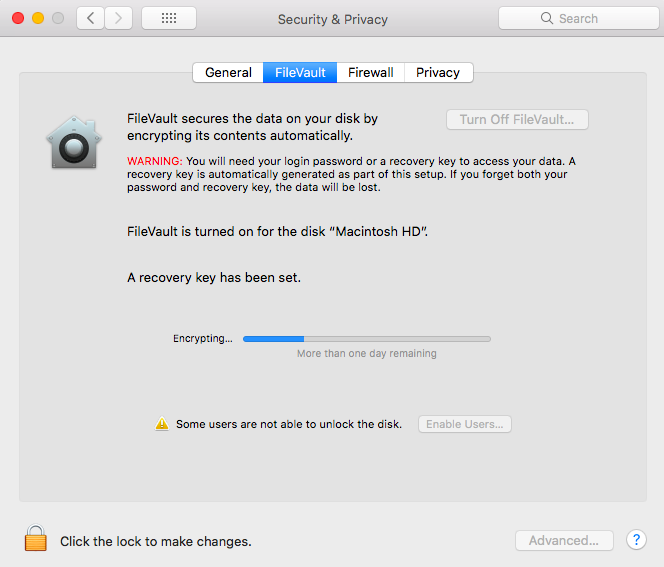
Now, the encryption begins. The time taken to complete the encryption depends on how much information is stored on your Mac.
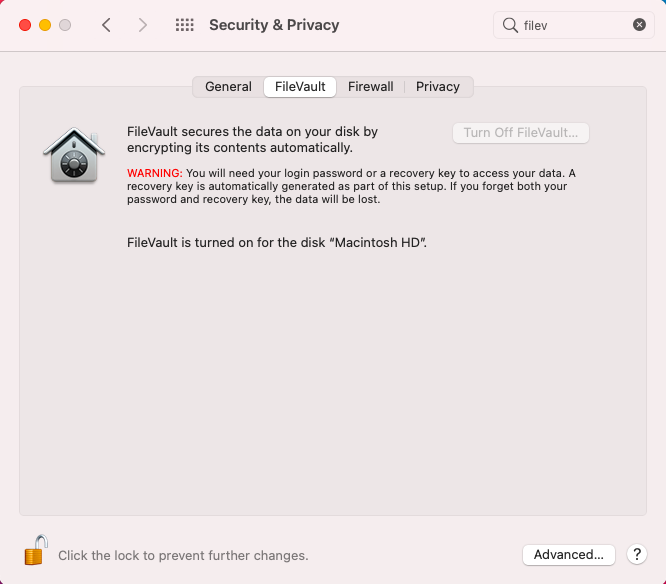
On your Mac, you can see the encryption process when you head on to System Preferences > Security & Privacy > FileVault.
Decrypting the device using the Personal Recovery Key
If you are decrypting your device with a Personal Recovery Key, you must enter the key when prompted and the device will be decrypted.
Institutional and Personal Recovery Key
This is the recommended method. In this method, an institutional recovery key as well as a personal recovery key will be generated for the user. The advantage of this method is that, in the event of your personal recovery key being lost, you can still use the institutional recovery to decrypt your device.
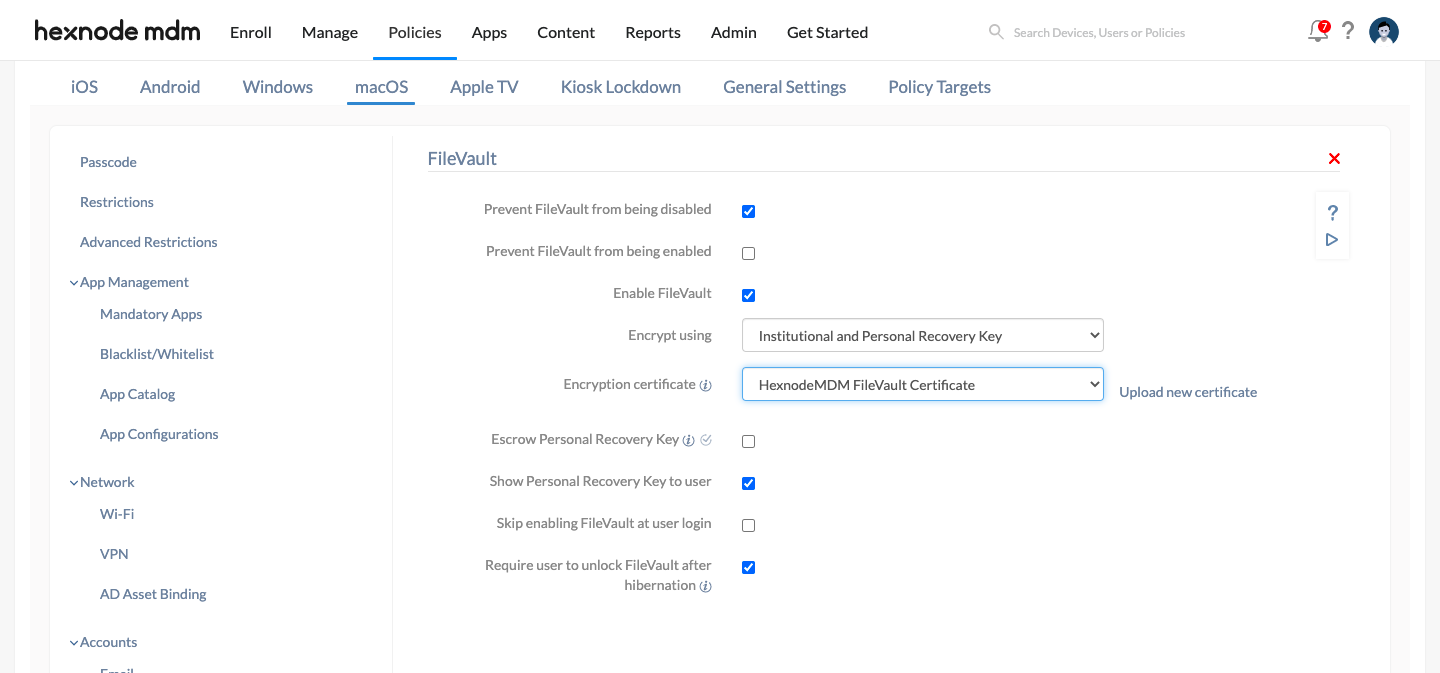
Encrypting Mac using institutional and Personal Recovery Key
- Navigate to Policies > New Policy.
- Click on FileVault under macOS > Security. Click Configure.
- Select the Enable FileVault option to enable FileVault on Mac devices.
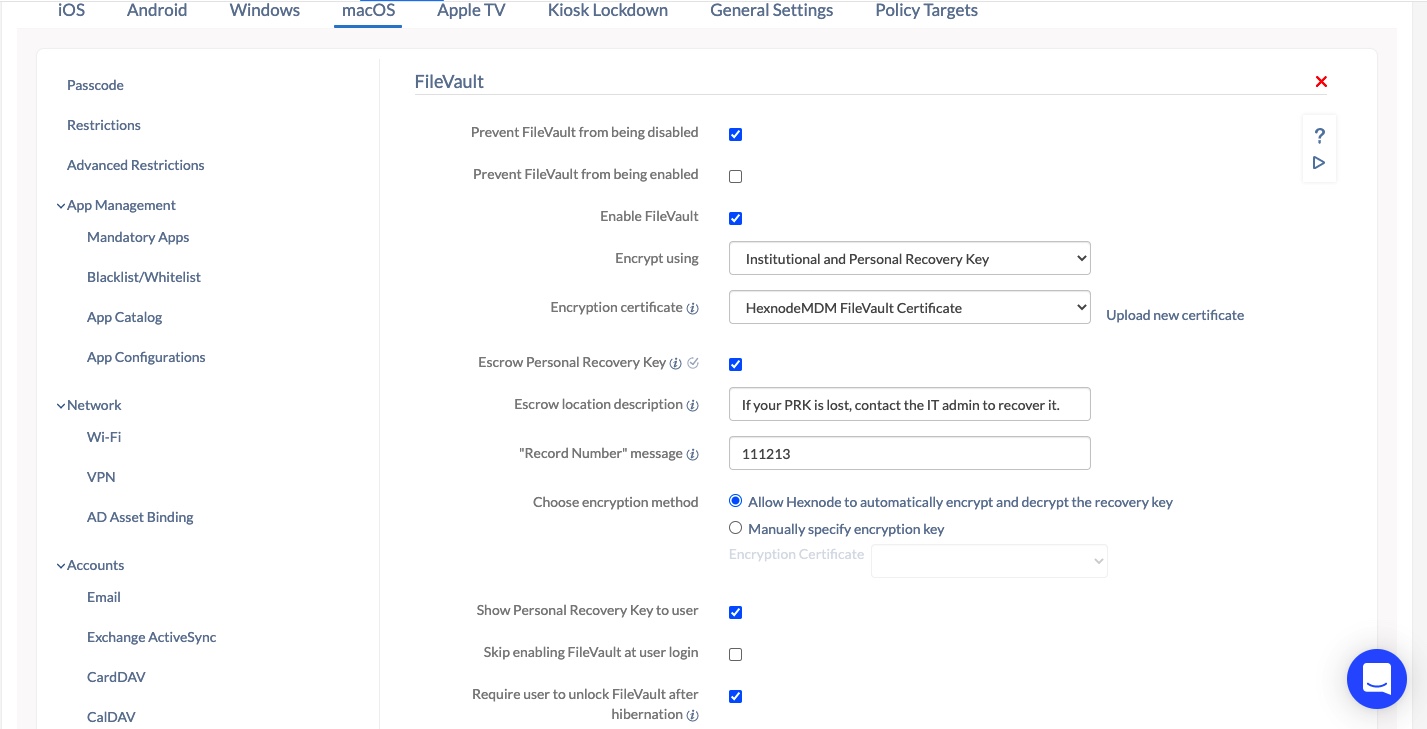
- From the drop-down list, select the option Institutional and Personal Recovery Key.
- By default, the encryption certificate used is HexnodeMDMFileVaultCertificate. Click on Upload new certificate to upload a new Encryption certificate.
- If you want to encrypt the personal recovery key with an auto-generated or custom certificate and keep it in Hexnode, enable the option Escrow Personal Recovery Key. Then set up the escrow key configurations.
- Enable the option Show Personal Recovery Key to user to show the recovery key to the user on the FileVault screen. The users should note down this key as it is necessary to decrypt the device. If the option Escrow Personal Recovery Key is not enabled, the key will not be recorded on the portal. The users will have to wipe the devices if they lose the key.
- Select the Skip enabling FileVault at user login option if you want to skip enabling FileVault when the user logs in to the mac device. You can set the number of skip attempts.
- If you enable the option Require user to unlock FileVault after hibernation, the user will have to unlock FileVault with the password after the device awakes from hibernation. Thus, the disk restores its saved state only after the user unlocks FileVault.
- Move to Policy Targets > +Add devices. Add all the necessary macOS devices to apply the FileVault policy.
- Click Save.
Decrypting the device using Institutional and Personal Recovery Key
You can use either of the keys to decrypt your device.
Escrow Personal Recovery Key
If the macOS is configured to be encrypted using the Personal Recovery Key, the system will generate a string of alphanumeric characters before the encryption initiation. The string of characters is referred to as the Personal Recovery Key. It is displayed only once and thus cannot be re-generated. So, if the recovery key is lost, you have to erase the device to reuse it. However, with Hexnode, you have the option to escrow the recovery key into Hexnode. This enables the users to retrieve the recovery key from the UEM to unlock the encrypted disk even if it is lost.
You will have the option to escrow the personal recovery key, if you choose to encrypt your device using the Personal Recovery Key or Institutional and Personal Recovery Key.
To escrow the recovery key,
- Create a new FileVault encryption policy or edit an already existing one.
- Check the option Escrow Personal Recovery Key. This enables Hexnode to retrieve and back up the recovery key generated by the system. The key will be encrypted before it is reported to Hexnode. This feature is supported on all macOS devices running v10.13 or later.
- Enter a small description of the escrow location to give users insights on where the recover key is escrowed in the field Escrow location description. This text will be shown to the user on the FileVault recovery key screen.
- Enter a message to be displayed next to the Record Number in the FileVault recovery screen in the “Record Number” message field. This value will be shown to the user along with the serial number of the device on the screen where they are asked to enter the recovery key. If the user forgets this key, they can give this record number to IT to help them find the device in Hexnode easily. IT can revert the escrowed recovery key back to the user once they identify the device. Therefore, this key should be a unique identifier of the device, for example, the device ID.
- Now, choose the method to encrypt the recovery key escrowed to Hexnode. You will have the following options:
- Allow Hexnode to automatically encrypt and decrypt the recovery key: If selected, Hexnode will automatically encrypt the recovery key before recording it in the UEM and automatically decrypt the key if requested.
- Manually specify the encryption key: Select the encryption certificate that should be used to encrypt the recovery key from the drop-down. To add a new certificate to the drop-down, navigate to Policies > macOS > Security > Certificates and add a new one there. If this option is selected, you should use the same certificate to decrypt the recovery key.
- Navigate to Policy Targets and click on +Add devices to add the devices you wish to associate the policy with. Click Save.
Retrieve the Personal Recovery Key
To retrieve the Personal Recovery Key escrowed to Hexnode,
- On your Hexnode console, navigate to Manage > Devices.
- Click on the required device to land on the ‘Device Summary’ page.
- Go to Device Info > Security Info.
- Click on Decrypt FileVault Recovery Key.
- From the pop-up menu, specify whether Hexnode has automatically encrypted your FileVault Recovery Key or the key was encrypted using a selected certificate.
- If the FileVault Recovery Key was encrypted automatically by Hexnode, click on Decrypt.
- If the recovery key was encrypted using a certificate, choose the certificate to decrypt the key and then click on Decrypt.
The key will be displayed next to FileVault Recovery Key; this can be used to decrypt the macOS disk.
How to create certificates for FileVault recovery key encryption?
As mentioned earlier, the FileVault recovery key can be encrypted using a custom encryption certificate as opposed to Hexnode automatically encrypting and decrypting the key. Follow the steps mentioned below to create a custom encryption certificate.
On a Mac, open Terminal and run the command:
|
1 2 3 4 |
openssl genpkey -algorithm RSA -out /folderpath/rsa_private.pem -pkeyopt rsa_keygen_bits:2048 openssl rsa -in /folderpath/rsa_private.pem -pubout -out /folderpath/rsa_public.pem openssl req -x509 -nodes -newkey rsa:2048 -keyout rsa_private.pem -out /folderpath/rsa_cert.pem -subj "/CN=unused" openssl x509 -outform der -in /folderpath/rsa_cert.pem -out /folderpath/public.crt |
Upload “public.crt” corresponding to the option ‘Manually specify the encryption key’ in the policy for encryption using that certificate.
To decrypt the recovery key, upload “rsa_private.pem” in the ‘Decrypt FileVault Recovery Key’ pop-up.
What happens at the device end?
Once the policy is associated, users will not be able to modify the FileVault settings under System Preferences > Security & Privacy > FileVault. The settings as configured in the policy will be Enforced.


