

Category filter
How to lockdown your devices onto Digital Signage Kiosk
Digital signage kiosk helps in addressing people at airports, malls, streets, and other public places in an easier way. It transforms your Android devices into images/video streaming screens, which enables you to play the media files in loops.
You can also trim, mute, and add custom background music to your videos. Transmission speed and animations can also be added, which helps in transforming your ideas into virtual reality. Moreover, you can change/remove the display content anytime using Hexnode.
To enable Digital signage display in Android kiosk mode
- Login to your Hexnode portal.
- Navigate to Policies.
- Select an existing policy or create a new one by clicking New Policy.
- Provide a policy name and a suitable description.
- From Kiosk Lockdown > Android Kiosk Lockdown, select Digital Signage Display and click Configure.
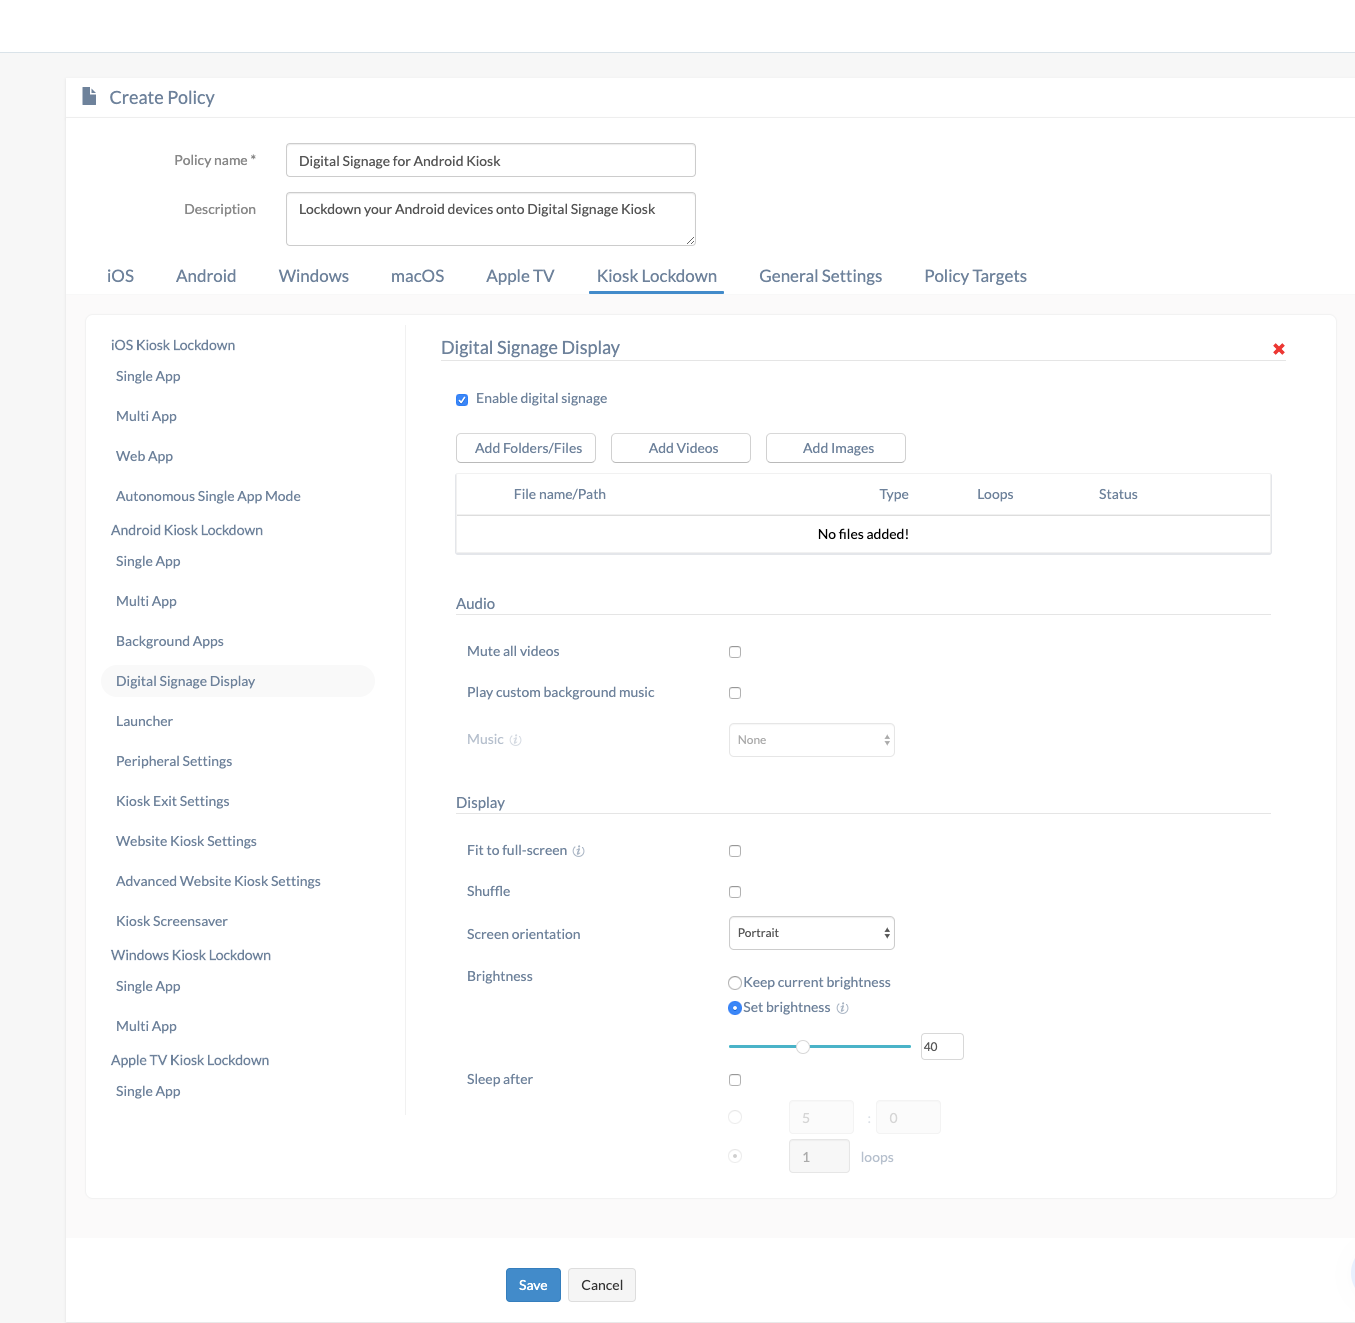
- Enable digital signage – Check this option to enable digital signage display. You can upload the files to be set in digital kiosk, only if this option is enabled.
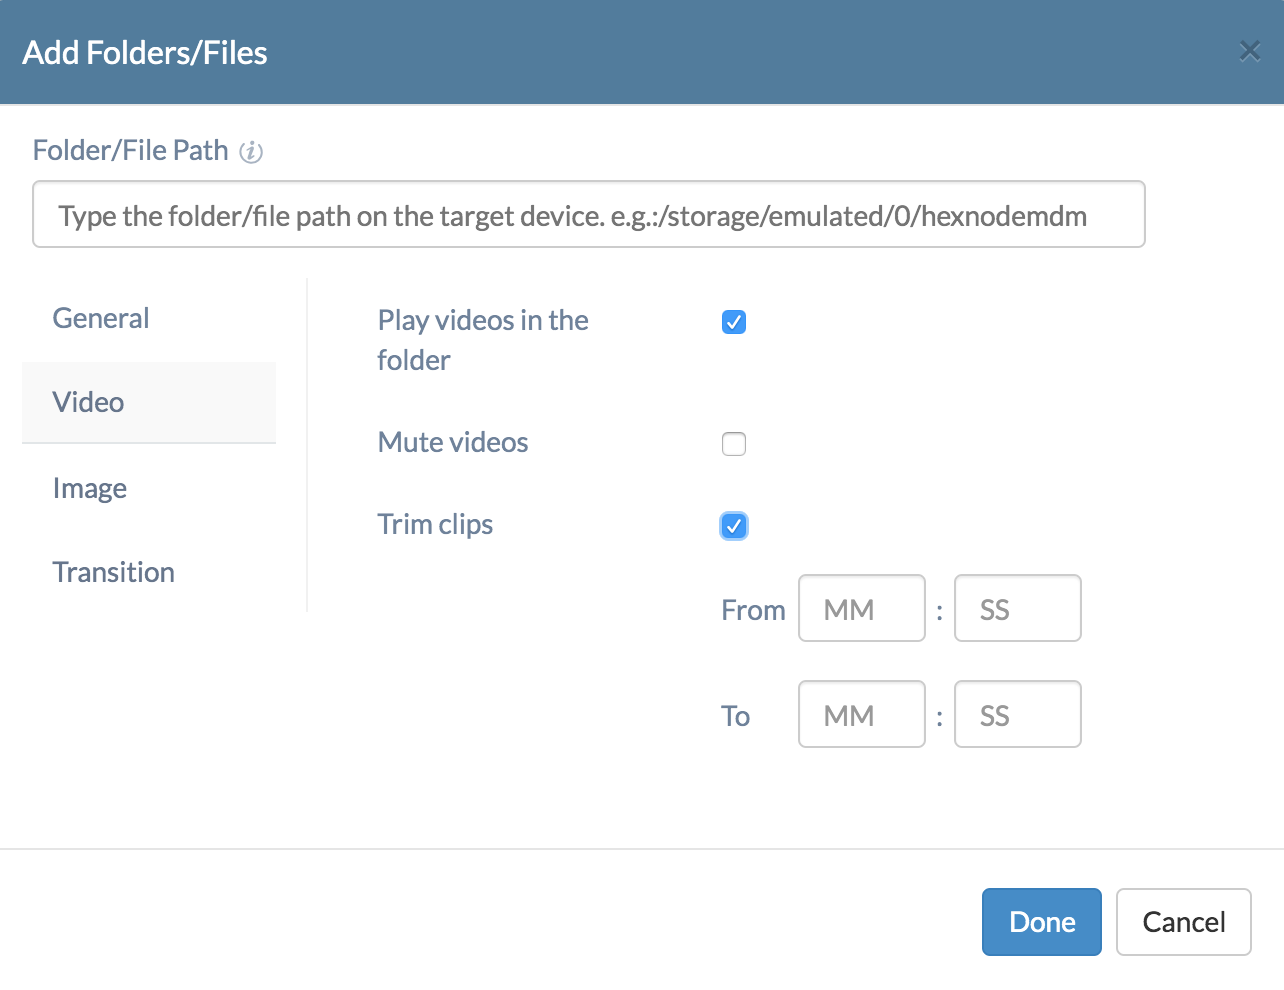
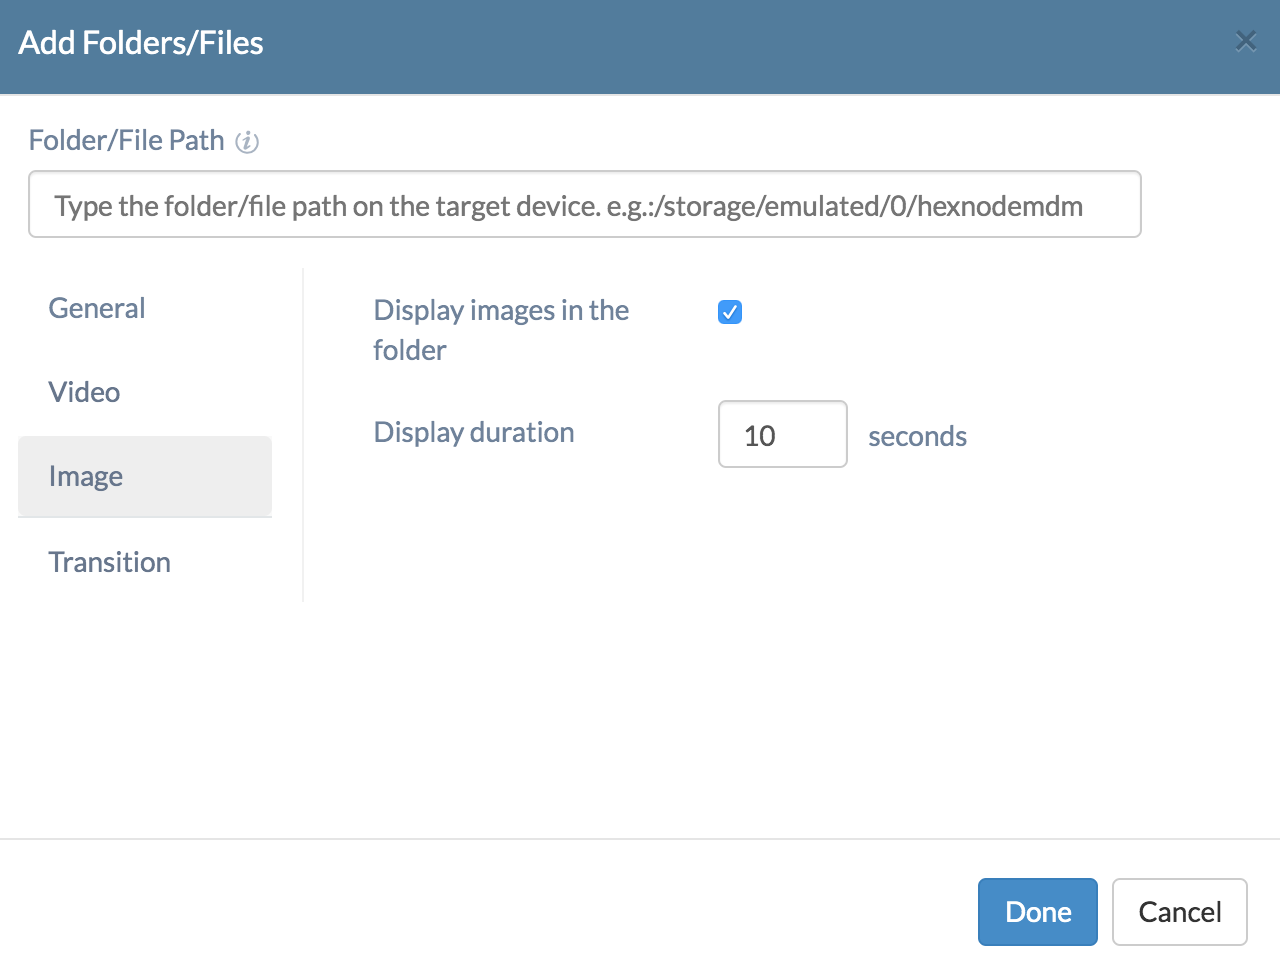
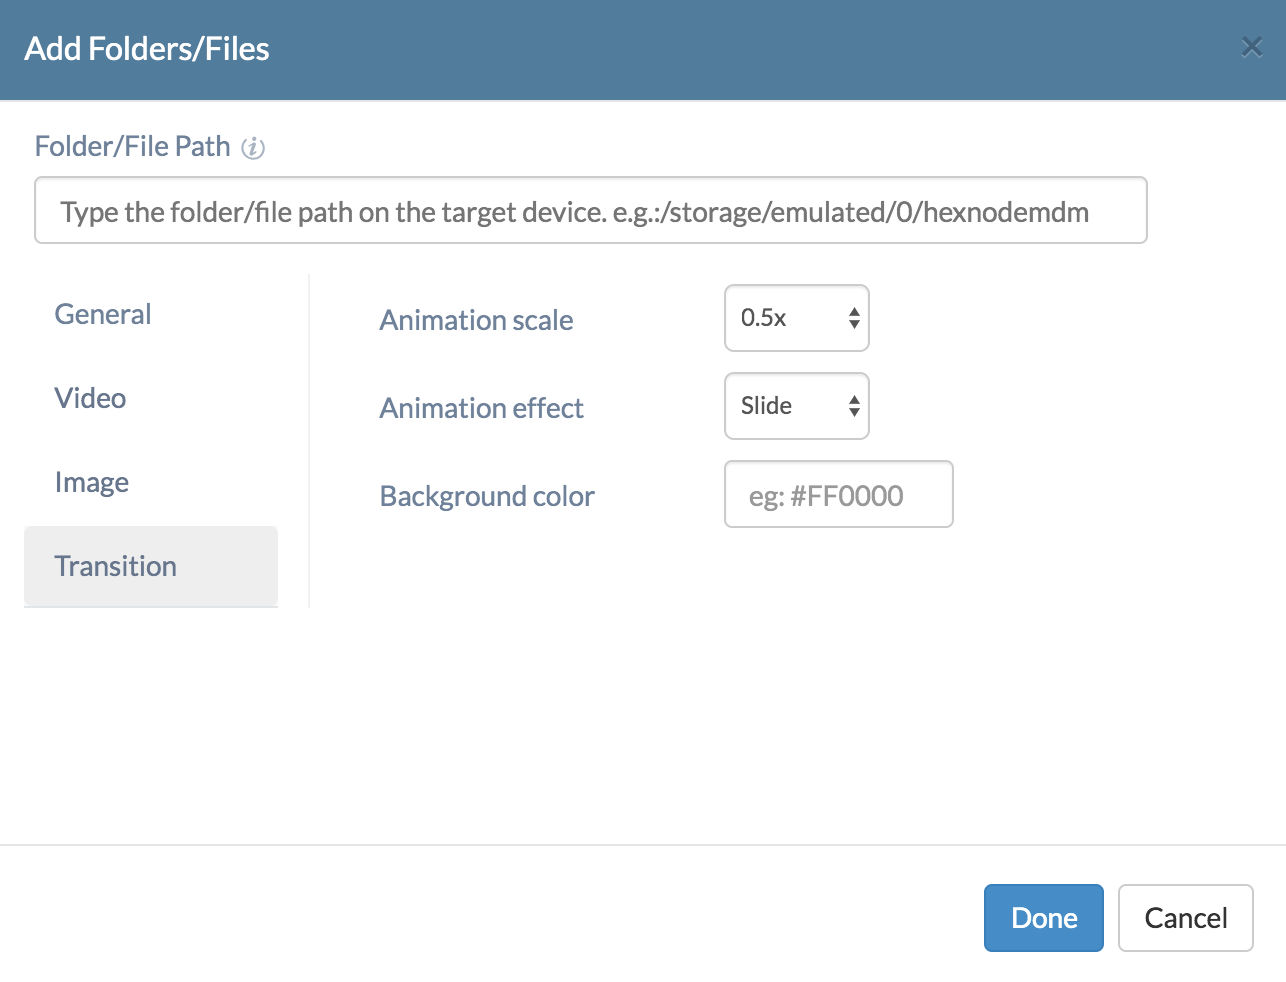
Add Folders/Files

- Folder/File Path – Provide the file path on the target device. e.g/:/storage/emulated/0/hexnodemdm
General
| Settings | Description |
|---|---|
| Include sub-folders | Check this option to include the files within the sub-folders. |
| Limit to | Choose the number of sub-folders to be included from the specified sub folder. This can take values from 1-9. |
| Order by | Choose the ordering by which media should be arranged.
|
| Play custom background music | Check this option to play a custom background music. |
| Fit to full-screen | Check this option to fit the image/video to the display screen. Normally, images/videos get cropped if their aspect ratios are different from the display screen. |
Video
| Settings | Description |
|---|---|
| Play videos in the folder | Check this option to play the videos in the folder. |
| Mute video volume | Check this option to mute the video. |
| Trim clips | Check this option to trim video clips. The duration to be trimmed is to be specified in MM:SS format. |
Image
| Settings | Description |
|---|---|
| Display images in the folder | Check this option to display images in the folder. |
| Display duration | Provide the time duration to display the image, in seconds. |
Transition
| Settings | Description |
|---|---|
| Animation scale | Choose the animation scale to be applied for transition. The value could be Off, 0.5x, 1x, 2x and 3x. |
| Animation effect | Choose the type of animation effect to be applied for transition. It could be Fade/Slide/Zoom. |
| Background color | Choose the background color of the transition. |
Add Videos
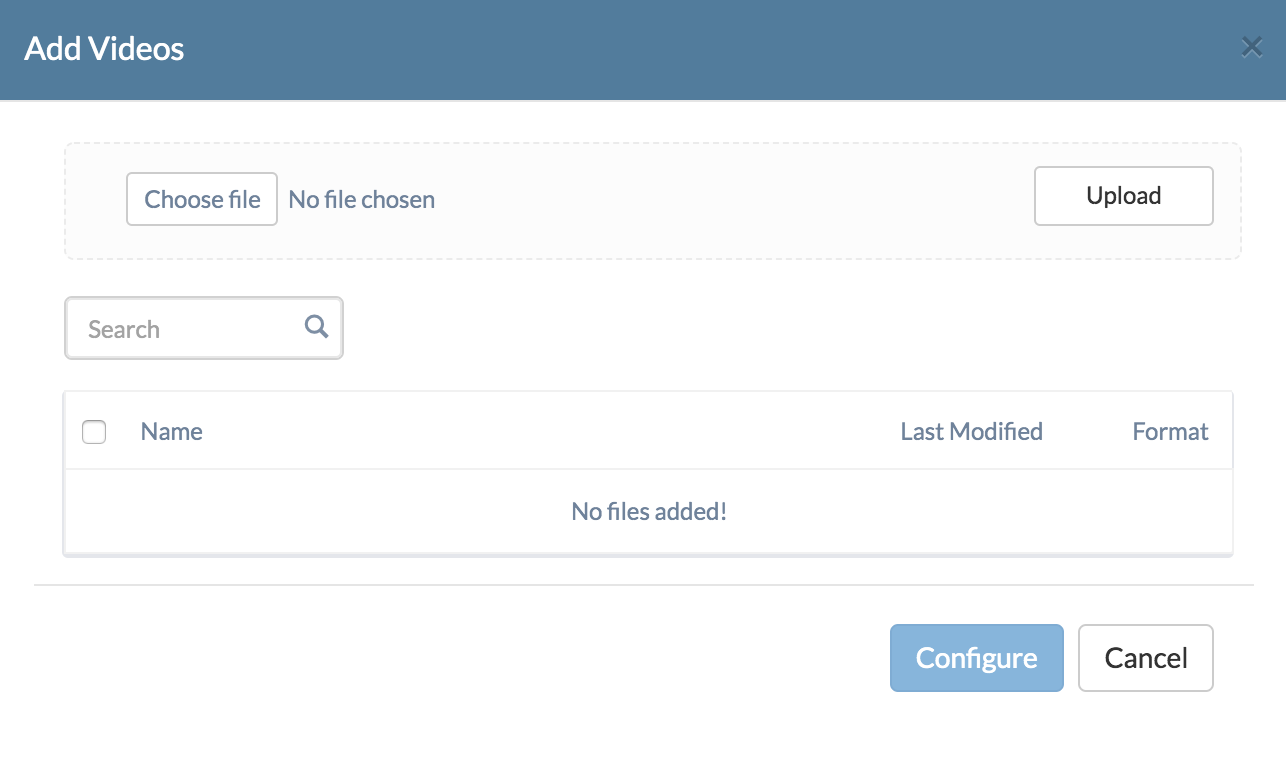
- Upload the videos to be set in digital signage kiosk.
- Select the uploaded file and click on Configure.
| Settings | Description |
|---|---|
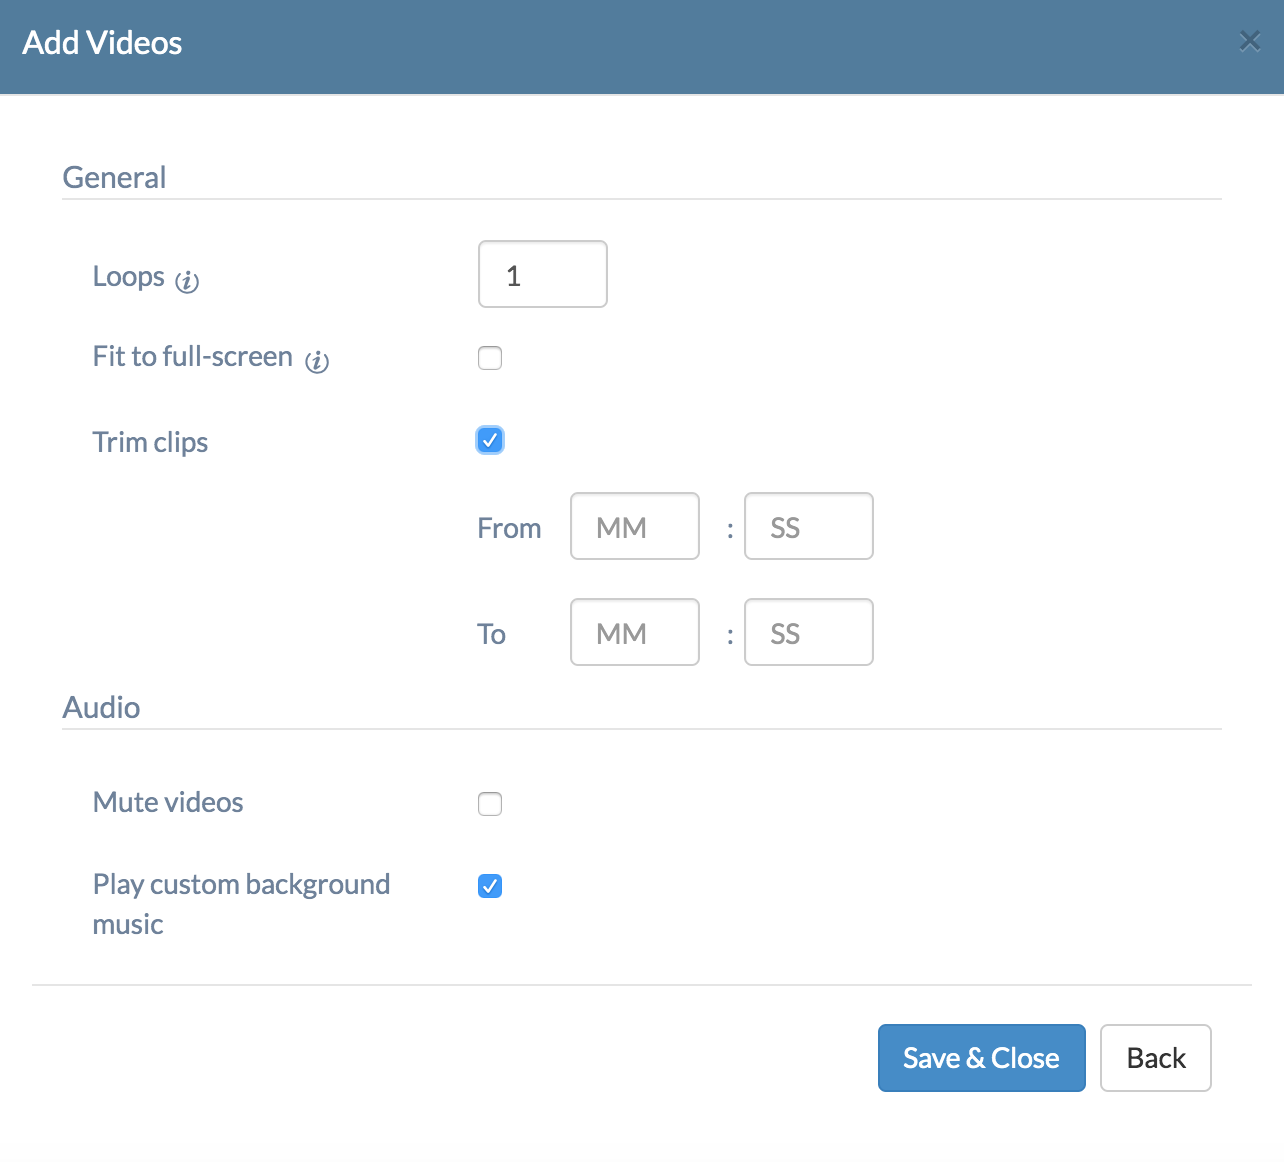
| Loops | Provide the number of sequences to play the video repeatedly. |
| Fit to full-screen | Check this option to fit the video to the display screen. Normally, videos get cropped if their aspect ratios are different from the display screen. |
| Trim clips | Check this option to trim video clips. The duration to be trimmed is to be specified in MM:SS format. |
| Mute videos | Check this option to mute the video. |
| Play custom background music | Check this option to play a custom background music. |
Add Images
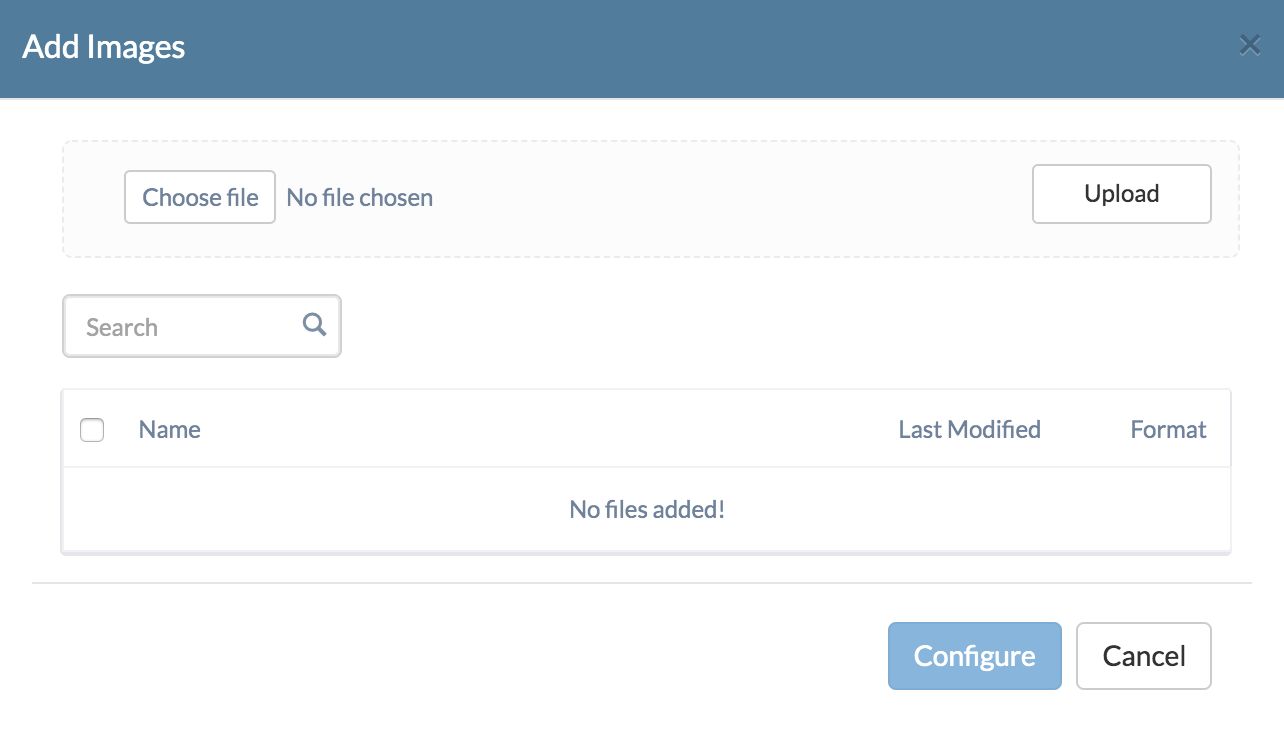
- Upload the images to be set in digital signage kiosk.
- Select the uploaded file and click on Configure.
| Settings | Description |
|---|---|
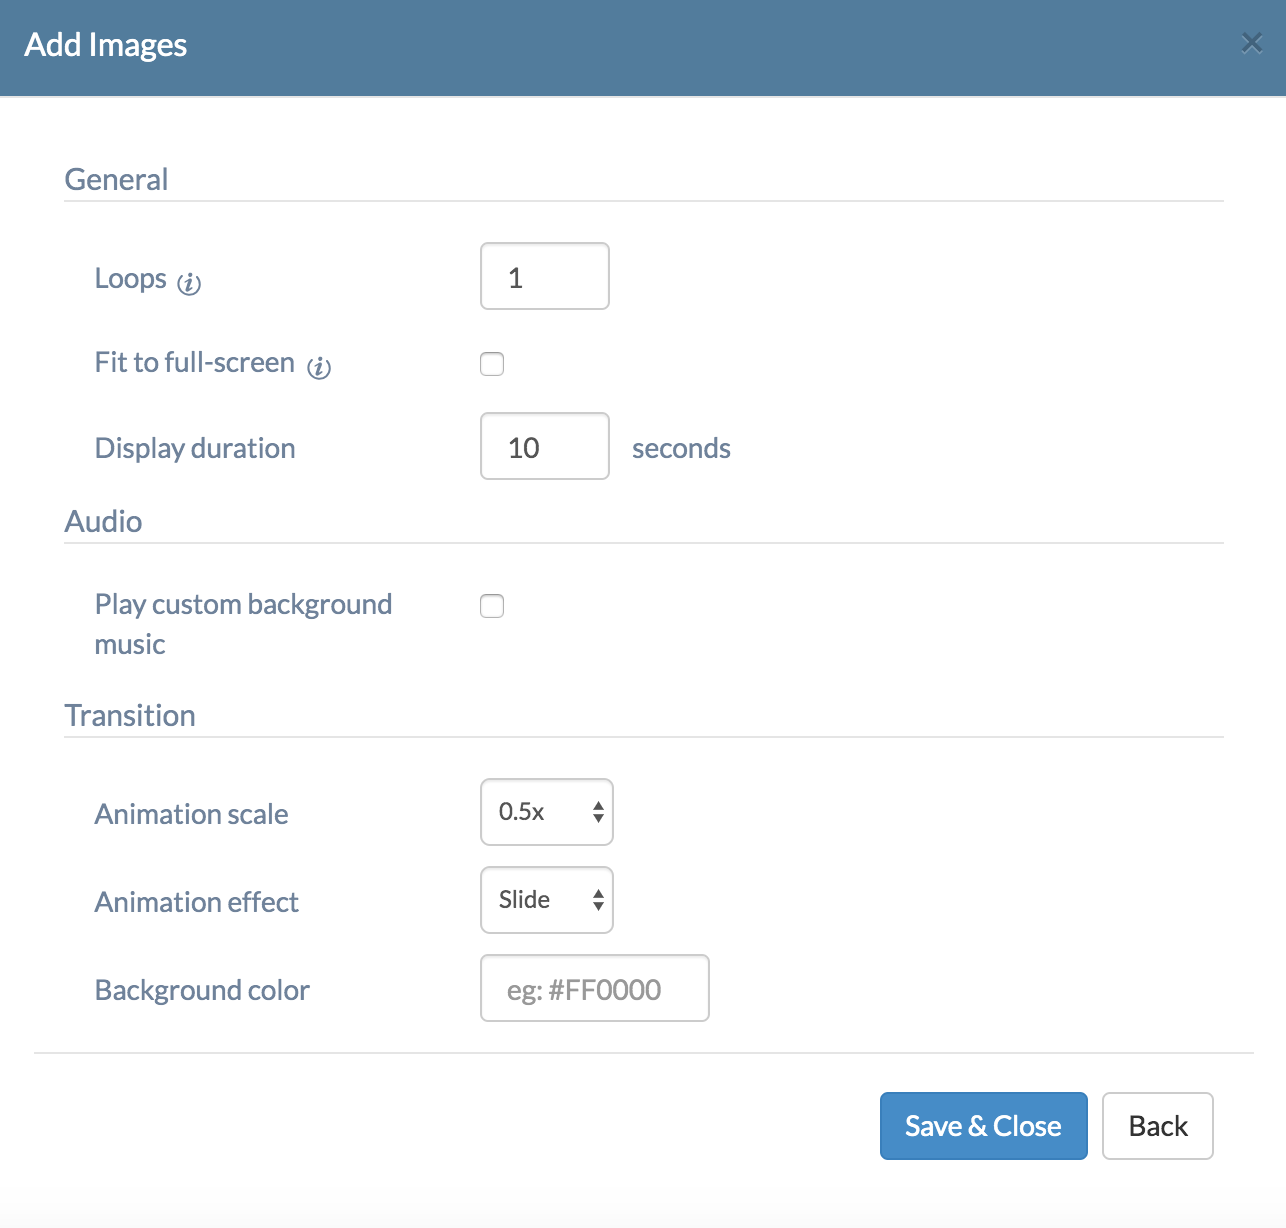
| Loops | Provide the number of sequences to display the images repeatedly. |
| Fit to full-screen | Check this option to fit the image to the display screen. Normally, images get cropped if their aspect ratios are different from the display screen. |
| Display duration | Provide the time duration to display the image, in seconds. |
| Play custom background music | Check this option to play a custom background music. |
| Animation scale | Choose the animation scale to be applied for transition. The value could be Off, 0.5x, 1x, 2x and 3x. |
| Animation effect | Choose the type of animation effect to be applied for transition. It could be Fade/Slide/Zoom. |
| Background color | Choose the background color of the transition. |
Audio
Configure the audio settings for the files uploaded.
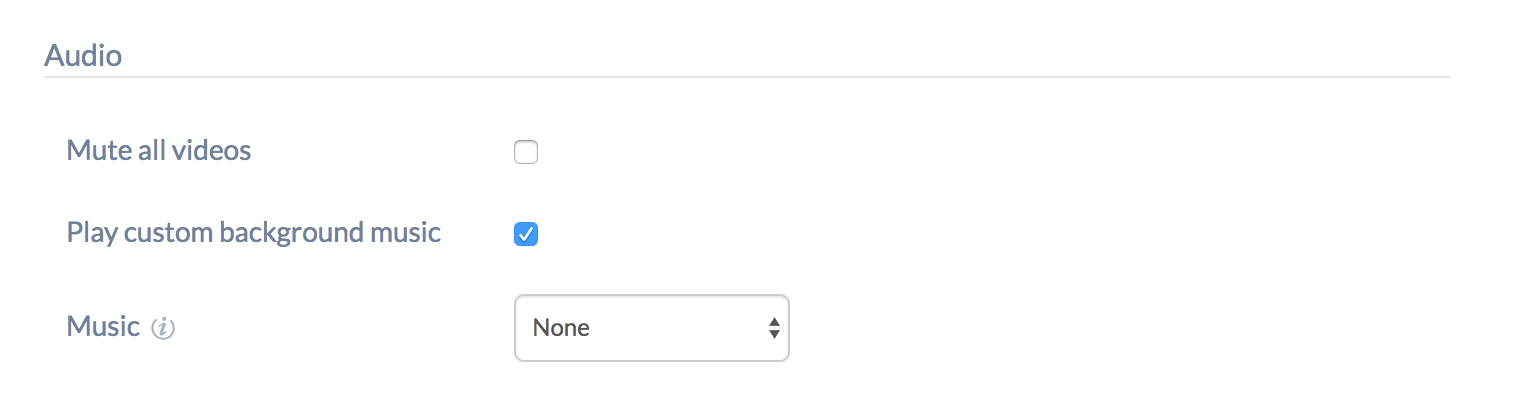
| Settings | Description |
|---|---|
| Mute videos | Check this option to mute the video. |
| Play custom background music | Check this option to play custom background music. |
| Music | Upload the audio file to be played in the loop. |
Display
Configure the display settings for the digital signage.

| Settings | Description |
|---|---|
| Fit to full-screen | Check this option to fit the image/video to the display screen. Normally, images/videos get cropped if their aspect ratios are different from the display screen. |
| Shuffle | Check this option to shuffle media files. |
| Screen orientation | Choose to set the screen orientation to either Portrait/Landscape mode. You can also choose to set the default mode. |
| Brightness | Choose the brightness mode.
|
| Sleep after | Provide either the time (mm:ss)/number of loops, after which the device should go to sleep mode. |
Associate the policy to target devices
You can associate the policy to devices by two methods.
If the policy has not yet been saved.
- Navigate to Policy Targets.
- Click on +Add Devices.
- Select the devices and click OK.
- Click on Save to apply the policies to devices.
Apart from devices, you can also associate the policies to device groups, user and user groups from Policy Targets.
If the policy has been saved, you can associate it with another method.
- From Policies, check the policies to be associated.
- Click on Manage → Associate Targets and select the devices.
- Click on Associate to apply the policy to the devices.


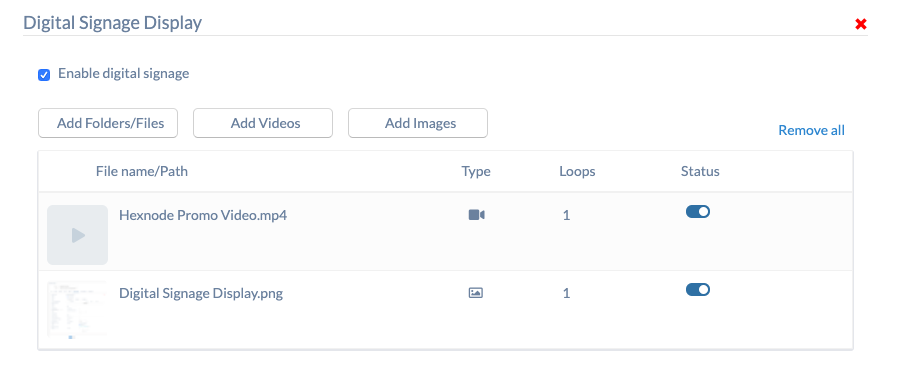
- It displays the file name, type of file, number of loops and the Status of the file.
- The status can be toggled off, if the specified file is not to be used.


