

Category filter
How to enroll iOS devices?
Before enrolling an iOS device, please make sure that you have configured the APNs certificate in your server.
There are different methods to enroll an iOS device. These methods of enrollment are subject to various criteria such as the size of the company, number of devices, security preferences, etc. The enterprises can use any of the below enrollment methods based on their requirement:
- Enrollment without authentication
- Email/SMS enrollment
- Self enrollment
- Apple Configurator enrollment
- DEP enrollment
- DEP enrollment using Apple Configurator
- Google Workspace Enrollment for iOS.
- User Enrollment
Enrolling iOS devices without Authentication
Users can enroll their iOS devices without providing any authentication credentials. They can just enroll devices with a single enrollment URL.
Open Safari browser and enter your enrollment URL which will look something like https://<portalname>.hexnodemdm.com/enroll/.
- This would take you to the enrollment screen. Enable the checkbox to agree with the terms and conditions and click Enroll.
- Provide the necessary permissions to allow profile download.
- After the profile gets downloaded, navigate to Settings > General > Profile for devices running iOS versions below 15. For devices running iOS 15+, navigate to Settings > General > VPN & Device Management.
- Choose Profile Service under the DOWNLOADED PROFILE tab.
- Click Install to install the configuration profile and certificate.
- Click Trust to allow remote management.
- When the profile is installed, click Done.
- Once the enrollment is complete, the Hexnode UEM app will start installing automatically on devices running iOS versions below 15. A prompt will be shown for devices running iOS 15+ to install the Hexnode UEM app. Click Install.
- Once the app is installed, allow the MDM to access the location, camera, microphone, and photos and send notifications.
- After allowing the permissions, click Agree & Continue.
Email or SMS enrollment
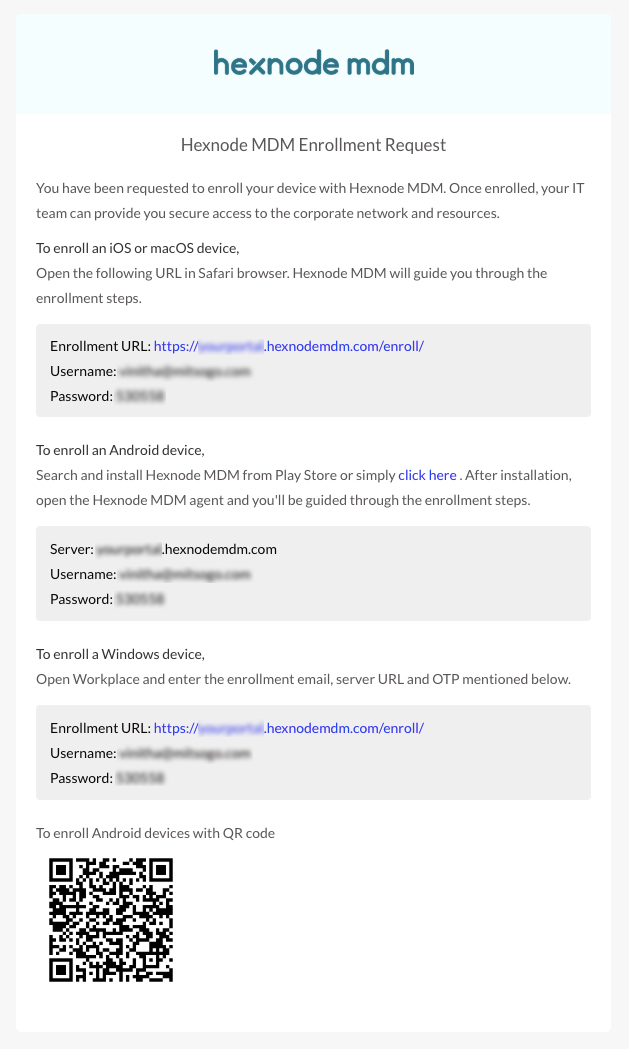
Authenticated enrollment can be enabled under Admin > Enrollment on the Hexnode UEM console. Enrollment with authentication delivers an enrollment request via email or SMS to the users which include the enrollment URL, username, password, and a QR code. A typical enrollment request would look something like this:
Once the enrollment credentials are received,
- Open Safari browser and enter the enrollment URL. It would look something like this: https://<portalname>.hexnodemdm.com/enroll/.
- This would take you to the enrollment screen. Enable the checkbox to agree with the terms and conditions and click Enroll.
- Enter the username and one-time password specified in the enrollment request and click Authenticate.
- Provide the necessary permissions to allow profile download.
- After the profile gets downloaded, navigate to Settings > General > Profile. for devices running iOS versions below 15. For devices running iOS 15+, navigate to Settings > General > VPN & Device Management.
- Choose Hexnode UEM under the DOWNLOADED PROFILE tab.
- Click Install to install the configuration profile and certificate.
- Click Trust to allow remote management.
- When the profile is installed, click Done.
- Once the enrollment is complete, the Hexnode UEM app will start installing automatically on devices running iOS versions below 15. A prompt will be shown for devices running iOS 15+ to install the Hexnode UEM app. Click Install.
- Once the app is installed, allow the UEM to access the location, camera, microphone, and photos and send notifications.
- After allowing the permissions, click Agree & Continue.
Self enrollment
Self-enrollment is a type of authenticated enrollment by which users will enroll their devices using their preassigned passwords (for local users) or their directory passwords (for AD, Microsoft Entra ID, Okta, and Google users). Users will not receive any enrollment requests if they have opted for self-enrollment.
- Access your enrollment URL through the Safari browser. The enrollment URL will look something like https://<portalname>.hexnodemdm.com/enroll/.
- On the enrollment screen, enable the checkbox to agree with the terms and conditions and click Enroll.
- Select the domain or authenticate via Microsoft, Google, or Okta.
- Enter the username and password.
- Click Authenticate.
- Provide the necessary permissions to allow profile download.
- After the profile gets downloaded, navigate to Settings > General > Profile for devices running iOS versions below 15. For devices running iOS 15+, navigate to Settings > General > VPN & Device Management.
- Choose Profile Service under the DOWNLOADED PROFILE tab.
- Click Install to install the configuration profile and certificate.
- Click Trust to allow remote management.
- When the profile is installed, click Done.
- Once the enrollment is complete, the Hexnode UEM app will start installing automatically on devices running iOS versions below 15. A prompt will be shown for devices running iOS 15+ to install the Hexnode UEM app. Click Install.
- Once the app is installed, allow the UEM to access the location, camera, microphone, and photos and send notifications.
- After allowing the permissions, click Agree & Continue.
UEM enrollment with Apple Configurator
Apple Configurator is an app that allows one to create configuration profiles for Apple devices including iPad, iPhone, Apple TV, and iPod Touch for easily deploying in business or school.
Follow these steps to enroll devices to Hexnode UEM with Apple Configurator:
Assign a user for the enrolled device.
- From your Hexnode UEM portal, navigate to Enroll > Platform – Specific > iOS > Apple Configurator.
- Select a user from the list and click on Save.
You can change the assigned user at any time from Manage > click on any device name > Actions > Change Owner.
Once the user is assigned you can open the Apple configurator on your Mac and follow the below steps.
Create a Wi-Fi profile
To create a Wi-Fi profile,
- Open Apple Configurator.
- Go to File > New Profile > Wi-Fi > Configure.
- Configure the Wi-Fi profile and save.
Create a Blueprint
- Go to Blueprint > Edit Blueprints.
- Create a new blueprint and name it.
- Name the new blueprint.
- Select the blueprint and click on the Add button on the top of Configurator 2 (or right-click on the blueprint > Add and select Profiles)
- Select the Wi-Fi profile created previously.
- Select the blueprint and click on the Prepare button on the top of Configurator 2 (or right-click on the blueprint > Prepare).
- Select Manual configuration and click Next.
- Select New Server and click Next.
- Provide any name and the enrollment URL available at Admin > Configurator Enrollment in Hexnode UEM.
- When the Configurator finishes fetching the certificates, click Next.
- To assign the blueprint to an organization, click New Organization and click Next.
- You can choose to sign in to Device Enrollment Program or click Skip.
- Provide organization details and click Next.
- Select Generate a new Supervision identity and click Next.
- In Setup Assistant, select the steps that you want to show while starting up the iOS device. You can also skip all the steps by selecting the option ‘Don’t show any of these steps’.
- Click Prepare.
- Enter the device password to apply the settings. The blueprint will be prepared now.
Apply Blueprint
- Connect iOS devices to the computer.
- Click on Blueprints on the top of Configurator and select the blueprint’s name and click Apply.
- When the blueprint is applied, a prompt appears giving a warning message that the device could erase, modify, remove or update. Click on Apply to apply the blueprint to the device and the device resets.
- If the device is already prepared, a prompt may appear saying that Apple Configurator could not perform the action. Click Erase.
- After applying the blueprint, a prompt appears on devices running iOS versions below 15, asking whether to apply/skip remote management configuration. Choose Apply Configuration and click Next.


