

Category filter
How to enroll Android devices?
The Android phones and tablets can be enrolled in different ways
- No authentication enrollment
- Email/ SMS enrollment
- Self enrollment
- QR Code Enrollment
- ROM enrollment
- Android Enterprise enrollment (a.k.a Android for Work)
- Non-Android Enterprise Enrollment as Device Owner.
No Touch Enrollment
Links for downloading Hexnode UEM Android app
Enroll Android mobile devices without authentication
The enrollment without authentication will require only the server name and no enrollment credentials. This is the fastest way of enrollment. All the device that are enrolled this way will be assigned to a default user.
- Open Google Play store and download and install Hexnode UEM application.
- Open the app and enter the server name which will look something like : <portalname>.hexnodemdm.com.
- Enable the Device administration permission, Usage access permission, Draw over apps permission, Write system settings permission, Notification access
permission and Allow app installation permission. - Click Allow in the following pop ups which asks for location, storage and phone permissions.
Your device will now be enrolled.
Enroll Android mobile devices with authentication
Here, the user will have to authenticate the enrollment using the enrollment credentials send to them via an enrollment request.
- Open Google Play store and download and install Hexnode UEM application.
- Open the app and enter the server name which will look something like : <portalname>.hexnodemdm.com.
- Enter the username and password mentioned in the enrollment mail or SMS.
- Click Next.
- Enable the Device administration permission, Usage access permission, Draw over apps permission, Write system settings permission, Notification access
permission and Allow app installation permission. - Click Allow in the following pop ups which asks for location, storage and phone permissions.
Self enrollment
Self-enrollment allows the users to enroll devices with their Active Directory/ Microsoft Entra ID/ Google user credentials. For other users, the admin may create a default user and a dedicated password manually or assign a common password or individual passwords for the users and sends it to them as a bulk mail. The enrollment process is pretty much the same.
- Open Google Play Store and download and install Hexnode UEM application.
- Open the app and enter the server name which will look something like : <portalname>.hexnodemdm.com.
- For Local users, click on Authenticate with Hexnode. Select the Domain as ‘local’ and type in the username and password.
- For AD users, click on Authenticate with Hexnode. Select your AD domain from the Domain drop-down and enter the username and password.
- For Microsoft Entra ID users, click on Authenticate with Microsoft and enter the Microsoft Entra ID username and password.
- For Google users, click on Authenticate with Google and enter the Google Workspace username and password.
- For Okta users, click on Authenticate with Okta and complete the on-screen procedure.
- Click Next.
- Enable the Draw over apps permission, Usage access permission and Device administration permission.
- Click Next and click Grant to grant additional permissions.
- Click Ok to grant access to GPS, storage and phone.
- Click Allow in the following pop ups which asks for location, storage and phone permissions.
QR Code Enrollment
At times, it becomes quite difficult with enrollment using the portal name, username & password. Hexnode UEM lets you enroll the devices by merely scanning the QR code.
Open Enrollment
For Open- enrollment, QR code will be present within the Hexnode UEM console.
- Login to your Hexnode UEM portal.
- Navigate to Enroll > Platform – Specific > Android > QR Code, Email or SMS.

- Download Hexnode UEM app from the PlayStore.
- Open the app and tap on the QR code icon on the bottom left of the screen.
- Scan the QR code on the screen and follow the on-screen instructions to complete the enrollment process.
Enrollment with Authentication
The QR Code required for the enrollment process will be send via email.
To Send Enrollment Request
- Login to your Hexnode UEM portal.
- Navigate to Enroll > Platform – Specific > Android > QR Code, Email or SMS.
- Select enrollment request mode as Email.
- Select the user and send the enrollment request.
An enrollment request mail will be received which contains the QR code.
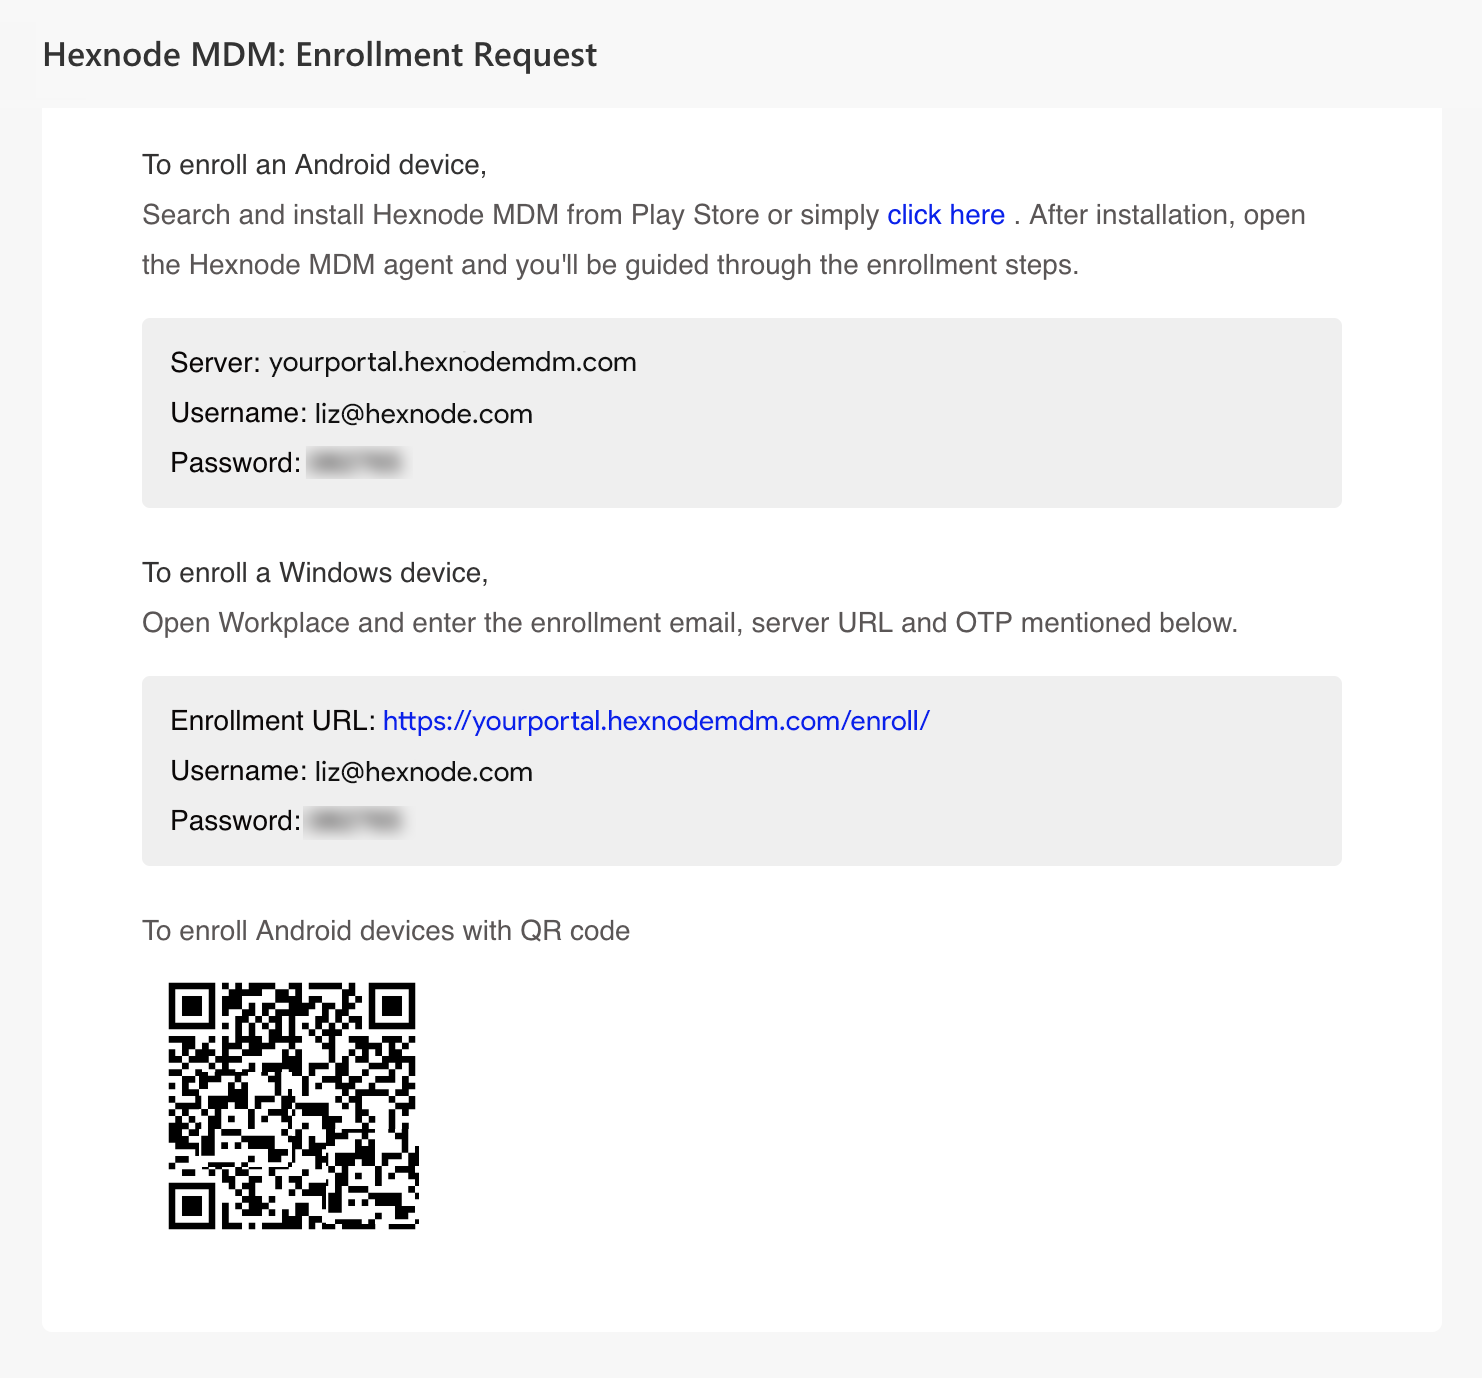
- Open Google Play Store and download and install Hexnode UEM app.
- Open the app and click on the QR Code icon on the bottom left of the screen and scan the QR code received via mail.
- Click on Agree.
- Enable Device administration, Usage access, Draw over apps, Write system settings and Notification access.
- Click on Next and the click on Grant to grant additional permissions.
- In the following pop-ups, click on Allow to grant the additional permissions.
- Your device will now be enrolled with Hexnode UEM.


