

Category filter
How to enroll iOS devices using Apple Configurator
The Apple Configurator app installed on Macs allows you to create configuration profiles for Apple devices, including iPad, iPhone, Apple TV, for easily deploying in business or school.
You can mass enroll and supervise devices with Apple Configurator. You can choose to add iOS and tvOS devices to Apple ADE using Apple Configurator, regardless of how or from where it is purchased. Download and install Apple Configurator from the Mac App Store.
Pre-requisites:
- To use Apple configurator, you must have a Mac device with:
- macOS 14 or later.
- Supported devices:
- iOS devices running OS version 11 or above.
- Apple TV (2nd generation or later).
Once these pre-requisites are met, follow these steps to enroll devices to Hexnode UEM with Apple Configurator:
- Create a Wi-Fi profile.
- Create a Blueprint and add Wi-Fi profile.
- Prepare the device.
- Connect iOS devices to the computer and apply the created Blueprint.
Create a Wi-Fi profile
To create a Wi-Fi profile,
- Open Apple Configurator.
- Click on File > New Profile.

- Give a name to the profile. All other fields are optional.
Select the Security type as “With Authorization” and provide a password. Set Automatically Remove Profile as “Never”.

- Select Wi-Fi from the left menu and click Configure.

- Give the name of the Wi-Fi network at Service Set Identifier (SSID)
- Select Auto join.
- Configure the Proxy Setup and select the Security Type.
- Provide the Wi-Fi password.
- Select Network Type as Standard.

- Click on File and Save the profile.


Create a Blueprint and add Wi-Fi profile
- On the Apple Configurator window, click on File > New Blueprint.

- Name the Blueprint.

- Select the created Blueprint, click on Add > Profiles and select the Wi-Fi profile you created earlier and click Add.


Prepare the device
- Select the Blueprint and click Prepare.
- Select the Configuration type as Manual Configuration and click Next.
- To enroll in Hexnode UEM from the Apple Configurator, select New server and click Next.
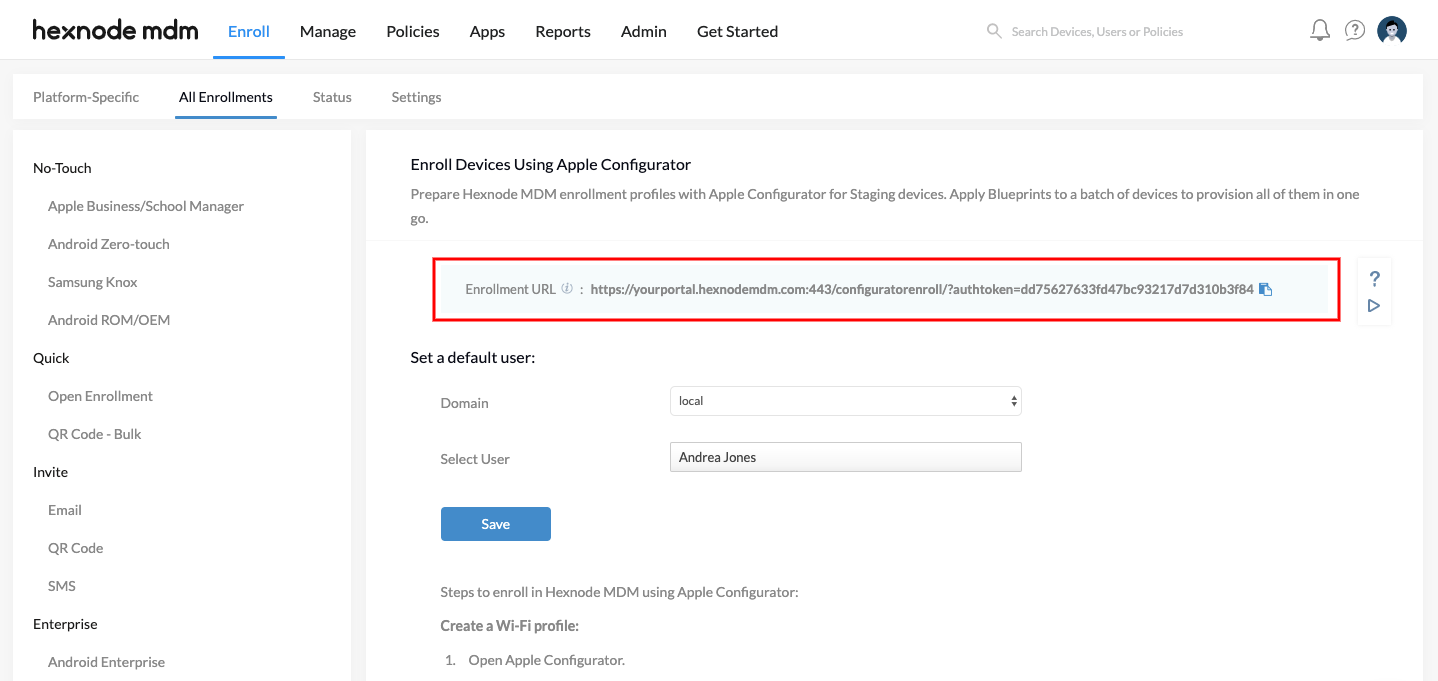
- Enter the server name and server URL as provided under Enroll > All Enrollments > Enterprise > Apple Configurator and click Next.
- The required Anchor certificates will be automatically added. Click Next.
- Click Skip on the page prompting for the Apple School/ Business Manager credentials.
- Create an organization by providing your organizational details and click Next.
- Select Generate a new supervision identity and click Next.
- Select the iOS Setup Assistant steps that you want to show up in the device and click Prepare.


The next step is to establish a connection between your unsupervised iOS device and Mac with a USB. After connecting, you can see your device in the Apple Configurator window.
Apply Blueprint
- Select the device from the Apple Configuration window.
- Right-click on the device, select Apply > choose the required Blueprint.
- Click Apply.


When you boot up the device, the MDM enrollment configuration, the Wi-Fi profile, the supervision settings and all of that you had set up in the Blueprint will get automatically deployed to the device.
Assign a user for the enrolled device
- This can be done from Enroll > All Enrollments > Enterprise > Apple Configurator.
- Select a default user from the list and click on Save.
You can change the assigned user anytime from Manage > Click on any device name > Actions > Change Owner.


