
Category filter
Rooting in Android Devices
Introduction
Android is one of the most customizable operating systems in use today. But do you have unrestricted access to your Android device? Can you download any apps you want? Have you wanted to change the look and feel of your device? Well, you can’t. This is because your carrier and device manufacturers have imposed several limitations on Android devices.
How then can you overcome these restrictions? Rooting is your answer. Rooting lets you break out from all such restrictions and tap the true potential of your Android device. Rooting in Android is the process of letting users gain root (superuser) access on their devices i.e. Rooting an Android device gives you the means to unlock the operating system and do just about anything on your Android device. You can modify software code, system application and settings, overclock or under-clock the processor, remove bloatware, replace the firmware, remove and replace the complete operating system, install software that the manufacturers wouldn’t normally allow you to and so on. When done correctly, you can make your Android work the way you want. Otherwise, you end up bricking your device.
Before you root your device, you need to know what the tweaks and risks are, and the best methods to root your device.
Advantages
You may think rooting is unnecessary. But you’ll be surprised at what you can accomplish with a few simple steps. Android users are resorting to rooting their devices because of the inherent benefits they provide, such as:
- Complete customization of every element of your phone’s appearance.
- Download apps from anywhere
- Remove pre-installed apps
- Install incompatible apps
- Block Ads in apps
- Flash custom ROM
- Boosted battery life and added performance
- Complete control of the kernel
- Remove bloatware
- Edit/delete system files
- Update to the latest version of Android even if your device is no longer supported by its manufacturer.
Consequences
Rooting gives you complete control over your phone. But if done incorrectly, it can simply turn your device into a brick. Here’s why you need to take rooting very seriously.
Warranty turns void
Your device goes straight out of warranty once it is rooted. If anything goes wrong with the hardware and you have rooted your device, the manufacturer will not cover the damages and you will have to pay out of your pocket. This is a better choice if you are past your warranty period. If you need to repair your device, you can flash the software backup you have made previously, and it will be as good as new. You will not receive software updates once you have rooted your device. All software updates are now your responsibility.
Security Vulnerabilities
Rooting your Android device introduces several security vulnerabilities. Viruses, Trojans from unsafe downloads, malicious links etc. can infect your device, and tamper with sensitive information such as passwords, credit card details stored on your device.
It is worthwhile to install proper antivirus before rooting to keep off attacks. If your device doesn’t have enough antivirus protection, rooting makes it prone to all sorts of mobile malware attacks.
Disabled Apps
Certain apps and services do not work on rooted Android devices. Such apps cannot be downloaded because the developer has blocked accessed by rooted devices. Google’s Android Pay is one such example.
Preparation
- Make sure that your device is adequately charged.
- Ensure that you have a backup of your phone’s current rom before you root.
- Enable USB Debugging and OEM Unlocking options. To do this,
- Open Settings > About Phone on your device.
- Tap on Build Number 7 times to enable Developer Options on the device.
- Find Developer options on the device.
- Check enable USB Debugging and enable OEM Unlocking options.
Methods
There are several methods to root your Android device. Before you do this, you need to know certain terms associated with rooting. In this context ROM refers to the custom version of your Android. When you root your device, you are flashing a custom ROM to replace the Android OS preinstalled on your device. Another term that we would be using frequently is the bootloader. The bootloader is a piece of software that boots up your phone’s OS, and it needs to be unlocked to root your phone.
Many of the methods require you to install Android SDK or unlock bootloader. Unlocking the bootloader is slightly different depending on the mobile vendor. Note that this might affect your warranty. You might need to install device drivers to ensure that your Android device can communicate properly with your computer.
Commercial apps like KingoRoot, OneClickRoot, TowelRoot, SuperOneClick are popular apps used for rooting Android devices. These apps are pretty much straightforward and can be done with or without using a computer. The process might take a while but if you follow the instructions carefully, it should be simple.
Once you have successfully completed the steps you would need to ensure that your device has successfully rooted. Root Checker is a popular app which when installed and run will tell you if your device has administrator privileges.
Root Android device using KingoRoot
Using KingoRoot apk
- Download and install KingoRoot on your Android device.
- Launch KingoRoot and click on One Click Root to start rooting your device.You can view the progress.
- Once completed, you will be able to see a message Root Succeeded on your device.
Using KingoRoot on PC
- Download and install KingoRoot on your Android device.
- After installation, launch Kingo Android Root.
- Connect your Android device to PC via USB cable.
- Click Root to root your device. Your device will be rebooted several times.
- Once completed, you will be able to see a message Root Succeeded on the screen.
Root Android device using SuperSU
- Download SuperSU zip file into your device.
- Boot your device into TWRP recovery.
- Tap on Install and select the zip file installed in step1.
- Select Swipe to Confirm Flash to start flashing your device.
- Once completed, select Reboot System option.
Your device has been successfully rooted.
Root Access for Hexnode MDM
In order to get the full privilege of a rooted device, the user has to grant root access permission for Hexnode MDM.
- After Hexnode MDM app installation is complete and the rooted Android device is enrolled in Hexnode MDM, you’ll be prompted to grant Root access.
- Click GRANT.
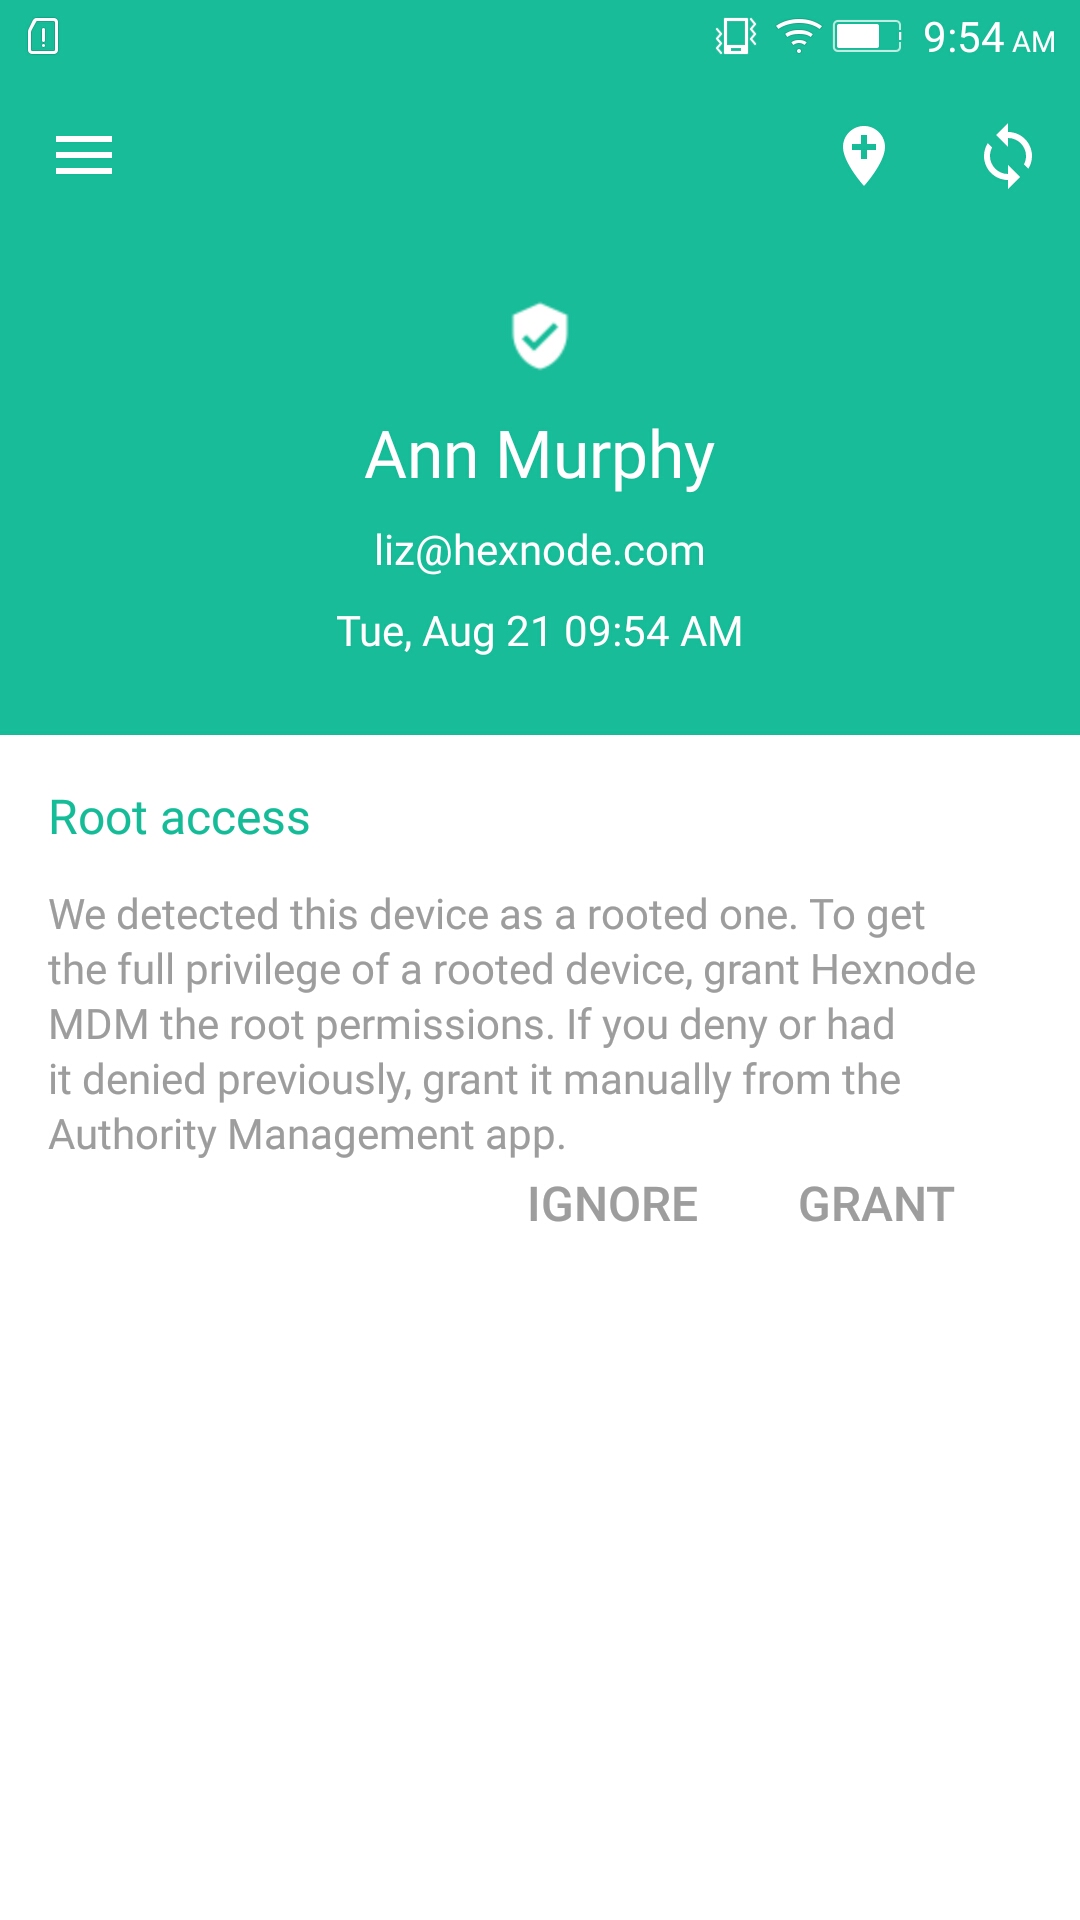
If you denied by clicking IGNORE, and wish to grant the Root access to Hexnode MDM later,
- Go to the Menu bar from the top left corner of the screen and click on Settings.
- Click on the three vertical dots at the top right corner for a drop-down menu. Select Update Root Access.
- Click OK in the popup for confirmation.
Unroot your Android
If you change your mind, no problem! You can easily unroot your phone. If you have rooted your device by flashing a custom ROM, then you need to perform factory reset to unroot it. Again, this process varies for different manufacturers. If you flashed a custom ROM, you can use SuperSU app to unroot the device.
- Launch SuperuserSU app and select Settings tab.
- Find the option Full Unroot from the Settings screen and tap on it.
- Tap on Continue button to unroot the device.
- Once successful, the device will reboot automatically. If it does not reboot automatically, press the Power button and select Restart option.


