Category filter
How to configure Email on iOS devices?
It is a boon for many organizations to get their users up and running quickly by setting up their mail remotely. With an efficient MDM solution provider such as Hexnode UEM, you can create and configure email settings for iOS devices to allow users to send and receive emails with their corporate email accounts.
The admin can configure the incoming and outgoing mail server settings, choose how users authenticate, enable S/MIME for encryption, and so forth. To set up mail for a large number of devices, use the wildcards feature to auto-populate usernames or email addresses.
Configure Email account settings on iOS via policy
To configure email settings via policy,
- Log in to your Hexnode UEM portal.
- Navigate to Policies > New Policy. Assign a suitable name and description (optional) for the policy. You can also choose to continue with an existing policy.
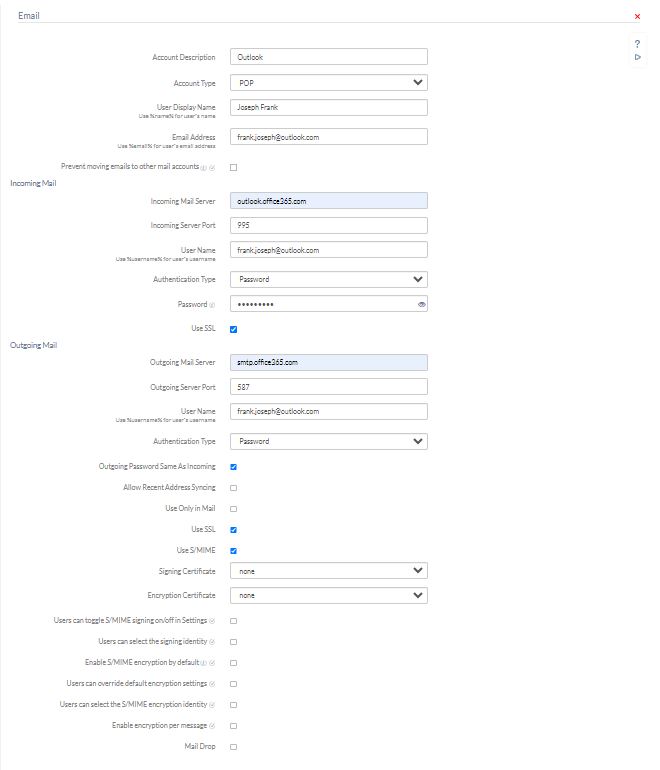
- Go to iOS > Accounts > Email. Click Configure.
| Email settings | Description |
|---|---|
| Account Description | Provide a display name for the email account. Use any name as this is used for distinguishing between email accounts. It is usually shown in the Mail and Settings applications. |
| Account Type | Select the protocol to be used for the Email account. There are two protocols to choose from:
|
| Path Prefix
(If IMAP is selected) |
Enter the path prefix to specify the location from where to find the mail for your IMAP account. Usually, the IMAP path prefix should be “INBOX” (use all caps). |
| User Display Name | The name to be displayed for a user. This field supports the use of wildcards. The supported wildcard is %name%. |
| Email Address | Enter the email address for the account. This field also supports the use of wildcards. The supported wildcard is %email%. |
| Prevent moving emails to other mail accounts
(iOS 5.0+) |
If enabled, it prevents users from moving emails to other mail accounts on their devices. It also prevents forwarding and replying to emails from different email accounts configured on the same device. |
Incoming Mail Settings
| Incoming Mail settings | Description |
|---|---|
| Incoming Mail Server | Specify the server address of the incoming email server. |
| Incoming Server Port | Enter the port number of the incoming email server. The default port number is 143. |
| User Name | Enter the username used to connect to the incoming email server. This field supports the use of wildcards. The supported wildcard is %username%. |
| Authentication Type | Select the type of authentication for incoming mail. The available options include:
|
| Password | Enter the account password to authenticate with the incoming mail server. The password should be specified if any option other than None is selected as Authentication Type. |
| Use SSL | Use SSL if an encrypted connection needs to be established between the incoming mail server and the iOS device. SSL is used by default. |
Outgoing Mail Settings
| Outgoing Mail settings | Description |
|---|---|
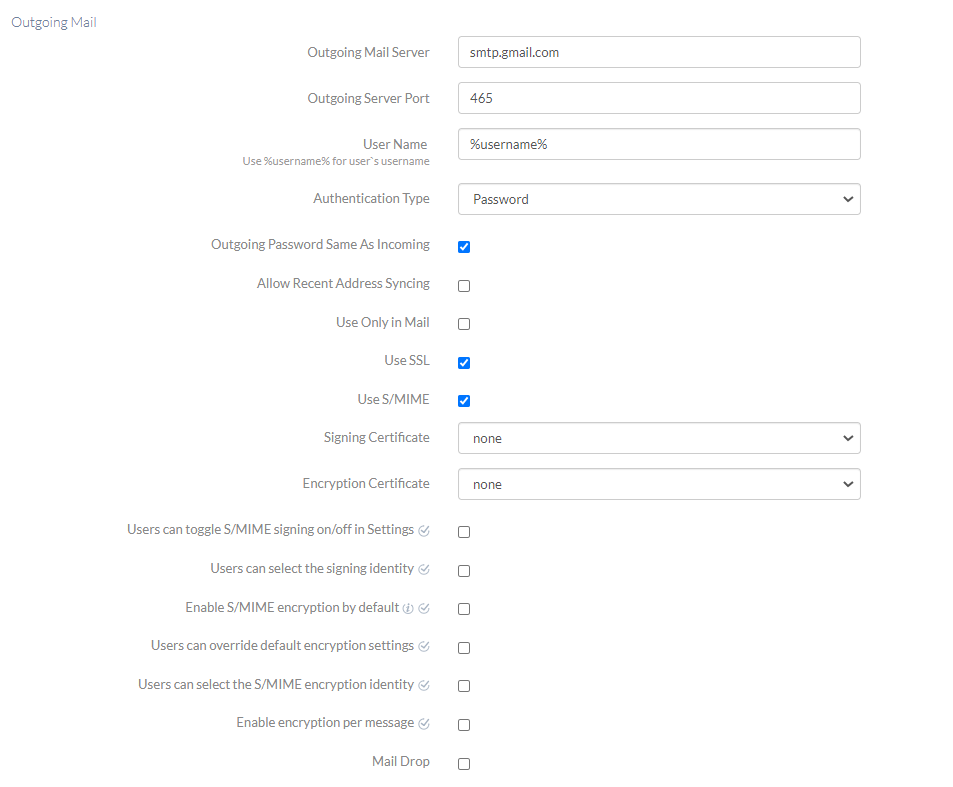
| Outgoing Mail Server | Specify the server address of the outgoing email server. |
| Outgoing Server Port | Enter the port number of the outgoing email server. The default port number is 587. |
| User Name | Enter the username used to authenticate with the outgoing email server. This field supports the use of wildcards. The supported wildcard is %username%. |
| Authentication Type | Select an authentication type to authenticate with the outgoing mail server. The available types include:
|
| Outgoing Password Same As Incoming
(if outgoing authentication type is other than None) |
Specify whether the passwords for the incoming and outgoing servers are the same. If enabled, the outgoing password field will be hidden. This option is enabled by default. |
| Password
(if ‘Outgoing Password Same As Incoming’ is disabled) |
Enter the email account password used to authenticate with the outgoing mail server. |
| Allow Recent Address Syncing (iOS 6.0+) |
Allow the device to sync the recently used email addresses between the device and their iCloud account. This option is disabled by default. |
| Use Only in Mail (iOS 5.0+) |
Allow users to view and send emails only from the Apple Mail app. This option is disabled by default. |
| Use SSL | A Secured Sockets Layer establishes an encrypted connection between the device and the outgoing server. By default, SSL is used. |
| Use S/MIME | Specify whether the email account uses S/MIME to sign, encrypt, or decrypt emails. S/MIME is an asymmetric cryptography-based encryption method used to check the authenticity, integrity, and confidentiality of emails. This option is disabled by default. |
| Mail Drop
(iOS 9.2+) |
Allows the configured email account to use Mail Drop. This option is disabled by default. |
If Use S/MIME is enabled,
| Settings | Description |
|---|---|
| Signing Certificate | A signing certificate helps users to digitally sign the outgoing email to ensure the authenticity of the sender. Select the already uploaded certificate from the list. If you haven’t uploaded one, go to iOS > Security > Certificates to upload one. |
| Encryption Certificate | An encryption certificate is used to encrypt all messages. Select the one you’ve uploaded at iOS > Security > Certificates. |
| Users can toggle S/ MIME signing on/off in Settings
(iOS 12.0+) |
Checking this option allows the users to toggle S/MIME signing on/off in Settings. If disabled, it prevents the users from changing the signing settings and forces them to use the signing certificate that you have configured. This option is disabled by default. |
| Users can select the signing identity
(iOS 12.0+) |
Checking this option allows the users to select the signing identity. This option is disabled by default. |
| Enable S/MIME encryption by default
(iOS 12.0+) |
Check this option to encrypt all emails as the default behavior. |
| Users can override default encryption settings
(iOS 12.0+) |
Checking this option allows the user to toggle the encryption by default settings. If disabled, it forces the user to use the encryption that you have configured. This option is disabled by default. |
| Users can select the S/MIME encryption identity
(iOS 12.0+) |
Checking this option allows the users to select S/MIME encryption identity. This option is disabled by default. |
| Enable encryption per message
(iOS 12.0+) |
Specify whether users can choose to encrypt emails while composing them. Checking this option will display the per-message encryption option when composing a new mail. This option is disabled by default. |
Associate policy with Target Devices
If the policy has not been saved,
- Navigate to Policy Targets > +Add Devices.
- Choose the target devices and click Ok. Click Save.
- You can also associate the policy to Device Groups, Users, User Groups or Domains from the left pane of Policy Targets tab.
If the policy has been saved,
- Go to Policies and choose the desired policy.
- Click on Manage drop-down and select Associate Targets.
- Choose the target entities and click Associate.
What happens at the device end?
Once the policy is successfully deployed with valid configurations to the device, the account will be added on the Mail app and listed under Settings > Mail > Accounts. Users can also view the account under Settings > General > Device Management > Hexnode MDM > Accounts.


