
Category filter
Configure Exchange ActiveSync on iOS Devices
Configuring Exchange ActiveSync on iOS devices provides secure access and storage for your email and attachments. It syncs emails, attachments, contacts, calendars, and other accounts between the devices and the Exchange server, thus providing access to this information even in the absence of a network connection. Exchange ActiveSync provides standard encryption services like SSL encryption to add security for mobile communication with the server. Hexnode allows the admin to configure ActiveSync settings for iPhone and iPad via the MDM console.
Configure Exchange ActiveSync on iOS devices via policy
To configure Exchange ActiveSync settings on Apple devices via policy,
- Login to your Hexnode UEM portal.
- Navigate to Policies > New Policy. Assign a suitable name and description (optional) for the policy. You can also choose to continue with an existing policy.
- Go to iOS > Accounts > Exchange ActiveSync. Click Configure.
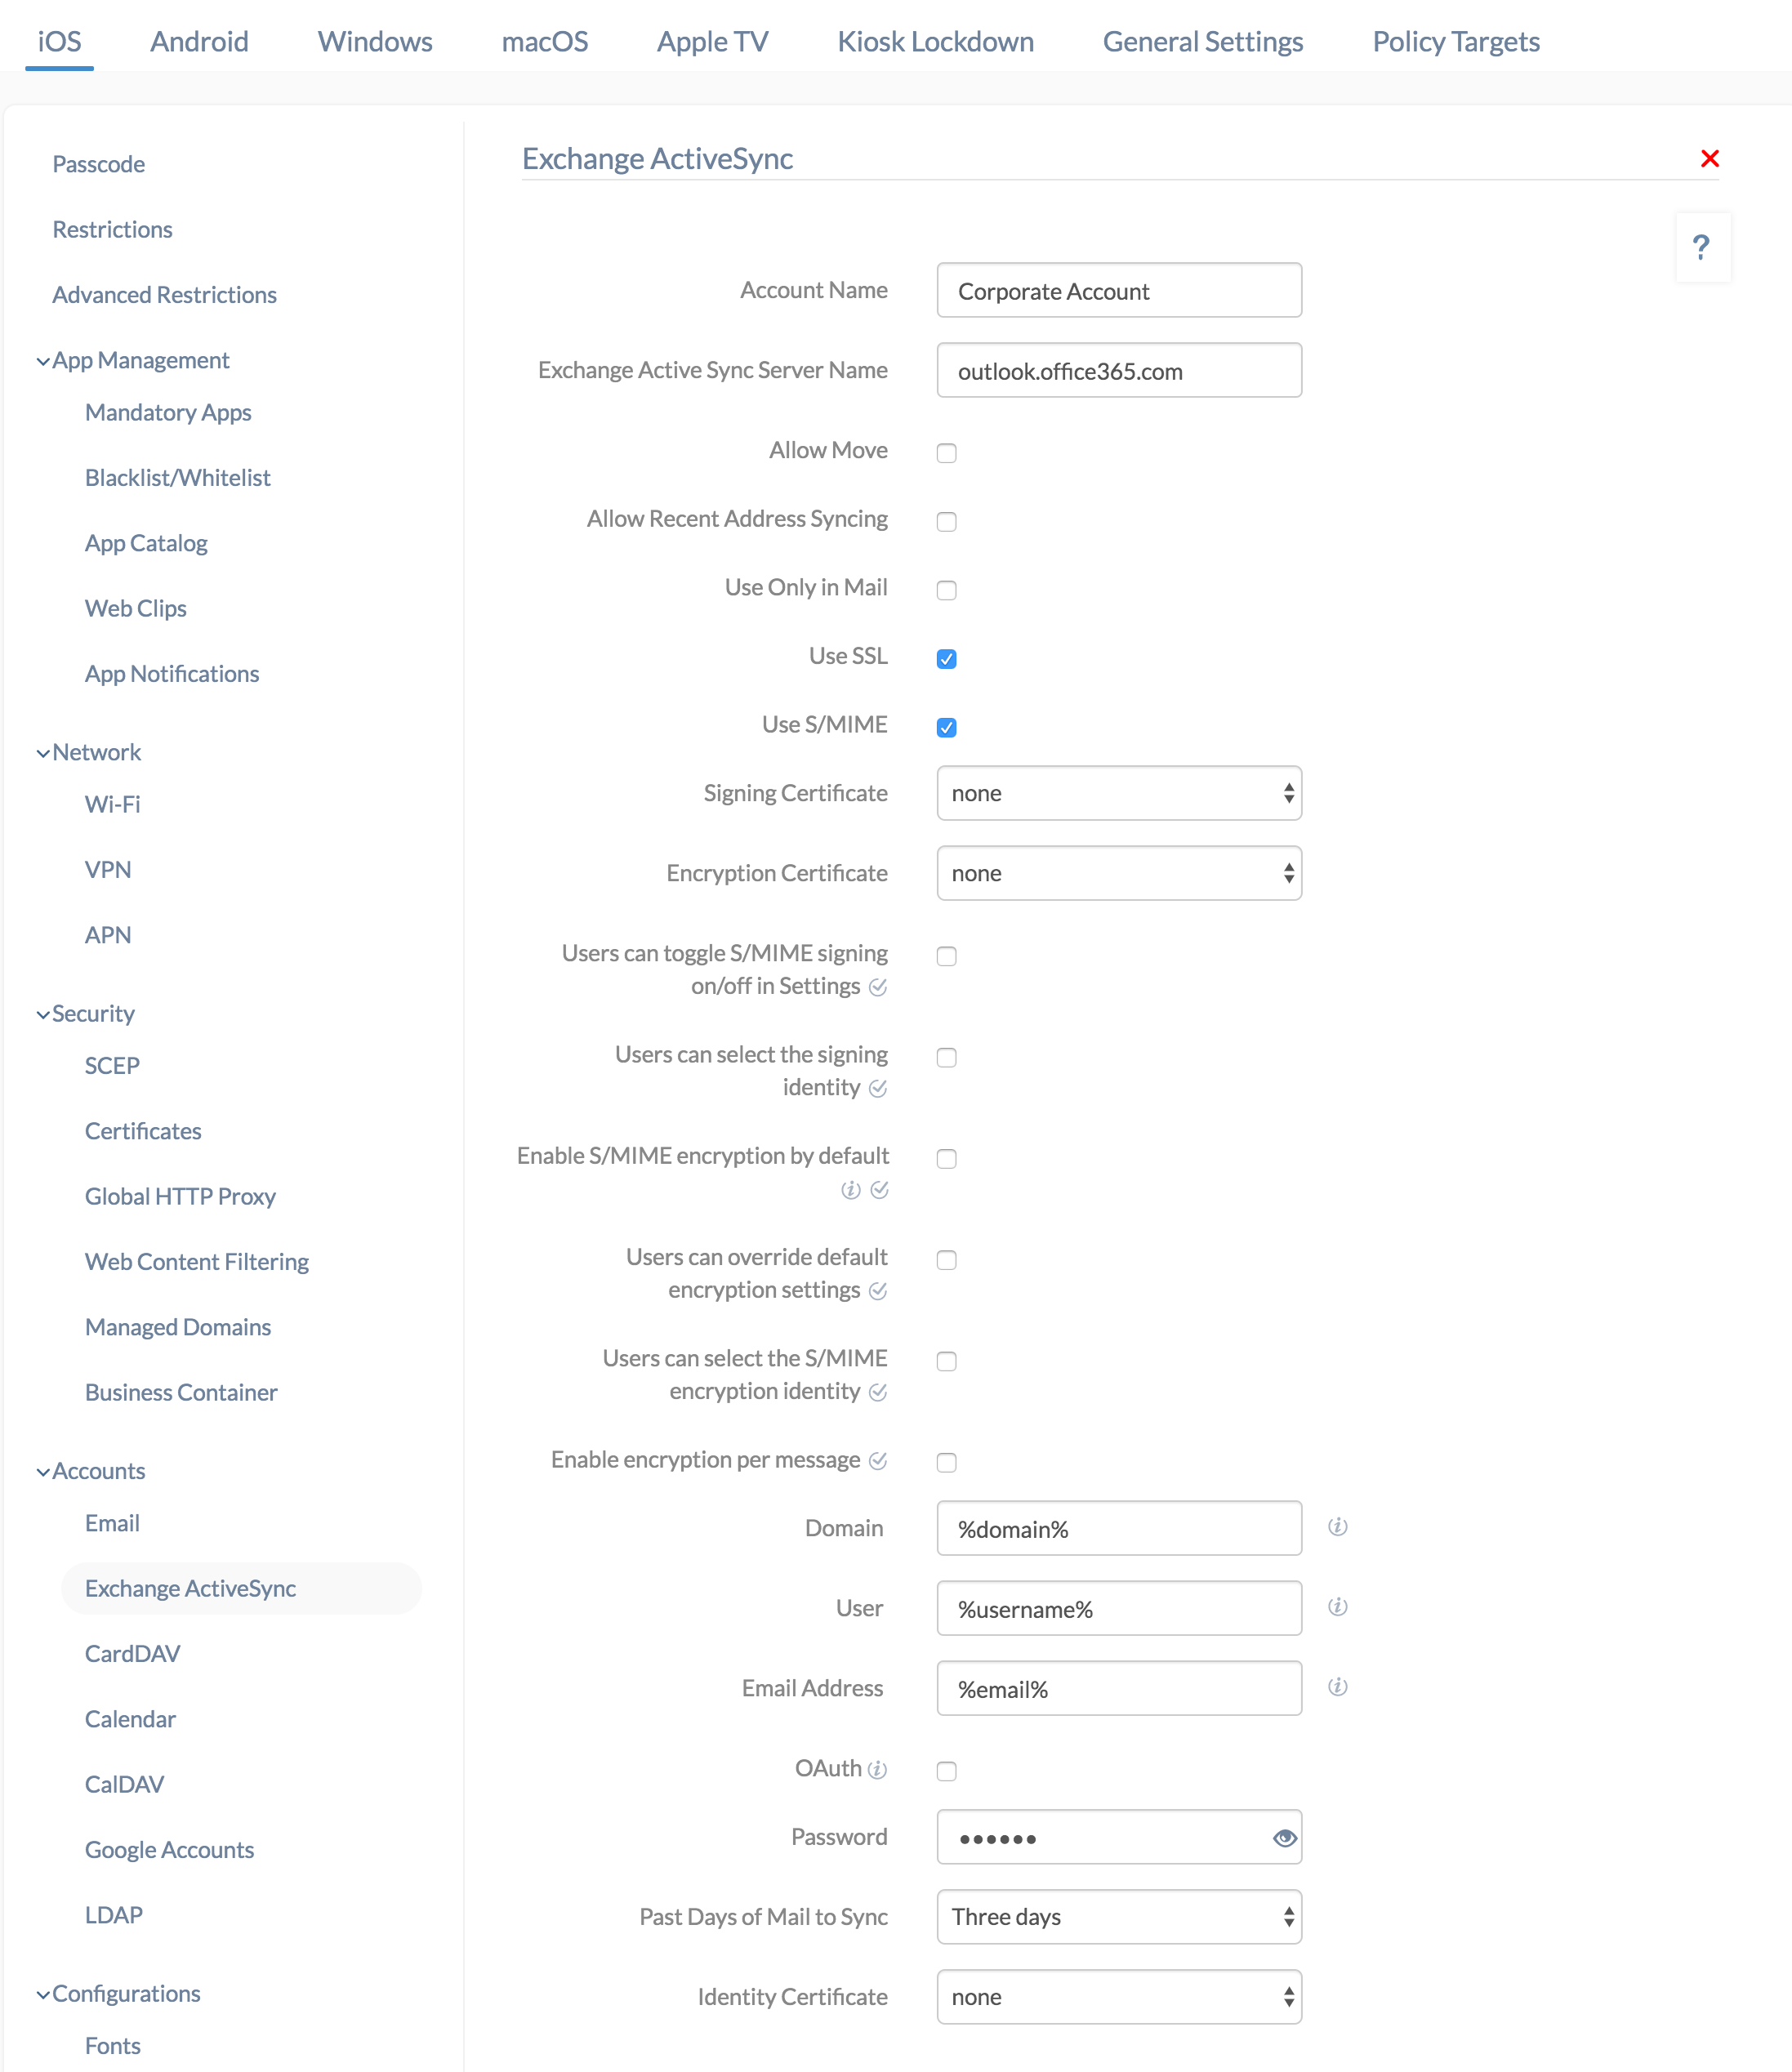
| ActiveSync Settings | Description |
|---|---|
| Account Name | Name used to identify an ActiveSync account. |
| Exchange ActiveSync Server Name | Provide the name of ActiveSync server. Example outlook.office365.com. |
| Allow Move | Allow users to move/forward messages between email accounts in their devices. This option is disabled by default. |
| Allow Recent Address Syncing | This option saves the recently used email addresses to their iCloud account. Recent address syncing is disabled by default |
| Use Only in Mail | Users are allowed to send and read emails only from the Mail app. Disabled by default. |
| Use SSL | Enable SSL to establish an encrypted connection between the device and the server. By default, SSL is used. |
| Use S/MIME | S/MIME provide extra security to your email communications by signing, encrypting, and decrypting the email. The use of S/MIME confirms the authenticity of the sender, and the integrity of the message. S/MIME is an encryption method based on asymmetric cryptography. Disabled by default. |
| Signing Certificate
(Available only if use of S/MIME is enabled) |
Select the signing certificate from the list of available certificates. To add a new certificate, go to Policies > select the existing policy > iOS > Security > Certificates. |
| Encryption Certificate
(Available only if use of S/MIME is enabled) |
Add a new encryption certificate from Policies > select the existing policy > iOS > Security > Certificates, and it’ll be displayed here. |
| Users can toggle S/ MIME signing on/off in Settings
(Available only if use of S/MIME is enabled) (Supported on iOS 12.0+ devices) |
Allows the users to toggle S/MIME signing on/off in Settings. Disabling this option prevents the user from changing the signing and forces the user to use the signing certificate configured by the admin. Disabled by default. |
| Users can select the signing identity
(Available only if use of S/MIME is enabled) (Supported on iOS 12.0+ devices) |
Allows the users to select the signing identity. Disabling this option prevents the user from changing the signing identity and forces the user to use the signing identity configured by the admin. Disabled by default |
| Enable S/MIME encryption by default
(Available only if use of S/MIME is enabled) (Supported on iOS 12.0+ devices) |
Checking this option allows S/MIME encryption by default. This default cannot be changed by the user, if enable encryption per message is disabled. |
| Users can override default encryption settings
(Available only if use of S/MIME is enabled) (Supported on iOS 12.0+ devices) |
Allows the user to toggle the encryption by default settings. Disabling the option prevents users from changing the encryption default settings, and forces users to use the encryption configured by the Admin |
| Users can select the S/MIME encryption identity
(Available only if use of S/MIME is enabled) (Supported on iOS 12.0+ devices) |
Allows the users to select S/MIME encryption identity. Disabling the option prevents users from changing the encryption identity, and forces users to use the encryption identity configured by the Admin. Disabled by default. |
| Enable encryption per message
(Available only if use of S/MIME is enabled) (Supported on iOS 12.0+ devices) |
Allows to display per-message encryption switch in the Mail Compose UI. Disabled by default.
If Enable S/MIME encryption by default is enabled, enabling encryption per message allows user to opt out of encryption and if Enable S/MIME encryption by default is disabled, enabling encryption per message allows user to opt in to encryption. |
| Domain | Specify the domain name of the Exchange server. This field supports the use of wildcards. The supported wildcards are
|
| User | The ActiveSync username. This field supports the use of wildcards. The supported wildcards are
|
| Email Address | Email address of the user. This field supports the use of wildcards. The supported wildcards are
|
| OAuth | Check this option to allow OAuth connection for authentication. A password may not be specified on enabling this option. |
| Password | The password associated with the ActiveSync username. |
| Past Days of Mail to Sync | The number of days of email to be downloaded on the device. You can choose from the six available options – Unlimited, One day, Three days (default value), One week, Two weeks, One month. For example, if you choose Three days, then the emails you sent/received in the past three days will be downloaded to the device from the mail server. |
| Identity certificate | Identity certificates which are uploaded at Policies > select the existing policy > iOS > Security > Certificates are displayed here. |
Associate policy with devices/groups
To associate the configured Exchange ActiveSync policy that has not been saved,
- Navigate to Policy Targets > +Add Devices.
- Choose the target devices and click OK. Click Save.
- You can also associate the policy to device groups, users, user groups or domains from the left pane of the Policy Targets tab.
If the policy has been saved,
- Go to Policies tab and choose the desired policy.
- Click on Manage drop-down and select Associate Targets.
- Choose the target entities and click Associate.
What happens at the device end?
Once the policy is successfully deployed with valid configurations to the device, the Microsoft Exchange account will be added on the Mail app and listed under Settings > Mail > Accounts. The account can also be viewed under Settings > General > Device Management > Hexnode MDM > Accounts.


