




Category filter
Configuring and Managing Exclusions in Hexnode XDR
TL;DR
Exclusions in Hexnode XDR prevent trusted files, folders, hashes, publishers, and file extensions from triggering false-positive threat alerts. You can configure these exclusions within policies, from flagged incidents, or globally across all endpoints via the Global Default Policy. Once created, all active exclusions are centrally managed in the Exclusions Repository under the Incidents tab, allowing you to easily track the specific policies and devices linked to each rule.
Hexnode XDR continuously monitors system calls across your endpoints to detect suspicious behavior. While this vigilance keeps your environment secure, it can occasionally lead to performance overhead or flag a trusted item, such as an internal application, as a threat.
Exclusions in Hexnode XDR let you specify exactly what the XDR agent should ignore. When you exclude a trusted file, folder, publisher, hash, or file extension, real-time monitoring is disabled for that item. Routine activity involving it (opening, editing, moving) no longer triggers incident alerts.
This guide covers how to create exclusions and how to manage them in Hexnode XDR.
Exclusion types at a glance
| Exclusion type | Supported Platforms | Use it when |
|---|---|---|
| File / Folder | Windows, macOS | An internal or custom-built application at a known path keeps getting flagged. |
| File Extension | Windows only | A trusted vendor’s software generates frequent false positives. Excluding the publisher suppresses alerts for all present and future applications signed by them. |
| Hash (SHA 1 / SHA 256) | Windows, macOS | You need to identify one specific binary, wherever it’s copied or however it’s renamed. |
| Publisher | Windows, macOS | A file type is used routinely and is low-risk across your environment. |
Create Exclusions
You can create an exclusion in two ways:
- From the Policies tab: Add exclusions as part of a policy’s configuration.
- From the Incidents tab: Add an exclusion directly from a flagged incident.
To view and manage all exclusions afterward, use the Exclusions Repository.
Method 1: Creating exclusions from the Policies tab
- Log in to Hexnode XDR.
- Go to the Policies tab and click New Policy.
Step 1: Configuration
- Select the OS platform — Windows, or macOS.
- Click on Exclusions. The Exclusions section expands into four exclusion types:
- File/Folder
- Publisher
- Hash
- File Extension (Windows only)
- Select an exclusion type and click on Configure, then follow the instructions for that type below.
- Click Next when you’ve finished configuring your exclusions.
Follow the steps below to configure each exclusion type.
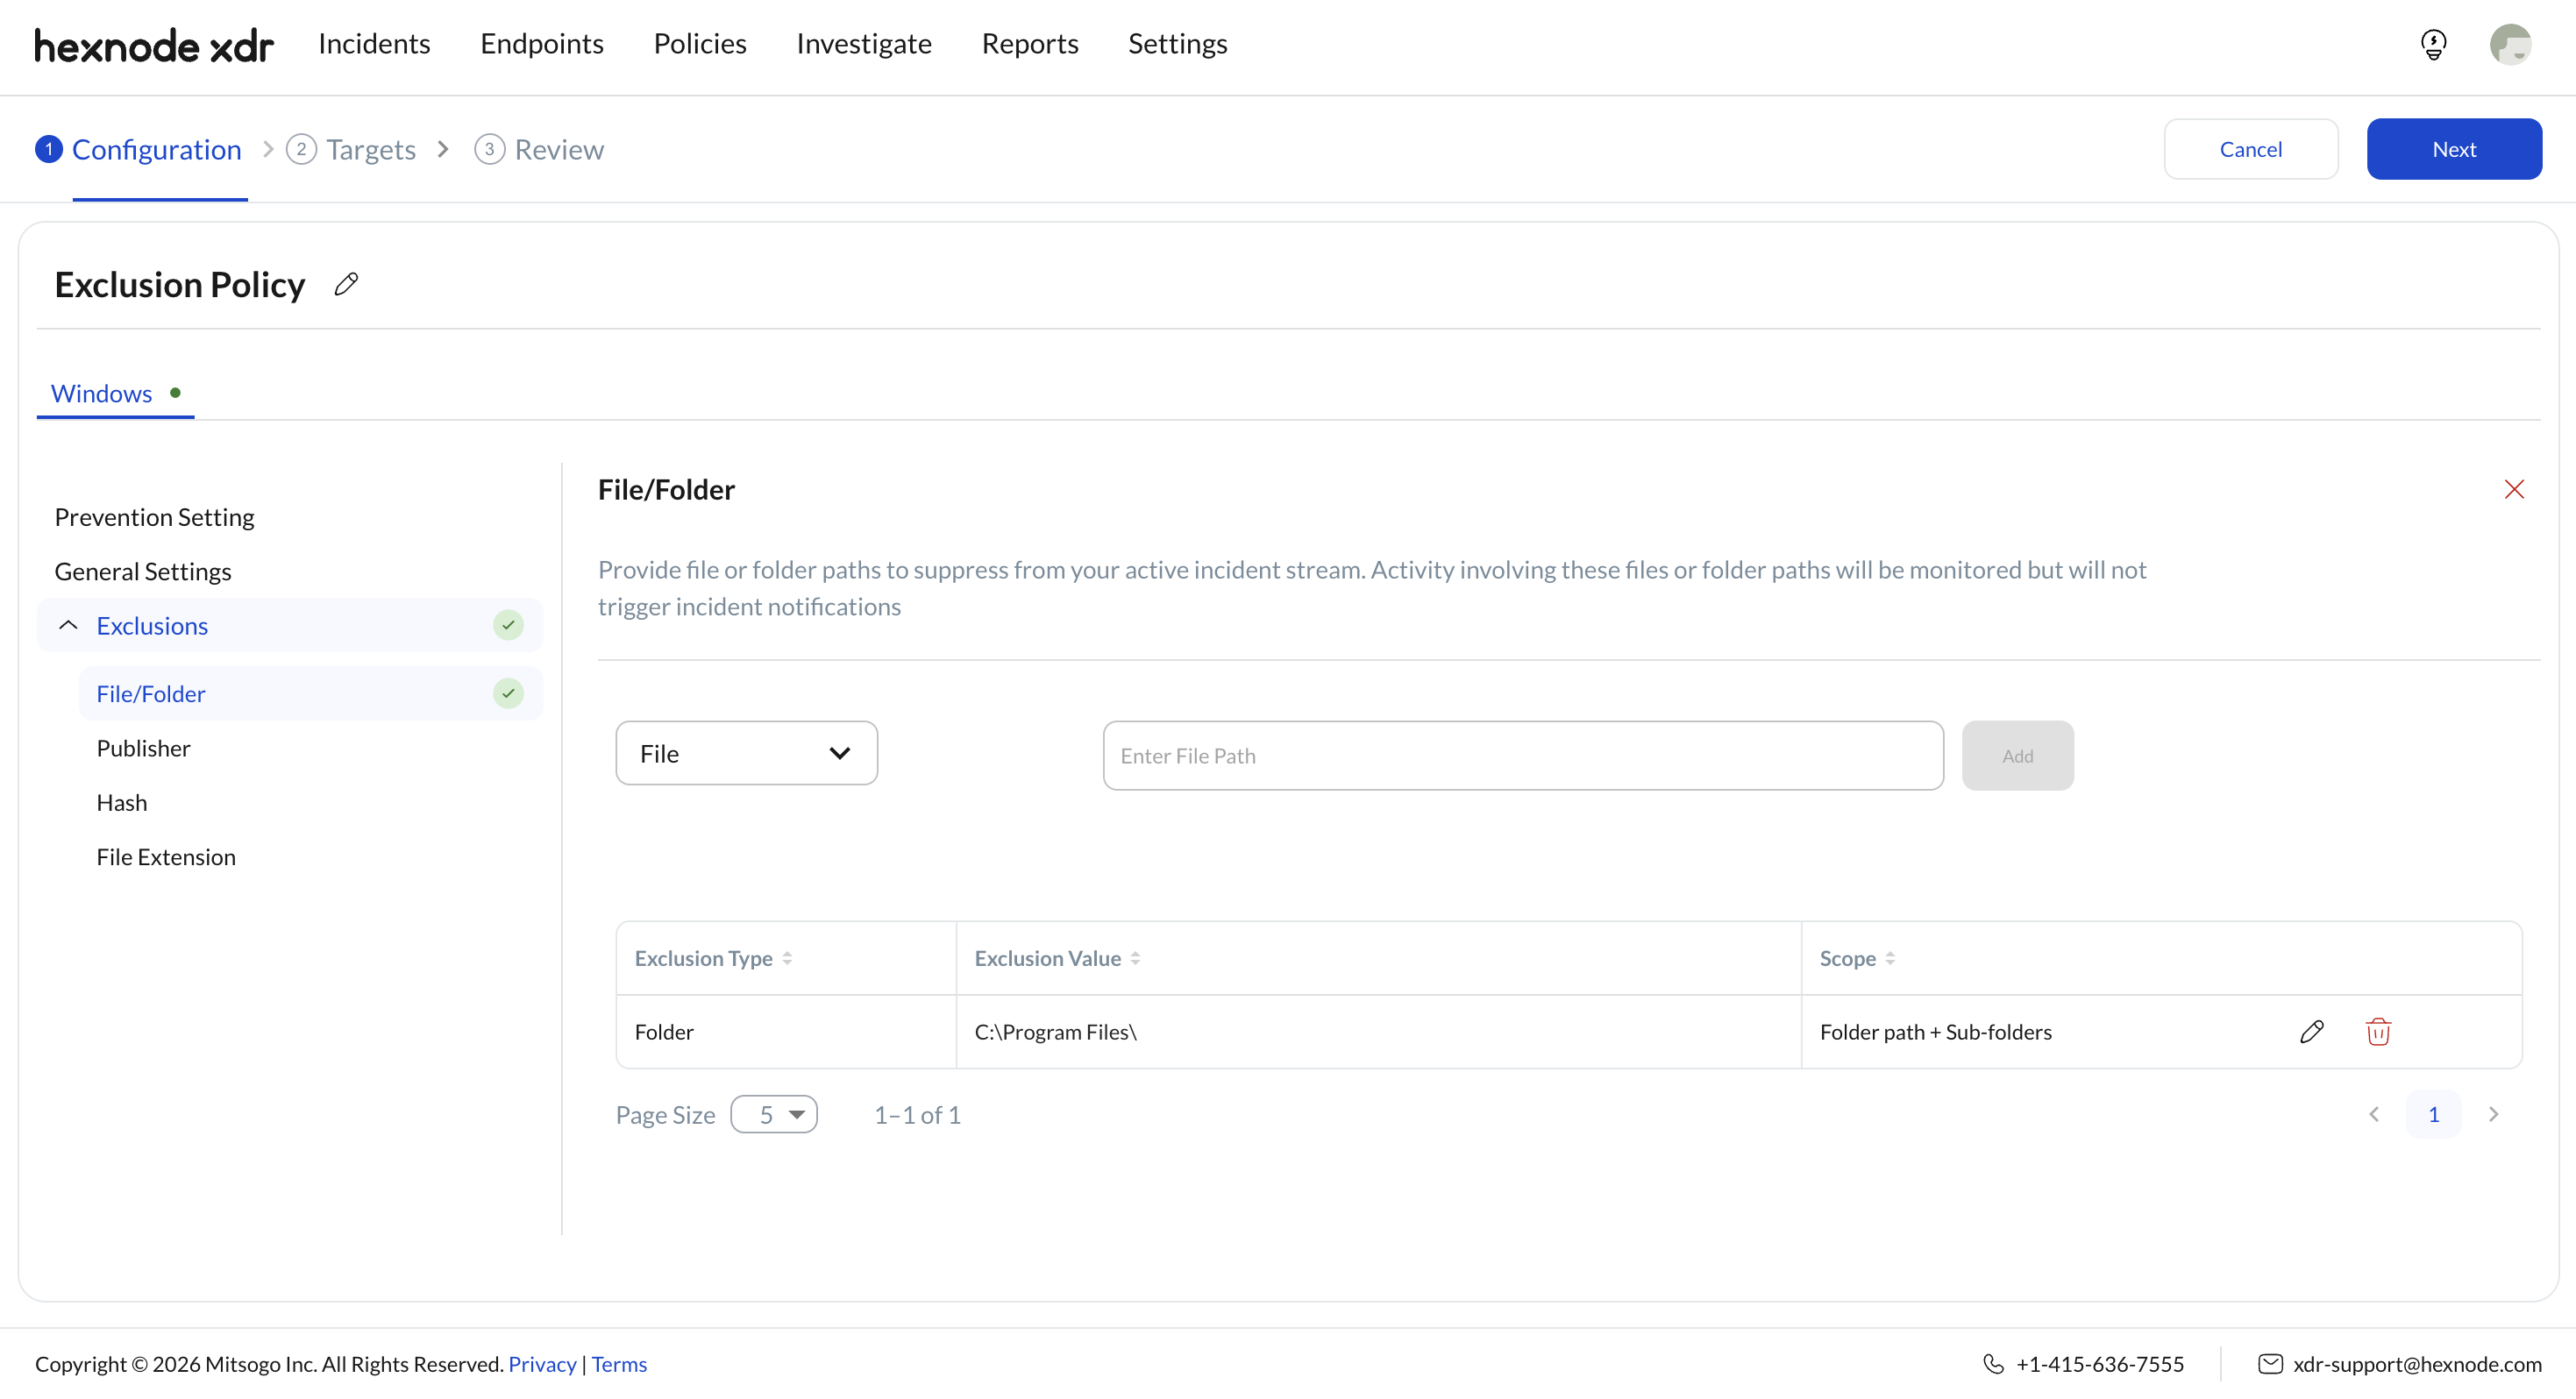
File/Folder
Specify the file or folder paths you want to exclude from your incident stream.
- From the dropdown, choose File or Folder.
- In the text field, enter the full path of the file or folder. For example,
C:\Program Files\Acme\acme.exeon Windows or/Applications/Acme.appon macOS. - For a folder, enable the Include sub-folder option if the exclusion should also cover every sub-folder inside the specified folder.
- Click Add to save the entry to the table.
Publisher
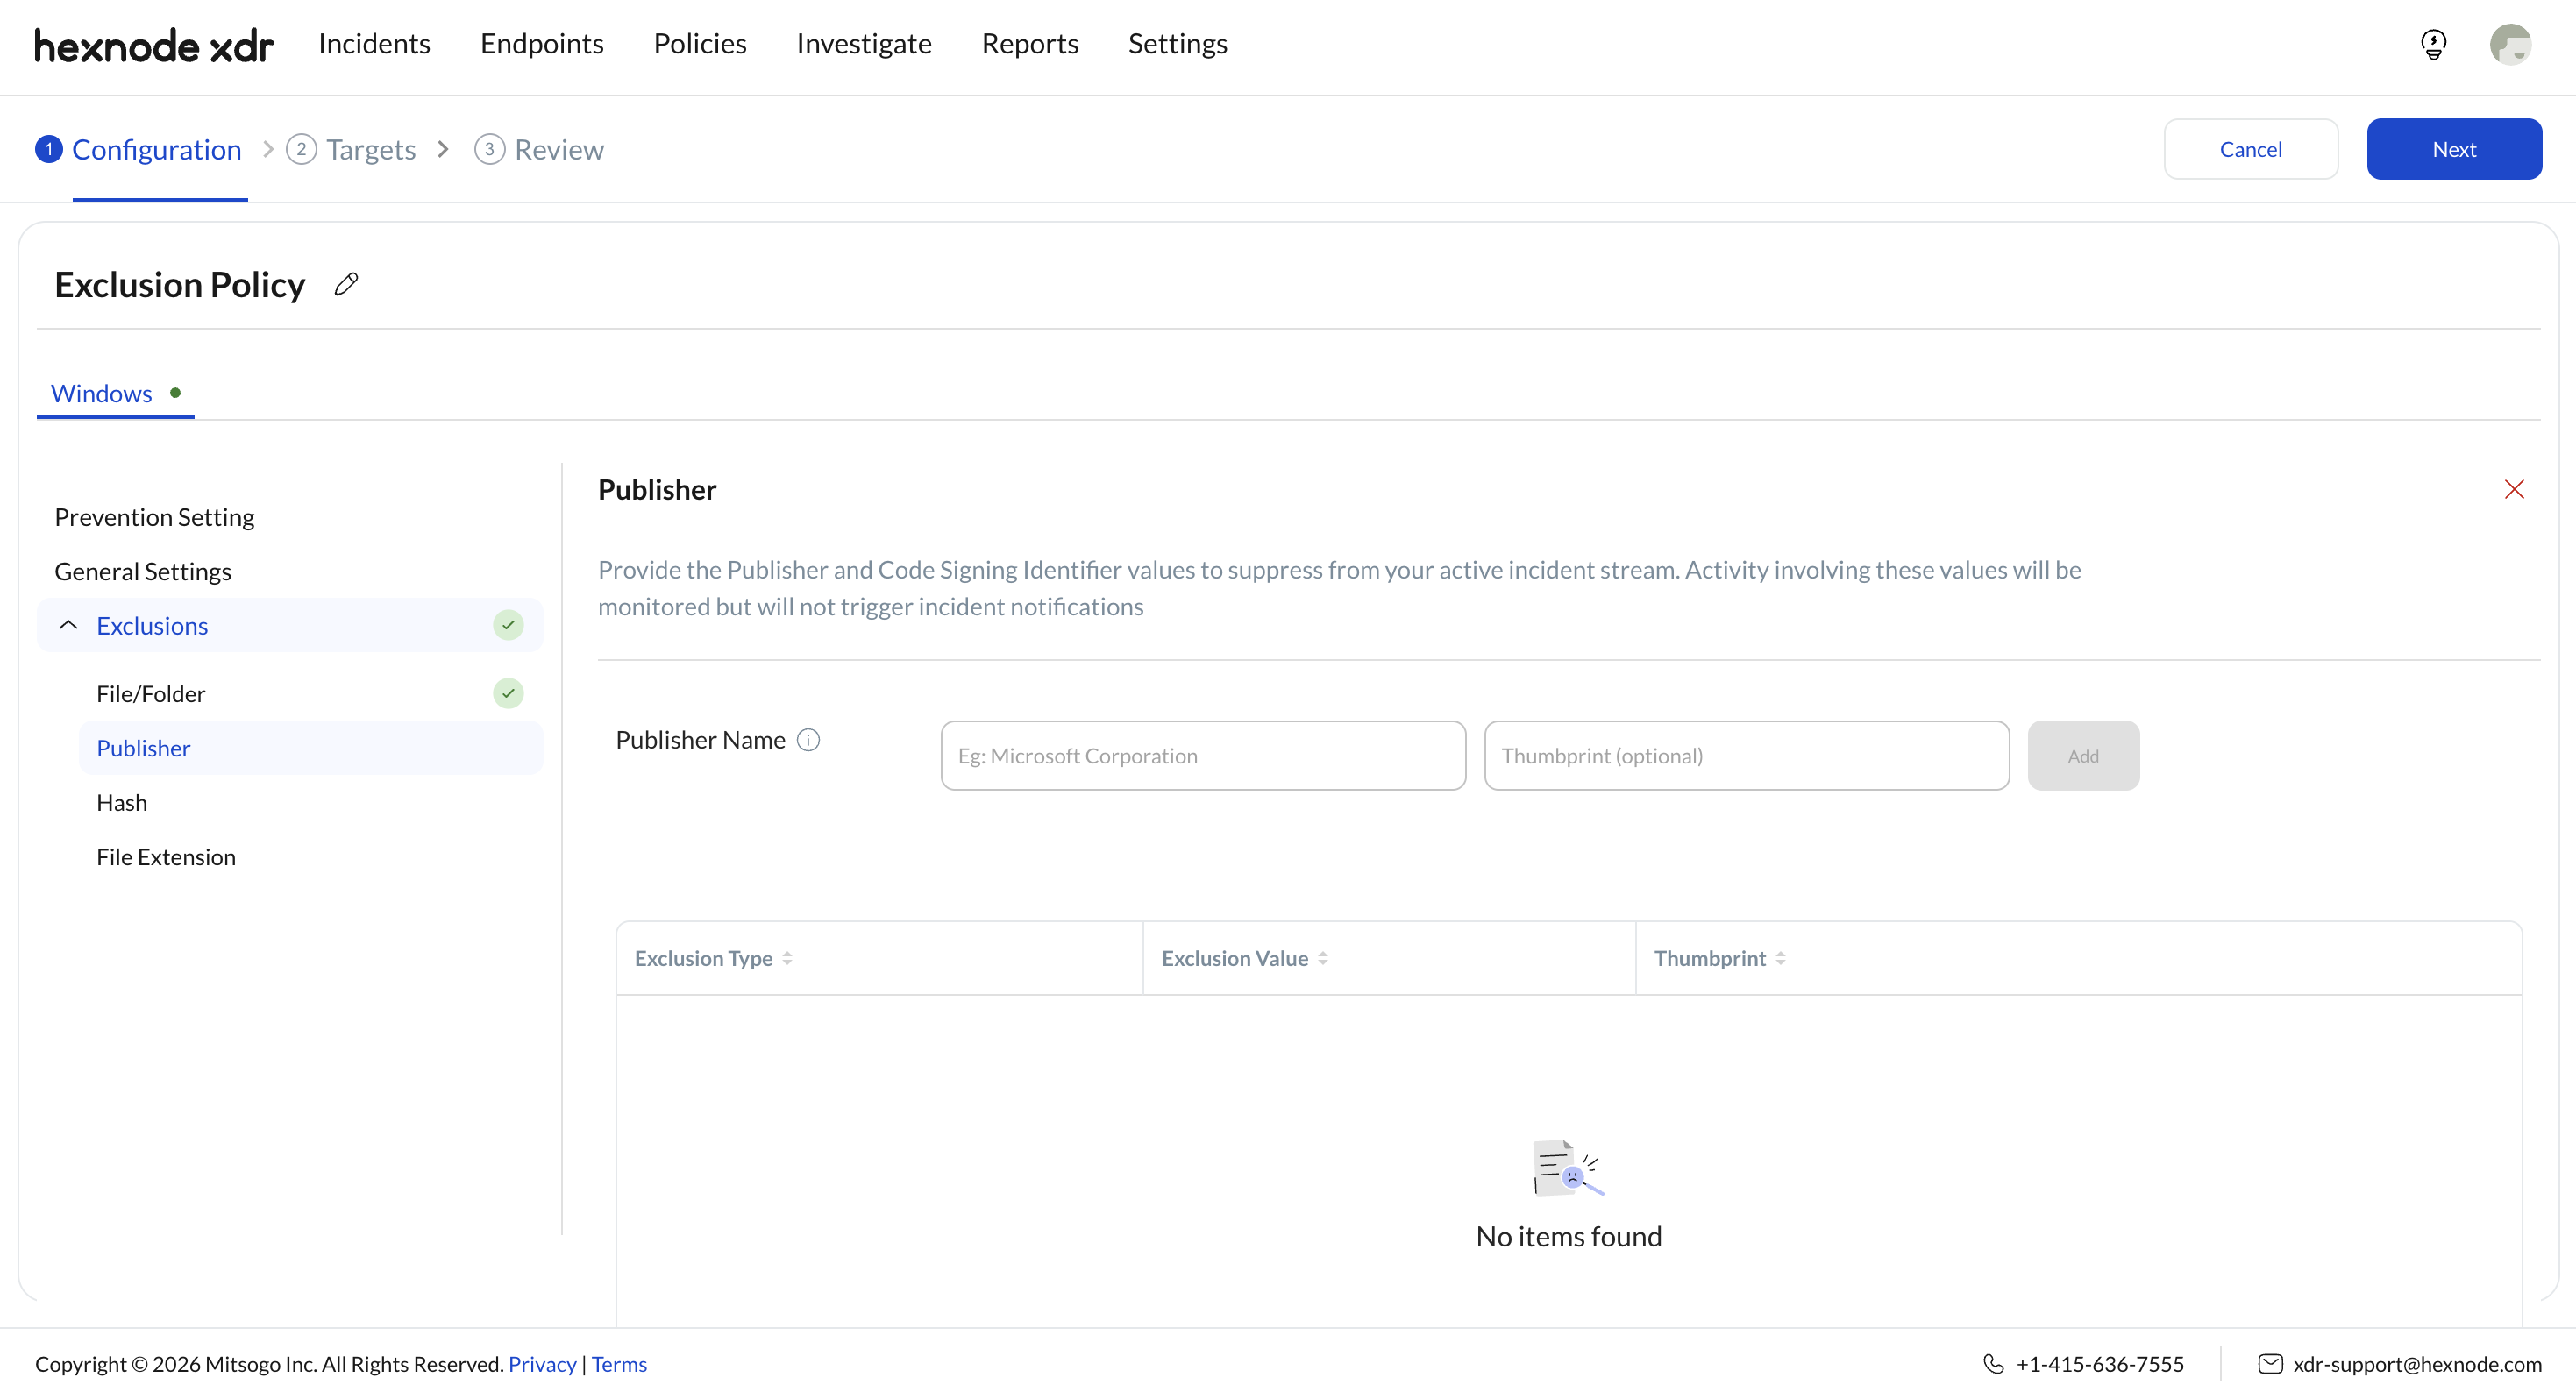
Exclude trusted software from being flagged as threats by specifying its publisher and code-signing identity.
- Enter the Publisher Name.
- (Optional, recommended) Enter the Certificate Thumbprint (Windows) or Team ID (macOS). Adding one verifies the publisher’s identity and makes the exclusion more precise.
- Click Add to save the entry to the table.
Hash
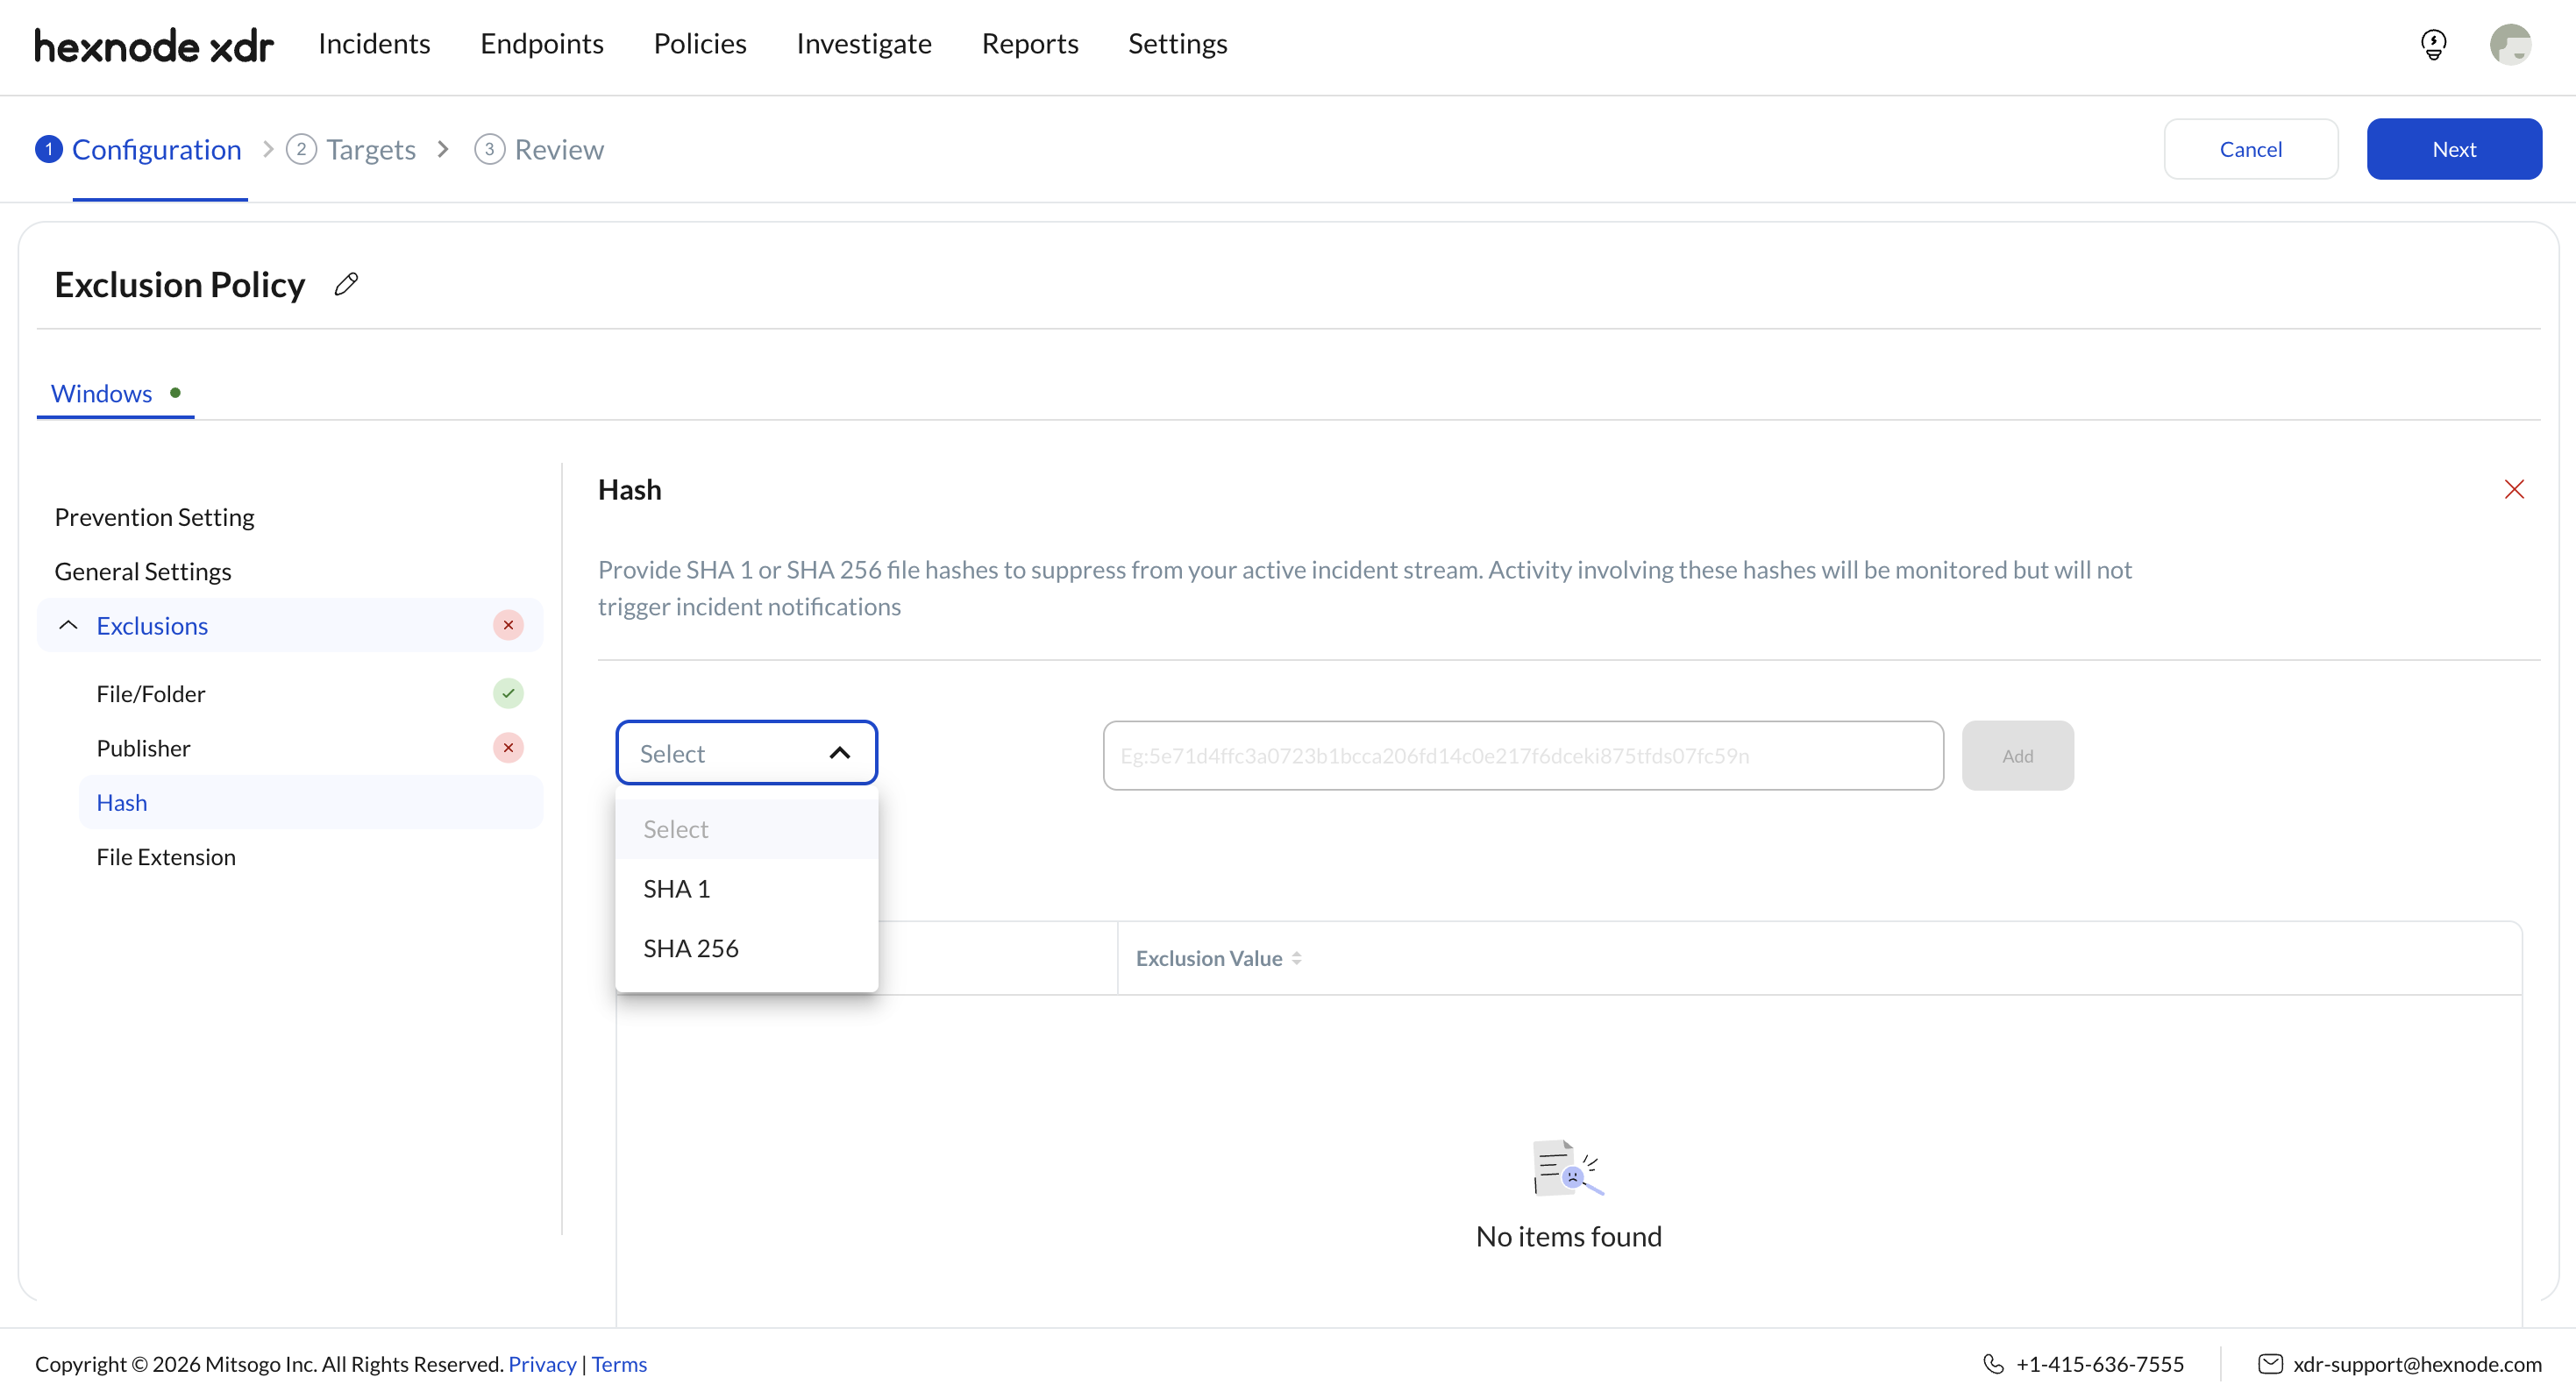
Exclude a specific binary by its hash value.
- Choose SHA 1 or SHA 256 from the dropdown.
- Enter the hash value in the text field.
- Click Add to save the entry to the table.
File Extension (Windows only)
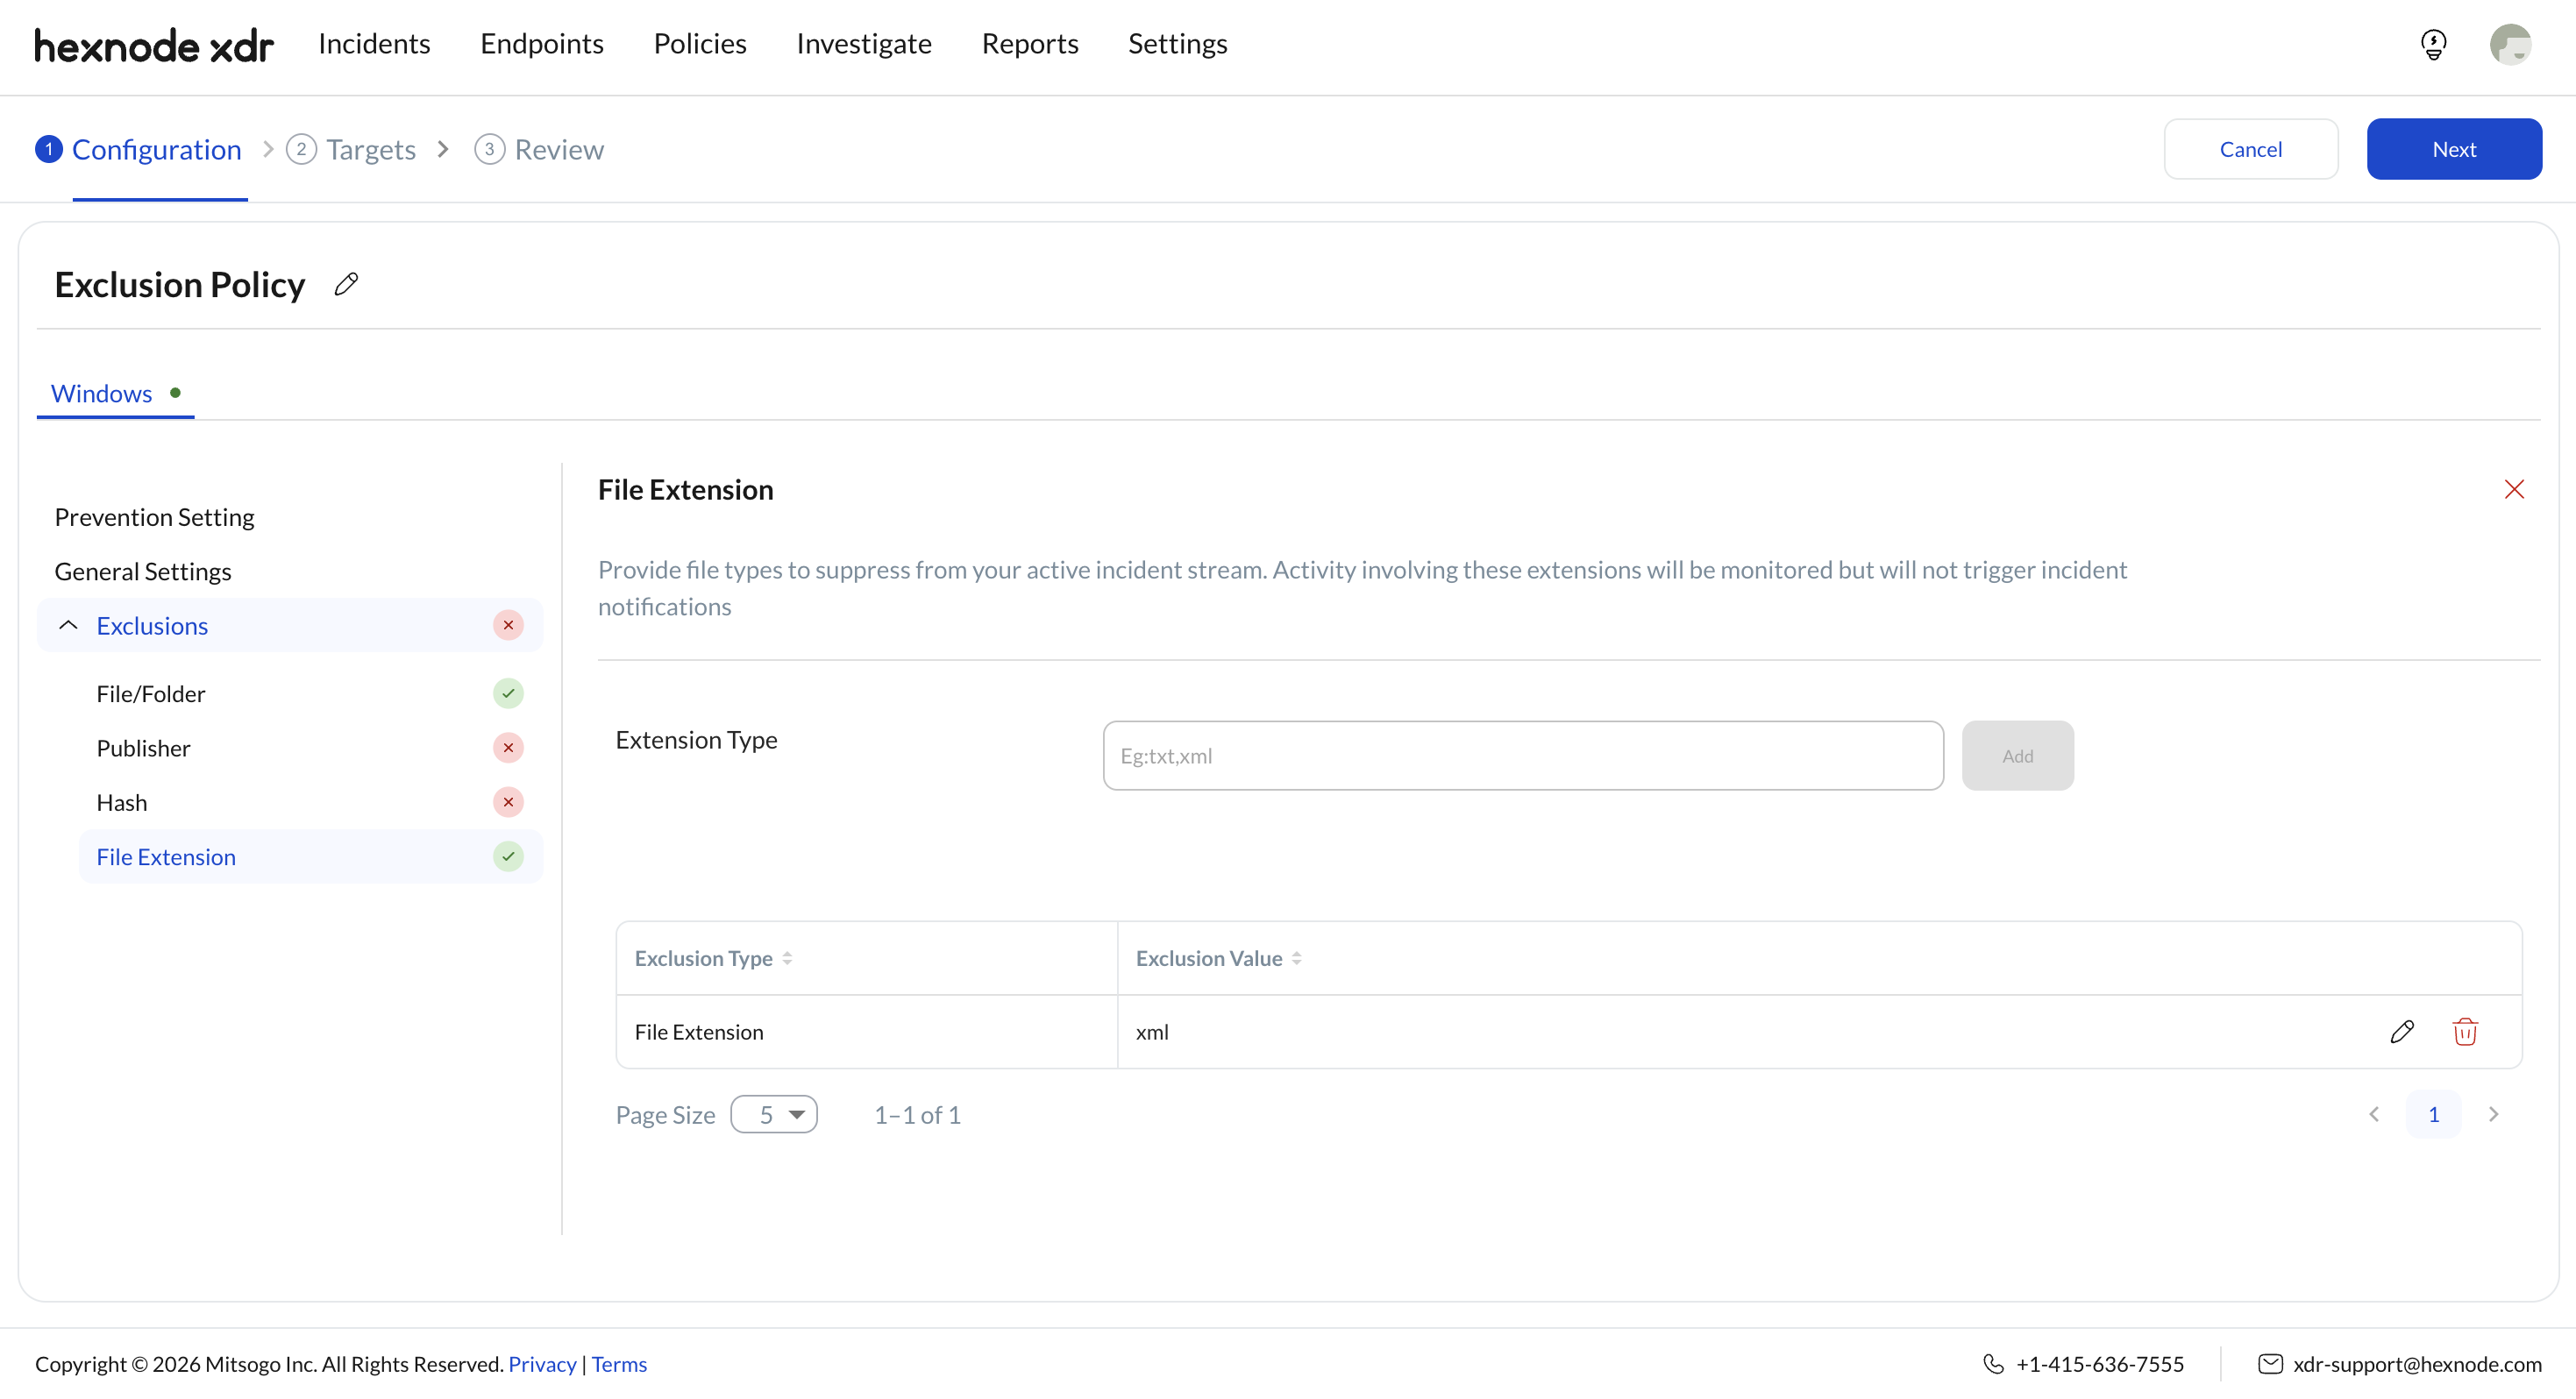
Exclude all files with a particular extension (for example, .xml or .tmp) so they are no longer flagged as threats. Once an extension is excluded, files of that type no longer trigger incident notifications.
- Enter the file extension in the text field.
- Click Add to save the entry to the table.
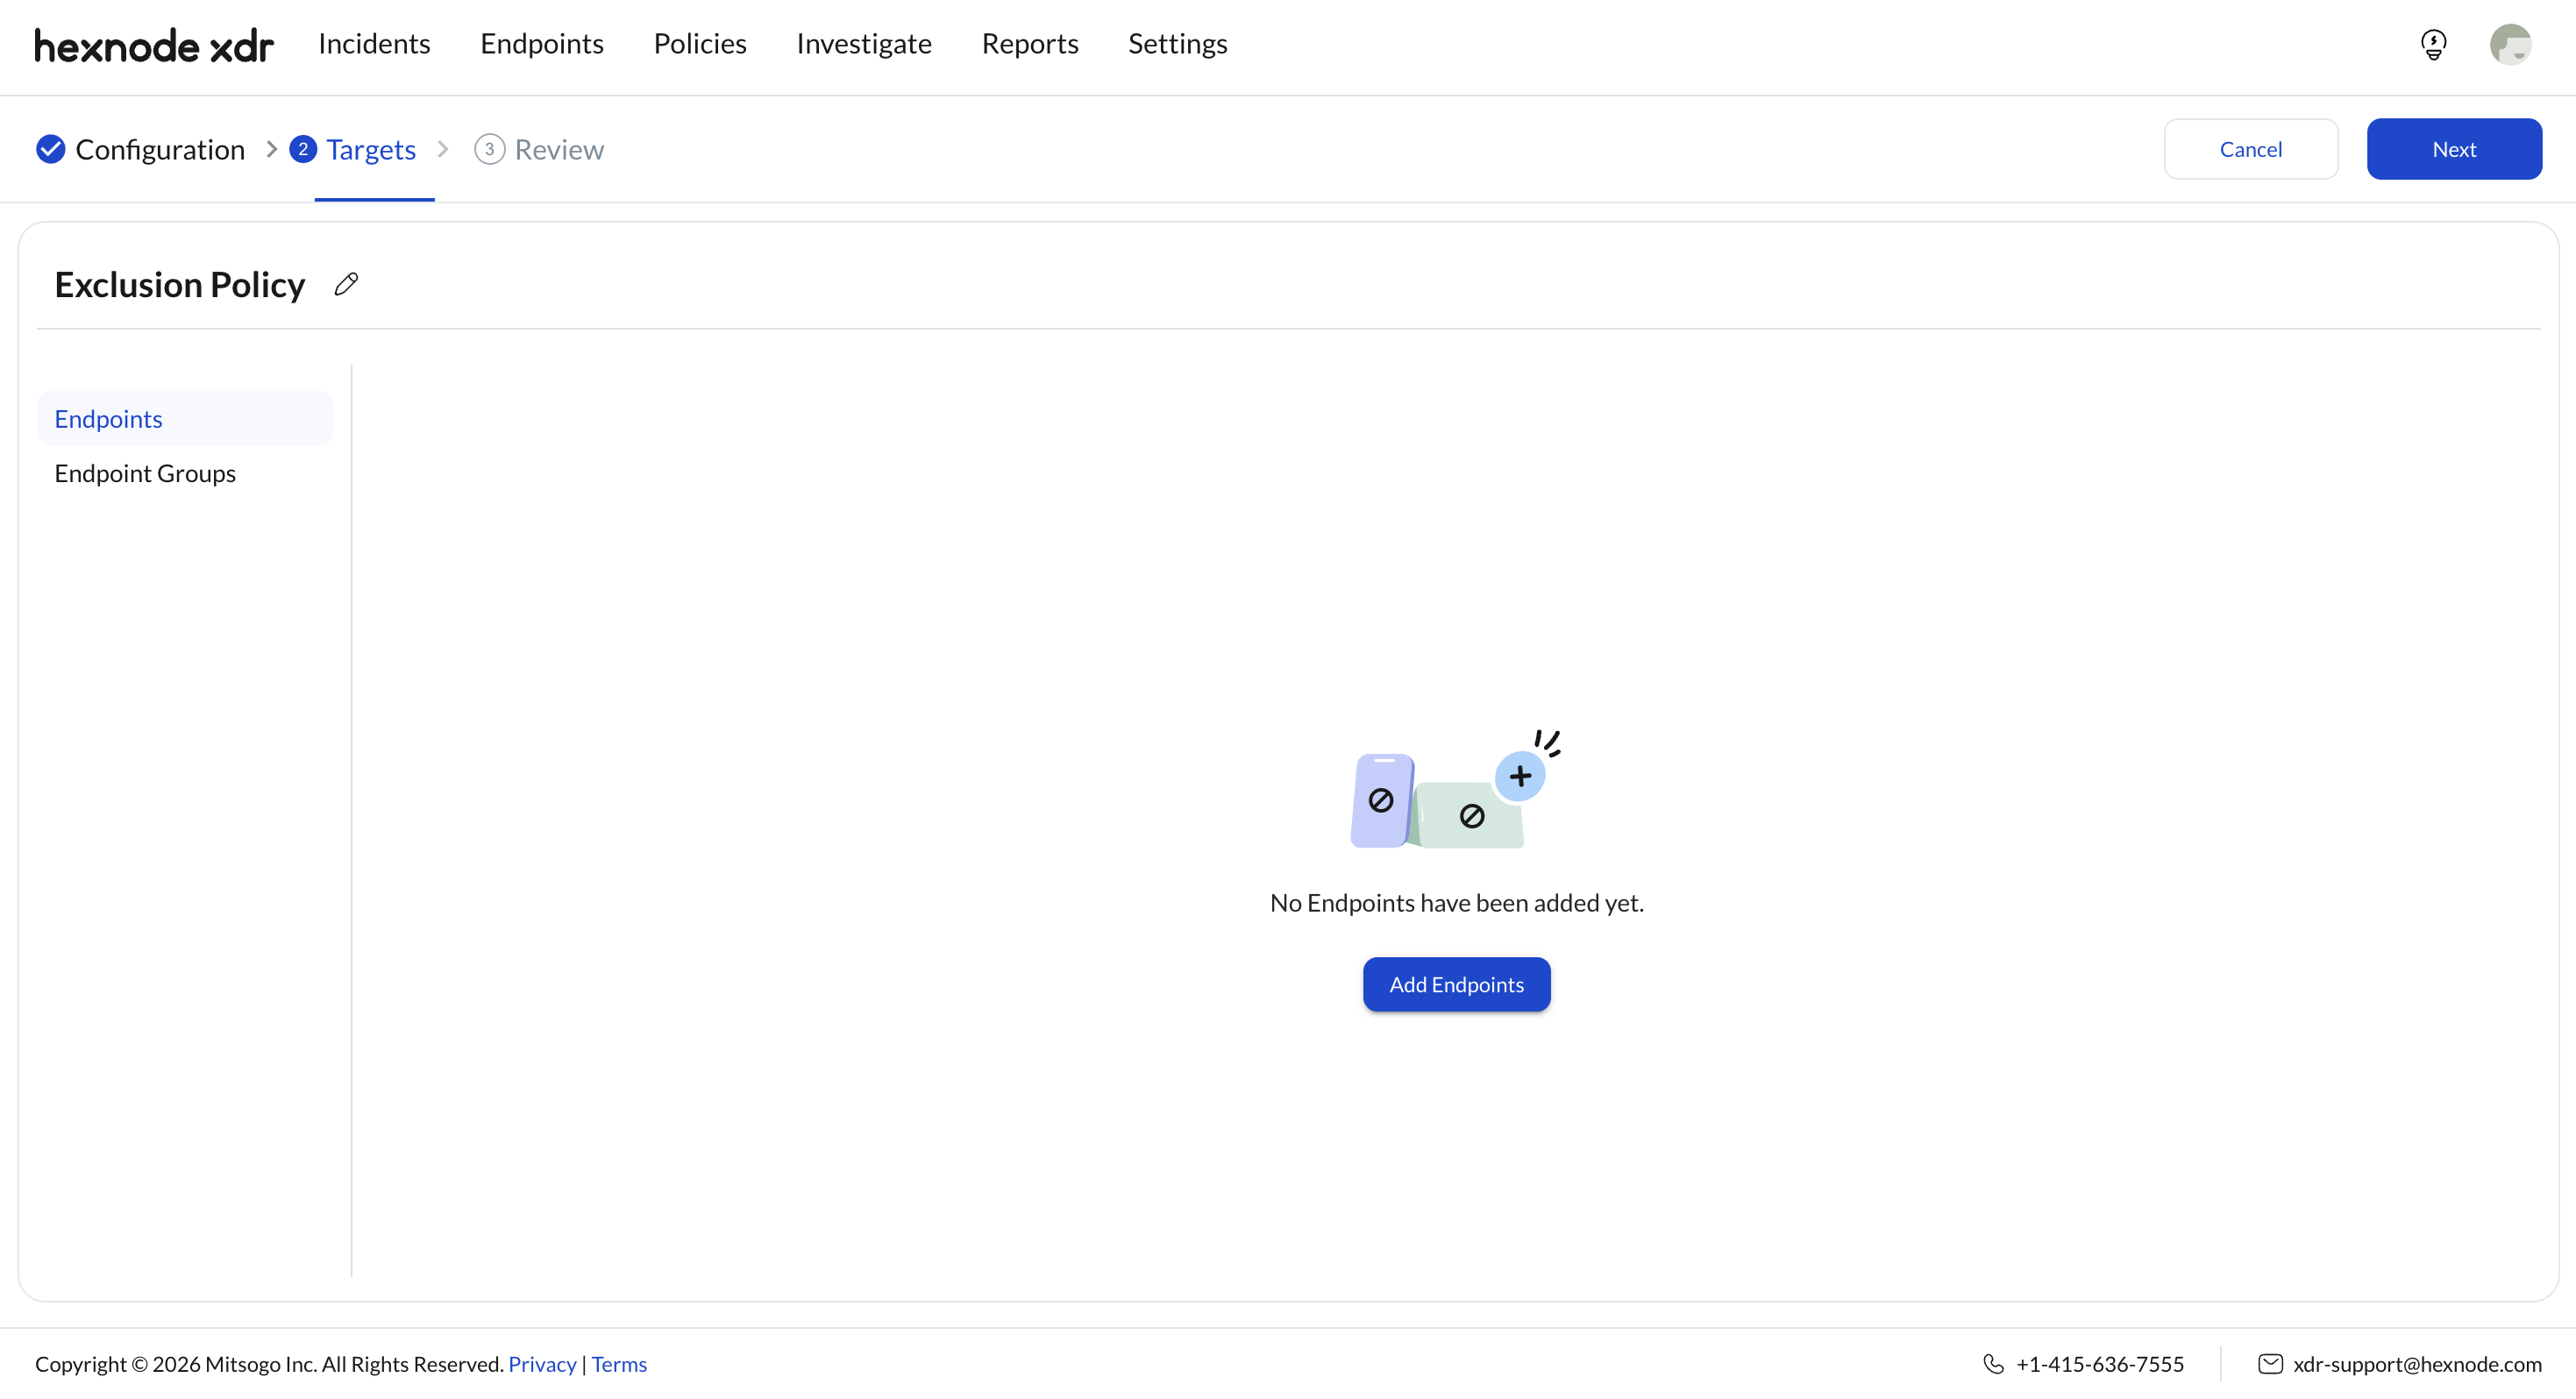
Step 2: Targets
- On the Targets page, choose where the policy should apply:
- Endpoints: Click Add Endpoints, select endpoints from the list, then click Add.
- Endpoint groups: Click Add Endpoint Group, select groups from the list, then click Add.
- Click Next to reach the Review page.
Step 3: Review
The Review page displays a preview of the policies you’ve configured in the previous steps.
- In the policy preview, under Exclusions, click Edit to go back to the configuration page and make changes.
- Click Save, then choose one of the following:
- Save Draft: saves the policy so you can publish it later.
- Publish: applies the policy to the selected targets immediately.
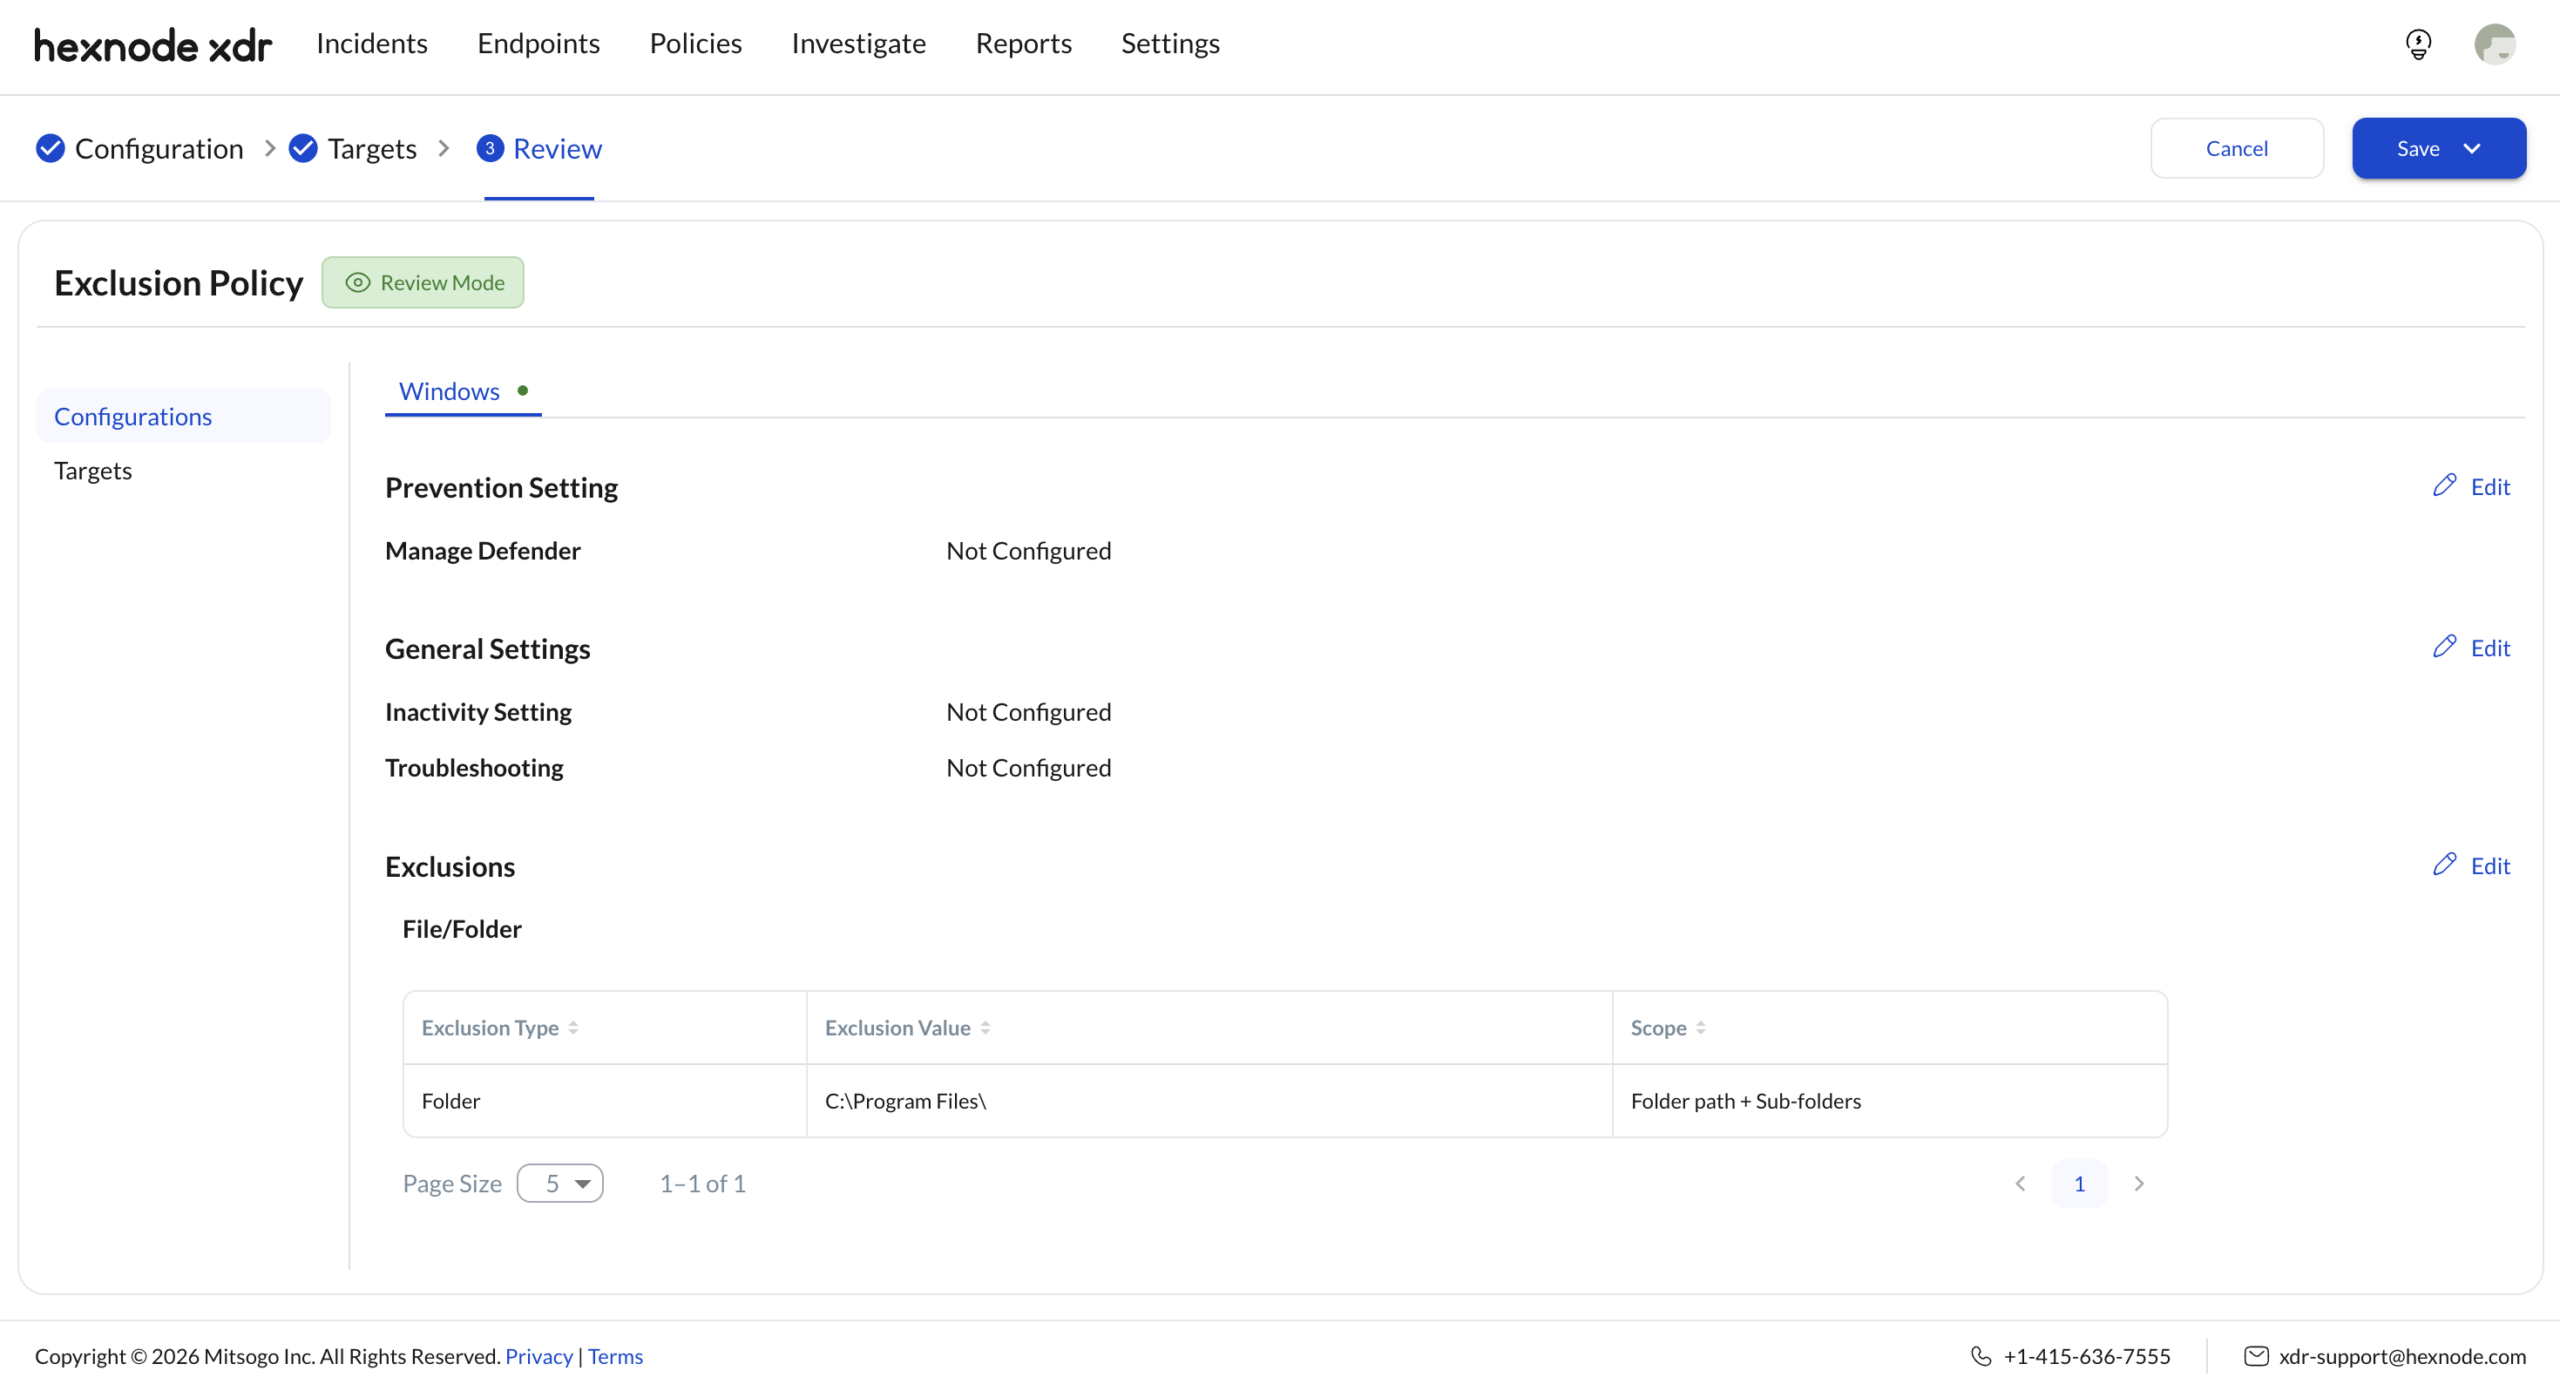
Once the policy is published, the exclusions you configured apply to the selected endpoints and endpoint groups. On those endpoints, the excluded items are no longer flagged as threats, and activity involving them won’t trigger incident notifications.
Method 2: Creating an exclusion from the Incidents tab
Use this method when you want to exclude a specific file, publisher, or hash directly from a flagged incident.
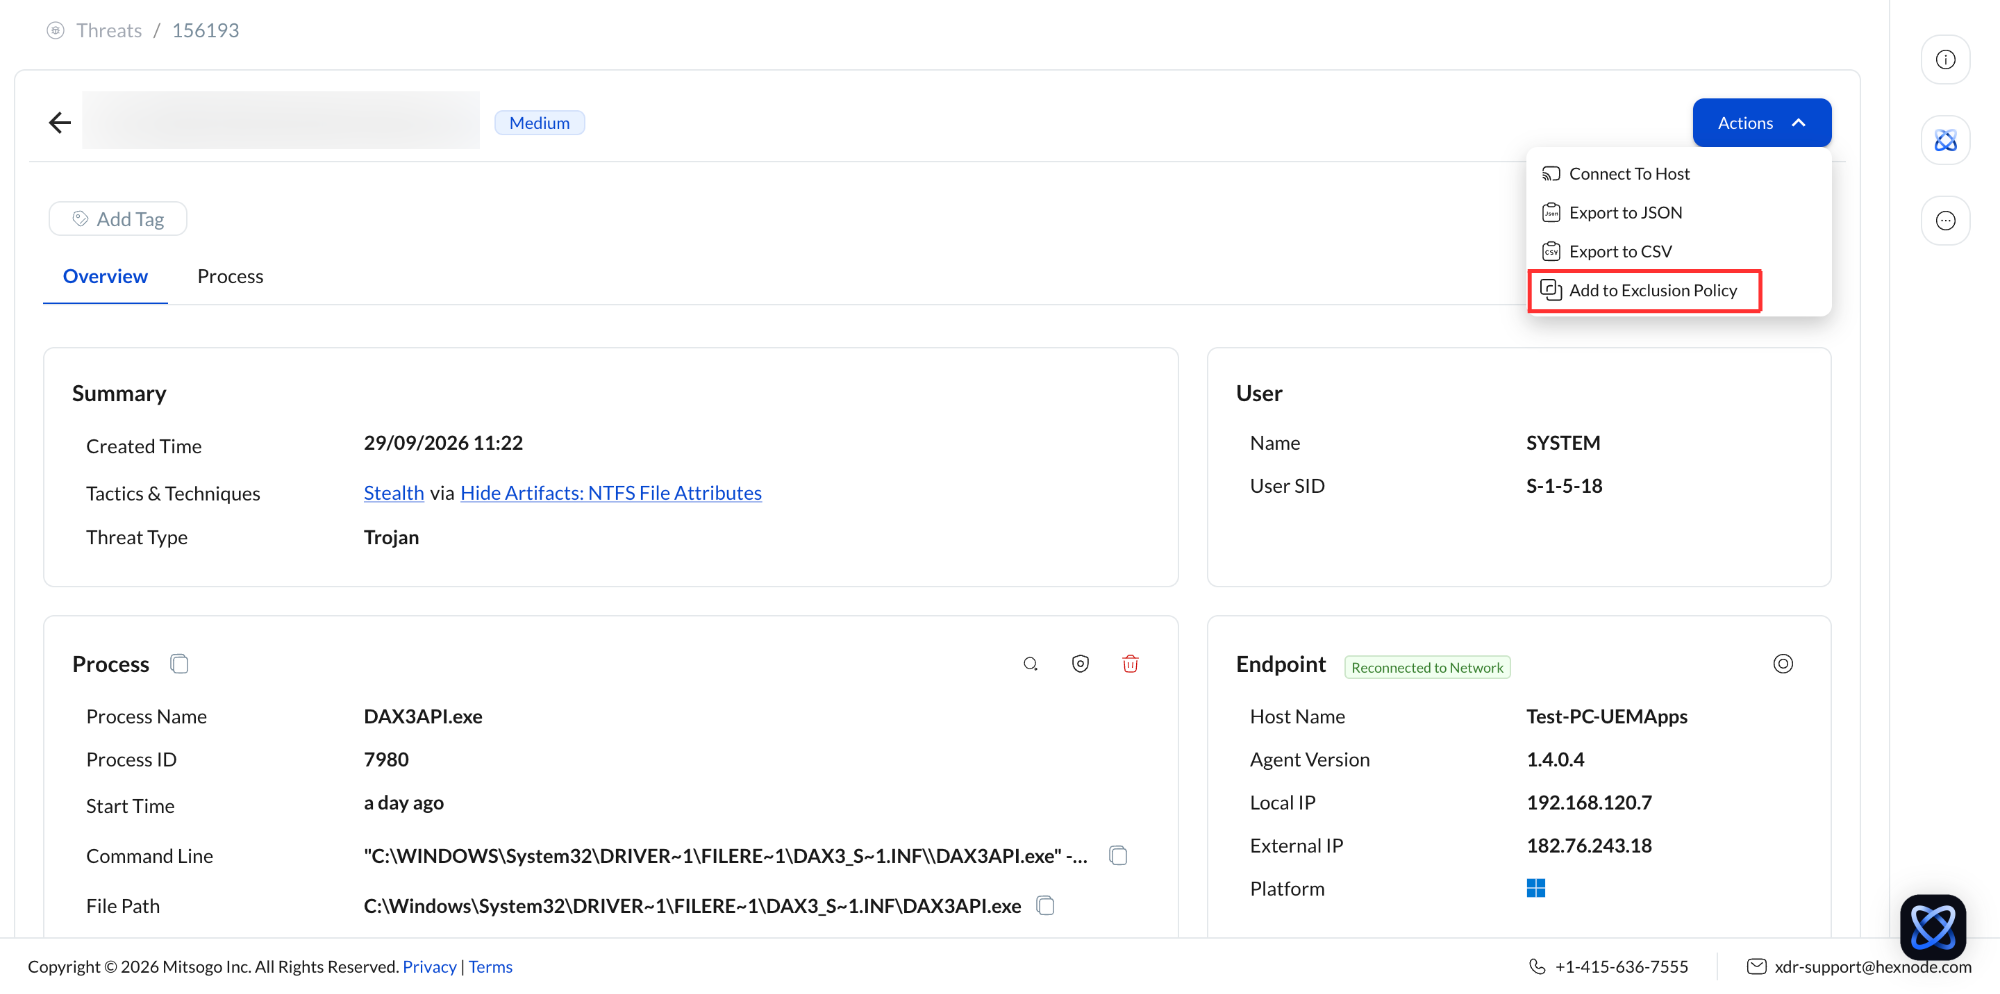
- Open the Incidents tab and click on the specific incident.
- Click on Action, then select Add to Exclusion Policy.
- In the window that appears, select the exclusion types.
- As you select each type, it’s added to the right side of the window with its fields already filled in from the incident’s data. These values are read-only and can’t be edited.
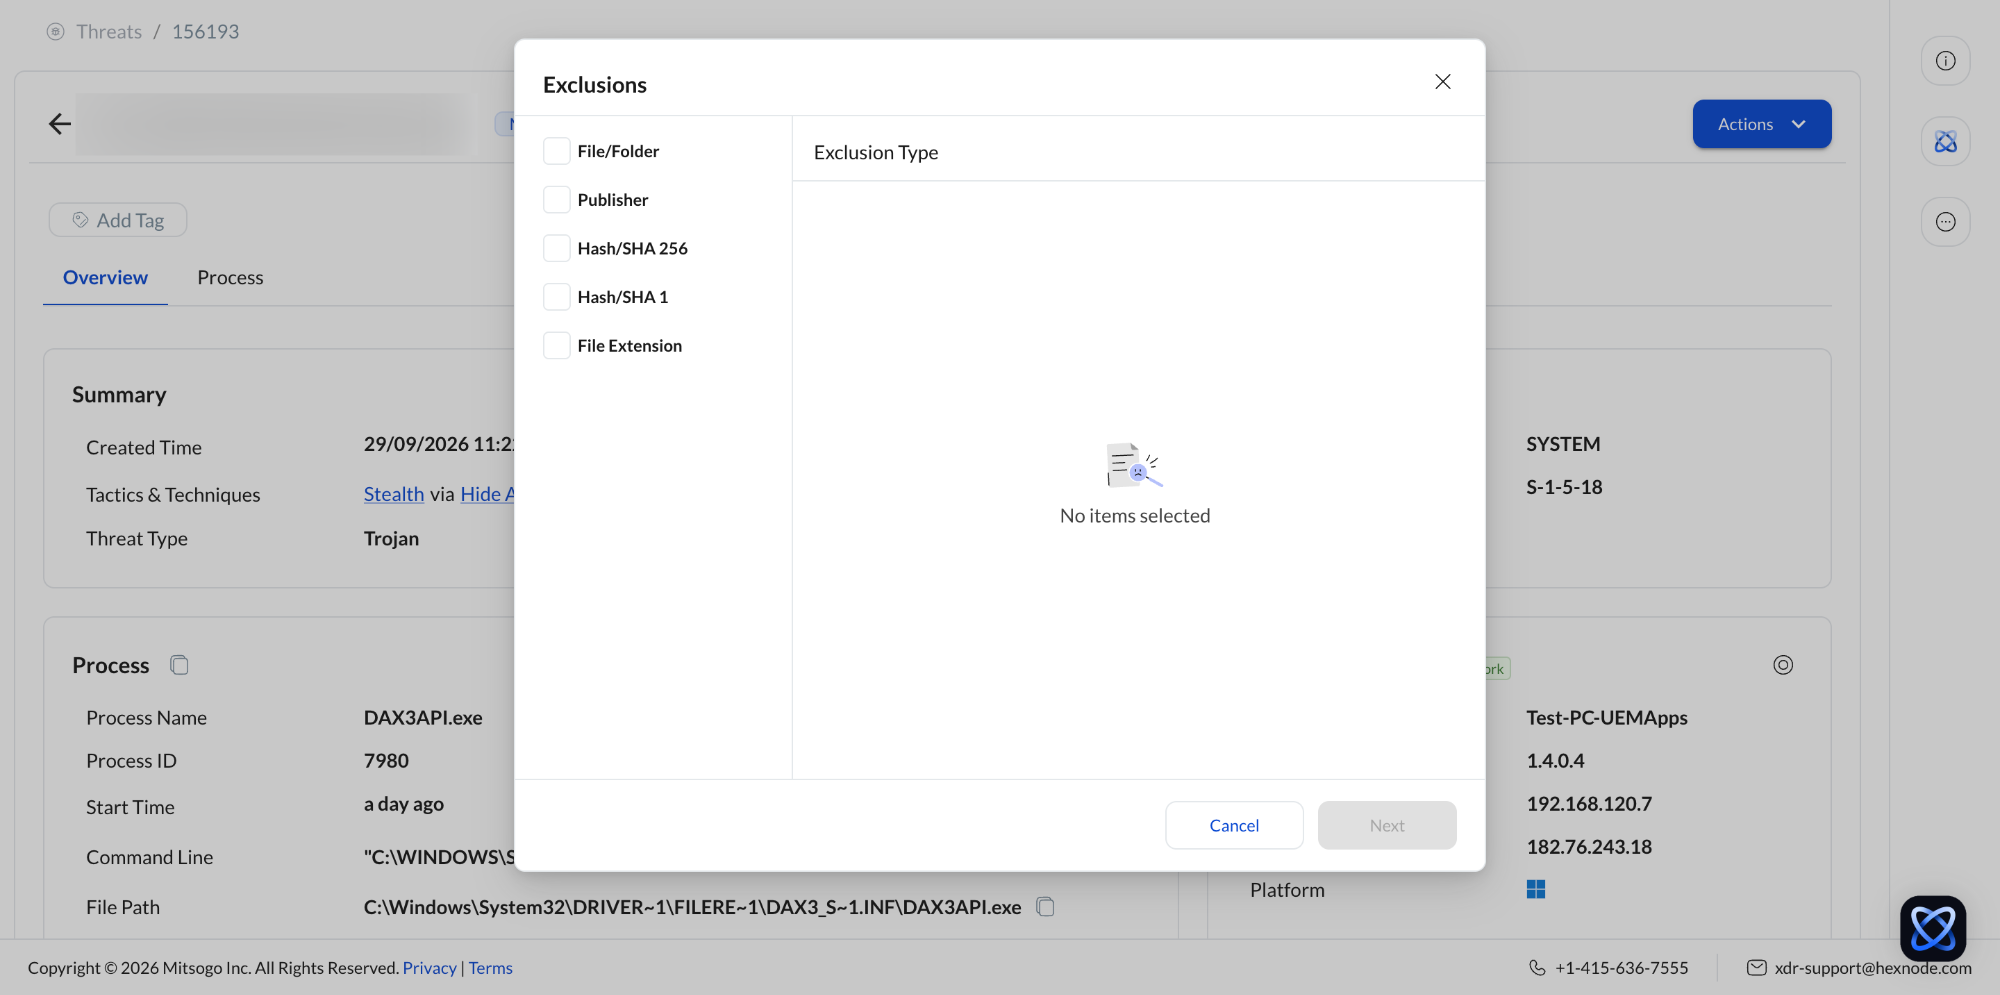
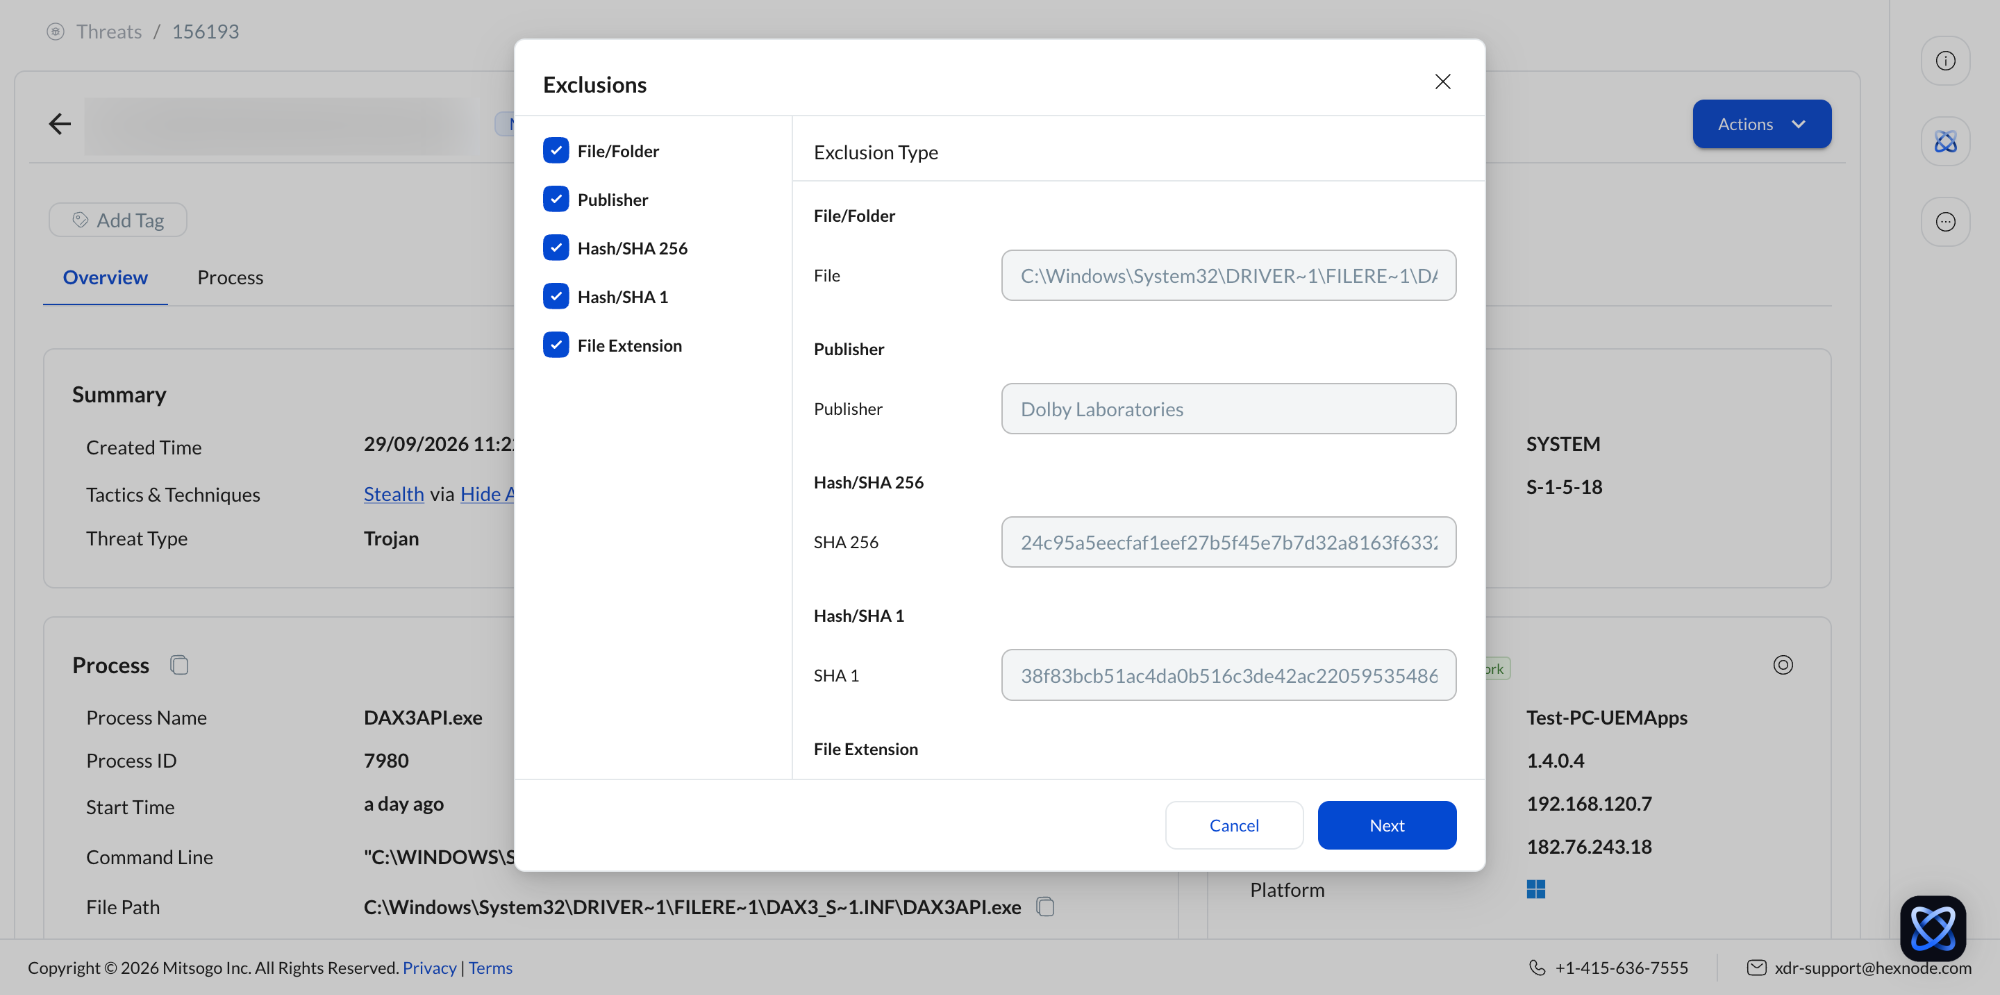
- Click Next.
- Select the policy you want to add the exclusion to, and then click Save.
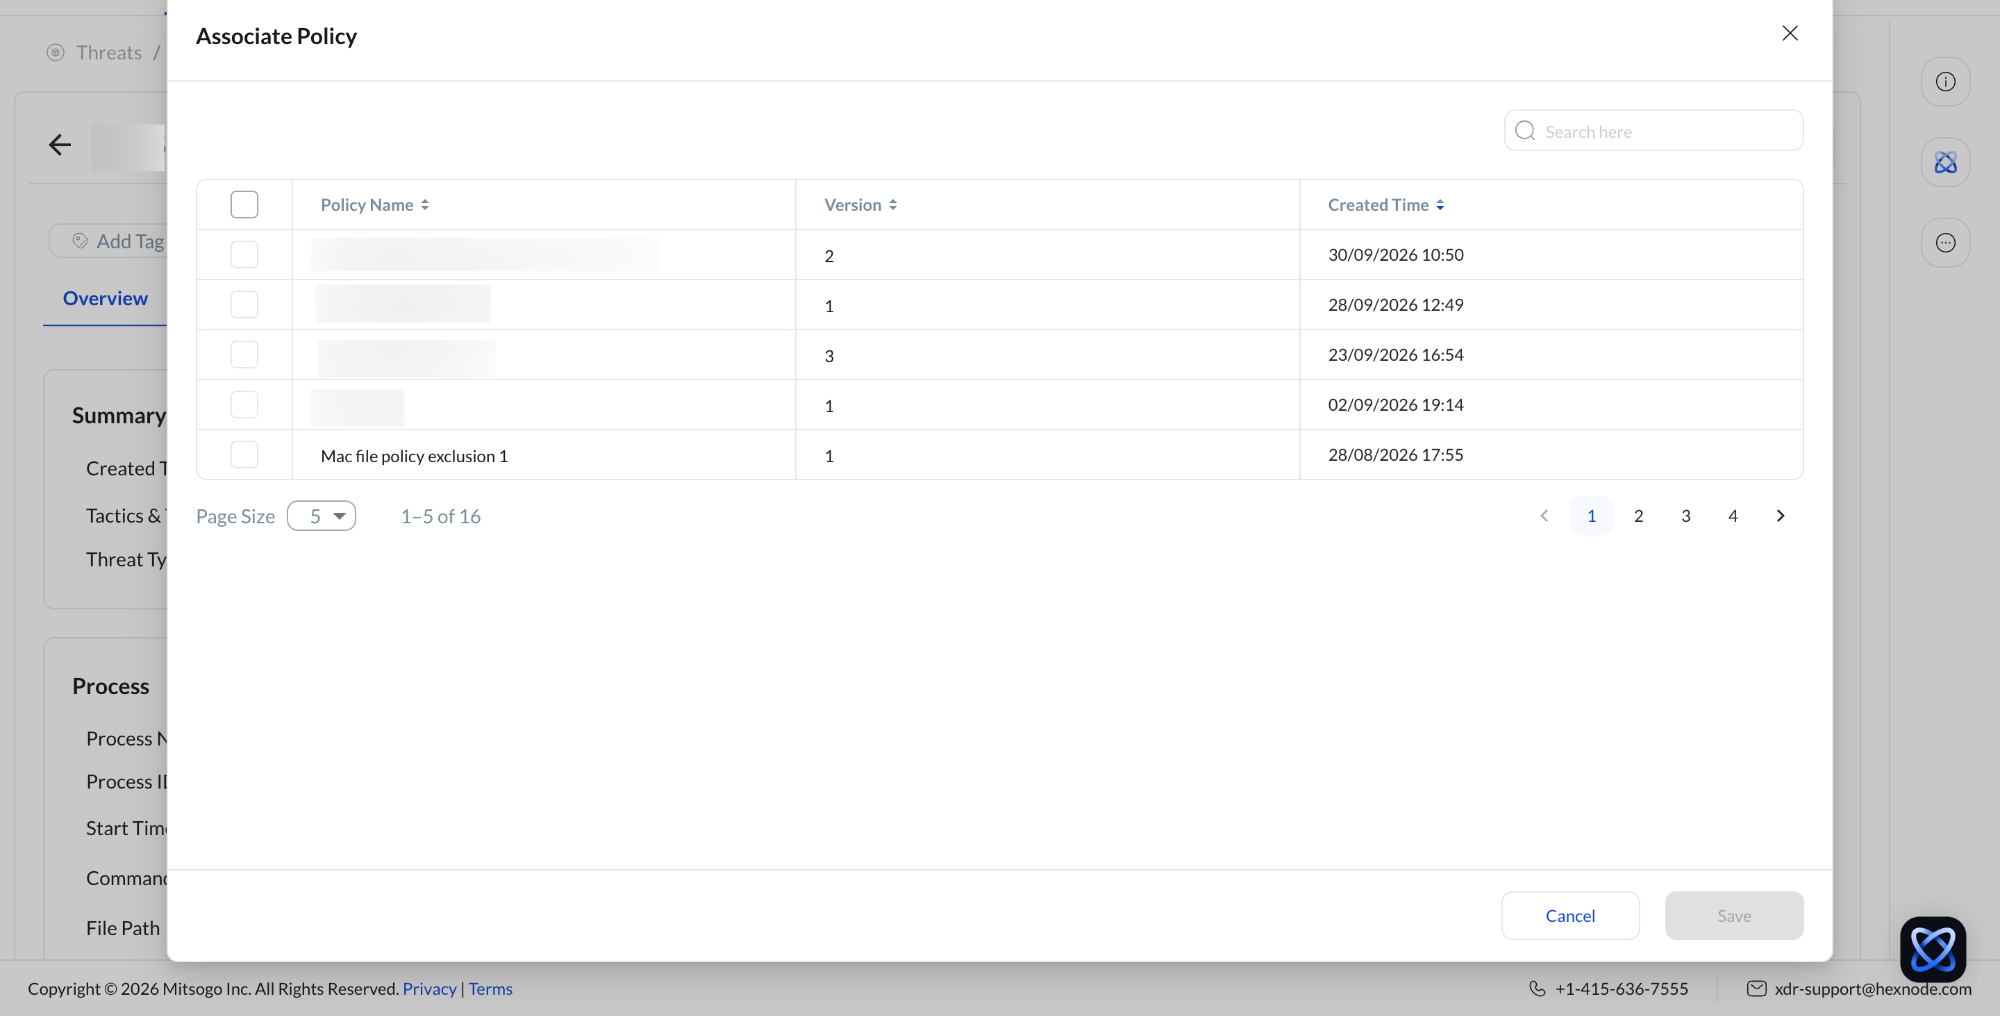
Once saved, the selected items are added as exclusions to that policy. On every endpoint the policy applies to, these items are no longer flagged as threats, and activity involving them won’t trigger incident notifications.
Managing exclusions: The Exclusions Repository
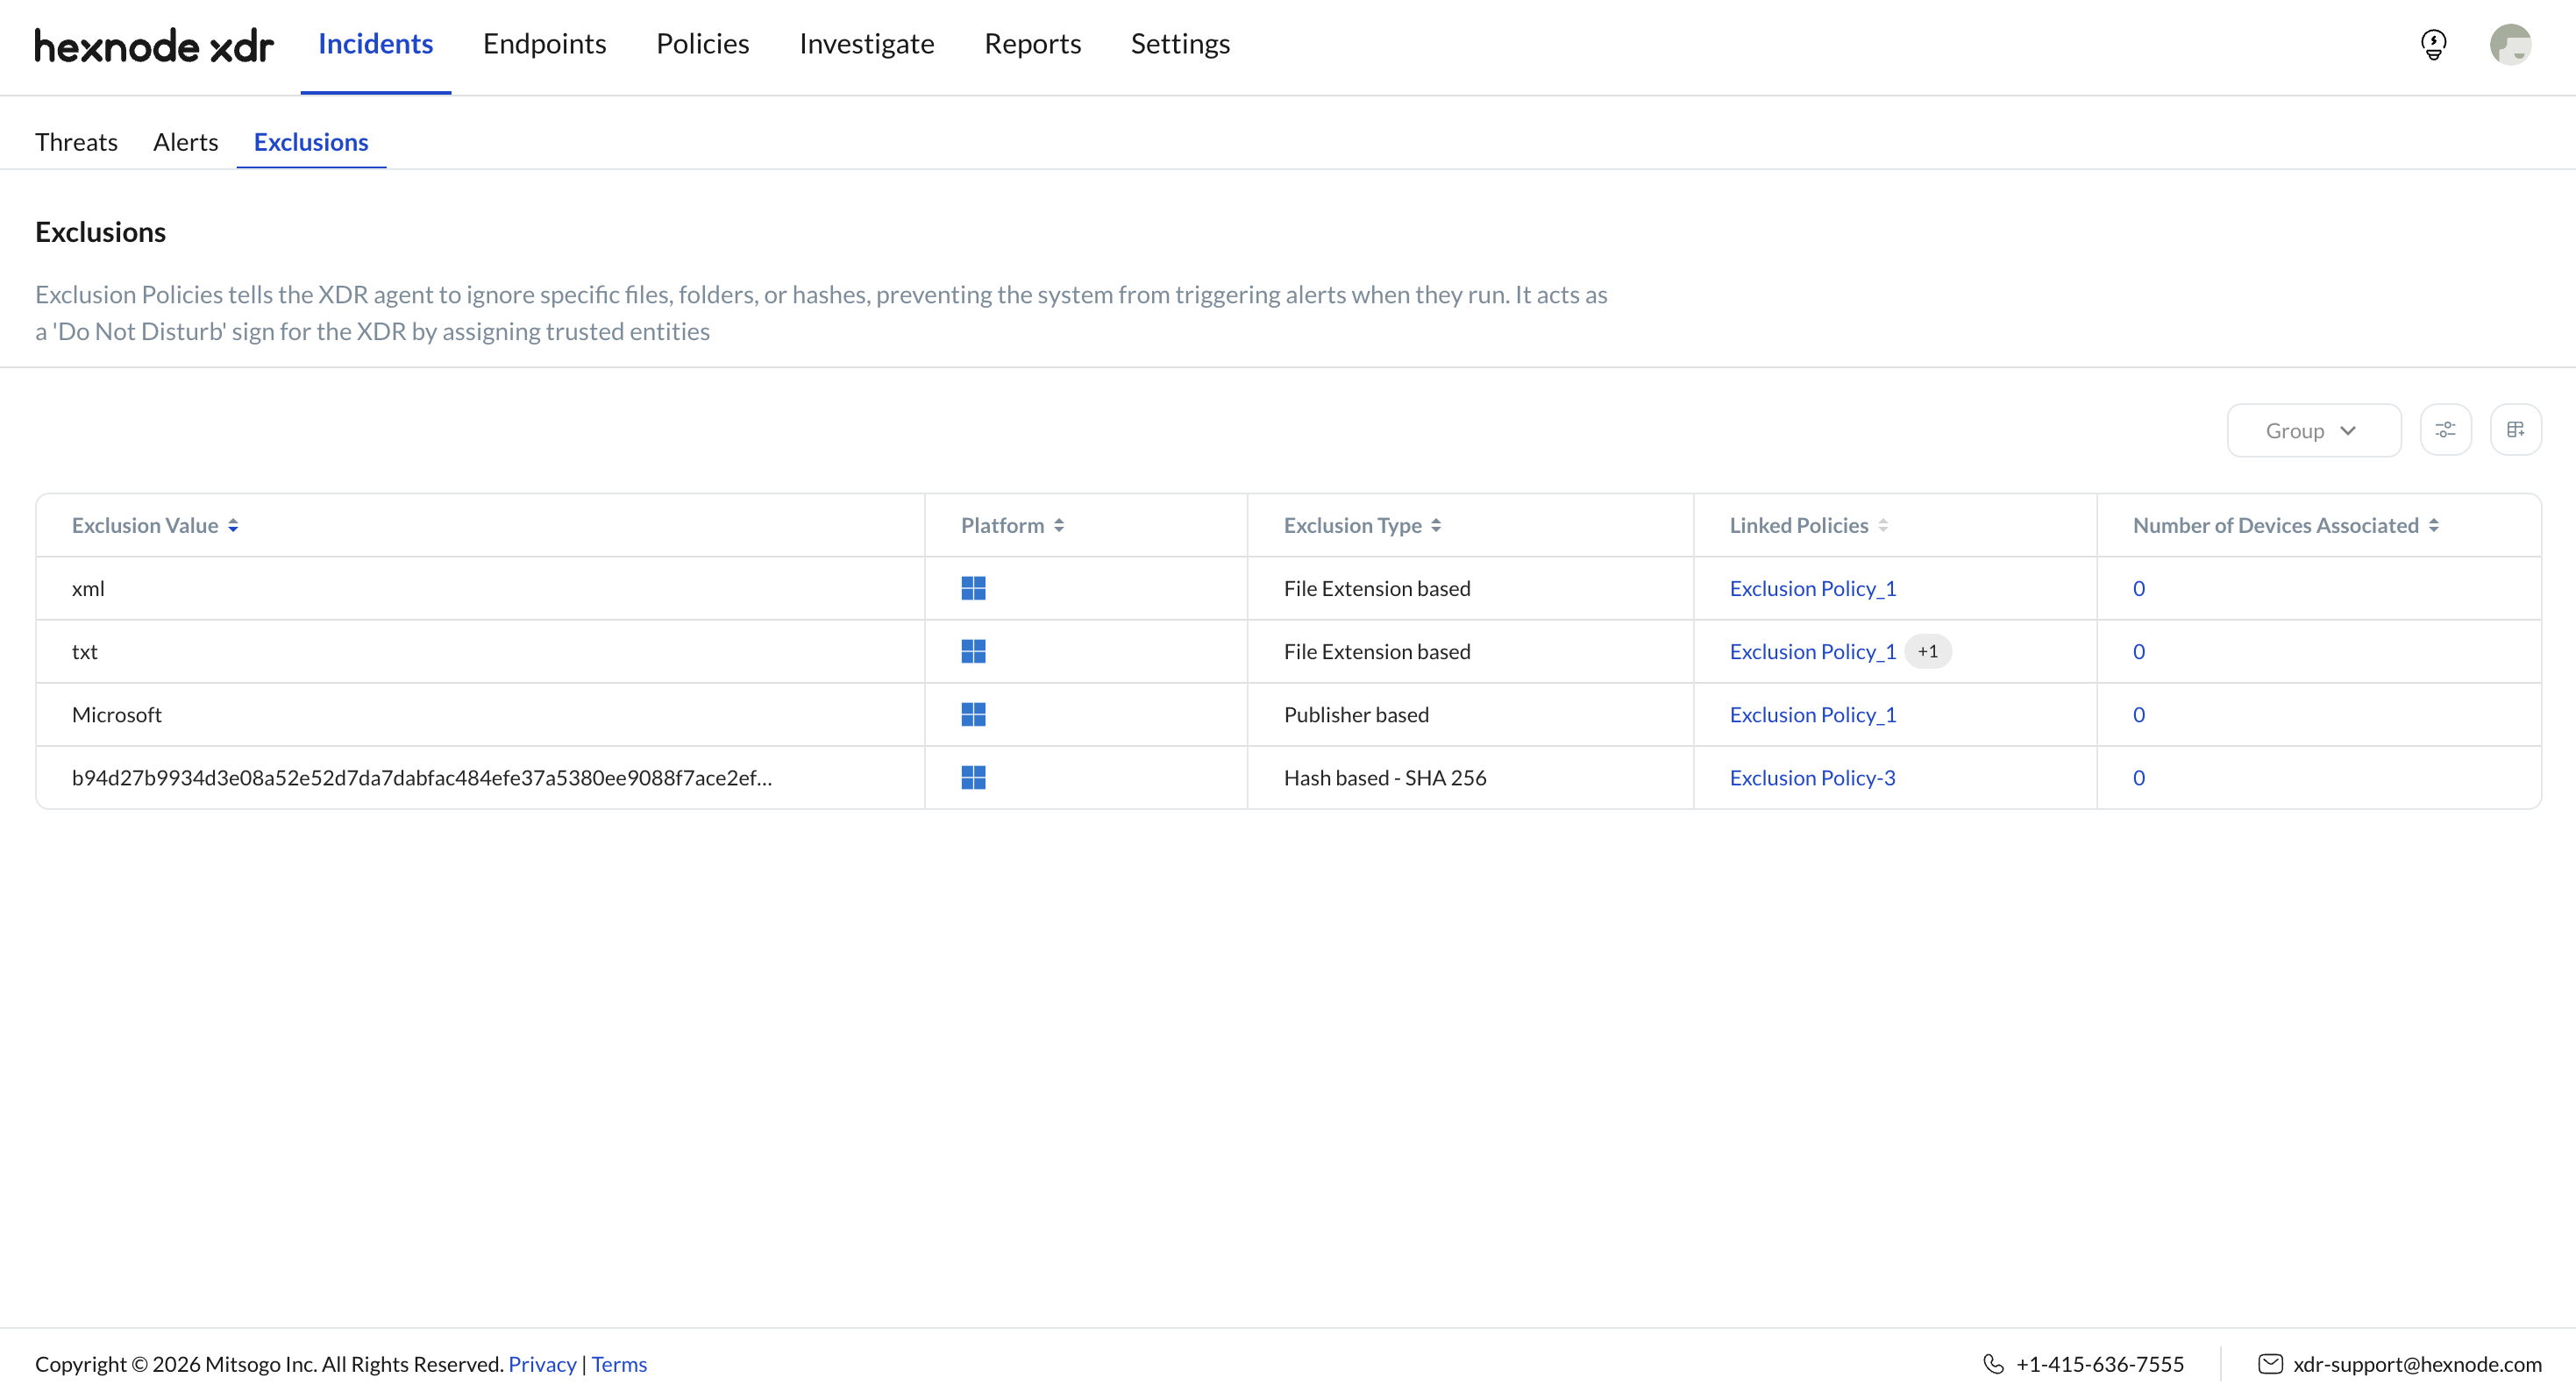
The Exclusions subtab, located under the Incidents tab, provides a centralized, tabular view of all active exclusions created across the Hexnode XDR portal.
You can use the Group by option to organize the table by Exclusion Type, or use the Filter menu to narrow results by Exclusion Type (File, Folder, Publisher, File Extension, Hash based – SHA 1 or Hash based – SHA 256) or Platform (Windows, macOS).
Table columns:
| Column | Details |
|---|---|
| Exclusion Value | The excluded file/folder path, publisher, hash value, or file extension. |
| Platform | Windows and/or macOS |
| Exclusion Type | File/Folder, Publisher, Hash, or File Extension |
| Linked Policies | Policy names where this exclusion is applied |
| Number of devices associated | Total devices this exclusion currently applies to |
Frequently Asked Questions
What if a trusted item must be excluded across all endpoints in the XDR portal?
To exclude that item across all endpoints in the XDR portal, you can add it to the Global Default Policy. An exclusion in the Global Default Policy covers every endpoint in the portal.
- Go to the Policies tab and select Default Policy.
- Click Manage and select Edit.
- In the Exclusions section, click Edit and add the exclusions.
Which exclusion types are available on macOS?
On macOS you can exclude files and folders, publishers, and hashes (SHA-1 or SHA-256). File extension exclusions are available on Windows only.
How can I see where an exclusion is applied?
Open the Exclusions subtab under the Incidents tab. In the Linked Policies column, click a policy name to open that policy, or click the +N badge to see all linked policies. In the Number of Devices Associated column, click the count to see every device the exclusion applies to.


