Restricting your iOS devices to run only a single app or a specific set of custom apps is a powerful way to improve customer engagement and security. Whether for digital signage, point-of-sale (POS) terminals, or self-service check-ins, iOS kiosk mode is the feature offered by Apple to help you achieve exactly this.
Particularly helpful for locking down customer-facing devices, iOS kiosk mode removes the human margin for error and acts as the simplest way to offer a streamlined user experience.
iOS kiosk mode is a restrictive security mechanism that locks an iPhone, iPad, or iPod touch to a single application or a specific set of apps, preventing users from navigating to the home screen or accessing system settings.
By removing standard navigation, businesses ensure that devices left unattended in public spaces remain secure and focused on their intended purpose. While Apple offers a native “quick fix” called Guided Access, scalable enterprise management relies on Single App Mode or Multi-App Kiosk Mode enabled via a Unified Endpoint Management solution.
Let’s take a look at the primary methods you can use to lock down iOS and iPadOS devices into kiosk mode, ranging from simple on-device settings to advanced enterprise management.
Method 1: Guided Access
The built-in “quick fix” for temporary setups. It requires no external software but must be configured manually on each device.
Method 2: Single App Mode
The enterprise standard for professional kiosks. It enables advanced security (like disabling hardware buttons) and allows for remote management, but requires device supervision.
Method 1: Guided Access (The Quick Fix)
Guided Access is a built-in accessibility feature found in iOS 6 and later that serves as a temporary kiosk mode by restricting the device to a single app.
This method works well for parental controls or small businesses with only one or two devices, as it requires manual setup on every individual unit.
Do You Know?: Guided Access was originally introduced in iOS 6 as an accessibility tool to help students with autism stay focused on learning tasks, not for business kiosks. Retailers later adopted this “education feature” as the first standard for locking down public displays.
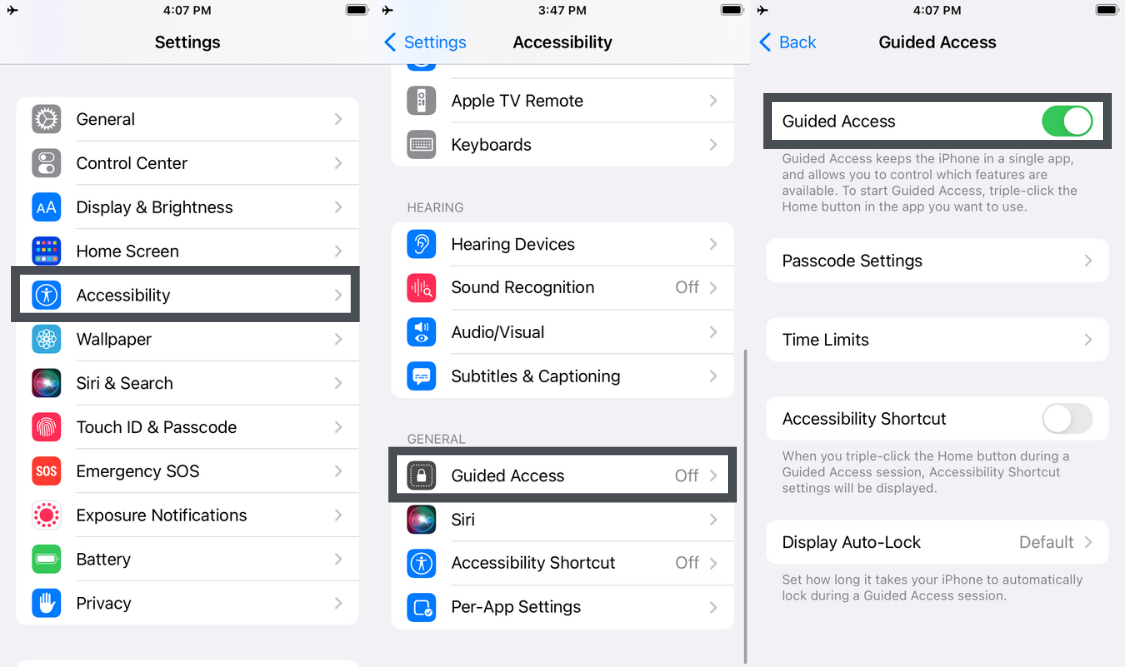
How to enable Guided Access
Navigate to Settings: Go to Settings -> Accessibility -> Guided Access and toggle it ON.
Set Security: Tap Passcode Settings -> Set Guided Access Passcode. (Pro Tip: Enable Face ID or Touch ID for easier exit).
Launch Target App: Open the specific ios kiosk mode app you want to lock the screen to.
Activate Session: Triple-click the Side button (iPhone X or later) or the Home button (iPhone 8 or earlier).
Configure Restrictions: Tap Options (bottom left) to disable volume buttons, keyboard access, or touch motion.
Start: Tap Start in the top right corner.
Enable Guided Access
How to Stop/Exit Guided Access
To exit the session, you must have physical access to the device:
Triple-click the Side button or Home button.
Enter your Guided Access Passcode.
Tap End in the top left corner.
Note: If you forget the passcode, you must Force Restart the device.
Limitations of Guided Access
Reboot Failure: If the device battery dies and the iPad reboots, it will open to the Home Screen—not the kiosk app—leaving the device unsecured.
The “Home Button” Nag: Users who instinctively press the home button will see a “Triple-click to exit” banner, which disrupts the immersive kiosk experience.
No Remote Management: You must physically touch the device to update apps or change settings.
What is Guided Access?
Lock iOS & Android devices to one app with Guided Access & App Pinning. Ideal for exams, gaming, & kiosks.
Method 2: Single App Mode (The Enterprise Standard)
Single App Mode is an advanced lockdown state that forces a supervised iOS device to open a specific app immediately upon waking and prevents it from ever closing, even after a reboot.
Unlike Guided Access, Single App Mode completely disables hardware buttons (Home, Sleep/Wake) and requires no manual intervention to start. This is the gold standard for dedicated kiosks.
Guided Access vs. Single App Mode
Feature
Guided Access
Single App Mode
Setup
Manual (On-Device)
Remote (UEM) or Wired (Configurator)
Reboot Behavior
Unlocks to Home Screen
Auto-launches Kiosk App
Hardware Buttons
Can be disabled
Completely Disabled
Updates
Manual (Must unlock device)
Silent / Background
Ideal For
Temporary / Parental Use
Public Kiosks / Enterprise
How to Configure iOS Kiosk Mode (Single App Mode)
There are two primary methods admins can adopt to configure iOS kiosk mode (Single App Mode), each feasible for a specific use case.
Method 1: Using Apple Configurator (Manual & Wired)
Apple Configurator is a free Mac utility that allows you to manually supervise devices and apply Single App Mode via a USB connection. This method is best for small deployments where you have physical access to all devices and no budget for an UEM.
Prerequisites:
A Mac running Apple Configurator.
A USB lightning/C cable.
Warning: This process requires “Supervising” the device, which will erase all data on the iPad/iPhone.
Steps to Enable:
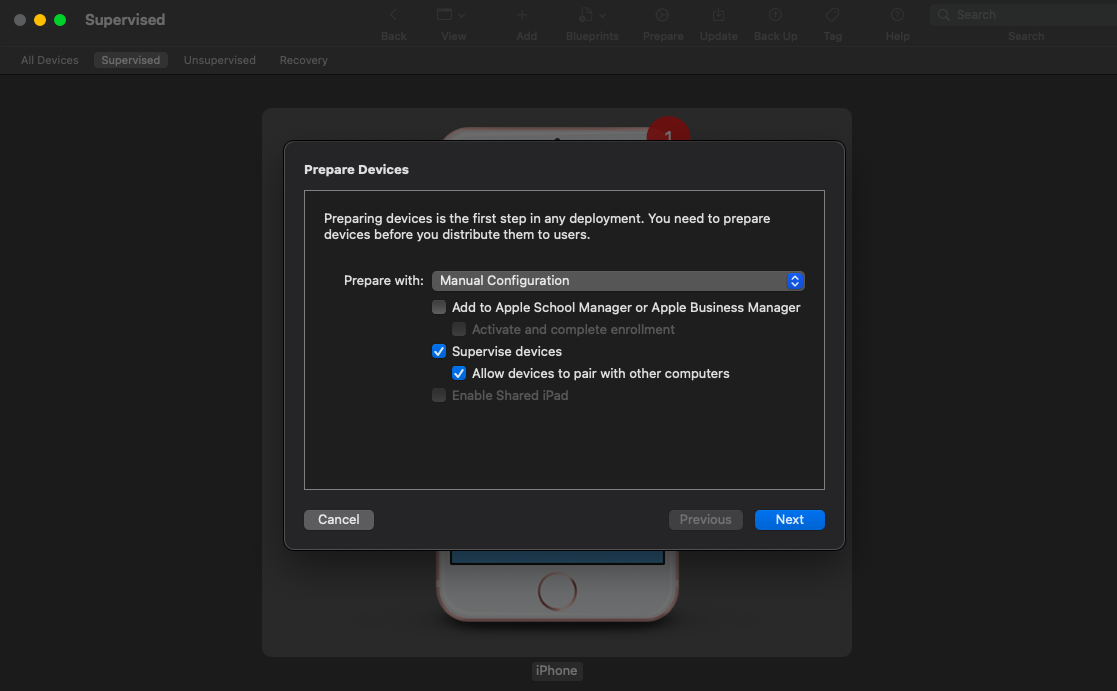
Connect & Prepare: Connect your iOS device to the Mac. Open Apple Configurator, select the device, and click Prepare.
Supervise: Choose Manual Configuration -> check Supervise devices -> select Do not enroll in MDM.
Select configuration method
Wipe Device: Follow the prompts to erase and prepare the device.
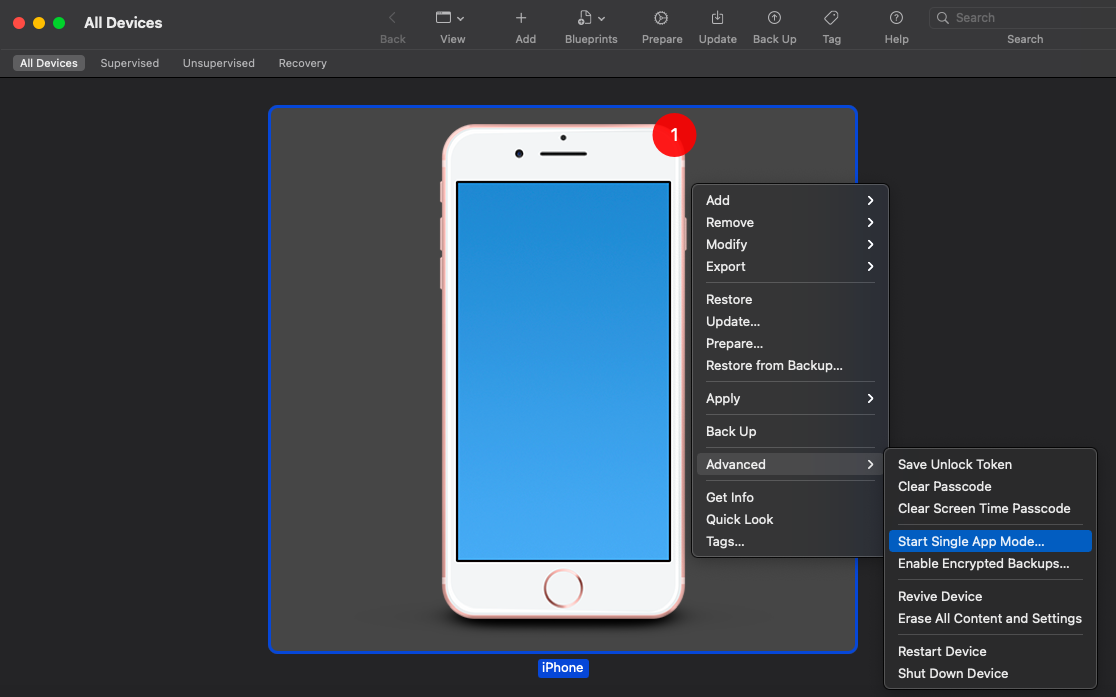
Start Kiosk: Once the device reboots to the home screen:
Right-click the device in Apple Configurator.
Select Advanced -> Start Single App Mode.
Start single app mode
Select App: Choose your desired app from the list. Click Options to disable features like touch, motion, or volume buttons, then click Start Application.
Drawbacks of Apple Configurator:
Not Scalable: You must physically plug in every single device to set it up or update it.
Zero Remote Control: If the kiosk needs an app update or a restart, you have to walk over to it.
Method 2: Using a UEM Solution (Wireless & Scalable)
A Unified Endpoint Management (UEM) solution like Hexnode allows you to wirelessly configure, secure, and monitor iOS kiosk mode on thousands of devices simultaneously.
This is the required method for deploying multi-app kiosks, or for managing single-app kiosks at scale across different locations.
Steps to Enable with Hexnode UEM:
Enroll the Device: Use Apple Business Manager (ABM) for “Zero-Touch Enrollment” so the device becomes Supervised and managed the moment it connects to Wi-Fi.
Configure the Kiosk Policy
Log in to your Hexnode portal.
Navigate to Policies –> Kiosk Lockdown –> iOS Kiosk Mode.
Select Single App for a dedicated terminal or Multi-App to allow a suite of approved apps.
Select App & Settings
Add your specific Store App, Enterprise App, or Web App.
Advanced Settings: Configure “Peripheral Controls” to disable the volume buttons, sleep/wake button, and auto-lock.
Expert Tip: Disable the “Sleep Button” to keep the screen always on.
Associate & Deploy: Save the policy and associate it with your target devices or groups. The iPad will lock into kiosk mode instantly, over the air.
Ongoing Kiosk Lifecycle Management
Deployment is just the beginning. Once your kiosks are live, Hexnode enables full lifecycle management: you can silently push app updates, monitor device health (battery, connectivity), and troubleshoot issues via Remote View—all without ever touching the device or exiting Kiosk Mode. This “zero-touch” maintenance is critical for keeping distributed fleets secure and functional long-term.
Featured resource
The Ultimate Guide to Kiosk Management
Secure your fleet and master kiosk strategy with our comprehensive 3-step management guide. Download the free whitepaper now.
Guided Access vs. Hexnode UEM: Real-World Performance
While Guided Access is free, technical limitations in the iOS architecture make it unreliable for “always-on” retail environments compared to UEM management.
Based on Apple’s developer documentation and standard iOS behavior, here is why manual setups often fail in the field:
The “Reboot” Problem:
Guided Access: When an iPad restarts (e.g., after a battery drain), it defaults to the lock screen or home screen. It does not automatically re-enter Guided Access, requiring a staff member to manually unlock and re-configure the device.
Hexnode UEM: Devices in Single App Mode are hard-coded to launch the specific app immediately upon boot. If a kiosk dies and recharges, it wakes up secure and ready to use without human intervention.
The Update Bottleneck:
Guided Access: To update an app, you must manually end the session, go to the App Store, update, and restart the session.
Hexnode UEM: Updates can be pushed silently in the background. The device briefly refreshes and returns to the kiosk screen automatically.
Common issues with iOS kiosks include app freezes, Wi-Fi disconnects, and screen dimming; here is how to solve them using Hexnode.
Problem: The App Freezes. Solution: Unlike a manual setup where you’d need to physically restart the iPad, Hexnode allows you to send a remote “Restart Device” command from the dashboard to clear the cache and relaunch the kiosk.
Problem: User is Stuck on a White Screen. Solution: This often happens with web clips. Use Hexnode Browser Lite, a restricted browser that clears cookies automatically and prevents users from navigating away from your whitelisted URL.
Problem: Battery Drain. Solution: Use Hexnode to lower the screen brightness remotely during off-hours without physically touching the device.
Why Hexnode is the iOS Kiosk Mode Solution Leader
Hexnode UEM stands out as the leader in iOS kiosk management because it integrates Granular Lockdown capabilities with Apple Business Manager for zero-touch deployment.
Autonomous Single App Mode: Allow specific apps to lock themselves into kiosk mode for high-stakes tasks (like an exam) and release themselves when finished.
Location Tracking: Ensure your portable kiosks (like those used by delivery drivers) stay within authorized geofences.
Remote View: See exactly what the user sees on the kiosk screen to provide real-time support.
Hexnode Browser Lite: A specialized, secure single-tab browser engine that restricts web kiosks to a specific URL, automatically clearing cache and cookies to protect user data between sessions.
Advanced Peripheral Controls: Go beyond the screen by disabling physical buttons (Volume, Sleep/Wake), blocking USB connections, and locking screen orientation to prevent tampering.
Broadcast Messaging: Instantly push full-screen alerts or instructions to your kiosk fleet via Hexnode Messenger—perfect for emergency notifications or staff announcements.
Custom Branding: Replace the native iOS look with your corporate identity by customizing the wallpaper, lock screen message, and app layout to ensure a professional brand experience.
Frequently Asked Questions (PAA)
What is kiosk mode application ios?
A “kiosk mode application” on iOS refers to the specific app that the device is locked into, or the UEM agent used to enforce the lock. In the context of Apple devices, there is no single “Kiosk App” you download to lock the phone; rather, you use the operating system’s features (Guided Access) or a UEM client (like the Hexnode app) to restrict the device to run your specific business application in the foreground.
What is Apple Kiosk/iOS Kiosk?
Apple Kiosk (or iOS Kiosk) is a restrictive mode that transforms an iPhone or iPad into a dedicated device, limiting it to a specific function. It prevents users from accessing the home screen, changing settings, or using other apps. This is commonly used for digital menus, self-checkout stands, and interactive displays in museums or retail stores.
How to enable kiosk mode on Apple (iOS) devices?
You can enable kiosk mode on Apple devices using two primary methods:
For Temporary Use: Go to Settings -> Accessibility -> Guided Access, turn it on, open your app, and triple-click the side button.
For Business Use: Enroll the device in a UEM solution like Hexnode, navigate to Policies -> Kiosk Lockdown, select “Single App Mode,” and push the profile to the device wirelessly.
How do I stop kiosk mode on my iPad?
To stop Guided Access, triple-click the home/side button and enter your PIN. To stop Single App Mode (managed via UEM), the IT administrator must remove the kiosk policy remotely from the Hexnode console.
Can I run multiple apps in iOS kiosk mode?
Yes, but only via a UEM solution. By enabling ios kiosk mode multiple apps in Hexnode, you replace the native home screen with a custom interface that allows users to switch between a predefined list of approved apps.
Conclusion
If you need a quick, temporary lock for a single device, Guided Access is a sufficient free tool. However, for businesses that need secure, “always-on” reliability across multiple devices, Single App Mode managed by a UEM solution like Hexnode is the only professional choice.
Build Secure iOS Kiosks in Minutes with Hexnode
Go beyond Guided Access. Deploy secure, persistent, and remotely managed iOS kiosks with Hexnode UEM.
Content Writer at Hexnode, a curious mind with a knack for words, I dive into ideas worth unpacking and craft narratives worth sharing. I enjoy turning complex concepts into clear, engaging stories that connect with people and spark thought. From tech trends to everyday insights, I’m driven by curiosity, clarity, and creativity, always learning, always refining, and always looking for the next story that deserves to be told well.