How Companies Boost Productivity with IT Automation Using Hexnode
Move from manual clicks to automated workflows. Learn how to eliminate bottlenecks in deployment and app distribution.

Get fresh insights, pro tips, and thought starters–only the best of posts for you.

In the world of Enterprise IT, the Graphical User Interface (GUI) is a double-edged sword.
For an admin managing 50 devices, a dashboard with buttons is perfect. But for an Enterprise Architect managing 50,000 endpoints, a dashboard is a bottleneck. You cannot click “Wipe” 500 times during a security breach. You cannot manually upload an app 20 times a week for your CI/CD pipeline.
Modern infrastructure is not managed; it is programmed.
Enterprises today operate on the principle of Infrastructure as Code (IaC). They want their Mobile Device Management (MDM) to behave like AWS or Azure—controllable via scripts, triggered by events, and integrated seamlessly into their existing stack.
This guide explores how to move beyond the Hexnode console and leverage the Hexnode REST API to build “Autonomous Endpoint Management.” We will detail three architectural patterns: Automated CI/CD Deployment, Event-Driven Security Remediation, and Bulk Provisioning.
The shift to API-based management requires a change in mindset.
Hexnode is an API-First Platform. Almost every action available in our GUI—from locking a device to installing an enterprise app—is available programmatically via our REST endpoints.
Your internal development team builds a new version of your proprietary “Field Service App” every Friday.
We connect your Build Server (Jenkins/GitLab CI) directly to Hexnode.
|
1 2 3 4 5 6 7 8 9 10 11 12 13 14 15 16 17 18 19 20 21 22 23 24 25 26 27 28 29 30 31 32 33 |
Python import requests # Configuration HEXNODE_API_URL = "https://yourportal.hexnodemdm.com/api/v1/" API_KEY = "YOUR_API_KEY" APP_ID = 152 # ID of your internal app GROUP_ID = 24 # ID of "Field Service" Group def deploy_update(): url = f"{HEXNODE_API_URL}actions/install_applications/" payload = { "users": [], "usergroups": [], "devices": [], "devicegroups": [GROUP_ID], "apps": [APP_ID] } headers = { "Authorization": API_KEY, "Content-Type": "application/json" } response = requests.post(url, json=payload, headers=headers) if response.status_code == 200: print("✅ Deployment Triggered Successfully") else: print(f"❌ Deployment Failed: {response.text}") if __name__ == "__main__": deploy_update() |
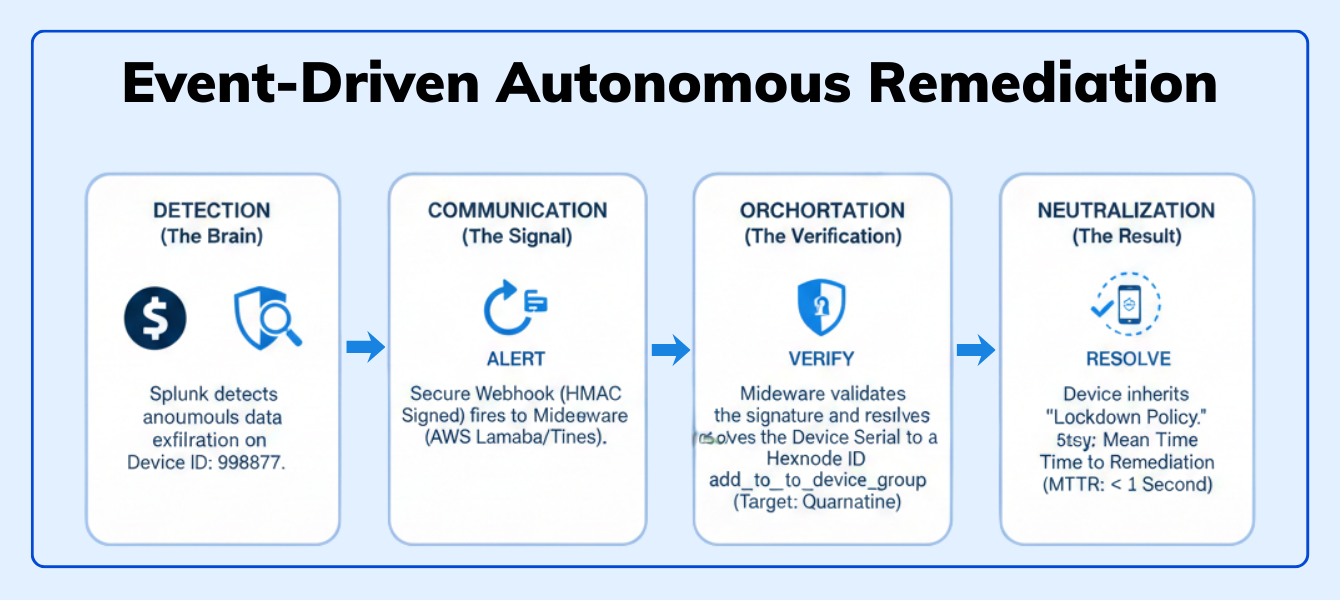
Your SIEM (Splunk/Datadog) detects anomalous traffic from a corporate iPad. It’s uploading gigabytes of data to an unknown server in a foreign country.
We turn Hexnode into the “Muscle” for your SIEM’s “Brain.”
|
1 2 3 4 5 6 7 8 9 10 11 12 13 14 15 16 17 |
Python def quarantine_device(device_id): # Endpoint to move device to the restricted "Quarantine" group url = f"{HEXNODE_API_URL}actions/add_to_device_group/" # ID of your pre-configured Quarantine Group (Strict Policy Applied) quarantine_group_id = 505 payload = { "devices": [device_id], "devicegroups": [quarantine_group_id] } # Execute the isolation requests.post(url, json=payload, headers=headers) print(f"🔒 Device {device_id} has been isolated.") |
Why this wins: You have reduced the Mean Time to Remediation (MTTR) from hours to milliseconds. The device is neutralized before the analyst even opens the ticket.

Scale your security with confidence. This blueprint provides the strategic framework needed to transform your automated API workflows into a resilient enterprise defense system.
Download White paperYou are deploying 500 tablets to a retail chain. They need to be assigned to 500 different “Store Groups” based on their Serial Number to get the correct localized content.
Before you start scripting, adhere to these “Senior Developer” standards:
When you use the Hexnode GUI, you are using a tool.
When you use the Hexnode API, you are building a Platform.
You are building a custom ecosystem where your CI/CD pipeline, your Security Operations Center, and your HR system all talk to your device fleet in real-time. This is the level of maturity that separates “Device Management” from “Enterprise Orchestration.”
Stop clicking buttons. Start building workflows.
Access the full Hexnode REST API Documentation and generate your first API Key.
Start your 14-day free trial today!What are dynamic parameters in MDM?
Dynamic parameters (wildcards) are placeholders in a policy that resolve into specific user or device data—like %email% or %serialnumber%—at the moment of deployment. They allow one policy to adapt to every device automatically.
How do dynamic parameters prevent “Policy Bloat”?
Instead of creating dozens of separate policies for different departments or users, you create a single “Master Policy.” The parameters handle the personalization, reducing the total number of managed policies by up to 80%.
Can I use wildcards in custom scripts?
Yes. You can use Hexnode wildcards in PowerShell (Windows) and Bash (macOS). Wrapping them in quotes (e.g., “%name%“) ensures the script handles spaces or special characters in user attributes without failing.
What happens if an attribute value is missing?
If a field is empty, the policy might push a blank value or fail. To prevent this, use fallback logic with the OR operator (e.g., %department%OR”Retail”) to provide a default value if the primary attribute is null.
Do dynamic parameters update automatically?
Yes. They are reactive. If you update a user’s department or email in the Hexnode portal or your synced Directory (like Entra ID), the policy reflects that change during the device’s next sync—no re-enrollment required.


