A quick guide to Android Debug Bridge (ADB)
Learn more about ADB: the command-line tool to debug, install apps, transfer files, and run commands on Android devices.

Get fresh insights, pro tips, and thought starters–only the best of posts for you.

Have you ever come across terms like “rooting” or “making system-level configurations” on your Android device? If you have, then chances are you might also know that these customizations are possible because of one hidden feature. USB debugging.
Yes, it is this hidden toggle that grants you advanced system-level customizations that normal users usually don’t get. But there is a trade-off: greater accessibility for the security.
In this blog, we’ll explore what USB debugging in Android means, what it enables, the risks associated with it, and why you should disable it to keep your device safe.
USB debugging is a developer mode in Android that allows communication between a device and a computer for advanced operations like installing apps, reading logs, or executing system commands.
When you connect your Android phone to a computer it’s only set up for basic functions like file transfer or charging. It will block any attempt by your PC to install custom apps or run system-level commands. Enabling USB debugging breaks those limits and gives you full control over your device.
USB debugging can be employed to its potential with a command-line tool called the Android Debug Bridge (ADB). This tool acts like a translator between your computer and your device and helps perform the inherent operations. Diving a level deep, ADB involves a client, a server that manages connections between the device and the computer, and a daemon that runs on the Android device and executes your commands. ADB is available as a part of Android Studio and downloaded together with it.
From developers for app development to IT admins for device provisioning and management, USB debugging gives you an extra edge far beyond what the standard Android interface offers.
One of the first and foremost advantages of USB debugging is to help developers build and test apps efficiently. Paired with tools like Android SDK and Android Debug Bridge, USB debugging becomes a key tool for Android software development. Once enabled, it creates a direct link between the Android device and the development environment that enables you to:
Beyond app development, USB debugging offers a gateway to system-level customization for advanced users by providing administrative access. This term is popularly called “rooting”. With the root access, you can bypass existing system restrictions to modify files, remove apps, and customize your device for a more personalized experience using ADB shell commands and Fastboot.
With USB debugging enabled and your computer authorised for debugging access, you can use ADB commands to access files, retrieve app data, and collect system files directly from your PC. This feature becomes a lifesaver especially in scenarios where the device becomes unresponsive or the screen is broken.
In enterprise environments, USB debugging becomes a key tool for device provisioning, diagnostics, maintenance, and management of multiple devices. For instance, IT admins and developers can use this feature to:
By default, USB debugging is turned off and hidden within the Settings menu. Without it your Android will behave just like a regular device, charging and transferring files.
If you are planning to go beyond the existing capabilities what Android offers, you’d first need to enable USB debugging. And enabling the USB debugging option on Android starts with unlocking the Developer options menu first.
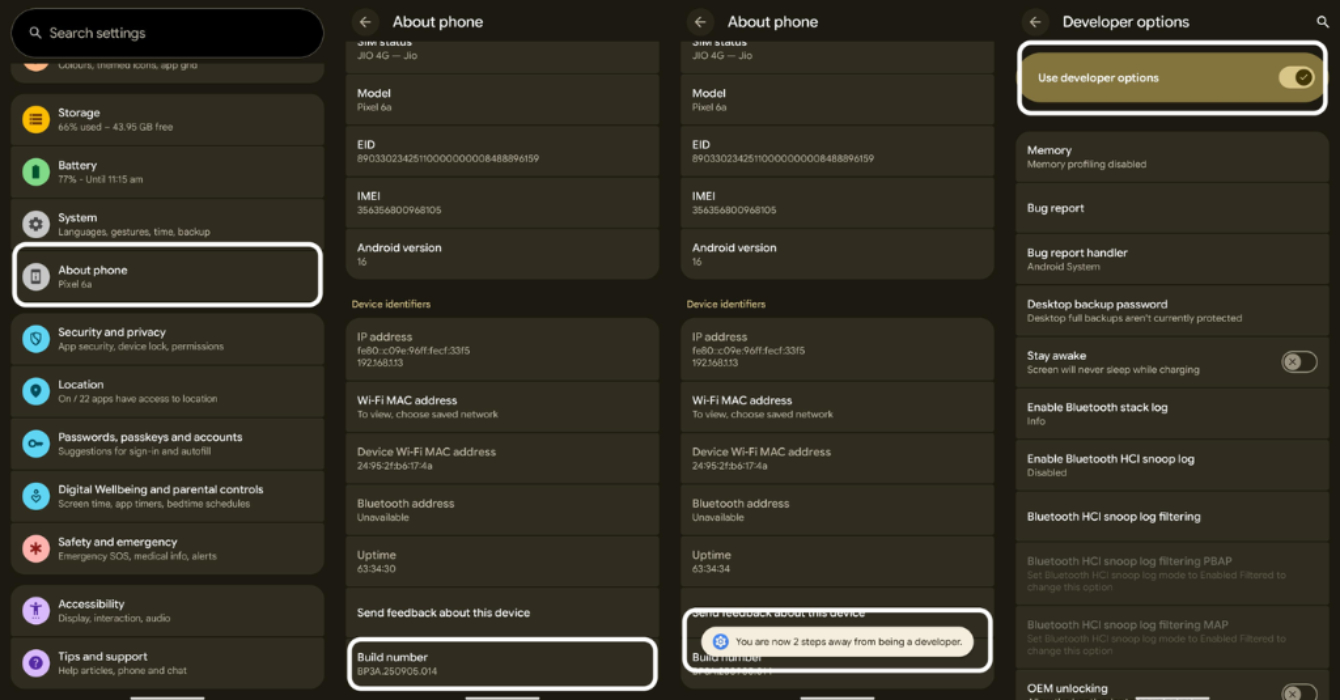
By default, Android keeps its developer tools out of sight to prevent accidental misuse. To enable Developer options:
Developer options is now enabled, and you can now find it under the System setting menu.
You have now enabled USB debugging in your Android device.
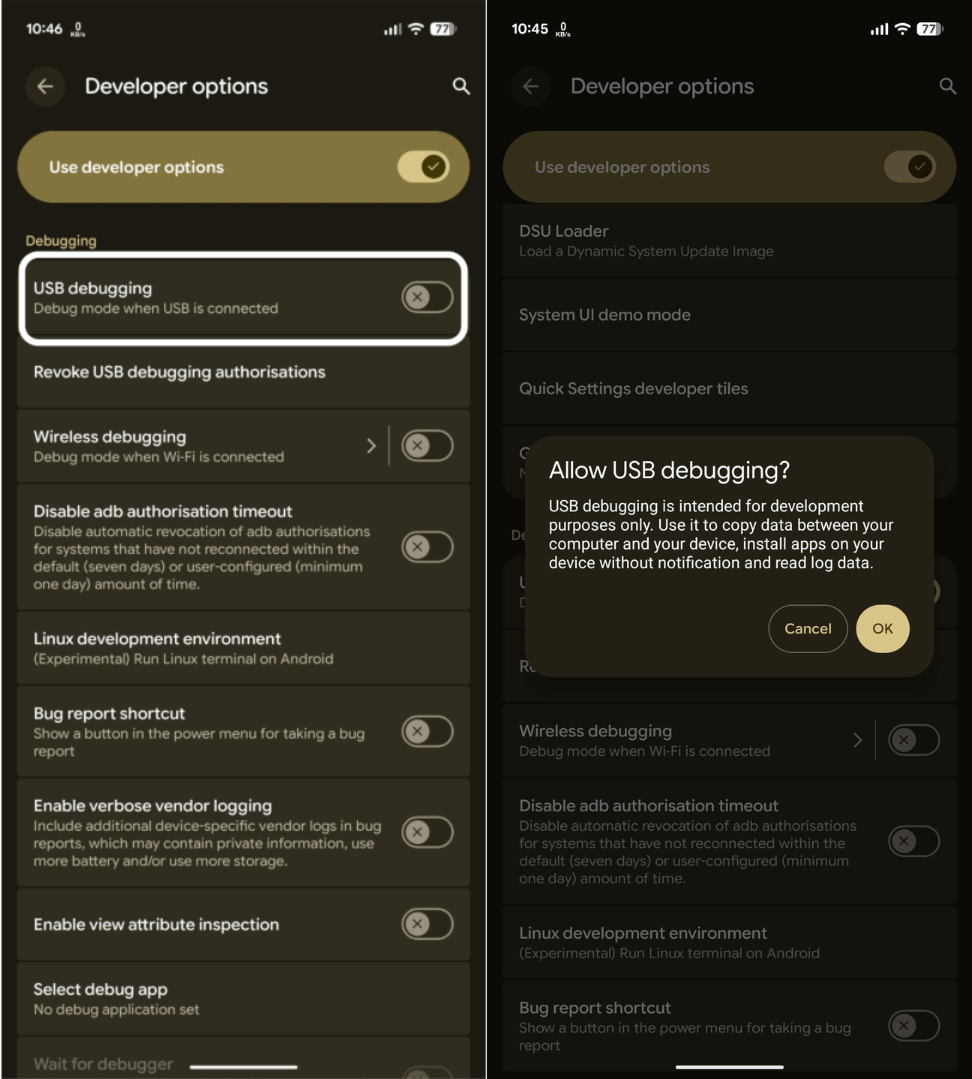
That is all. USB debugging is now active, and your Android device can securely communicate with your computer.
After looking at what USB debugging grants and how straightforward it is to enable, you might be thinking: Why don’t I just turn on USB debugging and use its features? If you are planning on enabling it, think about this as well: If it’s so useful, why is it buried inside Developer options? Why do you have to tap the Build number seven times just to unlock it?
That is because, USB debugging bypasses certain security walls to make more room for customization and flexibility, thereby inviting risks and potential threats that can compromise the integrity of the device. These threats come in a variety of ways:
When you connect your device to a PC with USB debugging enabled, you’d need to verify the RSA key authentication to trust the computer. Now, through the ADB, you gain the power to execute system-level changes anytime you connect your device. In case, the trusted device is affected by malware, your data and the entire integrity of the device is put at a risk.
The concept of USB debugging and the Developer options is to enable advanced functions by intentionally lowering the Android’s built in security features. This pushes the device to bypass certain security keys and compliance certificates that are initially designed to protect your device from threats. This weakened defence layer makes it easy for attackers to exploit your device rather easily.
USB debugging through the ADB grants you the ability to alter system-level configurations through the root access which can sometime be hazardous to your device. Any change to the existing inherent code to the system or application can have adverse effects like loss of important system files, data corruption, and even making the device unstable for further use.
If you ever were to lose your device or if your device falls into the wrong hands, anyone with the basic technical knowledge can gain access to the phone bypassing the existing PIN or password security locks. Without even opening the device, USB debugging can grant access to local backups, hidden system files, and sensitive data that malicious attackers can get their hands on. It is always a good practice to set up Android Device Manager which can help remotely wipe or factory reset your device, if it were to fall in the wrong hands.
The short answer is: Yes and No.
Simply put, USB debugging is a double-edged sword. It is safe when used responsibly. Meaning, you are aware of its capabilities, the risks associated, when and how to use it. But in most cases, the risks outweigh the benefits. If you are not an Android developer or an advanced user, you should consider the risks associated, take the necessary precautions, and turn it on and off only when needed.
Disabling USB debugging in Android is a relatively straightforward process and you can do it in a few simple steps, just like turning it on.
This restores your device’s security and prevents the risks associated with unauthorized or malicious access to the system-level features.
As a developer or an advanced user, you can switch on USB debugging when you need it, interface with ADB, develop apps or even make system-level modifications. Then, you can switch it off to prevent any risks or mishaps. But in a corporate environment with hundreds of endpoints, the dynamics are totally different.
| Aspect | Personal Device | Enterprise Setup |
|---|---|---|
| Control | User-controlled toggle | Admin-enforced policy |
| Visibility | Limited, manual check | Centralized monitoring |
| Risk Exposure | Moderate, isolated risk | High, due to data sensitivity |
| Management | Manual, inconsistent | Automated via UEM |
Now imagine you are an IT administrator responsible for managing multiple Android endpoints across different teams and geographies. If a malicious actor compromises or acquires a device with USB debugging enabled, they could question the integrity of the whole fleet. The security risk would be catastrophic.
While individual device owners can have a control over this setting, enterprise endpoints require a more systematic management and enforcement. This is where Hexnode Unified Endpoint Management (UEM) steps in, transforming a manual security chore into a proactive, centralized policy.
With Hexnode UEM, IT admins can control, manage and restrict certain settings like USB debugging across a fleet of Android devices from a single console. Specifically, in terms of device management related to USB debugging, Hexnode can offer:
With Hexnode, IT admins can transform this mundane and humongous task into a few clicks granting centralized and granular monitoring and control over the end points regardless of end users’ actions.
The contrast between managing USB debugging on a personal device and within an enterprise environment is huge. While it is a necessary, short-term tool for developers, leaving it enabled in a corporate setting introduces severe and unacceptable risks. For IT administrators, monitoring and managing the status of each device and their security settings can be highly unfeasible. One way to safeguard sensitive corporate data is with a system of centralized, consistent policy enforcement through UEMs like Hexnode.
1. Is USB debugging same as Rooting?
No. USB debugging is not same as Rooting. Rooting allows you to modify the device’s system-level settings and files. USB debugging is a setting that allows your phone to communicate with your PC through ADB and Rooting is one of the privileges you can enable with USB Debugging.
2. Is my device still at risk if I disable USB debugging?
Disabling USB debugging will stop your device from communicating with the PC and the debug bridge. System level commands and modifications will not work. But if any of the risks compromise your device, just disabling USB Debugging won’t restore the security.
3. How to disable USB Debugging on Android?
Disabling USB Debugging on Android will only take just a few seconds. Open Settings on your phone. Go to Developer options. If you don’t see it, you haven’t enabled it. If you have enabled, find the USB Debugging button and toggle it off.
4. Can I use USB Debugging to recover my data?
Yes, but with limitations. If you enable USB Debugging on your device and authorize your PC to access it, you can use ADB commands to access and recover data even if your device’s screen is broken or unresponsive.
Take control of settings like USB Debugging and deploy consistent security policies across all your Android enterprise devices effortlessly.
SIGNUP NOW, Google Cloud Messaging (GCM), Firebase Cloud Messaging (FCM) and Windows Notification Service (WNS)")


