OIDC integrations fail when the client type, redirect URIs, grant types, scopes or token-validation rules do not match the application’s architecture. A configuration that works for a server-side web application may be insecure or technically unsuitable for a native application or single-page application (SPA).
Each architecture handles credentials and tokens differently. Web applications can usually protect a client secret on the server, while native applications and SPAs are public clients that cannot securely store one. Their redirect behavior, session handling and use of Proof Key for Code Exchange (PKCE) also require different controls.
Before changing production authentication, teams must understand the complete protocol flow—from the authorization request and user authentication to code exchange, token validation and session creation. Otherwise, small configuration errors can cause failed sign-ins or weaken authentication security.
What Happens When OIDC Is Misconfigured?
A misconfigured OIDC integration can cause failed logins, token exposure, excessive access, persistent sessions and application outages. Because authentication sits directly in the application access path, even a minor configuration error can affect every user assigned to the application.
Weak redirect URI controls may allow authorization responses to reach an unintended endpoint. Storing client secrets in native applications or SPAs exposes credentials that users or attackers can extract. Similarly, missing PKCE protection increases authorization-code interception risk, while incomplete token validation can cause an application to trust tokens with an invalid issuer, audience, signature or lifetime.
Operationally, these failures increase help-desk volume and disrupt workforce access. Security gaps may also enable unauthorized access, leave sessions active beyond policy requirements and complicate audit evidence for authentication controls.
What Is OpenID Connect and How Does It Work?
OpenID Connect (OIDC) is an identity layer built on OAuth 2.0 that allows an application to verify a user’s identity and receive standardized identity claims.
A core OIDC authentication flow involves three primary participants: the end user, the Relying Party or client application, and the OpenID Provider. A resource server also participates when the client uses an access token to call a protected API.
The client sends an authorization request to the OpenID Provider, which authenticates the user. In the Authorization Code Flow, the provider returns an authorization code that the client exchanges for tokens. After validating the ID token and its claims, the application creates a local user session.
How Is OIDC Different from OAuth 2.0 and SAML?
OAuth 2.0 delegates authorization, allowing a client to access protected resources without receiving the user’s credentials. OIDC adds authentication through an ID token and standardized identity claims. SAML also supports federated authentication, but exchanges XML assertions rather than JSON-based tokens.
Protocol
Primary purpose
Token format
Common application types
Typical enterprise use
OAuth 2.0
Delegated authorization
Not prescribed; access tokens may be opaque or structured.
APIs, web and mobile apps
Granting scoped resource access
OIDC
Authentication and identity federation
ID tokens are JWTs; access-token format is determined by the authorization server.
Web apps, SPAs and native apps
Modern SSO and identity verification
SAML
Federated authentication
XML assertions
Browser-based enterprise apps
SSO for established SaaS and legacy applications
The appropriate protocol depends on application architecture, compatibility and access requirements.
Identity Federation Explained: SAML, OIDC, and Beyond
Compare SAML and OIDC across trust models, token formats, application fit and enterprise security.
What Are ID Tokens, Access Tokens, Claims and Scopes?
An ID token communicates that authentication occurred and carries claims about the authenticated user. An access token authorizes a client to call a protected resource, such as an API. Applications should not use access tokens as proof of authentication or send ID tokens to APIs as authorization credentials.
OIDC ID tokens are represented as JSON Web Tokens (JWTs). Before creating a session, the client should verify:
Issuer (iss): The OpenID Provider that issued the token.
Audience (aud): The client for which the token was intended.
Subject (sub): The stable identifier for the authenticated user.
Expiration (exp): The time after which the token must not be accepted. Issued at (iat): The time at which the token was issued.
Signature and nonce: The token’s integrity and relationship to the original authentication request.
Scopes control requested data or token behavior. openid activates OIDC, while profile and email request corresponding identity claims. offline_access requests refresh-token-based access. Scopes indicate permissions or claim categories; they should not be treated as application roles.
Note:
A valid ID token confirms authentication; it does not grant unrestricted application access. Enforce authorization separately through roles, group mappings or resource-level permissions.
How Does the Authorization Code Flow with PKCE Work?
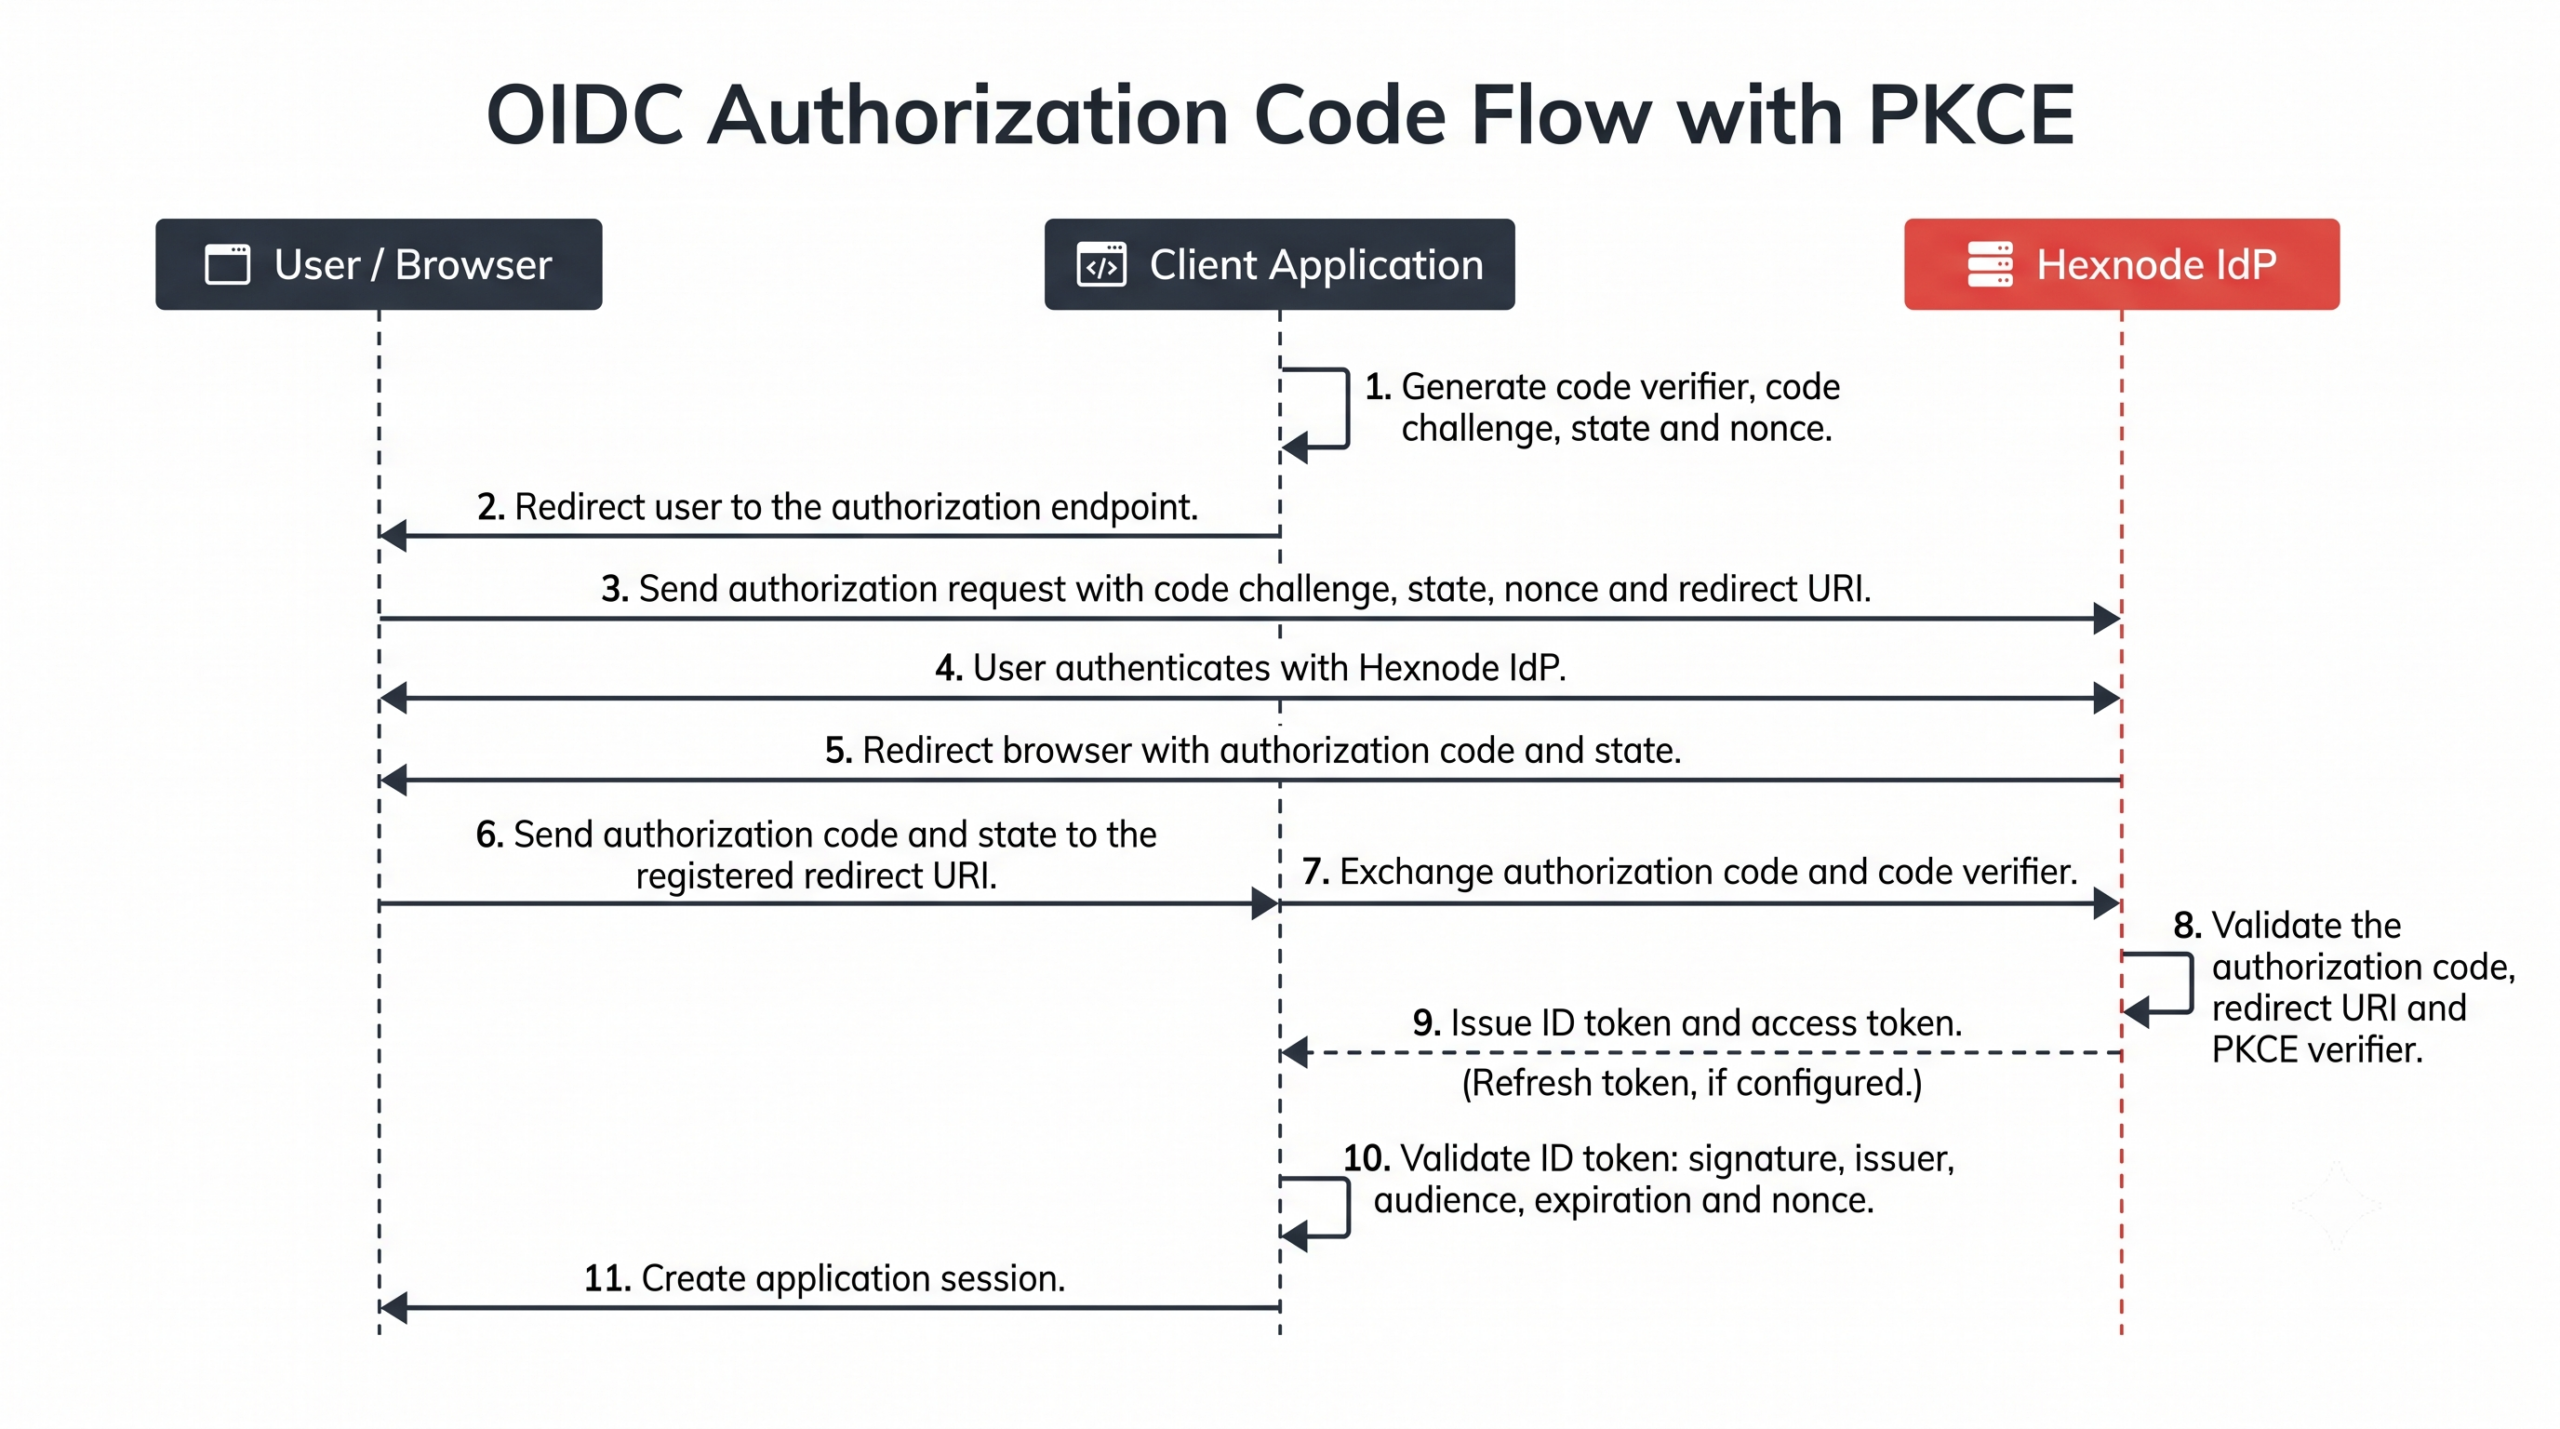
The Authorization Code flow with PKCE begins when the client generates a random code verifier and derives a code challenge from it. The client then redirects the user to the authorization endpoint with the challenge, requested scopes, redirect URI, state and nonce.
After authenticating the user, the OpenID Provider redirects the browser to the registered URI with an authorization code. The client sends that code and the original code verifier to the token endpoint. The provider verifies that the submitted verifier matches the earlier challenge before issuing tokens. The client validates the ID token and creates a local session.
Each parameter addresses a different risk:
state links the response to the request and helps prevent request forgery.
nonce binds the ID token to the authentication request and limits replay.
PKCE prevents an intercepted code from being exchanged without the verifier.
Native applications and SPAs are public clients because they cannot reliably conceal a client secret. PKCE protects their code exchange without relying on a stored secret.
OIDC Authorization Code flow with PKCE
How Should an Application Validate OIDC Tokens?
Before trusting an identity, the client must verify the ID token’s cryptographic signature and validate its issuer, audience, expiration, nonce and other required claims. It should also reject unexpected signing algorithms, tokens issued for another client and tokens outside their permitted time window.
Clients typically obtain the provider’s public signing keys from its published key set and cache them according to the provider’s caching instructions. Because providers rotate signing keys, the client must refresh its cached set safely when it encounters a legitimate but unknown key identifier. It should reject the token if the required key remains unavailable rather than bypass signature verification.
Successful validation confirms that the specified provider authenticated the user for the intended client. It does not determine what that user may access. The application must apply separate authorization controls, such as roles, group mappings or resource-level permissions, after authentication.
How Do You Plan and Implement an OIDC Integration?
Implementing OIDC requires architecture classification, secure client registration, exact endpoint configuration, standards-compliant token validation and controlled testing. Each decision must reflect how the application stores credentials, processes redirects and maintains user sessions.
The following vendor-neutral sequence covers requirements definition, client registration, authentication integration and security testing. Complete these steps in an isolated test environment using representative accounts and access policies before modifying production authentication or migrating existing users.
Step 1: Define the Application and Access Requirements
Classify the client as a server-side web application, native application or single-page application (SPA). Server-side applications can generally protect credentials within a backend environment. Native applications and SPAs execute in user-controlled environments and therefore cannot securely retain a client secret.
Document the integration requirements before registering the client:
Approved login redirect URIs for development, testing and production
Post-logout behavior and permitted logout destinations
Identity claims required to identify or create the user
Session duration, reauthentication and refresh requirements
Users, groups or business units expected to access the application
Keep authentication separate from adjacent controls. OIDC verifies identity, but API authorization still requires appropriate access tokens and scopes. Likewise, account provisioning and deprovisioning require a lifecycle mechanism, while application roles require separate authorization rules or approved claim mappings.
Step 2: Register the Client and Restrict Its Permissions
Register only the required redirect and logout URIs, use exact URI matching and require HTTPS in production, except where a native application uses a standards-compliant loopback HTTP redirect URI. Avoid wildcard redirect URIs. Where practical, use separate client registrations for development, testing and production to isolate credentials and configuration changes.
Select the client type according to the application’s ability to protect credentials. Enable only the grant types the application will use and limit scopes to the identity data and resource access it genuinely needs. Unnecessary scopes increase exposure if a token is compromised.
For confidential clients, store the client secret in a protected server-side secret manager rather than application code, configuration repositories or browser storage. Rotate it according to the organization’s credential policy. Public clients cannot protect a static secret; require Authorization Code with PKCE so an intercepted authorization code cannot be redeemed without the original verifier.
Pro tip:
Register separate redirect URIs and client configurations for development, testing and production. Exact URI matching reduces redirect errors and prevents non-production settings from affecting production authentication.
Step 3: Integrate Authentication and Token Validation
Use a maintained, standards-compliant OIDC library to initiate authorization requests, process redirects and exchange authorization codes for tokens. Avoid implementing protocol and cryptographic operations directly unless the application team can maintain and test them against the relevant standards.
Validate the ID token before creating an application session. Verify its signature, issuer, audience, lifetime and nonce, then map only explicitly approved claims to the local user profile. Do not automatically convert untrusted or unexpected claims into application roles or elevated permissions.
Define how the application handles token expiration, refresh-token use, reauthentication and logout. Authentication errors should fail securely and provide users with actionable but nonsensitive messages. Logs may record error codes, request identifiers and timestamps for troubleshooting, but they should never expose authorization codes, tokens, client secrets or complete identity payloads.
Step 4: Test Security, Access and Failure Scenarios
Validate more than the successful sign-in path. Test login, logout, expired tokens, invalid signatures, altered claims, mismatched redirect URIs, replay attempts and denied access. The application should reject every invalid response without creating a session or exposing sensitive diagnostic data.
Use representative accounts inside and outside the approved assignment scope. Confirm that authorized users receive the expected access while excluded, disabled or unassigned users cannot authenticate. Test refresh-token storage, rotation, expiration and revocation against the defined session policy.
After rollout, monitor authentication failures, redirect errors and unusual token activity. Retain a tested recovery path, such as an emergency administrative account or controlled rollback procedure, so configuration failures do not cause an organization-wide lockout.
How Does OIDC Work in Hexnode IdP?
Hexnode IdP acts as the Identity Provider, authenticating users and returning signed JSON Web Tokens to integrated client applications. The application uses these tokens to verify the user’s identity and establish a session without handling the user’s Hexnode IdP credentials directly.
Administrators can configure an integration from Applications > MyApps by adding an application and selecting OIDC as the protocol. This configuration connects centralized authentication in Hexnode IdP with server-side web applications, native applications and single-page applications.
Featured Resource
Hexnode IdP Solution Brief
See how Hexnode IdP combines SSO, MFA, RBAC, identity management and device-aware access controls.
When configuring OIDC SSO, administrators must first select the Application Type that matches the client architecture. Hexnode IdP provides three documented options:
Web Application: For server-side applications where backend code handles the authentication process.
Native Application: For applications installed on mobile devices or desktop computers.
Single Page Application (SPA): For browser-based applications that execute primarily in front-end code.
Administrators must then choose the Client Type. A Confidential client can securely store a client secret, which generally makes it suitable for server-side web applications. A Public client cannot protect a secret from the user or the runtime environment, as is typically the case with native applications and SPAs.
The Require PKCE setting protects the authorization-code exchange by linking the code to a verifier generated by the client. When Public is selected as the Client Type, Hexnode IdP makes PKCE mandatory. The setting is automatically selected and cannot be disabled, preventing the client from relying on a secret it cannot securely retain.
Configure Redirect URIs, Scopes and Grant Types
Under endpoint configuration, Login Redirect URIs specify where Hexnode IdP can return users after successful authentication. The redirect URI sent by the application must exactly match a registered value; otherwise, the authentication request fails. Logout URIs define the approved destinations for users after logout.
Administrators can then configure the application’s Allowed Scopes:
Open ID: Required to initiate OIDC authentication.
Profile: Permits access to standard profile claims.
Email: Permits access to email-related claims.
Offline Access: Allows the application to request refresh tokens.
SCIM: Available as an Allowed Scope. Configure SCIM 2.0 provisioning separately using the application’s SCIM endpoint and authorization token.
Hexnode IdP documents two grant types. Authorization Code allows the client to receive a temporary code and exchange it for tokens after authentication. Refresh Token allows the application to obtain new access tokens without requiring the user to authenticate again. Enable it only when continued access aligns with the organization’s session policy.
Add SCIM Provisioning and Application Assignments
OIDC authenticates users, but it does not manage their accounts within the connected application. Hexnode IdP provides a separate SCIM 2.0 provisioning configuration that supports four selectable actions: Create Users, Update Users, Deactivate Users and Sync Groups.
Administrators provide the application’s SCIM 2.0 Endpoint URL and authorization token, then configure User Attribute Mapping and Group Attribute Mapping to align directory data with the application’s schema. Synchronization can be scheduled at a specified time with a Daily, Weekly or Monthly frequency.
Access is controlled separately in the application’s Assignments section. Administrators can explicitly Include or Exclude individual users and groups. After configuring OIDC SSO, optional SCIM provisioning and assignments, they can review each section and create the application integration.
Can Hexnode IdP use OIDC with web, native and single-page applications?
Yes, Hexnode IdP supports OIDC configuration for Web Applications, Native Applications and Single Page Applications (SPAs). Administrators must select the application and client types that match how the application handles credentials and authentication redirects.
Should I configure a Hexnode IdP OIDC client as Public or Confidential?
Use a Confidential client when the application can securely retain a client secret, such as a server-side web application. Use a Public client for native applications and SPAs that cannot protect a secret; Hexnode IdP automatically requires PKCE for Public clients.
Does configuring OIDC in Hexnode IdP automatically provision users?
No, OIDC authenticates users but does not manage their accounts in the connected application. Configure SCIM 2.0 separately to create, update or deactivate users and synchronize groups.
Why can an OIDC login fail even when the user enters valid credentials?
An OIDC login can fail when the redirect URI does not exactly match a registered value or when the client type, grant type or scopes are incorrectly configured. Access may also be denied when the user or group is not included in the application’s assignments.
What should IT test before deploying a Hexnode IdP OIDC integration?
IT should test login, logout, token renewal, redirect URI matching and user assignment enforcement with a limited pilot group. The test should also cover expired or invalid tokens, denied access and recovery from a configuration failure.
Can OIDC scopes replace application roles and permissions?
No, OIDC scopes specify requested identity data or token behavior; they do not automatically define application roles. The connected application must enforce authorization separately through its approved roles, group mappings or resource-level permissions.
Configure Secure OIDC SSO with Hexnode IdP
A secure OIDC integration depends on matching the authentication flow, client type, PKCE requirement, scopes and user assignments to the application’s architecture and access requirements.
Begin with one OIDC application and a limited user group. Validate login, logout, token renewal, assignment enforcement and recovery from configuration or authentication failures before expanding access. Document the tested settings so subsequent application integrations follow the same controlled process.
Configure OIDC SSO with Hexnode IdP
Configure and test secure OIDC single sign-on for a pilot application with Hexnode IdP.
Associate Product Marketer at Hexnode focused on SaaS content marketing. I craft blogs that translate complex device management concepts into content rooted in real IT workflows and product realities.