

Is Mac shell scripting difficult to learn?
Well, to be honest, it depends. Shell scripting can prove to be quite challenging for individuals who do not have a firm grasp of its pre-requisites. However, learning the fundamentals of shell programming is actually rather simple.
The reason you may be facing difficulties with Mac shell scripting might be due to either of these reasons:
- You may need more experience in programming and in solving problems using logic.
- You may need more knowledge in the multitude of commands available for Mac shell scripting.
It’s tough to put tools together in a script if you don’t know how to utilize them individually or even know what problems they answer.
But do not despair, as there is hope. For this is precisely what we aim to remedy with this blog.
In this beginner-friendly guide,
-
- We’re going to walk you through the basics of Mac shell scripting, including how to create and run a Shell script.
- We’ll explore some of the basic Mac shell scripting terms and commands.
- We shall review some of the applications, use-cases, and best practices for Mac Shell scripting.
When you’re done with this guide, we expect you to be equipped with all the information and pre-requisites you may require to begin your own shell scripting journey.
Table of Contents
- What are shell scripts?
- Why use Mac shell scripts?
- Terminal commands vs shell scripts – What’s the difference?
- What are shells?
- Bash vs Zsh – What’s the difference?
- How do I change the default shell on my Mac?
- Basic Mac shell scripting terms to familiarize
- How do I create a Mac shell script?
- How do I execute a Mac shell script?
- Simplify script deployments using UEM
- Some frequently used shell commands
- Mac shell scripting best practices
- The final note
What are shell scripts?

Shell scripts are text files or small computer programs that consist of a collection of UNIX commands. You use a shell script to execute commands that you would normally type on the command line. However, rather than inputting them one by one into a Mac’s terminal, you can use shell scripts to execute the said group of commands with just one single action.
Why use Mac shell scripts?
While Mac shell scripts aren’t generally used to create complex programs and functions, you can use them to automate most of the basic software operations. With the help of its powerful built-in command-line tools, you can create scripts to perform operations such as:
Accessing and navigating your operating system more efficiently
With the help of scripting commands, you can navigate through your computer’s OS without having to interact with the GUI. This eliminates the need to go through your Mac’s menus, options, and windows.
Moreover, when combined with the remoting functionality via SSH, scripting allows IT to perform remote operations and processes on macOS devices.
Creating and editing text files, searching files within directories
With the help of macOS scripts, you can easily create and edit text files, and perform actions such as,
- Preparing data
- Sorting and editing data
- Searching for specific texts within data
- Looking up files within a directory
Integrate with other powerful tools that are installed
Mac shell scripting is ideal for integrating and connecting with other powerful tools within your system. As Apple says in their Mac shell scripting primer,
“Shell scripting is generally considered to be a glue language, ideal for creating small pieces of code that connect other tools together. “
They also allow for more practical functions, such as piping or command substitution. You can utilize the result of a command, and use its output as part of your next command.
Moreover, shell scripts allow you to use programming operations such as ‘for’ loops, if/then/else statements, and more, directly within the command-line. And the best part? You don’t have to learn an entire new programming language as Mac shell scripting works on the good ol’ terminal commands.
Terminal commands vs shell scripts – What’s the difference?
Terminal is the name given to the macOS command-line interface (CLI). It enables users to input single-line, text-based commands that help perform system-level operations on the device.
Shell scripts, on the other hand, are computer programs that collect a series of terminal commands into one file. While typing commands into the Terminal is done one by one, you can execute scripts with a collection of commands with just one click. This makes it easier to execute repeating or multi-process operations while eliminating any element of human error.
What are shells?

A shell is a special command-line interpreter that allows you to interact with the system kernel through issuing commands. To put it simply, a shell takes your text-based commands, converts them into programmable language and delivers it to the operating system to put into action.
Mac’s default shell is either zsh (Z shell) or bash (Bourne-again Shell). This default shell is determined by the version of macOS you’re running.
- For macOS Mojave and earlier, the default shell is bash.
- For macOS Catalina and later, the default shell is zsh.
Bash vs Zsh – What’s the difference?
So, what’s the difference between zsh (Z shell) and bash (Bourne-again Shell)?
Not much, really. Both bash and zsh are part of the Bourne family of shells, and have most of the fundamental features in common. However, some minor differences do exist between both shells.
| BASH | ZSH | |
| Directory navigation | Directory navigation in bash is relatively more difficult, as it does not support recursive path expansion. You will have to type the full path of the directory during file navigation. | Searching directories and files in zsh is relatively easier, as it supports recursive path expansion. For example, if you type in cd myfile in zsh, it will search any file or folder whose name has myfile. |
| Spelling auto-correction | Although you can manually enable spelling auto-correction, it is not enabled by default and is not as efficient as in zsh. | Spelling auto-correction is more efficient and functional in zsh. However, it is not enabled by default. |
| Wildcard expansion | Wildcard expansion is enabled by default in bash. | Wildcard expansion is not enabled by default in zsh. |
| Theme customization | Zsh offers many themes and plugins. | Bash offers relatively less themes and plugins. |
Moreover, bash is more widely used among IT administrators, and has more resources and help documentation. Hence, it is a great option for beginners. On the other hand, zsh offers extensibility, good customization, and unique functionalities. Choosing the right shell would depend mostly on user preference.
The programs included in this guide have been performed on the bash shell.
How do I change the default shell on my Mac?
Alright, so let’s look at how you can change the default shell on your macOS device. There are two ways to go about with this.
From System Preferences
Option one, is to change the default shell from System Preferences on your Mac.
- Open System Preferences and navigate to Users & Groups.
- Click on the Lock icon and enter your username and password (must have admin privileges).
- Now, hold down the ctrl button on your Mac keyboard and click on your username. A dropdown appears.
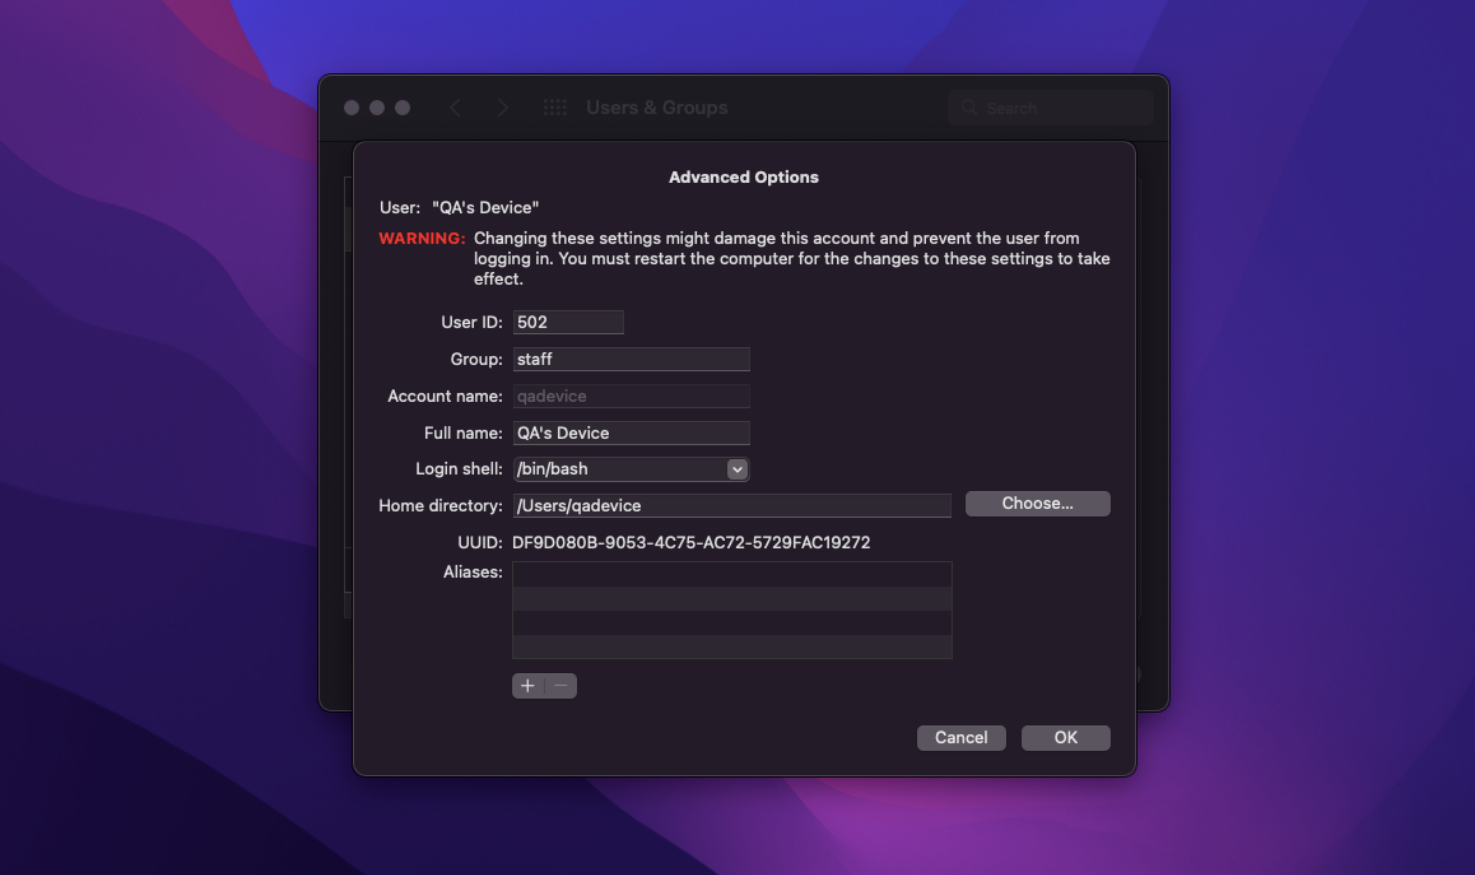
- Click on Advanced options. On the tab that appears, expand the dropdown for Login Shell and choose your preferred shell.
You have successfully changed the default shell on your Mac.
Using terminal commands
Option two, is to change the default shell using terminal commands.
- Open the terminal on your Mac and enter the command
|
1 |
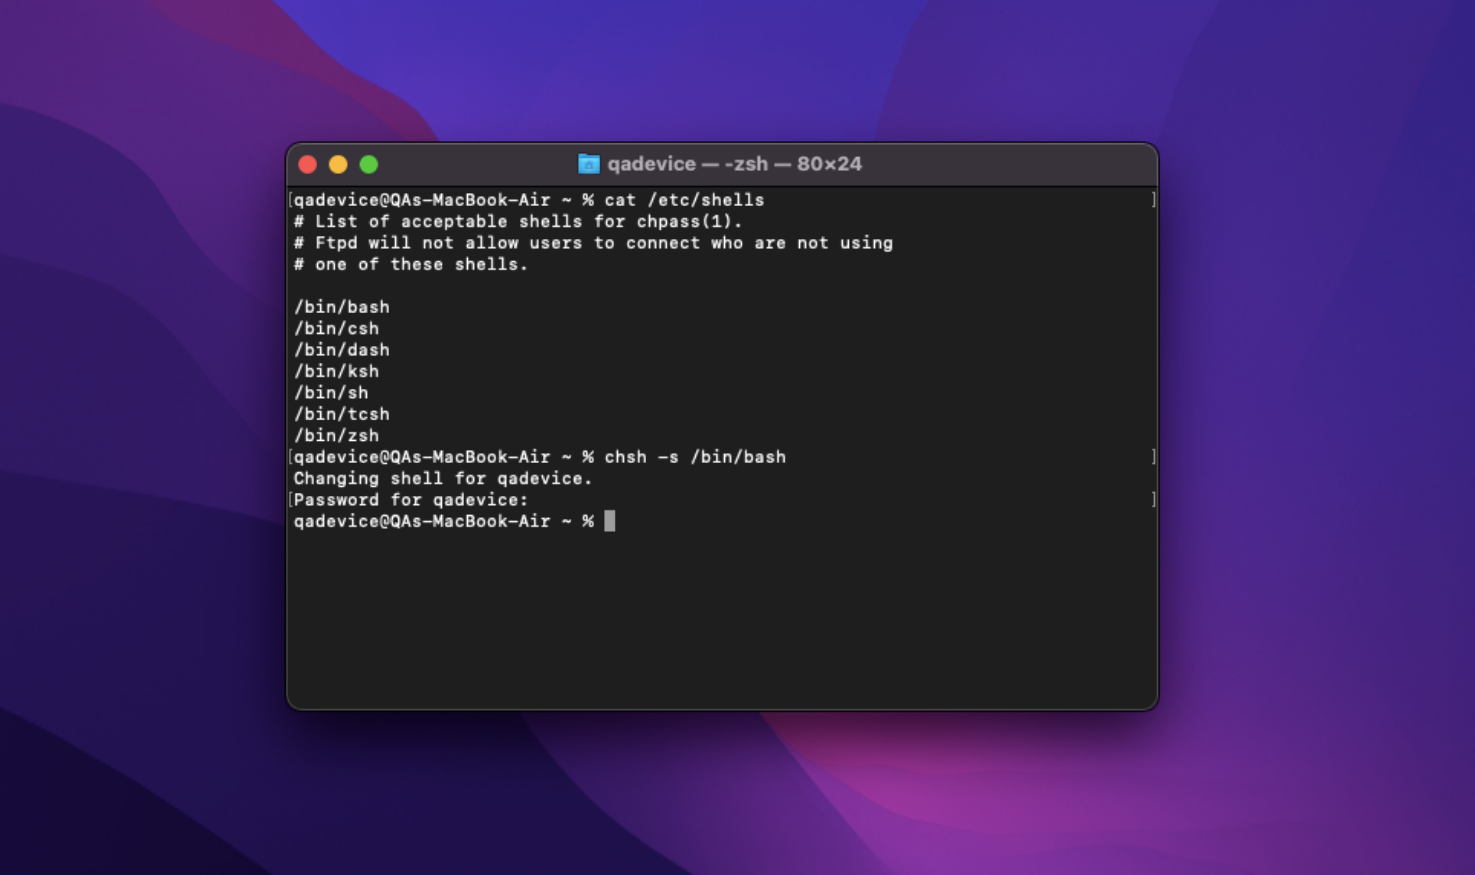
cat /etc/shells |
- This command shows all the available shells for your Mac.
- Now, once you’ve decided on your shell, enter the following command
|
1 |
chsh -s (shell syntax, obtained from the previous command) |
- For example,
|
1 |
chsh -s /bin/bash |
- Next enter the password for your user account to confirm.
When entering the password after the prompt appears, you will not see anything appear in the Terminal window. So the question pops up, how will you know if you’ve hit the right password? Well, once you’ve typed in your password and pressed ‘Enter’, you will see the message “Sorry, try again” if the password is entered incorrectly.
You have successfully changed the default shell on your Mac.
Basic Mac shell scripting terms to familiarize

Alright, so now that you’ve decided on the right shell, it is time to begin scripting. But wait? How will a sailor be ready to sail his ship through dangerous oceans, without even knowing what ‘port’, ‘starboard’, ‘stern’, or ‘bow’ means?
That’s right, much like a sailor should be familiar with all the sailing terms for communication, every programmer should know the basic terms and expressions that their fellow programmers may use when coding and documenting their scripts. Let’s take a look at a few of the common ones here.
What are variables?
Variables are the term given to a block of memory to which we may assign values, read, and alter their contents. Just about every programming language in existence has the concept of variables, and shells are no exception.
Syntax and examples for 'variables'
The syntax for a variable in shell would be as follows.
|
1 |
VAR=val |
Where VAR is the variable and val is the value given to the variable.
Unlike other programming languages, the shell does not care about the classification of variables. Instead, they store strings, integers, and real numbers the same way. However, it is important to note that a variable can only hold one value. Hence, a string separated by spaces must be quoted. For example, in the following line,
|
1 |
VAR=Hello World |
The variable VAR will store the string Hello, but try to execute the command World. Hence, the right assignment for such a variable would be as follows.
|
1 |
VAR="Hello World" |
What are arguments?
A command-line argument is a value that we may pass to our Bash script when it runs. They let a user dynamically change the actions a script takes or the results it produces.
To pass an argument to your Bash script, simply type in the arguments after the name of the script, during the script execution (The next section speaks more about script execution).
Syntax and examples for 'arguments'
The syntax would be,
|
1 |
shellextension ./scriptname.extenstion argument1 argument2 |
For example,
|
1 |
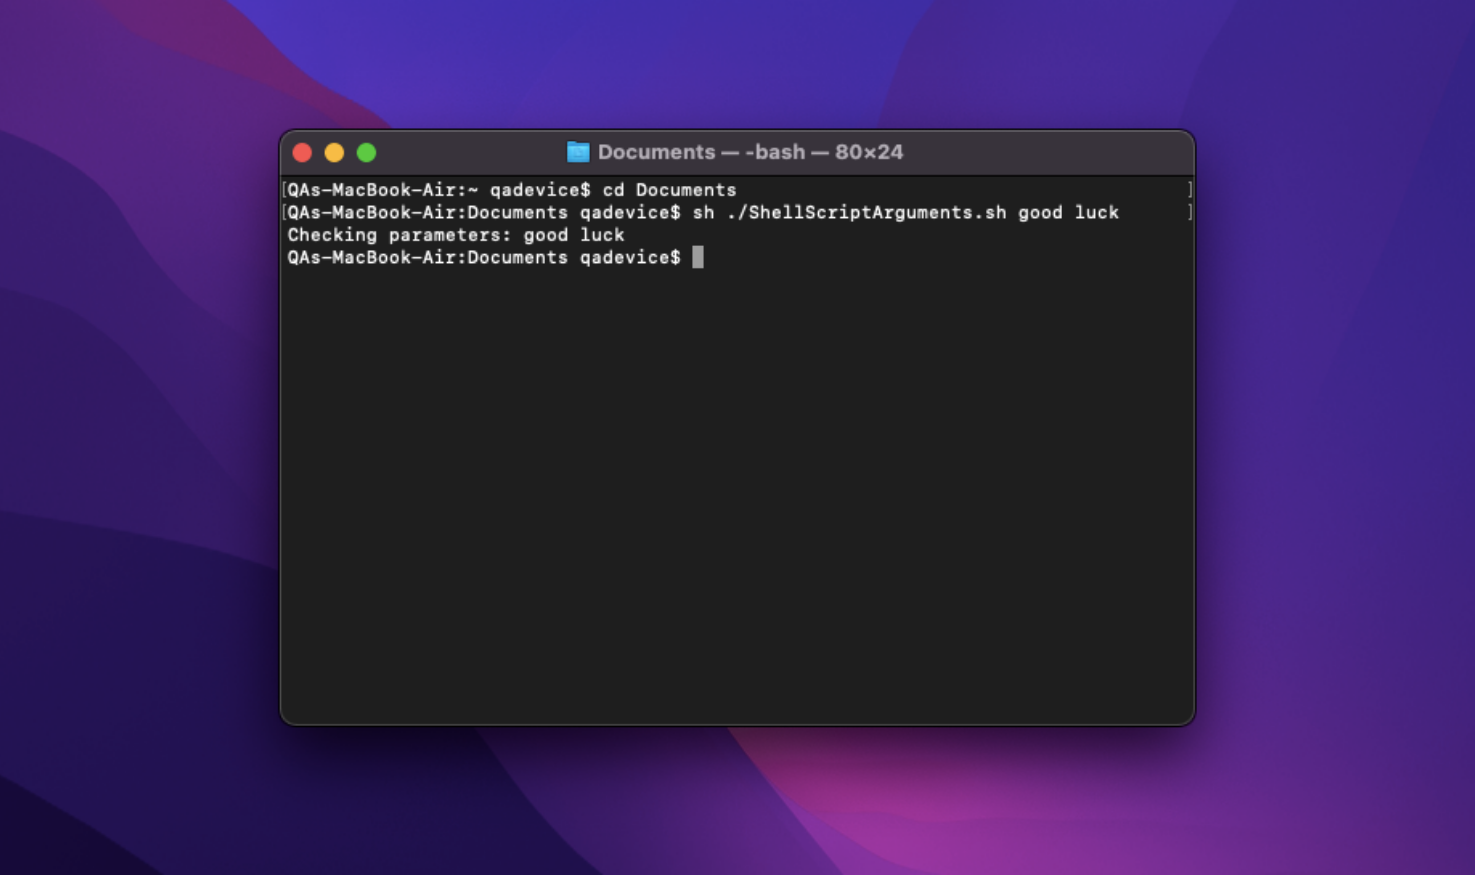
sh ./myscript.sh good luck |
The bash shell supports arguments from $1 to $9. Here, the first argument is stored in $1, the second in $2, and so on.
Let’s see how this works using an example script:
|
1 2 |
#!bin/bash echo "Checking parameters: $1 $2" |
Let’s see what the above script looks like, when no arguments are passed.
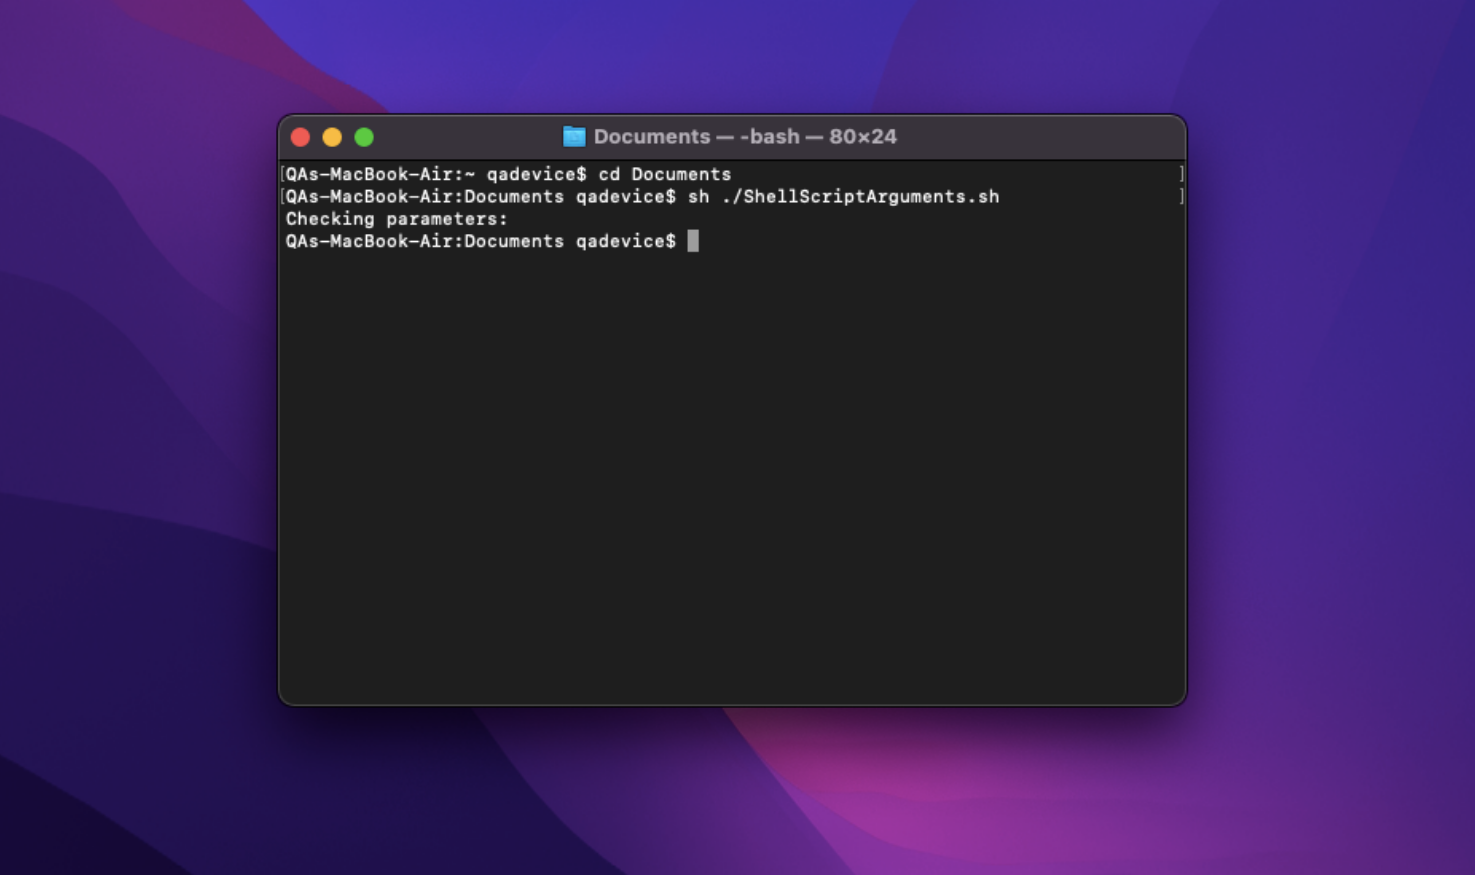
As noticed, if we run our script and no arguments are passed, we will see no output for our pre-defined variables. Now, let’s see what this script looks like when passing arguments.

Here, our script detects these arguments and provides the values to our pre-defined variables.
What are conditionals?
The conditional statement is used in programming languages to perform decision-making tasks. It enables you to change the flow of control in a program. There are a total of 5 conditional statements that may be used in shell programming.
if conditional
The syntax for the if conditional is as follows:
|
1 2 3 4 |
if [ logic ] then statement fi |
if-else conditional
The syntax for the if-else conditional is as follows:
|
1 2 3 4 5 6 |
if [ logic ] then statement1 else statement2 fi |
if-elif-else conditional (Else If ladder)
The syntax for the else-if ladder conditional is as follows:
|
1 2 3 4 5 6 7 8 9 |
if [ logic1 ] then statement1 elif [ logic2 ] then statement2 else statement3 fi |
if-then-else-if-then conditional (Nested if)
The syntax for the nested-if conditional is as follows:
|
1 2 3 4 5 6 7 8 9 |
if [ logic1 ] then statement1 else if [ logic2 ] then statement2 fi fi |
switch conditional
The syntax for the switch conditional is as follows:
|
1 2 3 4 |
case in case2) Statement 1;; case 2) Statement 2;; esac |
What are wildcards?
A wildcard is a character that may be used as a substitute for a class of characters in a search, thereby significantly increasing the flexibility and efficiency of searches.
There are three main wildcards in bash:
Asterisk (*)
This wildcard is used to match and provide the result of one or more occurrences of any character.
For example,
|
1 |
ls a*s |
provides the list of all files and folders starting with a and ending with s.
Question mark (?)
This wildcard is used to match and provide the result of a single occurrence of any character.
For example:
|
1 |
ls a??s |
provides the list of all files and folders starting with a and ending with s, with only two characters in between.
”Bracketed
)” id=”” class=”” style=”” ]This wildcard is used to match and provide the result of any occurrence of the characters enclosed in the square brackets.
For example:
|
1 |
) wildcard"]ls a[pn]s |
provides the list of all files and folders starting with a and ending with s, and having either the characters p or n in between.
What do you mean by piping?
A pipe is a form of redirection used in shell programming, to send the output of one command or process to another command/process. This is done by using the pipe character ‘|’.
In a nutshell, pipe is used to combine two or more commands, and take the output of the first command as the input of the second command.
Syntax and examples for 'piping'
The syntax is as follows.
|
1 |
command_1 | command_2 | command_3 | .... | command_N |
For example, let’s consider the following command.
|
1 |
ls | more |
Where, the more command displays text files, one screen at a time.
Here, the more command takes the output of ls as its input. Hence, the final effect of the command is that the output of ls is displayed one screen at a time.
What is the ‘man’ command?
The man command in bash displays the user manual of any command that you can run on the terminal. It provides detailed information on the command, including sections such as NAME, SYNOPSIS, DESCRIPTION, OPTIONS, EXIT STATUS, RETURN VALUES, ERRORS, FILES, VERSIONS, EXAMPLES, AUTHORS and SEE ALSO.
Syntax and examples for the 'man' command
The syntax for the man command is as follows:
|
1 |
man [option] [command name] |
Here, if we do not specify an option parameter, the terminal displays the entire manual for the searched command. Some arguments you can specify for the option parameter include,
|
1 |
man [section_number] [command name] |
You can use this command to display only a specific section of a manual. For example,
|
1 |
man 2 intro |
Similarly,
|
1 |
man -f [COMMAND NAME] |
shows all the sections in which the given command is present. For example,
|
1 |
man -f echo |
How do I create a Mac shell script?

There are many ways to create a shell script on a Mac. However, regardless of the method you may use to create your shell scripts, the fundamental instructions remain common for all these cases. Let’s take a look at the instructions.
- Begin editing your script by typing in #! followed by the binary path into the first line (the binary path will differ depending on the shell you’re using).
- Add all the necessary commands into your script file and save the file as a plain text (.txt) or as an executable.
Alright, now, let’s take a look at some of the methods you may adopt to create a shell script.
Using TextEdit
Creating scripts via TextEdit is the most basic method you can use to create and run shell scripts on a Mac. The primary benefit of this method is that it does not require any third-party tools or applications for performing this process. Let’s take a look at the steps.
To create a text file using TextEdit
- Open TextEdit from Applications tab
- Type in #! followed by the binary path into the first line (the binary path will differ depending on the shell you’re using)
Now, add the necessary commands into the TextEditor.
- Next, you must convert the text file from Rich Text (.rtf) to Plain Text (.txt). To do so, expand the Format tab on the top status bar, and click on Make Plain Text.
- Click Ok and save the text file.

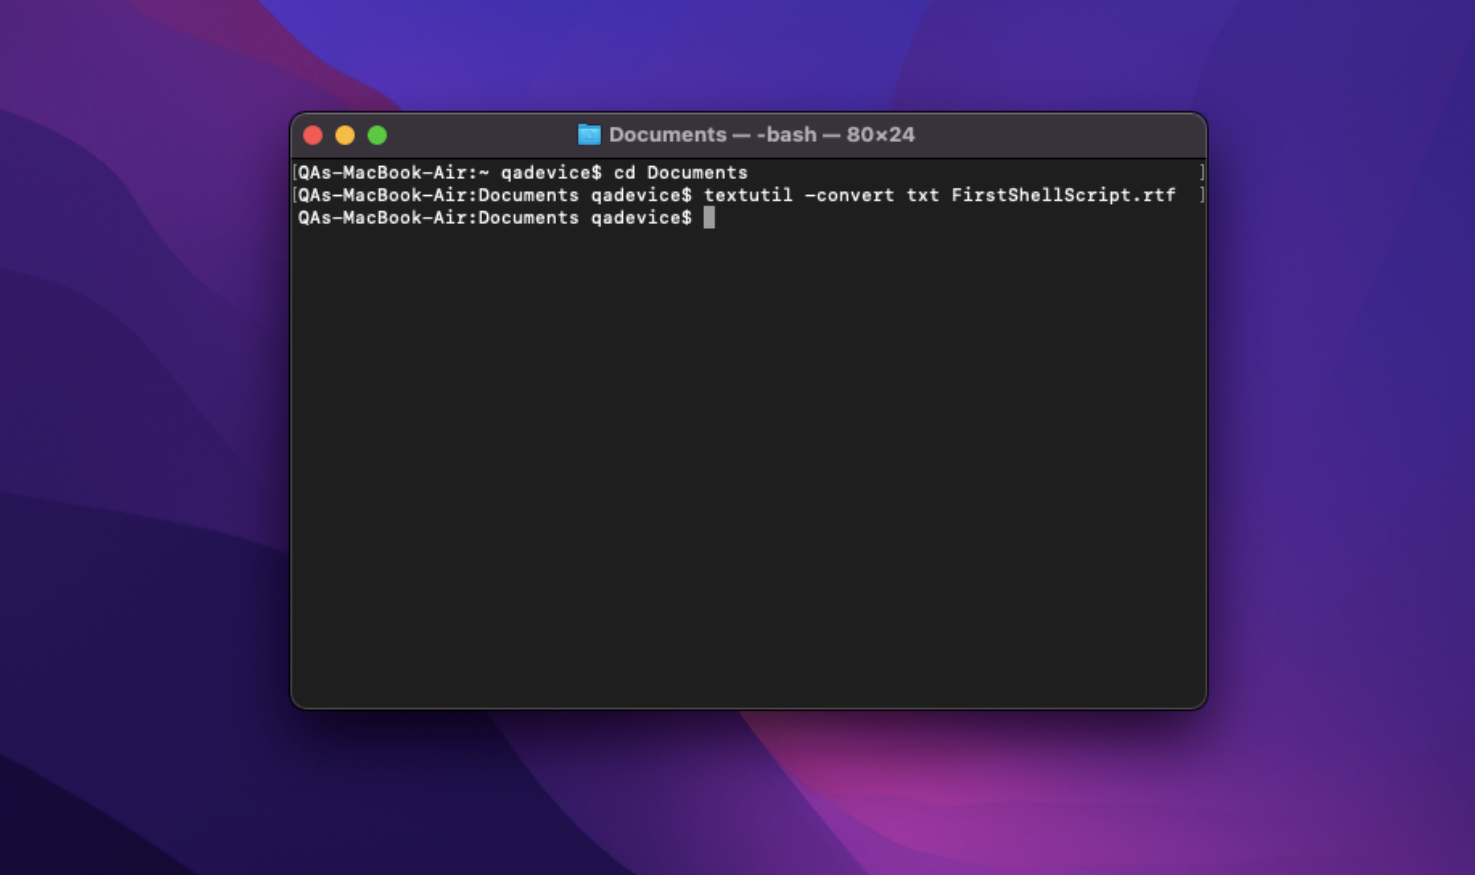
Some of us may be wondering, what if the file has already been created in Rich Text format, and you do not have the means to change it? No worries. Open Terminal and navigate to the file location using cd commands. Then, run the following command:
|
1 |
textutil -convert filetype filename |
For example,
|
1 |
textutil –convert txt TestScript.rtf |
Your file has been converted to Plain Text format.
Using Xcode
You can create shell script files using Xcode, which you can then save as an executable and run from the terminal. Lat’s take a look at how.
- Install and open Xcode from the App Store. Once opened, navigate to the top left status bar, where you can then expand the File dropdown.
- Hover over New, and select the File option that comes up.
- Next, scroll down to the Others section on the tab that pops up, and select the option marked Shell script. Click Next.
- Expand the Create dialog box that opens up, by clicking on the dropdown button, and decide on where you want to save your shell script file.
- Once this is done, the script editor opens up.
- You may now create and save your shell script.

Using pico or nano commands (ideal during remote SSH sessions)
If you’re using SSH to connect to a computer remotely, you’ll need a text editor that can be launched from the command line.
Pico and nano are two such command-line text editors that are incredibly simple to use.
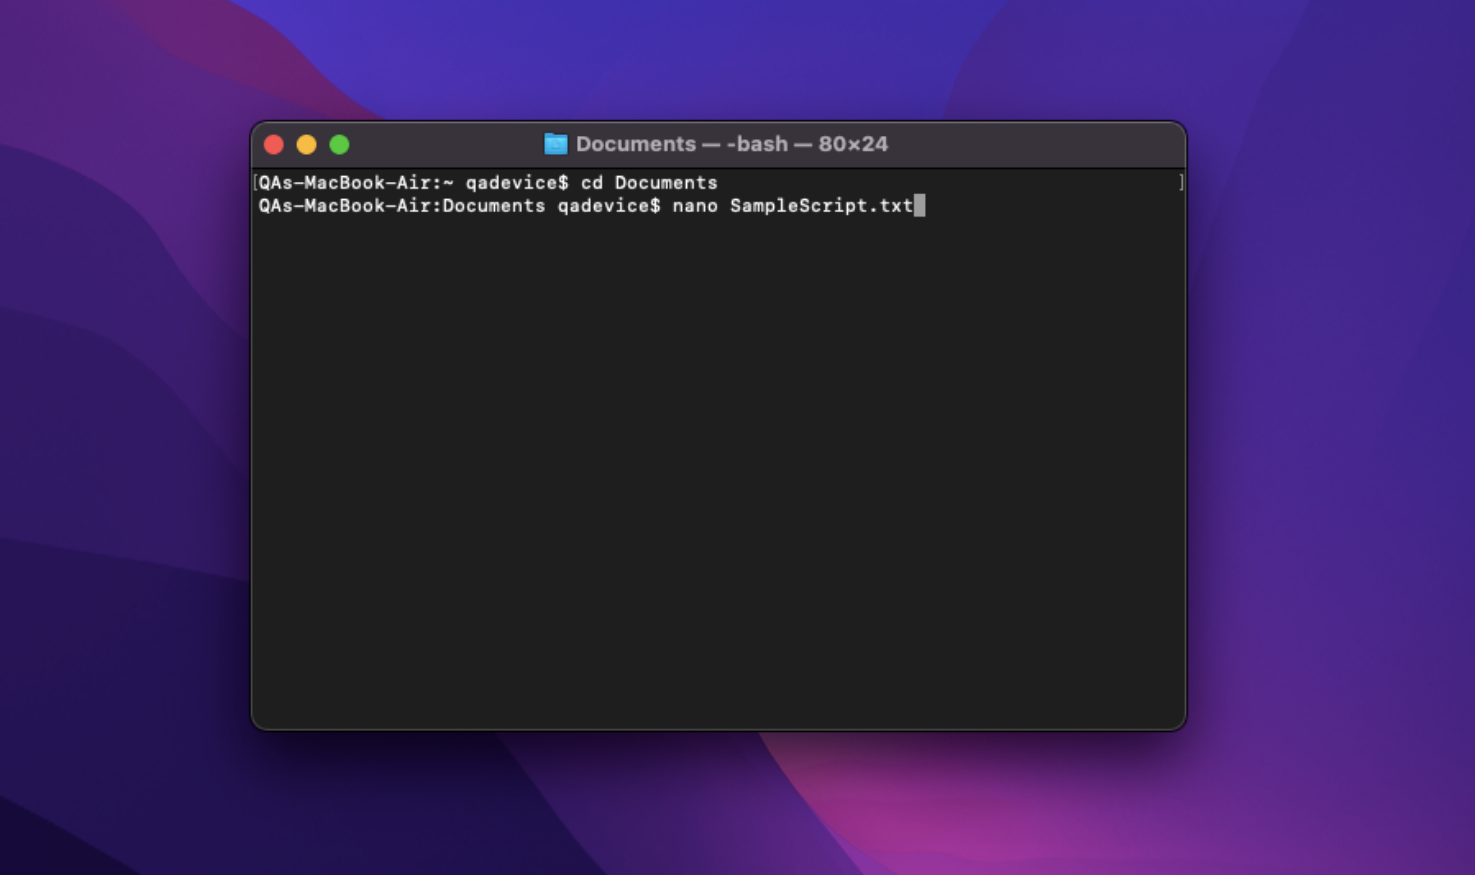
To create a text file using nano or pico commands
Open Terminal and use cd commands to navigate to the directory where you want to create or edit the text file.
Enter the following command:
|
1 |
nano filename.txt |
OR
|
1 |
pico filename.txt |
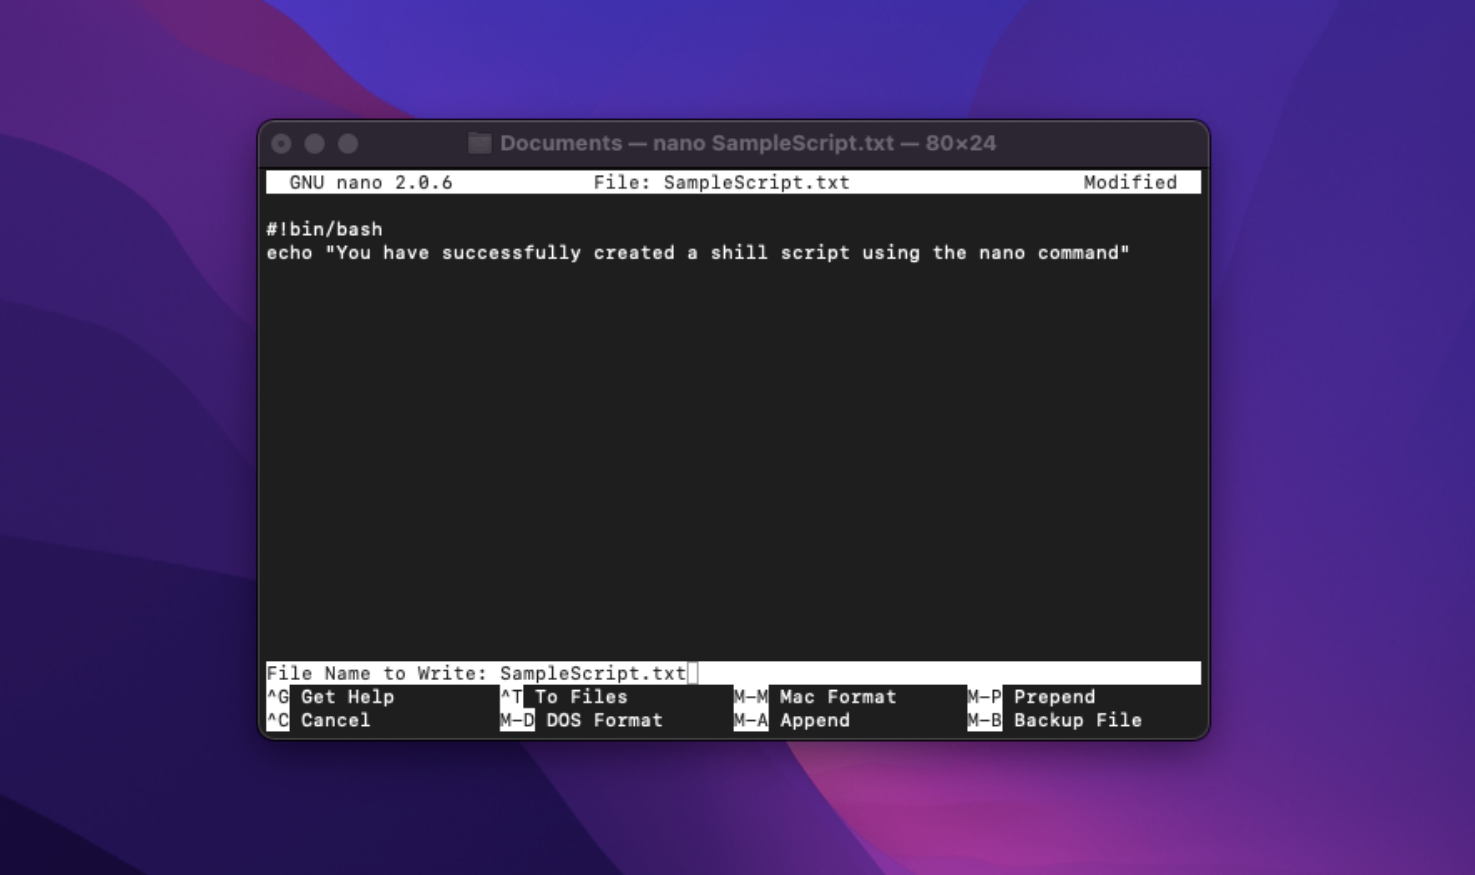
The terminal is now converted into a text editor. You can now edit the text file. Use arrow keys to navigate.
When you are finished with editing, press Control + O to save the file and if required, edit the filename. Press Enter once you’re done.
You can now exit the editor by pressing Control + X.
To view the complete documentation for the nano command, hold down Control + G when working on the text editor in the terminal.
Using Third-party tools
You can also use third-party tools such as Sublime or Atom to create executable shell script files. In such cases, use the tool to save the script file as an executable. Then, open Terminal and navigate to the file using cd commands. You can then directly run the file using the following command:
|
1 |
(shell) ./(filename) |
For example,
|
1 |
bash ./TestScript.txt |
How do I execute a Mac shell script?
To run a Mac shell script, you must first convert the .txt file into an executabe. Then, you can execute the file as a shell script. In case your file is already saved as a shell scipt file (usually occurs when creating files via third-party tools), you can skip executing the first command that’s mentioned below.
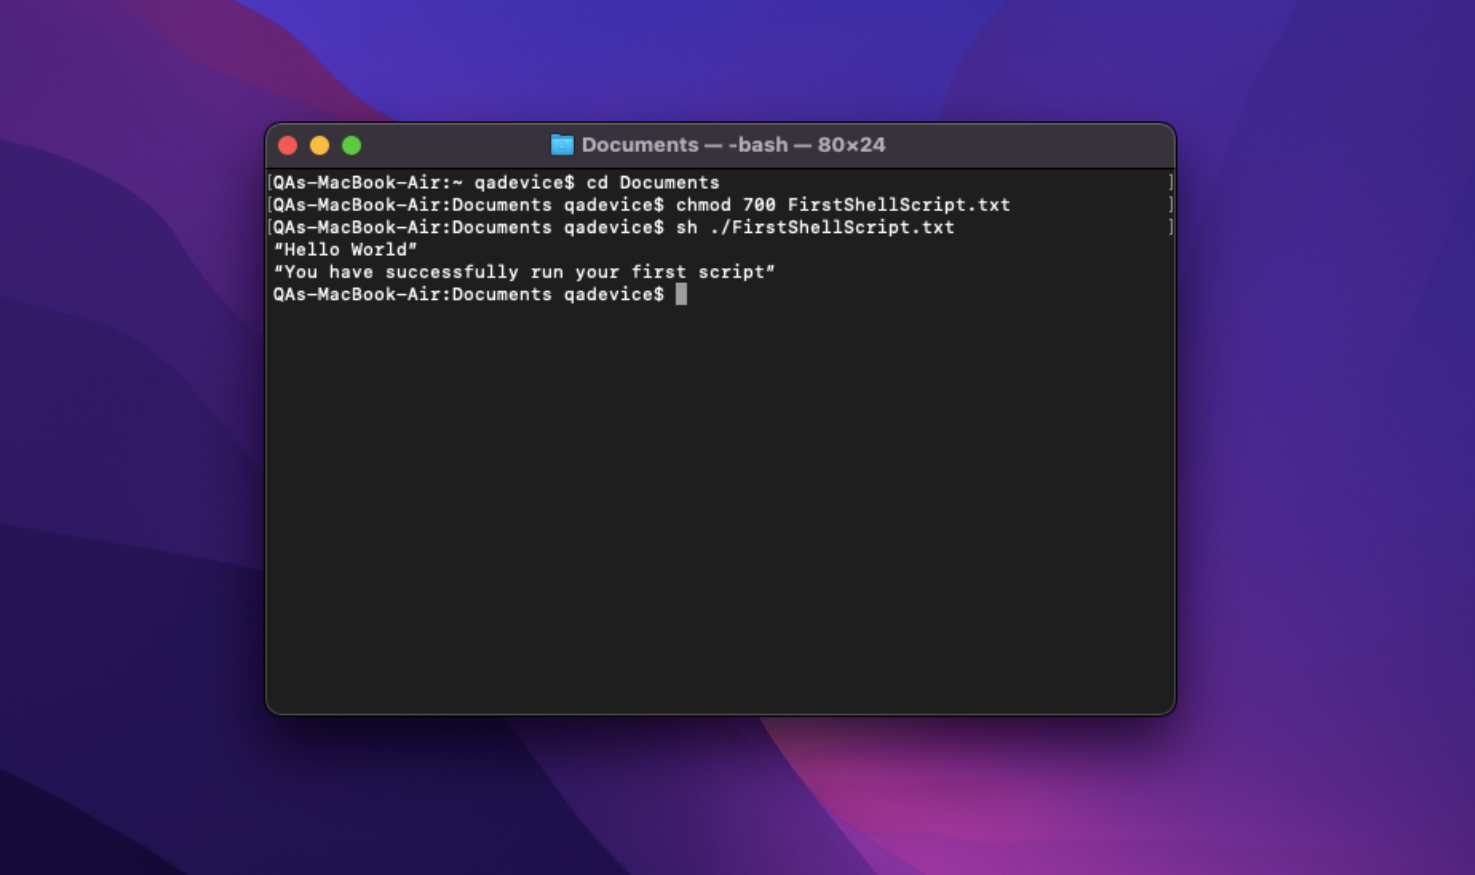
Steps to execute a shell script
- Open Terminal and navigate to the saved text file using cd commands.
- Now, you must convert the text file into an executable. Use the following command:
|
1 |
chmod 700 (filename) |
For example,
|
1 |
chmod 700 TestScript.txt |
This command may vary depending on the shell you’re using.
You will notice no change in the Terminal or on the actual file when you enter this command. However, don’t be thrown off by this, as your file has simply been converted to an executable.
Next, to execute your file, type in the following command:
|
1 |
(shell) ./(filename) |
For example,
|
1 |
bash ./TestScript.txt |
You have successfully executed your script.
Simplify script deployments using UEM
When employing a Unified Endpoint Management solution, deploying shell scripts to your managed macOS devices turns out to be a pretty straightforward process.
IT admins may often find themselves in situations where they may need to deploy different sets of scripts to specific categories of devices. In such cases, employing a UEM solution can help you create dynamic device and user groups, which you can then use to push and run scripts. Moreover, you can keep track of the script’s response and execution status remotely, straight from the UEM console.

WHITEPAPER
A complete guide to Mac device management
Macbooks have become the go-to devices for enterprises due to their cost-effective price and efficient OS. Read more about Mac device management from our whitepaper.
DOWNLOAD PDFSome frequently used shell commands

With so many Mac Terminal commands available out there, it’s often difficult to identify and correctly use them all. We’re here to help you out with a list of some commonly used Mac shell commands.
The concatenate (cat) command
The cat command is one of the most frequently used commands in the macOS operating system. It has four primary functions related to it – creating, displaying, editing, and combining text files.
To view a file, use the following command:
|
1 |
cat filename.extension |
To replace text in a file, use the following command:
|
1 |
cat > filename.extension |
If the file does not exist, a new file is created. You can press ctrl + d to stop editing.
To append the content in a text file, use the following command:
|
1 |
cat >> filename.extension |
You can press ctrl + d to stop editing.
To combine two files and save the result to a third file, use the following command:
|
1 |
cat file1.extension file2.extension > file3.extension |
The change directory (cd) command
The change directory (cd) command is used to change the current working directory the terminal is pointing at. It is one of the most basic and frequently used commands you will encounter when working on the Linux terminal.
To change the current working directory to the Home folder, give the following command:
|
1 |
cd |
To go back to the directory you were in before you issued the cd command, type in the following command:
|
1 |
cd - |
To go to the directory above the one you’re currently in, type in the following command:
|
1 |
cd.. |
The copy (cp) and move (mv) command
Using the copy (cp) and move (mv) command on Mac is quite simple.
To copy the contents of one file to another file, use the following command:
|
1 |
cp file1.extension file2.extension |
To copy a file from one location and move it to another location, use the following command:
|
1 |
cp destination1 destination2. |
For example,
|
1 |
cp ~/Desktop/samplefile.txt ~/Documents/samplefile.txt |
To copy folders or directories, we use the recursive flag (-R). The command is:
|
1 |
cp –R directory 1 directory2 |
For example,
|
1 |
cp -R ~/Desktop/MyFolder ~/Documents/MyFolder |
To move a file from one location to another, use the following command:
|
1 |
mv destination1 destination2. |
For example,
|
1 |
mv ~/Desktop/samplefile.txt ~/Documents/samplefile.txt |
To move folders or directories, we use the command:
|
1 |
mv directory 1 directory2. |
For example,
|
1 |
mv ~/Desktop/MyFolder ~/Documents/MyFolder |
The echo command
The echo command is used to display formatted static or dynamic text to the terminal window.
To display static text, use the following command:
|
1 |
echo “write content here” |
Dynamic text includes displaying variables in the output. To display dynamic text that includes a variable, enter the following command:
|
1 |
echo “My name is $username” |
where you must define the variable $username beforehand. For example,
|
1 2 3 |
!bin/bash read -p "What’s your name?:" username echo “Hi $username” |
Here, the read -p command takes input from the user and stores it in the variable $username. Then, the value stored in the $username variable is displayed using the echo command.
The list (ls) command
The ls command shows you the names of all the files and folders contained within the current directory. Adding additional parameters to this command can help give more information and simplify the process of searching for files and folders.
To list files in a given directory, enter the following command:
|
1 |
ls directorypath |
For example,
|
1 |
ls Documents/Myfiles |
To list hidden files, use the following command:
|
1 |
ls –a Documents/Myfiles |
To list additional information on files, use the following command:
|
1 |
ls –l Documents/Myfiles |
To list information about a directory, use the following command:
|
1 |
ls –d Documents/Myfiles |
The make directory (mkdir) and remove directory (rmdir) command
The mkdir command enables you to create new directories straight from the command line. The following is the syntax for the mkdir command:
|
1 |
mkdir [OPTION] [DIRECTORY] |
To create a new folder in the current working directory, use the following command:
|
1 |
mkdir directoryname |
To create a new directory in a different location, specify the path along with the directory name.
|
1 |
mkdir /Myfolder/newdir |
To create parent directories along with the new directories, include the parameter -p. For example,
|
1 |
mkdir /home/scriptfiles/samplefiles/learnmkdir |
Here, if the directories mentioned do not exist, they are automatically created.
The open and remove (rm) command
The open command in macOS enables you to open a file or URL in your preferred application. On the other hand, the rm command is used to remove objects such as files and directories from the macOS system.
To open a file or application, use the following command:
|
1 |
open filename.extension |
To remove a file from the macOS system, use the following command:
|
1 |
rm filename.extension |
To force remove a file from the macOS system, use the following command:
|
1 |
rm -f filename.extension |
You can also view our collection of sample scripts by visiting Hexnode’s sample script repository.
Mac shell scripting best practices
Scripting can sometimes prove to be very complex to users, especially when writing and executing hundreds of lines of code. Without the right approach, you may get lost in the swamp of variables, subroutines and improperly formatted documentation. However, a few well-known scripting best practices may be able to help you out here.
- Document your code and ensure proper formatting
- Follow naming conventions. Ensure names do not clash with Shell commands
- Review your code in a test environment before deploying online
The final note
As you can see, the features and functionalities provided by Mac shell scripting can enable IT administrators to accomplish nearly any sort of administrative task within a macOS environment. Furthermore, using a UEM solution like Hexnode to expedite the deployment and execution of Mac shell scripts allows IT teams to save a substantial amount of time and money, and helps make the remote execution of scripts on multiple devices a simple task.
Need help managing macOS devices?
Give Hexnode a go! Hexnode's industry-leading Unified Endpoint Management solution can easily help you meet all your device management needs.
TRY OUT HEXNODE


