
What is Browser Lockdown?
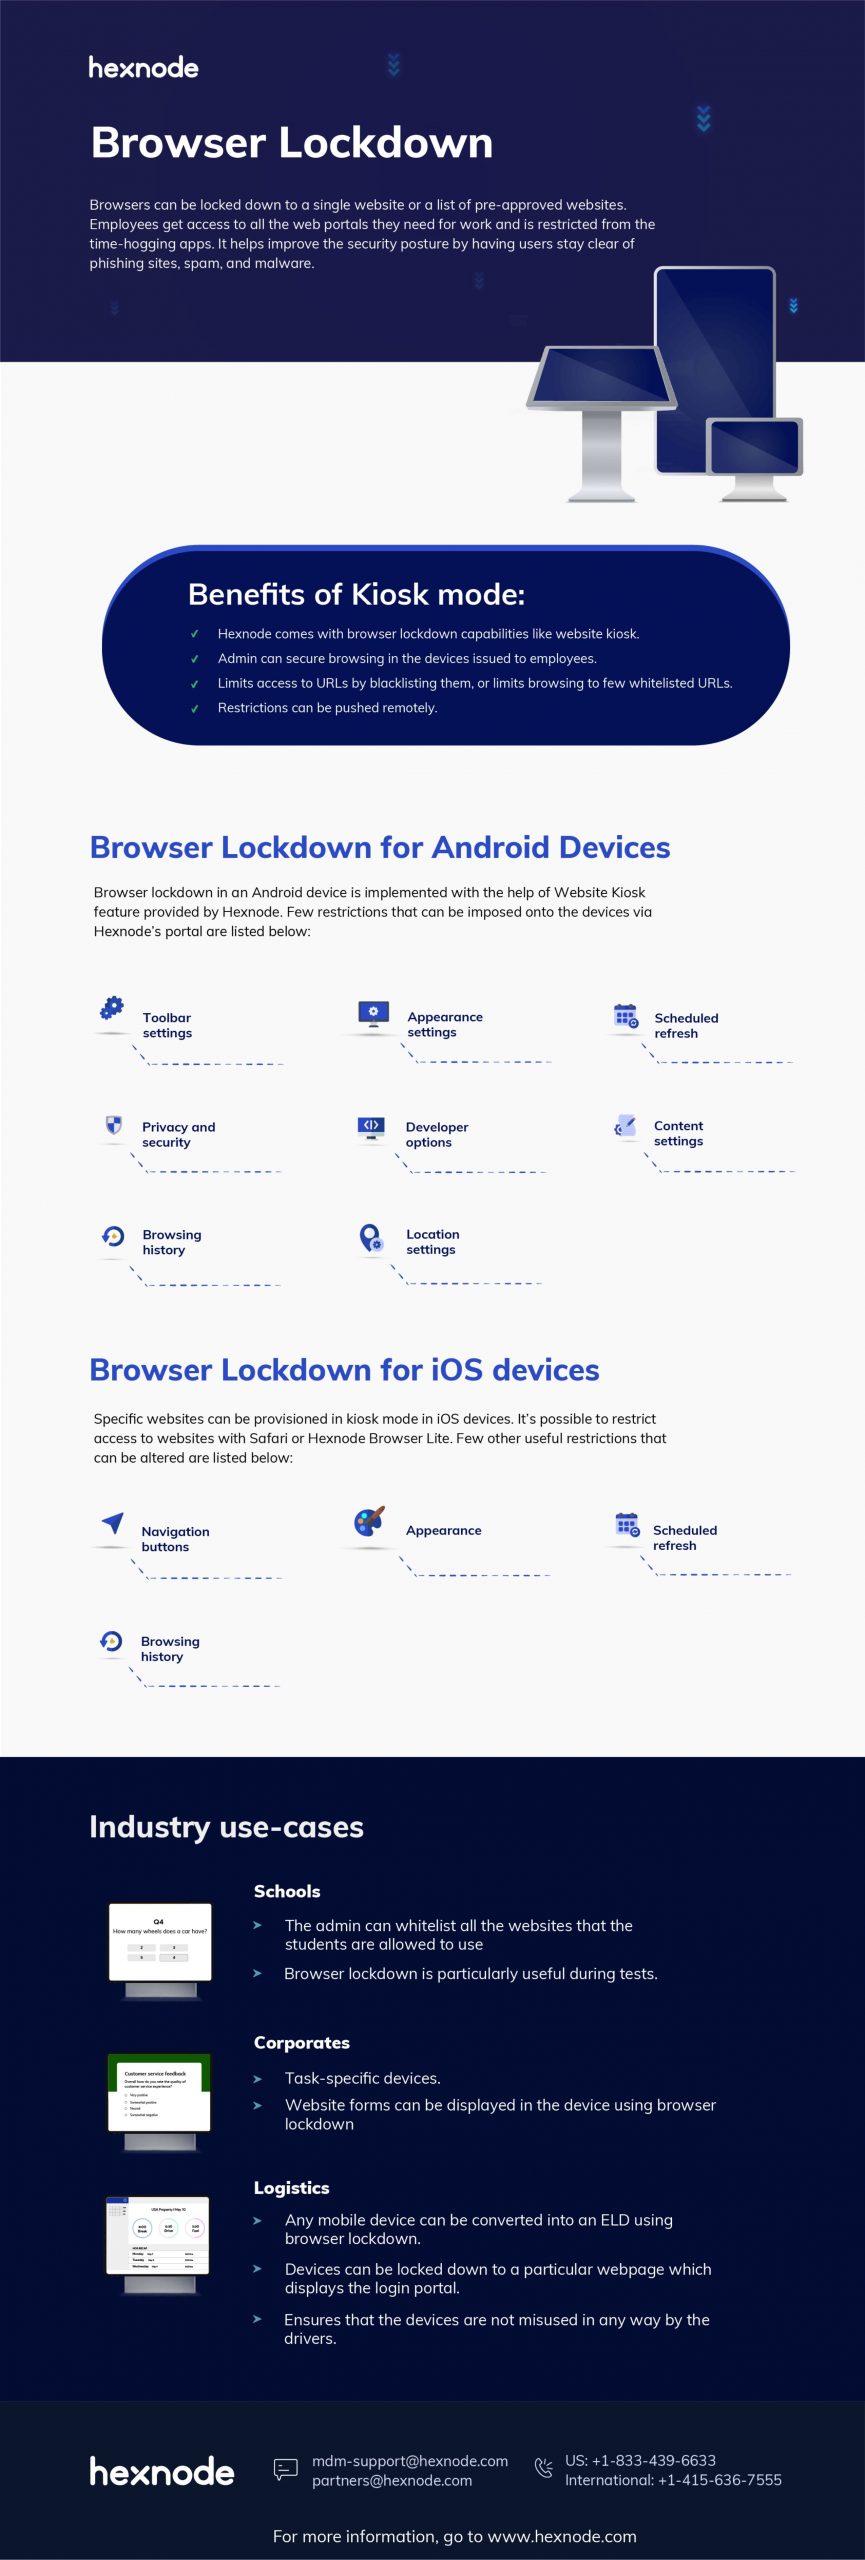
Browser lockdown is all about restricting internet access on a web browser. Browsers can be locked down to a single website or a list of pre-approved websites. It is usually enforced on devices issued for a sole purpose where users need access to one or more unique websites to get their job done.
Businesses can use browser lockdown on corporate devices to boost online productivity. Employees get access to all the web portals they need for work while none of those social networking sites and time-hogging apps. Moreover, it also helps improve the security posture by having users stay clear of phishing sites, spam, and malware. It essentially acts as a kiosk browser setup.
Browser lockdown is also a great way for schools and educational institutions to monitor students’ online browsing behavior and ensure they aren’t exposed to harmful content on the web. The kiosk lockdown experience on student devices also cuts down distractions during class hours and help conduct malpractice-free tests and assignments.
Initiating Browser Lockdown in your organization
Deploying a browser lockdown in an organization where thousands of devices are issued at once might turn out to be a bit cumbersome. There are many lockdown browsers in the market but most of them lack scalability. A mobile device management software like Hexnode MDM can provide a solution to this problem.
Hexnode comes with kiosk lockdown capabilities built-in through features like website kiosk, blacklisting / whitelisting websites etc. You or your IT admin can secure browsing in the devices issued to employees with help of these capabilities. You can limit access to URLs by blacklisting them, or you can limit browsing to a few whitelisted URLs on your own. All these can be done remotely over the air.
Browser Lockdown for Android Devices
Android devices with multi-app browser lockdown.
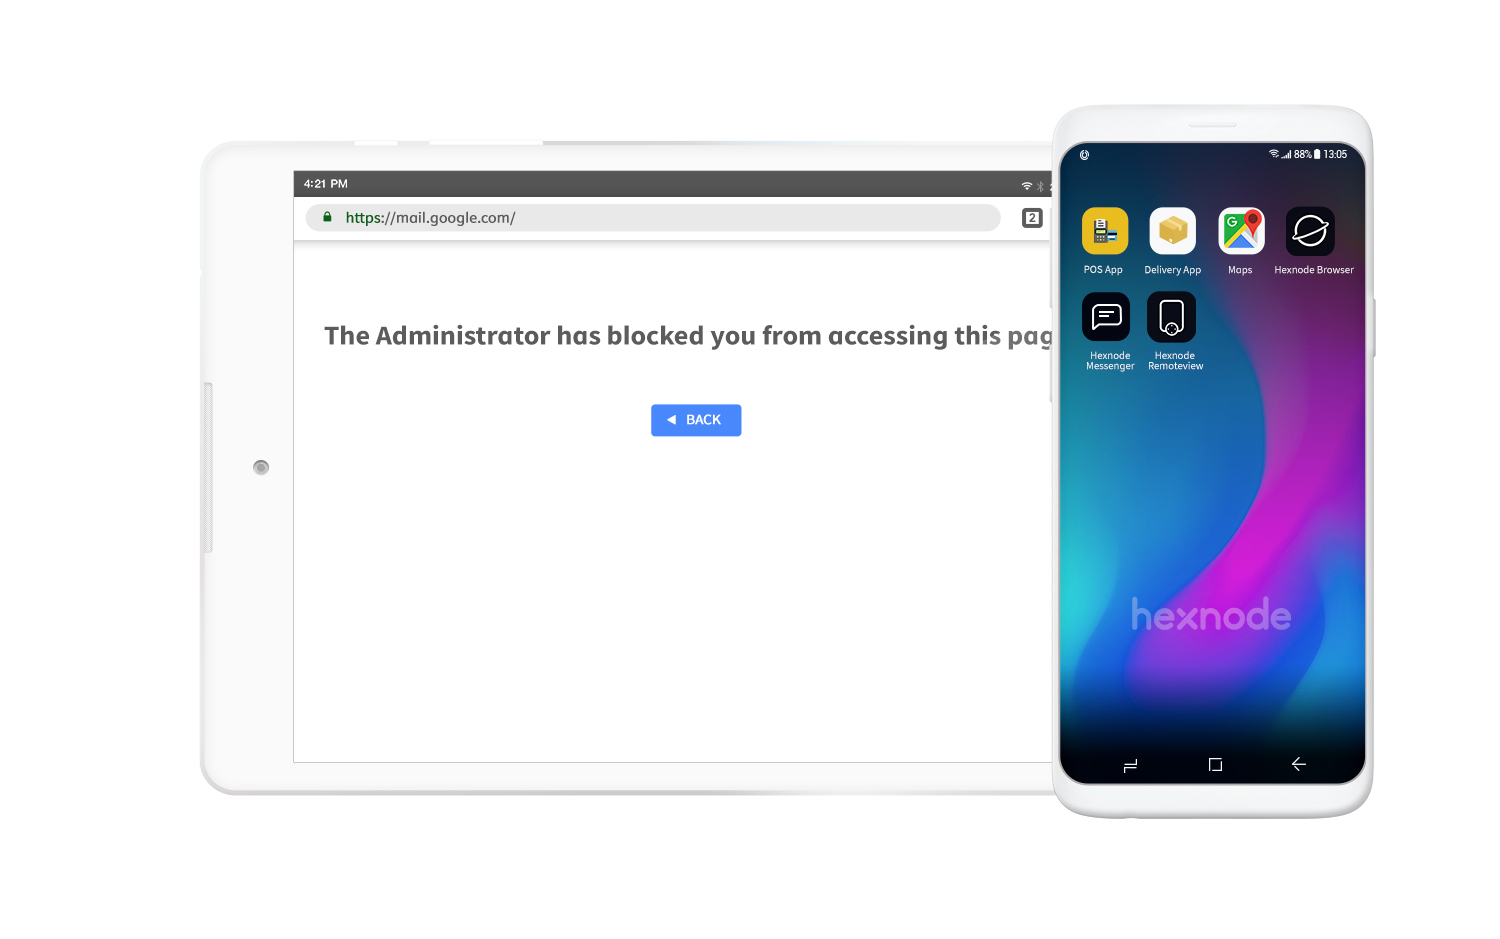
If you need to prevent the user from accessing websites online that are not needed for work and allow the user to access only the necessary set of websites when using the device, the browser lockdown would come into play. A browser lockdown situation can be created in an Android device with the help of the Website Kiosk feature provided by Hexnode MDM thorough its kiosk lockdown capabilities.
Learn more with Hexnode's webinar on Website Kiosks.
Watch Webinar
Once you have opted for Website Kiosk you can then configure the various aspects of your browser lockdown. Under the Website Kiosk tab, you can choose which browser would be available to your employees in their respective devices. The first one is the Hexnode Browser Lite a single tabbed browser that opens the websites approved by the admin. It can only open external URLs inside the web app, provided the URLs are whitelisted. It can also open web apps if previously added in Hexnode App inventory.
The second option is Hexnode Browser. It enables secure browsing by restricting the organization’s access to a few websites. It allows you to restrict access to either single tabbed browsing / multi-tabbed browsing. The third option is to select any other browser, like Google Chrome. For this option to work you have to evoke the multi-app kiosk mode and then add the particular browser app and then select the app in the Website Kiosk configurations.
At this point, you also have to enter the list of whitelisted websites that you would allow your employees to browse in their devices.
It is also possible to set advanced restrictions on the imposed browser lockdown via Hexnode’s portal. Keep in mind these restrictions are only applicable for Hexnode Browser and Hexnode Lite Browser.
Toolbar Settings
On Hexnode browser lite and Hexnode bowser single tab mode, the admin may alter the default toolbar settings in the browser. These settings include
- Enable browser toolbar
- Toggle reload button
- Toggle back button / forward button
- Toggle Home button
- Toggle print icon (Android 4.4+)
- Toggle Clear session option.
- Title content
- Theme color selection.
Appearance Settings
In this configuration option, the admin can set how the browser will behave and look, appearance-wise, to the user.
- Screen Orientation: Determine how which orientation the screen should appear in, landscape right or left, portrait, as per device settings or invert orientation.
- Pinch to Zoom: Toggle the pinch to zoom in feature for the browser.
- Enable Overview mode: Only available in Hexnode browser lite, this option can be toggled to view the website in full width.
- Enable Wide View: When checked, the browser sets the maximum width to ensure that almost the entire area of the web page is displayed by width.
- Webpage View: Choose how you want to view the web page. The selected option will only be updated after the next reload of the page. You can choose between Default, Desktop, and Custom. If the custom option is selected, a custom name must be entered.
Scheduled Refresh
Scheduled refresh is a highly sort after feature. It automatically reloads the page or app the employee was using based on a set criterion.
- Reload web app on the basis of inactivity: Enter the amount of time in seconds after the web page has to be reloaded. A maximum of 86400 sec (1 day) may be given. The minimum value is 1 second.
- Don’t reload if on Homepage: Check this option to avoid reloading the home page (the URL added as a web app) on no interaction for a period of time set under the previous option.
- Reload webpage when connected to a network: Check this option to reload a web page when you are connected to a network or switched from one network to another. By default, allowed.
- Refresh Current page every nth second: Enter the amount of time in minutes after which the web page must be reloaded. A maximum of 1440 minutes (1 day) can be given. The minimum value is 1 minute.
Privacy and Security
Retirement and security deals with notifications regarding security certificates not being available or anything of that sort.
- Ignore SSL errors: Check this option to hide warnings regarding security due to SSL errors. SSL connection errors occur when you attempt to connect to an SSL-enabled website and your browser (client) is unable to connect securely to the server on the website.
Developer Options
The developer options feature only deals with debugging any issue with the issued device.
- Remote Debugging: Check this option to debug the Chrome web app on your computer. Remote debugging allows you to inspect a page running on your Android device from your development machine.
Content Settings
The content settings deal with how Javascripts and media behave in the browser.
- Allow Javascript: Check this option to enable JavaScript on your browser. Permitted by default. JavaScript is a handy feature that allows you to interact more with web pages in web browsers.
- Autoplay Videos: Decide if the video is allowed to play automatically.
- Allow file upload: To enable file upload through the browser, check this option. It’s available on Android 5.0 and later.
- Capture and Upload image: Check the option to capture and upload a photo directly from the system camera. But you need to add the camera package to the background app list. It’s available on Android 5.0 and later.
- Clear Downloaded files: Check this option to clear browser downloads from the Hexnode Browser, and any downloaded files from the device. Each time you load the web app’s home page, the files are removed.
Browsing History
The browsing history settings deal with cache, cookies, and history storage options present in the browser.
- Cache Settings: Web caching temporarily stores some files and pages to improve page loading speed and minimize the use of the bandwidth. There are four distinct ways in which you could deal with cache settings with Hexnode MDM. The first being, using cache management mode in the default manner. If available and not expired, using cached resources, otherwise load resources from the network. The second method, when available, use cached resources, otherwise, load resources from the network. Third, don’t use the cache. Load off of the network. And lastly, don’t use your network. Load for the cache.
- Clear Cache: Enable this option to empty the cache on page reload.
- Clear Cookies: To clear cookies, check this option. A cookie is a piece of data that the website places on the device so that the website knows that the device has been visited before. This allows websites to customize their content based on information from previous visits.
- Clear Web Storage: Check this to clear Web Storage function. Web storage provides a way for web applications and pages to store data locally in web browsers. The data that is collected is permanent, ensuring that a session doesn’t expire.
- Clear Browsing History: Check this option to clear your browsing history. Browsing history is a list of web pages that the user has recently visited along with related data such as page title and time of visit. Browsing history on each reload page will be cleared. After the browsing history is cleared, the back button will exit the web app if it is on a single app kiosk with a high auto-launch delay or on a multi-app kiosk. But pressing back button would have no effect if the auto-launch delay set to 0 sec if on a single app kiosk mode.
Form Settings
Form settings let the admin decide what should be done regarding the information that users enter into the forms that may appear in the webpages.
- Clear forms on page reload: Enable this option to remove the auto-complete pop up from the form on page reload.
- Save form Data: The form data is saved by default. Uncheck this option to prevent form data from being stored unintentionally. Available from Android 8+.
Location settings
Locations setting is aimed to dictate how the browser should behave when a webpage asks for location data.
- Allow web apps to use location services: Check this function to allow Web apps to use location services for a variety of reasons such as providing targeted neighborhood or general area-specific material.
Other Settings
-
-
- Disable text selection: Text selection can be prevented if this option is checked.
- Redirect from blocked URL: When a blocked page is reloaded, users will be taken to the first page of the web app instead of reloading the same page.
- Pull down to refresh the web page: Check this option to allow the user to manually refresh the Hexnode Browser Lite screen by swiping it down.
- Refresh web page after screensaver is dismissed: Check this option to reload the webpage immediately after the screensaver has been cleared.
-
After you have applied all the required configurations to your browser, the next step is to associate this policy you have created to the targeted devices and then your browser lockdown would be in full effect.
Browser Lockdown for iOS devices.
Similar to Android devices, browser lockdowns can also be implemented in iOS devices. The function provided is pretty much the same. The user is provided restricted access to the internet through whitelisting/ blacklisting. But the way we go about establishing the browser lockdown is different.
Specific websites can be provisioned in kiosk lockdown mode in iOS devices. You may restrict access to websites with Safari or Hexnode Browser Lite. With Safari, a single website or multiple websites can be whitelisted as required. Here, the Safari browser is acting as a kiosk app. The whitelisted websites will appear in the browser as bookmarks.
With the Hexnode Browser Lite, the apps can be locked in either single-web app or multi-web kiosk mode. In a single web app kiosk mode, the device could be locked to a single website while multiple websites would be available in multi-web app kiosk mode. In addition, you can also add external links that can be accessed from within the web app by whitelisting them.
So before you go about creating the policy for browser lockdown, make sure that all the required URLs are added in the app as Web Apps.
Here, you can select the browser of your choice, Safari, or Hexnode lite browser. Once, you have selected that, then you should enter all the URLs you wanted to be whitelisted.
Once that’s completed, you can now set advanced configurations. Remember, this would only be available if you choose Hexnode lite Browser.
Navigation Settings
This setting defines user movement through webpages presented to them.
-
-
- Disable Back button: By toggling this option you can disable the back button in the browser.
- Disable Close button: Check this option to disable the close button in the multi-app kiosk.
-
Appearance
The appearance settings, similar to the ones in Android, allows the admin to alter the look and feel of the browser.
- Pinch-to-zoom web page: Disable the option to deactivate the pinch-to-zoom feature in the web app.
Scheduled Refresh
With scheduled refresh you can set a fixed time period after which the webpage would refresh.
- Reload the web page after X seconds of inactivity: Set the inactivity interval to reload the web app’s home page every time after the specified time span. The period of inactivity should be no less than 10 seconds.
Browser History
Browsing history deals with the storage of the browsing data relating to the user of the device.
- Clear cache: Check the option to clear cache every time the home page of the web app is loaded. Do keep in mind, the previous setting, scheduled refresh must be active in order to use this feature.
Industry use-cases for Browser Lockdown.
Schools
If an educational institution is planning to issue mobile devices such as tabs to students, then browser lockdown is an important and unavoidable feature.
Firstly, with the help of browser lockdown, the administration can improve student productivity. The admin can whitelist all the websites that the students are allowed to use. This means the students can’t use the school issued device for any other purpose on the internet. Secondly, a browser lockdown is particularly useful during tests or quizzes. By employing specific configurations mentioned above, tests and online quizzes can be conducted safely and can be easily monitored. For example, the scheduled refresh feature coupled with the clear browser history feature available in both Android and iOS devices can be used to make sure that student doesn’t get any unwarranted help during their evaluation.
Corporate

Task-Specific devices in action.
In a corporate office scenario, devices enabled with browser lockdown can be used as a task-specific device. For example, certain information has to be collected from customers in person. The best way to go about accomplishing this task is by using a task-specific device, in this case, enabled by a browser lockdown. The browser can be locked down to only display the webpage with the specific form in which the info has to input, this can be achieved through toolbar settings and appearance settings. Other configurations like scheduled refresh, clear cache, and form settings can also be used to make sure that the data entered by the customers is safe and not vulnerable to leaks.
Such forms of task-specific devices improve productivity in a corporate environment.
Logistics

A worker using a tablet as an ELD.
In an iteration of task-specific devices, ELDs or Electronic Logging Devices are widely used in the logistics industry. The basic functionality of an ELD is to track the working hours of a driver. With a device equipped with a browser lockdown and kiosk lockdown, you can convert any mobile device into an ELD. The device can be locked down to the particular webpage which displays the login portal. This could ensure that this device is not misused in any way.
Healthcare
Mobile devices issued to patients while they are in the hospital can be put under browser lockdown. With whitelisting, you can ensure that the patients won’t get access to inappropriate content. Multi-tab browsing can also be made available to them.
INFOGRAPHIC

Share your thoughts