

With the introduction of macOS High Sierra (macOS 10.13), Apple announced a number of changes to the overall security and privacy functionalities on a macOS device. Among these, one significant change was how Apple would handle the ‘chain of trust’ on a macOS system, and how Macs would recognize a ‘trusted’ account on a user’s device. Now, if these terms seem a bit foreign to you, it’s because you haven’t been introduced to Apple’s latest approach to securing users and accounts on a macOS device – With the help of Mac secure tokens.
Table of Contents
- What is Mac secure token?
- Some terms you should know
- What happens if my account does not have a secure token?
- How does a macOS device grant a secure token?
- Why are secure tokens not generated for some accounts?
- How do I get a secure token for my account?
- How to manage secure tokens using sysadminctl commands
- How does IT manage secure tokens using UEM?
- Case-1: When the end-user sets up the Mac
- Case-2: When the IT admin sets up the Mac
- How to grant secure token using Hexnode UEM?
What is Mac secure token?
A secure token on a Mac is an account attribute that permits users to perform critical operations on the macOS system, involving processes such as enabling FileVault, approving system and kernel extensions, and enforcing software updates.
For example, in previous versions of macOS that ran on CoreStorage volumes, the keys used in the FileVault encryption process would be generated only when a user tried to enable FileVault on their Mac. However, Apple believed these processes would make the Mac vulnerable to potential attempts to misuse the authority granted to macOS admin accounts.
But this all changed with the introduction of the Apple File System (APFS). For macOS devices running on APFS volumes, the encryption keys are generated either during
- The user creation process
- When setting the first user’s password
- During the first login by a Mac user
But how does this improve security? Well, that’s because these keys aren’t generated for ‘all’ user accounts. These accounts need to pass specific criteria set by Apple to receive encryption keys.
According to Apple,
“A secure token is a wrapped version of a key encryption key (KEK) protected by a user’s password.”

What happens if my account does not have a secure token?
If a user does not have a secure token associated with their account, this account will not have access to perform any critical tasks on the macOS device, including – approving system extensions, kernel extensions, enabling FileVault and approving software updates on a Mac.

But that’s not all. For example, let’s assume your IT has enabled FileVault on your Mac, and the encryption process has finished. Now, once a user powers on a Mac, only the user accounts that have a secure token associated with it will have the authority to decrypt FileVault encryption. Any user account that does not possess a secure token will be hidden from the login window, and can only access the Mac once FileVault has been decrypted.
This basically renders any user account without a secure token useless, once FileVault is enabled.
How does a macOS device grant a secure token?
A secure token is automatically granted to the very first user account on a macOS device. You could create this local user account in either of the two ways. (However, the instance at which the secure token is granted differs based on the how the account is created.)
- Account is created via Setup Assistant:
When a user turns on the Mac for the first time, the Setup Assistant helps the user configure the first account on the Mac. Once a password has been set up for this account, macOS automatically grants a secure token to this user account.
- Account is created via Automated Device Enrollment:
When the first account on a Mac is configured to be created via Automated Device Enrollment (ie, the Auto-Admin account), macOS grants this account a secure token when a user logs in to this account for the first time.
Once the initial account has a Secure Token associated with it, any subsequent user accounts created by the secure token enabled account – via System Preferences > Users and Groups – will in turn automatically be granted their own secure tokens.
The idea behind Apple’s implementation of the Mac secure token attribute is to create a secure chain of trust among the user accounts on a macOS device, thereby ensuring that only trusted accounts can access a FileVault-encrypted Apple File System (APFS) volume, and execute critical operations on a Mac.

However, this layer of safety also presents a challenge to IT admins. How can enterprises remotely manage essential configurations, including FileVault, system extensions, kernel extensions, and software updates on Mac, if the macOS device doesn’t grant their users a secure token? Well, let’s see what we can do about this.
How to manage secure tokens using sysadminctl commands
IT can make use of the sysadminctl commands to grant secure tokens to any user account, including Active Directory mobile accounts, and accounts created via command-line tools. However, this process must be done manually after the account has been created. To run the sysadminctl utility, you will require access to a user account with the following pre-requisites:
How to check secure token status
To check if your user account has a secure token associated with it, open terminal and run the following command
|
1 |
sysadminctl -secureTokenStatus (username) |
You will receive an output similar to this:
|
1 |
Secure token is ENABLED for user (username) |
Alternatively, you can also use either of the following methods to check the secure token status.
|
1 |
dscl . -read /Users/(username) AuthenticationAuthority |
- If the account is an Active Directory mobile account, you can also check secure token status by navigating to System Preferences > Users and Groups > Login options > Network account server > Open Directory Utility > Directory Editor > username. Here, check for ‘secure token’ under ‘Authentication Authority’. If not present, the account does not have a secure token.
How to manually generate secure token
To generate a secure token and associate it to a user account, you must first log in to an admin user that has secure token enabled. Then, open terminal and run the following command.
|
1 2 |
sudo sysadminctl -adminUser “ourAdminAccount” -adminPassword “password” sysadminctl -secureTokenOn (username that needs secure token) -password (password of user that needs secure token) |
Alternatively, if you would like to enter the password separately in the password dialog box, run the following command.
|
1 2 |
sudo sysadminctl -adminUser “ourAdminAccount” -adminPassword “password” sysadminctl -secureTokenOn (username that needs secure token) -password - |
How to remove secure token
To remove an associated secure token from a user account, you must first log in to an admin user that has secure token enabled. Then, open terminal and run the following command.
|
1 2 |
sudo sysadminctl -adminUser “ourAdminAccount” -adminPassword “password” sysadminctl -secureTokenOff (username that needs secure token) -password (password of user that needs secure token) |
Alternatively, if you would like to enter the password separately in the password dialog box, run the following command.
|
1 2 |
sudo sysadminctl -adminUser “ourAdminAccount” -adminPassword “password” sysadminctl -secureTokenOff (username that needs secure token) -password - |
How does IT manage secure tokens using UEM?
The introduction of secure tokens has forced enterprises to adjust their Unified Endpoint Management workflows so that all corporate Mac accounts receive their corresponding secure tokens. But how exactly have these management workflows changed, and how did they incorporate secure tokens in the enterprise? Let’s find out.
When deploying a macOS device to the end-user, we know that they are first enrolled in the UEM portal via Apple’s Automated Device Enrollment program. Now, from here, there exist two different device deployment scenarios, each with their own workflows.
Case-1: When the end-user sets up the Mac
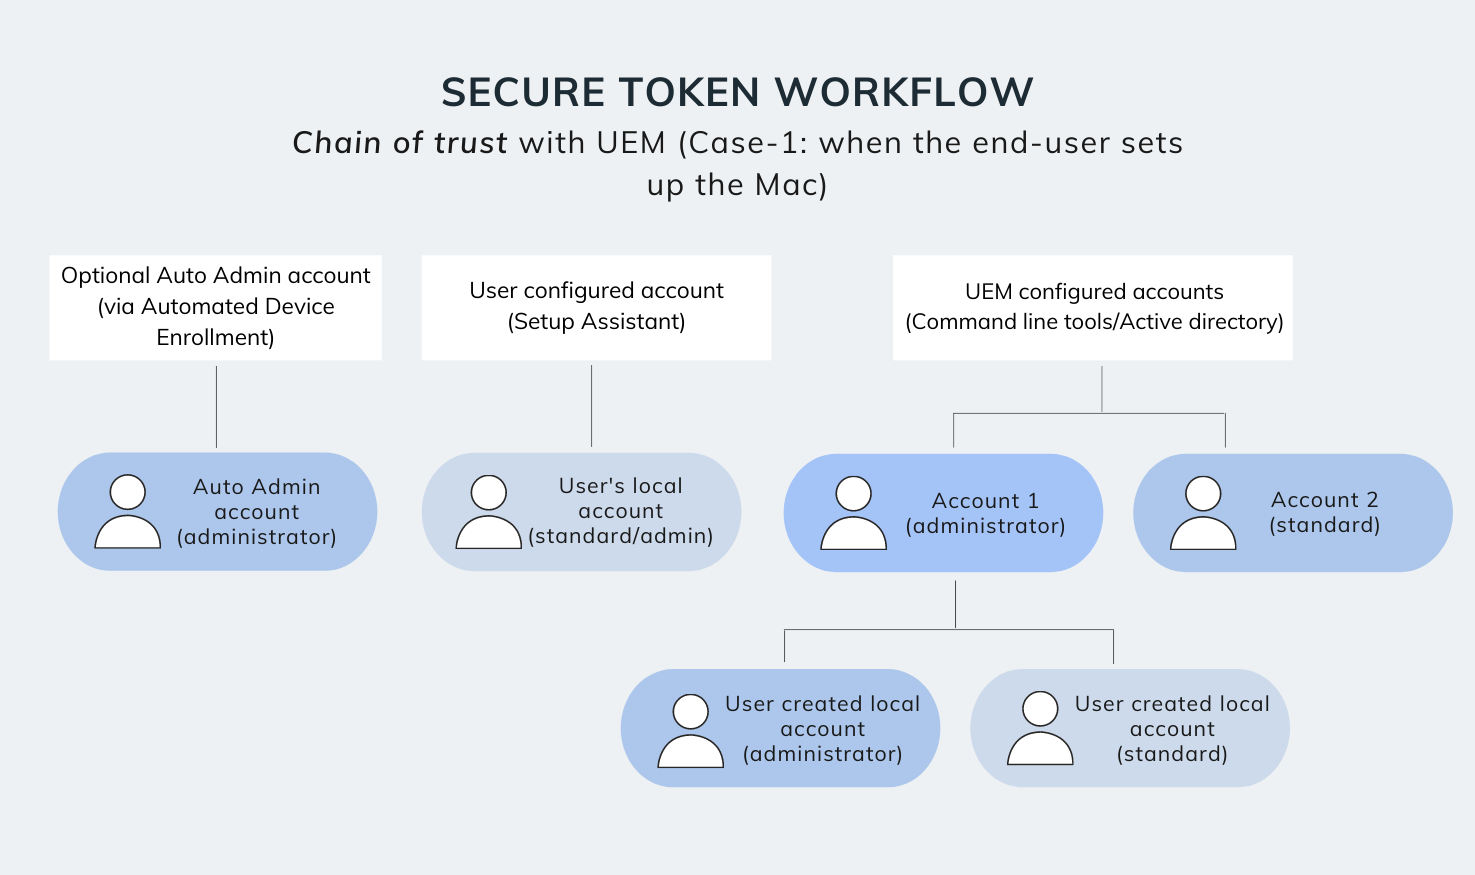
Here, the macOS device is configured via Apple School Manager/Apple Business Manager and deployed directly to the end-user. Once the Mac is turned on for the first time, the user is directed to create their account via Setup Assistant.
Next, the user sets a password for their account, after which macOS automatically associates a secure token to this user account (regardless of whether the account has standard or admin privileges).
Once a secure token is associated to the user account, the device management workflow proceeds back to the normal flow.
- If additional Active Directory mobile accounts (or even accounts created via UEM commands) are set up after the Setup Assistant process, the secure tokens for these accounts will not be automatically generated by the Mac. Instead, IT must grant secure tokens for these accounts from the UEM portal itself.
- Now, it is also worth noting that if, an Active Directory mobile user account (or, an account created via UEM commands) that has a secure token associated with it, creates a local user account, this local account will automatically be granted a secure token by the macOS device.
Case-2: When the IT admin sets up the Mac
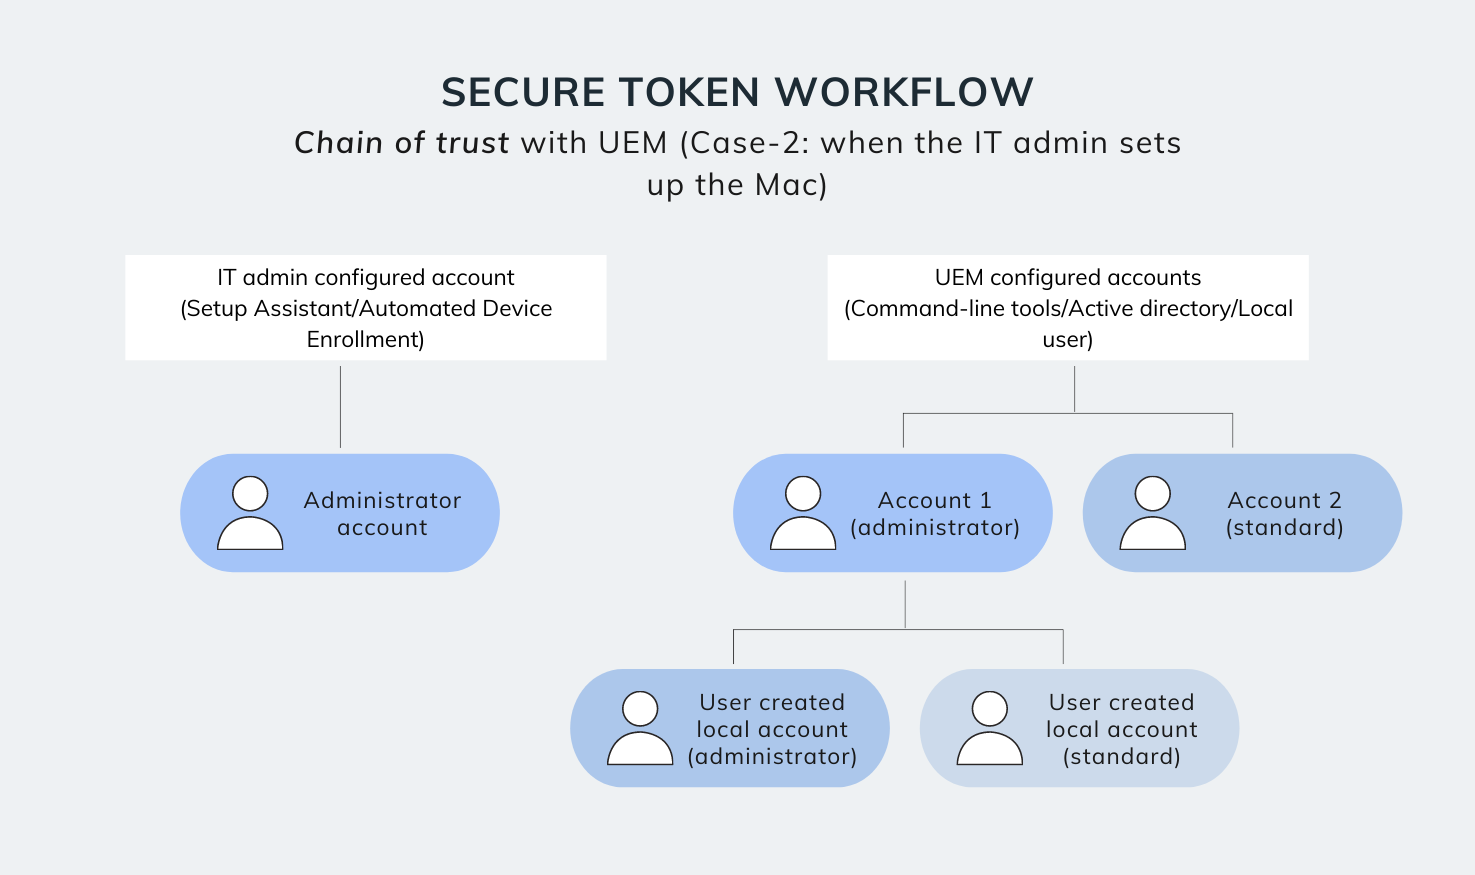
Here, the macOS device is configured by the IT admin before being deployed to the end-user. In this case, the admin account (created either via Setup Assistant or via the DEP configuration profile) is used to set up and provision the Mac. A secure token is associated to this account either during first login, or after the account password is set (depending on how the account was created).
Next, the user accounts are set up. There exists three methods that IT admins may use to set up user accounts on a macOS device.
- Method-1: Suppose you’re associating the Mac with an Active Directory service and setting up mobile accounts (and the bootstrap token is not escrowed to the UEM). Then, when the mobile account users log in for the first time, they will be prompted to enter the credentials of an existing admin account with a secure token (the user can bypass this option if IT doesn’t require granting these user accounts a secure token).
- Method-2: Suppose IT decides to create local user accounts instead of Active Directory mobile accounts. In that case, these local users are automatically granted a secure token, when they are created from System Preferences > Users and Groups by a secure token enabled admin account.
- Method-3: Alternatively, if IT decides to create user accounts directly via UEM commands – and the UEM solution has the bootstrap token escrowed – these user accounts will be automatically granted secure tokens when user first logs in. If the bootstrap token is not available, then IT admins can manually grant the secure token from the UEM portal itself.
How to grant secure token using Hexnode UEM?
Enterprises can remotely grant secure tokens to a user account via Hexnode UEM, by making use of the ‘Grant Secure Token’ action in the Hexnode portal. Just select the required macOS device, click on the ‘Grant Secure Token’ option from remote actions, and enter the following details.
Now, if IT requires to create a new user account and grant a secure token to this user account, they can use the ‘Create User Account’ option from remote actions, and check the ‘Grant Secure Token’ box. They will need to provide the username and password of an existing secure token enabled admin account, after which the required user account will be created on the Mac.
Need help managing your corporate Macs?
Give Hexnode a try. Take a 14-day free trial and get first-hand experience on how well Hexnode goes with your Macs
TRY OUT NOW