

Are you tired of dealing with spotty internet connections and network issues on your macOS system? Well, we’ve got you covered. Managing the network settings on macOS devices can be confusing at times. Where to connect, how to connect, which is safer…are some of the questions that may flash through our mind in this scenario.
Although network connections may seem as easy as toggling the switches, behind-the-scene connections make it all happen. This blog will walk you through setting up wireless connections and configuring network settings for your macOS. We’ll also come across the ‘networksetup’ command that allows you to manage network settings from the command line like a ninja.
Whether you’re a home user or a network administrator, this blog will offer you the skills to handle any network challenges that come your way.
How to configure network settings on macOS
Now let’s talk about how this blog will be used.
To configure macOS network settings, navigate to the Apple menu > System Preferences, then click Network in the sidebar or search for it. Then we can see any accessible network paths on the left side of the Network window. All the entries in the Network window will have a colored dot next to them. Here is a brief outlook on its colors:
- Any entry with a green dot next to it is an active, usable connection.
- A yellow dot indicates that although the connection has not yet been configured, it may be operational.
- A red dot indicates that there is no connectivity.
Additionally, listings for USB Ethernet, FireWire, Thunderbolt FireWire, and Bluetooth PAN may be visible. Since ethernet and Wi-Fi are the most widely utilized connections, we’ll focus on them.
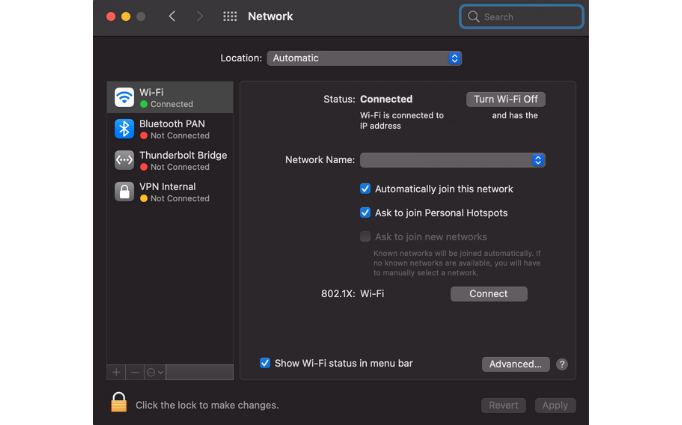
Decide amongst the open connections (one with a green dot). If you chose Wi-Fi, a Status entry to the right of the screen should say Connected. There is a Turn Wi-Fi Off button to its right. Simply click this button to turn off Wi-Fi. The connected network name and the IP address given to your Mac are displayed below the button. (Note that depending on the Mac you’re using, this may not exactly be what you see).
If you select an active Ethernet connection, the similar Connection entry with an IP address will be visible below. The IP address of the ethernet will be different from the Wi-Fi address as each connection receives a unique internal IP address.
Mastering the art of network configuration with “networksetup” on macOS
On macOS, a built-in tool called networksetup enables users to control and modify their network settings from the command line. In addition, IT admins can remotely set up network settings in the Terminal using this networksetup utility’s command-line interface via SSH (remote desktop). With the release of macOS Big Sur, Apple updated the networksetup tool with a few new features. The following list shows some of the tasks that can be performed using the networksetup utility:
- Setting the primary network service
- Configuring TCP/IP, DNS, and proxy settings
- Enabling and disabling network services
- Viewing a list of all network services and their current status
- Creating and removing network locations
- Managing Wi-Fi settings
- Troubleshoot network issues
It is significant to note that you need administrator rights to execute the networksetup command.
Putting the networksetup command to work: showcasing its capabilities
Some examples of how to apply the networksetup command are provided below:
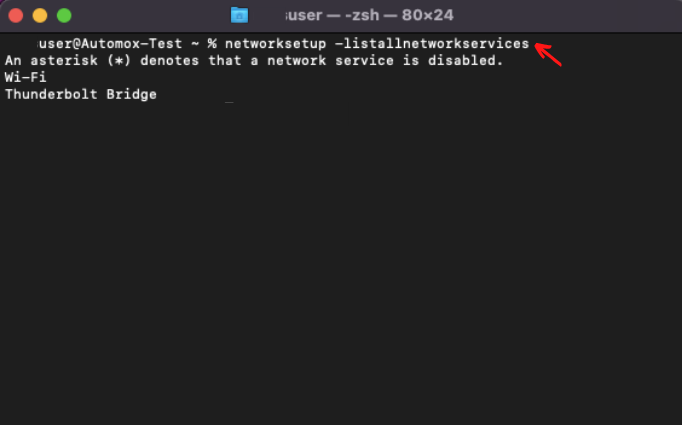
- networksetup –listallnetworkservices
To view all network services on the hardware ports of the computer. Asterisks will indicate that it is presently disabled.
- networksetup -setmanual networkservice
ip subnet router
The chosen network service’s TCP/IP configuration can be set to manual. Simply type [-setmanual], select the network service, and then set the IP address, Subnet Mask, and Router address. E.g.
networksetup -setmanual “Ethernet”
192.168.100.100 255.255.255.0 192.168.100.1 - networksetup -setbootp networkservice
Bootstrap Protocol (BOOTP) is a static protocol that permits manual IP address setup. By entering [-setbootp] and specifying the network service, you can force TCP/IP for the chosen network service to use BOOTP. E.g.
networksetup -setbootp “Ethernet” - networksetup -setsearchdomains networkservice domain1 [domain2]
This will specify the search domain for the chosen network service. Using this, the IT admin can list any number of search domains (replace domain1, domain2, and so on with the name of a local domain). Type “empty” in place of the domain name to remove all search domain entries for the chosen network service. E.g.
networksetup -setsearchdomains “Ethernet” example.com foo.com
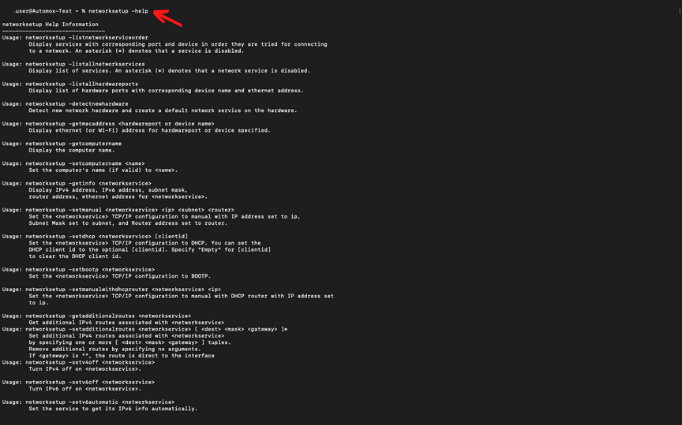
Apart from these, there are many more commands. You can use networksetup –help command to view all the commands in the Network Setup Tool along with their descriptions.
Missing the reset option?
Are you facing a network connectivity issue and struggling to find the reset option?
Don’t worry. We will help you!
Although there is no dedicated function on macOS for resetting internet and wireless connection preferences for our easiness, two approaches can still achieve it:
- Straightforward technique
- Advanced technique
With the straightforward technique, you can easily restart the currently connected Wi-Fi network if you are experiencing a temporary issue. Your Mac will lose its current network configuration settings, allowing you to connect to it entirely from scratch as you did when you initially set it up. The Wi-Fi network settings are typically reset by this, which should fix the issue.
If the issue persists, you can remove the network configuration files from your Mac using the second option. This strategy is challenging, but it is the best way to resolve any persistent network problems.
Straightforward technique: Reset the Wi-Fi connection
Resetting the Wi-Fi or Ethernet network connection is the first and simpler method. By doing this, the connection will be deleted and then restored. If needed, you must note down the credentials because it will also erase your system’s Wi-Fi information (username and password). You can later use these credentials to rebuild the connection.
- Navigate to the Apple menu > System Preferences
- Select Network in the sidebar
- From the left-hand pane, choose Wi-Fi.
- Under the list of connections, click the minus (-) sign.
- Select Apply. This will disable the Wi-Fi on your Mac.
- Now select the plus (+) icon to add it back.
- Select Wi-Fi> Create.
- Click Apply and an option to choose a Wi-Fi connection will appear.
Choose the connection you want to use and then type your password. Now that your Mac is connected, the internet will be operating normally.
Advanced technique: Reset the Wi-Fi connection
This method may not be the easiest but it guarantees security. During this process, the removal of few system files of network settings take place. You have to restart your Mac to restore these files. Follow the procedures listed below to execute this approach.
- Turn off the Wi-Fi from the Wi-Fi icon in the top menu bar
- Open up Finder, and select the Go tab from the top-left menu bar.
- Select Go to Folder and enter the following address into the text field and click Go. /Library/Preferences/SystemConfiguration/
- The Finder window will open and display some system files. Choose the following files from it:
-
- com.apple.airport.preferences.plist
- com.apple.network.identification.plist or com.apple.network.eapolclient.configuration.plist
- com.apple.wifi.message-tracer.plist
- NetworkInterfaces.plist
- preferences.plist
-
- Make a copy of these files and put them somewhere secure as a backup. Then, if you run into any problems, you can use this to restore the network settings.
- After that, delete the files from the SystemConfiguration folder. To delete them, select them, and then hit Command + Delete.
- When finished, clear the trash to remove the files completely.
- Restart your Mac now.
macOS should now recreate the network configuration files you destroyed, and all your network settings should be reset.
To check if everything is working, try connecting to the internet. You can remove the backup files you previously stored if all goes well and you can successfully access the internet. To check the quality of your network, you may use the networkquality command in the Terminal app and will get an output as shown in the figure below. macOS 12 Monterey supports this command.

Still struggling?
If you’ve tried the above solutions and your problem persists, your Mac might have a hardware issue rather than a software one. Therefore, it would be better to take it to an Apple Store or an Apple Authorized Repair Facility to get it inspected and fixed.
What are the challenges of managing network settings for work devices?
The art of configuring network settings for work devices is like a game of chess, one wrong move and the whole system can fall apart and it requires a strategic mind and foresight. There are several challenges that an IT admin may face while configuring network settings for work devices. Some of them are as follows:
- Complexity: Network configurations can be complex and it requires a deep understanding of network protocols, routing, and security to set up correctly for an entire organization.
- Security: Network configurations in work devices must be secure to protect against hacking and data breaches.
- Scalability and Compatibility: As the number of work devices increases, the network should be capable of accommodating the additional devices and traffic. It should also be compatible with the existing infrastructure and devices, including hardware and software.
- Remote management: Configuring and managing network settings for remote devices can be challenging, especially when dealing with different types of devices and operating systems.
- Constant monitoring: IT admins in the organization should constantly monitor the network configurations to address security threats and to ensure their optimal performance.
- Keeping up with the latest updates and technologies: Update network configurations regularly to take advantage of new features and security patches and to stay current with the latest technologies.
Macbooks have become the go-to devices for enterprises due to their cost-effective price and efficient OS. Read more about Mac device management from our whitepaper.

Featured resource
Mac Device Management
Conclusion
Setting up a Mac to join a network is necessary but tedious. When network connectivity drops in the middle of some tasks, we could become upset. By configuring the network settings on macOS, we can identify network connectivity problems, keep an eye on network activity for safety reasons and intercept private data. With the network configuration settings discussed in this blog, level up your network security?.
Securely manage endpoints with Hexnode
Try Hexnode's 14-day free trial and gain first-hand experience with our Mac management features.
Try out now


