Category filter
How to set up Wi-Fi for Android devices?
Set up and help connect a device to the corporate Wi-Fi network without the user knowing its password. You can create a policy with the Wi-Fi settings of your organization’s wireless network and associate them with the enrolled Android/Android TV OS devices. This policy can be configured on all subscription plans.
To configure Wi-Fi network on Android devices,
- Log in to your Hexnode portal.
- Go to Policies.
- Create a new policy or select an existing one.
- Click on Android.
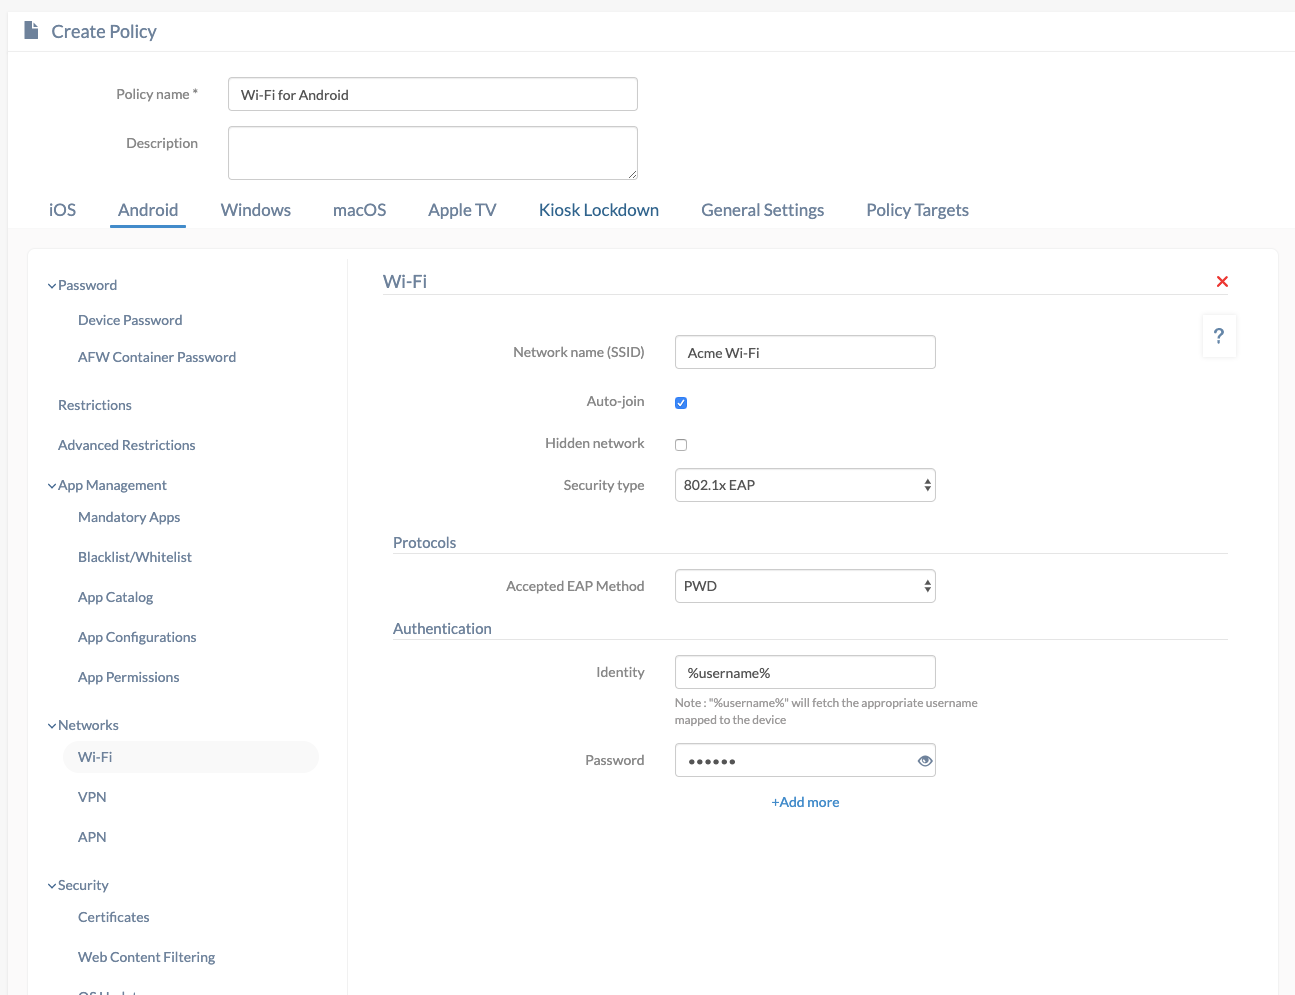
- Select Wi-Fi from Networks.
| Wi-Fi Settings | Description |
|---|---|
| Network name (SSID) | In simple words, Service Set Identifier (SSID) is the name of the Wi-Fi network. |
| Auto-join | Devices will connect to this Wi-Fi network when the devices are in its range, no need to manually tap connect. Auto-join is enabled by default. |
| Hidden network | Enable this option to connect to a Wi-Fi network which is hidden, the one whose SSID is not broadcasting. A hidden network will not appear in the list of available wireless networks. |
| Security type | Select a security type to display additional security setup options. The available security types are None, WEP, WPA/WPA2 PSK (default) and 802.1x EAP. |
| Password
(If WEP or WPA/WPA2 PSK is selected as the security type) |
Enter the password in this field to connect to the Wi-Fi network.
Note: Minimum character length should be 8. |
| Accepted EAP method
(If 802.1x EAP is selected as the security type) |
Select the accepted Extensible Authentication Protocol to authenticate the wireless connection. Available protocols are PEAP, TTLS, TLS and PWD. The remaining settings will change according to the EAP type selected. PEAP is selected as the default EAP method if 802.1x is selected as the security type. |
PEAP Settings
| PEAP Settings | Description |
|---|---|
| Phase 2 authentication | Select an authentication protocol None, PAP, MSCHAP, MSCHAPv2, GTC. In PAP, passwords are sent as plain text. MSCHAP is Microsoft’s variant of CHAP (Challenge-Handshake Authentication Protocol), which uses a hash function with random numbers on the password, and the random number and the result of the hash are sent instead of a plain password. MSCHAPv2 is the second version of the MSCHAP and support mutual authentication. GTC (Generic Token Card) is an alternative to Microsoft’s MSCHAPv2 and is developed by Cisco. Ensure that the same protocol configured on your corporate Wi-Fi network is selected here. MSCHAPv2 is set as the default authentication protocol. |
| Identity | Provide the username to authenticate with the authentication protocol. This field supports the use of wildcards. The supported wildcard is %username%. |
| Outer identity | The outer identity entered here will be sent in response to the EAP identity request allowing the users to hide their real identity. A secure tunnel is created for transferring the identity and password. While authentication, outer identity will be sent initially. It securely conceals the real identity of the user from attackers. |
| Password | Enter the password associated with the username provided in the ‘Identity’ field. |
Settings for TLS
| TLS Settings | Description |
|---|---|
| Identity | Provide the username to authenticate with the authentication protocol. This field supports the use of wildcards. The supported wildcard is %username%. |
| CA Certificate | Choose the CA certificate to be used for authentication. For this, the certificates must first be uploaded under Security > Certificates. |
| User Certificate | Choose the CA certificate to be used for authentication. For this, the certificates must first be uploaded under Security > Certificates. |
Settings for TTLS and PWD
| TTLS/PWD Settings | Description |
|---|---|
| Identity | The username to get authenticated with the authentication protocol. This field supports the use of wildcards. The supported wildcard is %username%. |
| Password | Provide the password associated with the identity to get authenticated to the authentication protocol. |


Push Wi-Fi configurations to Android Devices/Groups
If you haven’t saved the policy yet, to associate the policy with the device,
- Head on to Policy Targets tab.
- Click on + Add Devices.
- Select the devices and click OK.
- Click on Save.
Not only devices, but you can also associate any policies with the device groups, users, user groups, or domains from the left pane under Policy Targets.
There’s another method for the policies created already to get associated with the device.
- From Policies, choose the required policy.
- Under Policy Management, click on Manage.
- Select Associate Targets and choose the devices.
- Click on Associate.
What happens at the device end?
- The details of the pushed Wi-Fi network(s) can be seen in the Policies section of the Hexnode app on the device.
- The user can connect to the configured network without authenticating with the network password.


