Category filter
How to set up Wi-Fi for iOS devices?
Set up and connect your devices to a secure Wi-Fi network without the user knowing its password using Hexnode mobile device management solution. Push this configured policy to the device to set up Wi-Fi network configurations over the air. Hexnode offers configurations like adding a SCEP or PKCS certificate, selecting authentication processes, and other settings. This feature is available on all pricing plans.
Configuring iOS Wi-Fi settings via policy
To set up Wi-Fi settings on an iOS device via policy,
- Login to your Hexnode UEM portal.
- Navigate to Policies > New Policy. Assign a suitable name and description (optional) for the policy. You can also choose to continue with an existing policy.
- Go to iOS > Network > Wi-Fi. Click Configure.
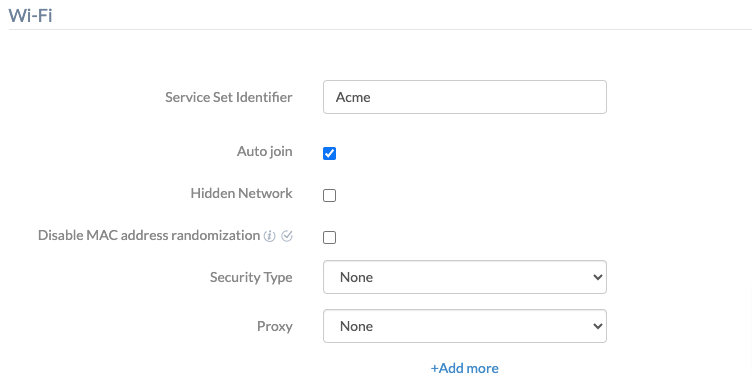
| Wi-Fi settings | Description |
|---|---|
| Service Set Identifier | Service Set Identifier (SSID) denotes the name of the Wi-Fi network. |
| Auto join | Allow the device to automatically connect to the Wi-Fi network when the device enters the network’s range. Enabled by default. |
| Hidden Network | Allow users to connect to a Wi-Fi network that is hidden, the one whose SSID is not broadcasting. By default, connecting to hidden networks is disabled. |
| Disable MAC address randomization | This option disables MAC address randomization when the device is associated with the given Wi-Fi network.
Note: Supported on iOS 14+. |
| Security Type | There are seven options to choose from – None, WEP, WPA/WPA2, Any (personal), WEP Enterprise, WPA/WPA2 Enterprise and Any (Enterprise). The rest of the Wi-Fi network configuration depends on the security type. Any (personal) is set as the default security type. |
| Proxy | Set proxy, the available methods are None (default), Manual and Automatic. |
Configuring network security types
- None: By choosing None, you are trying to connect to an open Wi-Fi network. So, there isn’t anything else to configure.
- WEP, WPA/WPA2 or Any (personal): For these kinds of networks, the admin needs to push only the network password through Hexnode. The users will be able to join the network without authenticating with the network password.
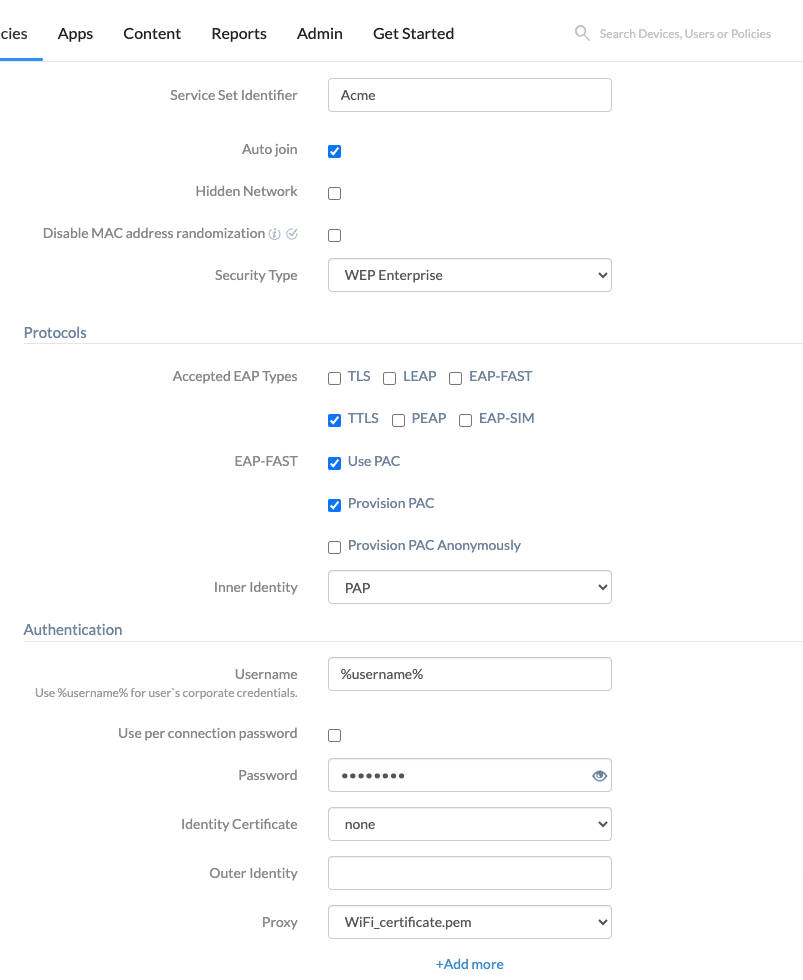
- WEP Enterprise, WPA/WPA2 Enterprise or Any Enterprise: Set up the below options to connect to a network that is protected by any of these Enterprise security types:
| Available options | Description |
|---|---|
| Accepted EAP types | Select all applicable Extensible Authentication Protocols (EAPs). Available EAP types are TLS, LEAP, EAP-FAST, TTLS, PEAP, EAP-SIM. TTLS will be accepted by default. |
| Use PAC
(Works only if EAP-FAST is enabled) |
Use Protected Access Credentials (PAC), which is stored on the device to show that the authentication is successful. Enable this option to use an existing PAC. Used by default. |
| Provision PAC
(Editable if PAC is used) |
Check this option to use PAC successfully. Used by default. |
| Provision PAC Anonymously
(Option available if PAC is provisioned) |
Provision PAC without authenticating with the server. Disabled by default. |
| Inner identity
(Shown only if TTLS is accepted) |
Select from the list of authentication processes like PAP (default), CHAP, MSCHAP, MSCHAPv2. PAP, CHAP and MSCHAP (v1 and v2) are all peer-to-peer connection methods. Passwords are transferred as a plain text in PAP, whereas a hash function is applied on the password with a random number in the case of CHAP, and both the random number and the result of hash is sent in CHAP. MSCHAP is Microsoft’s own variant of CHAP. The second version of MSCHAP (MSCHAPv2) supports mutual authentication. Make sure you choose the same protocol that’s configured on your Wi-Fi network. |
| Username | Username provided by the Enterprise to connect to its network. This field supports the use of wildcards. The supported wildcard is %username% |
| Use per connection password | Per-connection password is one which is used to connect to a Wi-Fi network and discarded once the connection is made. If this option is checked, the user needs to enter the password every time he tries connecting the device. Disabled by default. |
| Password
(Can be set if per connection password is disabled) |
The password to join the Wi-Fi network. The maximum character limit is 64. |
| Identity certificate | Upload Simple Certificate Enrollment Protocol (SCEP) or Public Key Cryptography Standards (PKCS) certificate profiles in Policies > select the existing policy > iOS > Security > Certificates > Add Certificates, and they’ll be displayed in the ‘Identity certificate’ field. You can select one from the list. |
| Outer identity | Provide a username to send through the secure tunnel before passing the original username and password during authentication. |
Proxy settings
Proxy server act as an intermediary between the device and internet, so the devices can be secured from attacks. To start with, choose the proxy setup type.
- None: If you don’t want to use a proxy server, then select this option.
- Manual: To set up proxy manually, provide the below details:
- Server – The server’s name or IP address of the proxy server.
- Port – Port number of the proxy server.
- Authentication – Username to get authenticated with the proxy server.
- Password – Password required to authenticate to the proxy server.
- Automatic: If you are using a proxy server but don’t prefer to set it up manually, just provide the proxy server URL and Hexnode UEM will configure the rest for you.
Associate the policy with devices/groups
If the policy has not been saved,
- Navigate to Policy Targets > +Add Devices.
- Choose the target devices and click OK. Click Save.
- You can also associate the policy with device groups, users, user groups or domains from the left pane of the “Policy Targets” tab.
If the policy has been saved,
- Go to “Policies” tab and choose the desired policy.
- Click on Manage drop-down and select Associate Targets.
- Choose the target entities and click “Associate”.
What happens at the device end?
The Wi-Fi network configuration will get saved on the device when the policy gets successfully associated. When the network is in range, it will appear under the ‘My Networks’ list while scanning for discoverable Wi-Fi networks.


