# Enroll Google Chrome for Chrome Browser Cloud Management
Chrome Browser Cloud Management (CBCM) is an offering by Google, which enables the centralized management of Chrome browser settings and policies across enterprise devices. Using CBCM, admins can deploy policies, block suspicious extensions, view reports and much more on Chrome browsers across your deployed devices as a means to ensure safe and secure browsing.
With the help of Hexnode, you can enroll cloud-managed Chrome browsers on your devices with a handful of steps. Once completed, you can use your organization’s [Google Admin console](https://admin.google.com/) to manage all the enrolled browsers.
Pre-requisite:
Your organization should be managing a domain using one of the following products:
- Google Workspace
- Chrome Browser Enterprise Support
- Chrome Enterprise Upgrade
- Cloud Identity
**Step 1:** Sign up for Chrome Browser Cloud Management
-------------------------------------------------------
1. Using the **administrator** credentials, log in to the [Google Admin console](https://admin.google.com/).
2. In the sidebar, navigate to ***Billing > Subscriptions***.
3. Click on **Add or upgrade a subscription**.
4. On the left, click on **Devices**.
5. Under Chrome Browser Cloud Management, click on **Get Started**.
6. Review your selection and click on **Checkout**.
7. Click on **Place Order**.
**Step 2:** Generate enrollment token
-------------------------------------
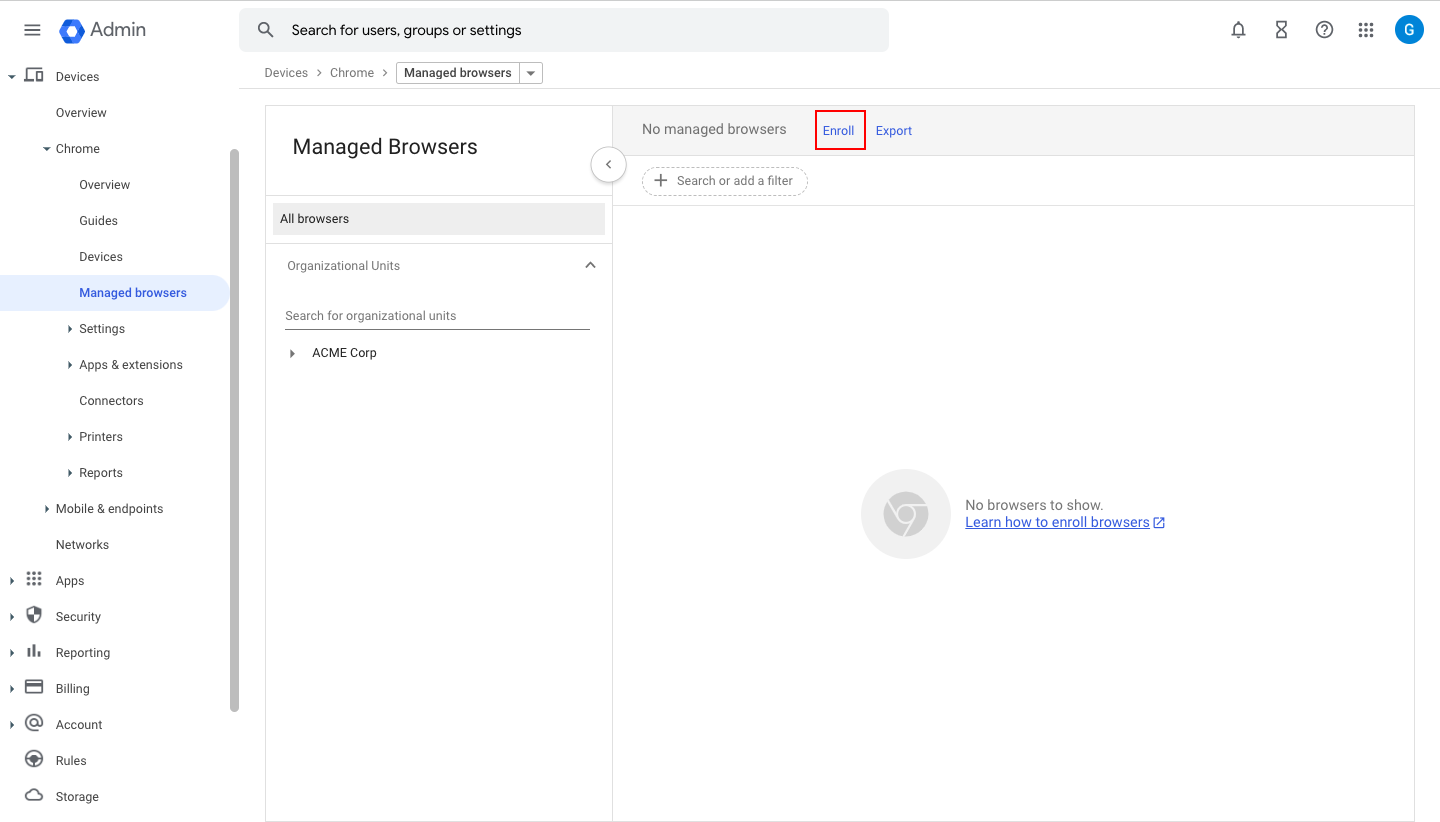
1. In the Admin console sidebar, navigate to ***Devices > Chrome > Managed browsers***.
2. At the top, click on **Enroll**.
[](https://cdn.hexnode.com/mobile-device-management/help/wp-content/uploads/2023/04/Generate-enrollment-token.png)
Note:
If this is the first time you are enrolling a browser, the console will prompt you to accept the Chrome Browser Cloud Management (CBCM) Terms of Service.
4. Click on **Copy enrollment token to clipboard** icon.
[](https:2023/04/Copy-enrollment-token.png)
5. Click on **Done**.
Store the enrollment token on your device. The token will be later required to enroll Chrome browsers.
**Step 3:** Enroll Chrome browsers using the enrollment token
-------------------------------------------------------------
Note:
CBCM currently has a limit on the number of browsers that can be enrolled simultaneously, and it is recommended to **not enroll more than 150 browsers per minute**.
Enroll Chrome browser on iOS/iPadOS devices
Pre-requisite:
Make sure that the Google Chrome app for iOS is added to the Hexnode app inventory. Here is how you can [add apps to the Hexnode console](https://www.hexnode.com/mobile-device-management/help/apple-mdm-app-distribution/#add-an-app-to-mdm-console).
1. Download the below code. Enroll Chrome browser on iOS/iPadOS devices
CloudManagementEnrollmentToken XXXXXXXX-XXXX-XXXX-XXXX-XXXXXXXXXXXX CloudManagementEnrollmentMandatory PayloadEnabled PayloadDisplayName Chrome Browser Settings PayloadIdentifier com.google.Chrome.23C34886-E28B-4C6D-A26F-B50531C8EB3F PayloadUUID 57DFA6B0-466A-446B-B875-5803B149DB9E PayloadType com.google.Chrome PayloadVersion 1
1
2
3
4
5
6
7
8
9
10
11
12
13
14
15
16
17
18
19
20
21
22
CloudManagementEnrollmentToken
XXXXXXXX-XXXX-XXXX-XXXX-XXXXXXXXXXXX
CloudManagementEnrollmentMandatory
PayloadEnabled
PayloadDisplayName
Chrome Browser Settings
PayloadIdentifier
com.google.Chrome.23C34886-E28B-4C6D-A26F-B50531C8EB3F
PayloadUUID
57DFA6B0-466A-446B-B875-5803B149DB9E
PayloadType
com.google.Chrome
PayloadVersion
1
2. Open the downloaded file in a text editor. Replace `XXXXXXXX-XXXX-XXXX-XXXX-XXXXXXXXXXXX` with the **enrollment token** generated in **Step 2**.
3. Save the file with the extension **.xml**.
On your **Hexnode portal**,
5. Navigate to the **Apps** tab.
6. Search and click on the **Google Chrome** app on the inventory.
7. Click on the settings (gear) icon on the top right of the app details box. Then, select the [App Configuration](https://www.hexnode.com/mobile-device-management/help/how-to-push-ios-app-configuration-using-xml-in-hexnode-mdm/) option.
8. Check the **App Update Configuration box** and upload the XML file that you previously saved.
9. Click on **Save**.
Follow the above steps to enroll the iOS devices onto Google Admin console where you can manage Chrome browser. Once done, all you now need is to [distribute this app to the target iOS/iPadOS devices](https://www.hexnode.com/mobile-device-management/help/apple-mdm-app-distribution/#install-apps-from-actions).
Enroll Chrome browser on macOS devices
Pre-requisite:
Make sure that the Google Chrome app for macOS is already [installed](https://www.hexnode.com/mobile-device-management/help/how-to-install-apps-silently-in-macos-devices-using-hexnode-mdm/) on the devices.
1. Download the below code. Enroll Chrome browser on macOS devices
CloudManagementEnrollmentToken XXXXXXXX-XXXX-XXXX-XXXX-XXXXXXXXXXXX CloudManagementEnrollmentMandatory PayloadEnabled PayloadDisplayName Chrome Browser Settings PayloadIdentifier com.google.Chrome.5F15308F-877A-4F25-916B-948E771D8128 PayloadUUID 8EBD3676-7C77-4FEE-9E78-C00EA0A0B5C3 PayloadType com.google.Chrome PayloadVersion 1
1
2
3
4
5
6
7
8
9
10
11
12
13
14
15
16
17
18
19
20
21
22
CloudManagementEnrollmentToken
XXXXXXXX-XXXX-XXXX-XXXX-XXXXXXXXXXXX
CloudManagementEnrollmentMandatory
PayloadEnabled
PayloadDisplayName
Chrome Browser Settings
PayloadIdentifier
com.google.Chrome.5F15308F-877A-4F25-916B-948E771D8128
PayloadUUID
8EBD3676-7C77-4FEE-9E78-C00EA0A0B5C3
PayloadType
com.google.Chrome
PayloadVersion
1
2. Open the downloaded file in a text editor. Replace `XXXXXXXX-XXXX-XXXX-XXXX-XXXXXXXXXXXX` with the **enrollment token** generated in **Step 2**.
3. Save the file with the extension **.xml**.
On your **Hexnode portal**,
5. Navigate to the **Policies** tab.
6. Choose an existing policy or create a new policy by clicking on **New Policy**.
7. Provide a suitable name for the policy if the New Policy option is chosen.
8. Select App Configurations from ***macOS > App Management***.
9. Select **Configure** option and then click on the **+ Add New Configuration** button.
10. Search and choose the **Google Chrome** app. Note:
Ensure that you deploy the configuration to the same type of app (Enterprise app, VPP app, Store app) as what you had installed earlier.
11. Upload the previously downloaded XML file by clicking on **Choose File** option.
12. Go to the **Policy Targets** tab and select the devices or device groups on which you want to enroll Chrome browsers.
13. Click on **Save**.
Follow the above steps to enroll the macOS devices onto Google Admin console where you can manage Chrome browser.
Enroll Chrome browser on Android devices
1. Navigate to the **Policies** tab.
2. Choose an existing policy or create a new policy by clicking on **New Policy**.
3. From ***Android > App Management***, select **App Configurations**, and click on **Configure**.
4. Click on ***Add new configuration > Search*** and select **Google Chrome** app.
5. On the Configure Applications window, provide the **enrollment token** generated in **Step 2** for the field ***The enrollment token of cloud policy***.
[](https:2023/04/Provide-enrollment-token.png)
6. Click on **Done**.
7. Click on **Add**.
8. Go to the **Policy Targets** tab and select the devices or device groups on which you want to enroll Chrome browsers.
9. Click on **Save**
Follow the above steps to enroll the Android devices onto Google Admin console where you can manage Chrome browser.
Enroll Chrome browser on Windows devices
Pre-requisite:
Make sure that the Google Chrome app for Windows is already [installed](https://www.hexnode.com/mobile-device-management/help/how-to-install-apps-on-windows-devices-using-hexnode-mdm/) on the devices.
1. Download the below code. Enroll Chrome browser on Windows devices
$token = "XXXXXXXX-XXXX-XXXX-XXXX-XXXXXXXXXXXX" try{ $path = 'HKLM:\\SOFTWARE\\Policies\\Google' if(-not (Test-Path $path)) { $status = New-Item -Path 'HKLM:\\SOFTWARE\\Policies' -Name 'Google' } $path = 'HKLM:\\SOFTWARE\\Policies\\Google\\Chrome' if(-not (Test-Path $path)) { $status = New-Item -Path 'HKLM:\\SOFTWARE\\Policies\\Google' -Name 'Chrome' } $status = Set-ItemProperty -Path $path -Name "CloudManagementEnrollmentToken" -Value $token Write-Host "Execution successfully completed" } catch{ Write-Output $\_.Exception.Message }
1
2
3
4
5
6
7
8
9
10
11
12
13
14
15
16
17
18
$token = "XXXXXXXX-XXXX-XXXX-XXXX-XXXXXXXXXXXX"
try{
$path = 'HKLM:\\SOFTWARE\\Policies\\Google'
if(-not (Test-Path $path))
{
$status = New-Item -Path 'HKLM:\\SOFTWARE\\Policies' -Name 'Google'
}
$path = 'HKLM:\\SOFTWARE\\Policies\\Google\\Chrome'
if(-not (Test-Path $path))
{
$status = New-Item -Path 'HKLM:\\SOFTWARE\\Policies\\Google' -Name 'Chrome'
}
$status = Set-ItemProperty -Path $path -Name "CloudManagementEnrollmentToken" -Value $token
Write-Host "Execution successfully completed"
}
catch{
Write-Output $\_.Exception.Message
}
2. Replace `XXXXXXXX-XXXX-XXXX-XXXX-XXXXXXXXXXXX` with the **enrollment token** generated in **Step 2**.
3. Save the file with the extension **.ps1**.
On your **Hexnode portal**,
5. Navigate to ***Manage > Devices***.
6. Select the Windows devices on which you want to enroll Chrome browsers.
7. Click on ***Actions > Execute Custom Script***.
8. Choose the platform as **Windows**.
9. Choose the script file source as **Upload file**.
10. Upload the previously downloaded **.ps1** file.
11. Click on **Execute**.
Follow the above steps to enroll the Windows devices onto Google Admin console where you can manage Chrome browser.
**Step 4**: Check for enrollment completion
-------------------------------------------
Once the enrollment process is completed, the user must quit and relaunch the app. You can confirm the enrollment from the admin console.
Once the browsers are enrolled, you can use features available in the admin console to manage the Chrome browser.
[](https:2023/04/Managed-browsers-in-Google-Admin-console.png)