Category filter
Kiosk Mode for Android – Complete Guide
System Requirements
To activate Kiosk mode on your Android device, you should have
- A device running Android v5.0 or above.
- An active internet connection on your devices.
This locks your device down to a purpose-specific machine well suited for work-related applications. The end-users can only perform those operations and actions that are approved by the organization on their kiosk lockdown-activated devices.
Set up and enable kiosk lockdown mode
Set up Kiosk Mode
Enroll Devices with Hexnode UEM
The first step is to enroll your devices with the Mobile Device Management software. All methods of enrollment are explained in this section.
Open Enrollment requires only the server’s name and no enrollment credentials. It is the easiest and fastest method of enrollment. All the devices that are enrolled using Open Enrollment get assigned to a default user.
Organizations may prefer open enrollment to set up kiosks seamlessly. If you wish to display digital signages or simply set up a customized screen with the required apps, open enrollment is the perfect choice for your organization.
To set up Open Enrollment:
- Navigate to Enroll > Settings on your Hexnode portal.
- Set the Request Modes as either Email or Text/SMS, or both.
- Under Authentication Modes, enable No Authentication, and choose a default user and set a default password, which is for Windows devices.
- Under Enrollment Restrictions, choose the device models to be allowed for enrollment, enable/disable pre-approved enrollment, and enforce assigned user.
- Choose the Enrollment Ownership.
- Re-enrollment Options can be set either to enroll as a new device or to retain configurations and change owner.
- Click Save.
To create a new user,
- Head on to Manage > Users on your Hexnode portal.
- Click on New User.
- Enter the Display Name and Email address. Enable Send enrollment request to send the enrollment request immediately after the user is created.
- Clicking on Save will save the user details on the Hexnode portal and send the enrollment request to the user.
An enrollment request will be sent via mail/SMS to the user, consisting of the Server name and QR code.
The devices can now be enrolled using open enrollment.
Enrollment with authentication requires the server’s name and an authentication password. This password is randomly generated and can be used only once.
Authenticated enrollment makes sure that only the right users have the right access to the devices. If you want to set up kiosks and make it available only for the required users, go with enrollment with authentication.
To set up enrollment with authentication,
- Navigate to Enroll > Settings on your Hexnode portal.
- Set the Request Modes as either Email or Text/SMS, or both.
- Under Authentication Modes, enable Enforce Authentication, and choose to send the enrollment request to AD/Microsoft Entra ID/Local/Google/Okta User or allow users to enroll with their dedicated credentials using Self Enrollment.
- There are several options available under Enrollmet Restrictions. It includes choosing the device models that can be enrolled, enabling pre-approved enrollment, and enforcing assigned user enrollment.
- Choose the Enrollment Ownership.
- Re-enrollment Options can be set either to enroll as a new device or to retain configurations and change owner.
- Save the settings.
To create a new user,
- Head on to Manage > Users on your Hexnode portal.
- Click on New User.
- Enter the Display Name and Email address. Enable Send enrollment request to send the enrollment request immediately to the user.
- Save these settings. This will add the user details on the Hexnode portal and will initiate the ‘enrollment request’ deployment to the users.
An enrollment request will be sent via mail/SMS to the user, consisting of server name, password, and QR code. The devices can now be enrolled with authentication.
Self-enrollment allows users to enroll their devices in Hexnode UEM manually. If an organization needs to set up kiosks only for the users in their directory services, enroll devices using self-enrollment.
Self Enrollment using AD User allows the user to directly enroll in Hexnode UEM if they already have their dedicated Active Directory credentials.
To configure Active Directory,
- Go to the Admin tab and select Active Directory settings.
- Configure Active Directory settings and enable Allow self-enroll.
- Click Save.
Once the AD users are imported to the Hexnode console,
- Go to Manage > Directory Services.
- Select the domain or OUs or groups.
- Click on Actions and select New Enrollment.
- Click on Send to send the enrollment request to the AD users.
Self Enrollment using Microsoft Entra ID user allows the user to directly enroll in Hexnode UEM if they already have their dedicated Microsoft Entra ID credentials.
To configure Microsoft Entra ID,
- Go to the Admin tab and select Microsoft Entra ID.
- Configure Microsoft Entra ID and enable Allow self-enroll.
- Click Save.
Once the Microsoft Entra ID users are imported to the MDM console,
- Go to Manage > Directory Services.
- Select the domain or OUs or groups.
- Click on Actions and select New Enrollment.
- Click on Send to send the enrollment request to the Microsoft Entra ID users.
Self Enrollment using Local User: The admin creates a default user and a dedicated password manually or assigns a common password or individual passwords for the users and sends it to them as a bulk mail. The devices can be enrolled with these credentials.
- Go to Enroll > All Enrollments > Enterprise > Self-Enrollment – Local.
- Create a new user by clicking on the Create a new user button. Click on the Change Password button to change the passwords of existing users.
Self Enrollment using Google User allows the user to directly enroll in Hexnode UEM if they already have their dedicated Google Workspace (G Suite) credentials.
To configure Google Workspace (G Suite),
- Go to the Admin tab and select Google Workspace (G Suite).
- Configure Google Workspace (G Suite).
Once the G Suite users are imported to the Hexnode console,
- Go to Manage > Directory Services.
- Select the domain or OUs or groups.
- Click on Actions and select New Enrollment.
- Click on Send to send the enrollment request to the Google Workspace (G Suite) users.
Self Enrollment using Okta User allows users to enroll their devices in Hexnode UEM if they already have their dedicated Okta credentials. Before configuring Okta enrollment, you have to configure the Okta domain in Hexnode.
To configure Okta with Hexnode,
- Go to Admin > Okta.
- Configure Okta and enable Allow self-enroll.
- Click Save.
Once the Okta users and groups are imported to the Hexnode console,
- Navigate to Manage > Directory Services.
- Select the domain or OUs or groups.
- Click on Actions and select New Enrollment.
- Click on Send to send the enrollment request to the Okta users or groups.
The devices can now be self-enrolled.
Hexnode UEM allows you to enroll devices in bulk. To do this,
- Go to Enroll > All Enrollments > Invite > Email.
- Choose the required domain.
- Under Send enrollment request to, toggle the button to Bulk User.
- Upload the CSV file containing the fields name, email and ownership. All other fields – mobile, devicename, SerialNumber and platform – are optional. The ownership field can have the values personal, corporate or selectuser. selectuser allows the user to select ownership details while enrolling.
- Click Next and verify the details of the CSV uploaded.
- Click Next and then choose the method to send the enrollment request either via Email/SMS.
- Click on Send, and the enrollment email/SMS will be sent to all the users.
Pre-approved enrollment lets the administrator set up policies for devices even before the devices are enrolled in Hexnode UEM. The configurations/restrictions are automatically applied once the device is enrolled. Pre-approved enrollment is set up by adding a CSV file with all the device details. You can also add DEP devices as pre-approved devices in the portal.
Install Hexnode UEM app to Android devices
Hexnode UEM Android app can be downloaded from Google Play.
When the installation is complete,
- Open the Hexnode UEM app and enter the server address into the field and tap Next. The server address will be <yourportalname>.hexnodemdm.com.
- The rest of the process differs with the enrollment type.
- If you are enrolling without authentication, you’ll be asked to activate device administration. Make sure to grant the Device Administration permission while enrolling the devices.
- If you are self-enrolling devices, you’ll need to provide your Directory or Local user credentials. Now, tap Next and activate Device Administration.
- If you are enrolling devices using any other methods, provide the email address and the password obtained from the enrollment email/SMS. Tap Next and activate Device Administration.
- When this is done and you tap on the Enroll button, your device is all set to receive commands from the administrator.
Associate Kiosk Lockdown policy with enrolled devices
To turn your device into a Kiosk, you need to push the kiosk policy.
- Go to the Policies tab.
- Create a new policy and provide a name.
- Proceed to Kiosk Lockdown > Android Kiosk Lockdown.
- Lock down your device onto either Single App/Multi App kiosk mode.
- Click on the Configure button and add the required apps in kiosk mode.
- Go to the Policy Targets tab.
- Select the required Devices/Device Groups/Users/User Groups/Domains to which the policy is to be associated.
- Click Save.
The policy will be automatically associated with the device.
Enable Android device lockdown
In Android Marshmallow (6.0) and above, you’ll need to allow ‘Draw over apps’. To allow this,
- Go to Settings > App Settings > Configure Apps.
- Select Draw over apps.
- Select Hexnode UEM and turn on Permit drawing over other apps.
When the policy is applied, Hexnode UEM will be launched and you’ll be asked to
- Enable usage access on some devices. If you don’t have an option to enable usage access, just ignore it.
- Activate Kiosk: Tap on the prompt, select Hexnode Kiosk in the ‘complete action using’ popup and choose Always Select.
Advanced bulk deployment options
If you are into shipping, like, thousands of devices to several other industries, they won’t be willing to download the Hexnode app and enter the server address on every device they have. In such a case, you can make the Hexnode MDM app as a system app, MDM pre-configured and kiosk mode pre-activated.
A system app will have access and permission to edit root directories and files, so you’ll have additional benefits.
You can make a custom ROM with Hexnode MDM app as the system app.
Additional benefits
You will benefit from these additional features if you add Hexnode UEM as a system app.
- Silent app installation: Apps can be installed without user intervention if Hexnode UEM is installed on the device as a system app.
- Non-removable MDM app: Add the app to “/system/priv-app/” folder to make the Hexnode MDM app non-removable.
Make Hexnode UEM a system app before the device is turned on
Used by enterprises collaborating with OEM vendors, devices are manufactured with specially configured ROM, with all privileges and permissions granted to Hexnode UEM. Flashing a custom ROM makes Hexnode UEM a system app even before the device is turned on for the first time, and automatically enrolls the device in the MDM.
Major kiosk features
Hexnode Kiosk features are endless. Here’s a list of selected features that most of the industries are looking for. For a full list of features, see Hexnode Android Kiosk web page.
Hexnode Browser Lite
The Hexnode Browser Lite is a single tabbed browser that opens the web apps added in either single app/multi-app kiosk mode. It can also open the external URLs within the web app, provided the URLs are whitelisted. To enable the Hexnode Browser Lite in Kiosk mode,
- Head onto Policies > New Policy > Kiosk Lockdown.
- Select Single App or Multi App mode under Android Kiosk Lockdown.
- Whitelist all the apps that you need including web apps.
- Select Website Kiosk Settings, and start to configure the policy.
- Choose Hexnode Browser Lite to browse the web apps and whitelisted URLs.
- You can specify whether to open the web apps in full screen or not on the device.
- Go to Policy Targets and select the required Devices/Device Groups/Users/User Groups/Domains to which the policy is to be associated.
- Click Save.
Hexnode Kiosk Browser
The Hexnode Kiosk Browser enables secure multi-tabbed browsing, by restricting user access to URLs and web apps permitted by the enterprise alone. To enable the Hexnode Kiosk browser in Kiosk mode,
- Head onto Policies > New Policy > Kiosk Lockdown.
- Select Single App or Multi App mode under Android Kiosk Lockdown.
- Whitelist all the apps that you need including web apps.
- Select Website Kiosk Settings, click Configure.
- Choose Hexnode Kiosk Browser, single tab or multi-tab to browse the web apps and whitelisted URLs.
- You can specify whether to open the web apps in full screen or not on the device. You can also choose to make the browse icon visible or not in the device.
- Associate the policy with the required target entities by navigating to Policy Targets. From here you can attach the policy with devices, users, groups and domains.
- Save the settings.
When multi-tabbed browsing is enabled, the Hexnode Kiosk browser will get downloaded to the device. It will be installed silently only on Samsung Knox, LG GATE, Kyocera business phones, devices with Hexnode UEM as a system app, and devices enrolled in Android for Work as Device Owner.
Advanced Website Kiosk settings
Hexnode allows you to configure advanced configurations for a set of whitelisted web apps opened in Hexnode Browser Lite or Hexnode Kiosk Browser. It allows you to configure additional settings to set up the perfect kiosk experience tailored for your use case. To configure advanced website kiosk settings,
- Go to Policies, create a new policy or continue with an existing one.
- Select Kiosk Lockdown > Android Kiosk Lockdown > Website kiosk Settings > Configure.
- Select Hexnode Browser Lite or Hexnode Kiosk Browser. Choose whether to open apps in full screen and refresh web apps periodically. You can also whitelist a set of websites if needed.
- Now, go to Advanced Website Kiosk Settings > Configure.
- Configure the advanced settings based on your use case and click on the Save button.
Digital Signage Display
Hexnode’s digital signage module transforms your devices into images/video streaming screens. This feature enables you to display images and play videos for advertising/informational purposes in Android kiosk mode. You can play the media files in loops and add custom background music to it. To enable digital signage display on your devices,
- Navigate to Policies.
- Select an existing policy or create a new one by clicking New Policy.
- From Kiosk Lockdown > Android Kiosk Lockdown, select Digital Signage Display and start configuring.
- Check the option Enable digital signage and upload the files to be set in digital signage.
Hexnode Messenger
The Kiosk messenger module enables the admin to broadcast text messages to user devices, even while they are in Kiosk mode. The communication is unidirectional, from admin to user only.
- Head onto Policies and create a new policy.
- Go to Kiosk Lockdown > Android Kiosk Lockdown > Peripheral Settings and click Configure.
- Under the Messenger category, enable View messages sent by admin.
- Save the settings.
Now, the broadcast messages can be sent to the enrolled devices via the Hexnode Messenger.
Update enterprise apps
Hexnode UEM makes it possible to update Enterprise apps set up in Kiosk, without taking them out of the Kiosk mode. You can either,
- Method 1: Replace the old APK file with the new one in the Hexnode app inventory.
- Method 2: Add the new APK file as a new enterprise app in Hexnode app inventory & push them to target devices.
Hide apps
App icons can be hidden away, yet run the app in the background, with the Background Apps feature in Kiosk mode. This enables the enterprise to install an app in the device but restricts the user from tampering with it. Hidden apps can’t be set as a Default app.
Add PDF and Video shortcuts in single/multi app mode
Hexnode UEM allows admins to create shortcuts for PDF and video files in the portal. These PDF and video shortcuts can be added in Single App/Multi App kiosk mode. Hexnode provides its own Hexnode Document Reader and Hexnode Media Player to open PDF and video shortcuts respectively. Users are also free to choose their own apps to open these file shortcuts.
Set up a default kiosk app
A default app can be set in Kiosk mode which would launch automatically as per the auto-launch period set in the policy and would run in the foreground at all times. You can access the other apps in multi-app Kiosk mode by pressing the back button and returning to the home page. The default app launches automatically when the device enters Kiosk mode or when the device stays idle for a set time.
Setting up a default Kiosk app can be done in the Kiosk Lockdown > Android Kiosk Lockdown > Launcher > Auto-Launch. You can also customize the kiosk launcher and choose the desired size for the kiosk app icon as per its requirements.
Kiosk Screensaver
With Hexnode’s Kiosk Screensaver feature, enterprises can transform their Android devices into images/video streaming screens while in kiosk mode. It allows users to display images and play videos as screensavers for devices locked in kiosk mode. To enable kiosk screensaver,
- Head onto Policies and create a new policy.
- Go to Kiosk Lockdown > Android Kiosk Lockdown > Kiosk Screensaver and click Configure.
- Check the option Enable Screensaver and upload the files to be set as the screensaver.
- Save the settings.
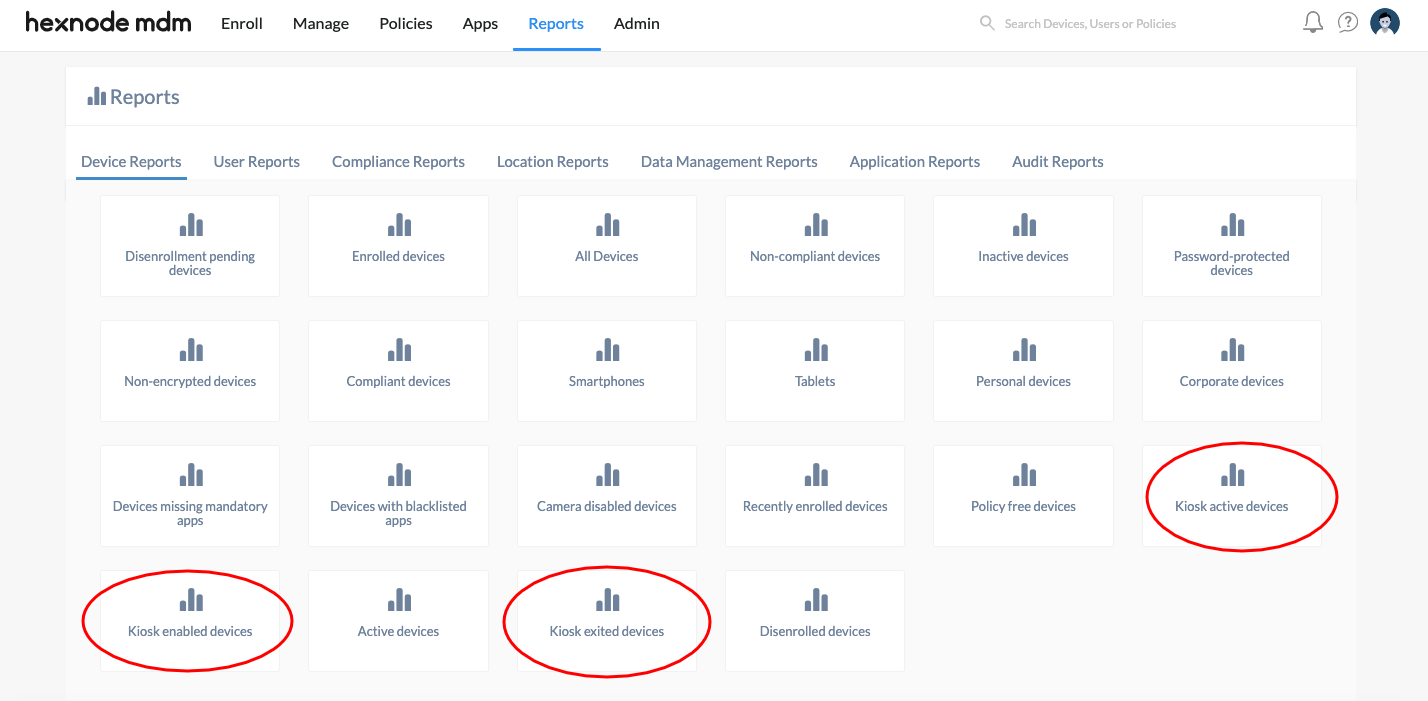
Reporting
Hexnode UEM stores the device, user, compliance, location, data management, application, and audit data, which can be accessed from the “Reports” tab. Choose any report, click on “Export” and select the file format – PDF or CSV, for it to be saved to your computer. It allows you to generate the following kiosk reports:
- Kiosk active devices: It lists all the devices that are currently locked down into kiosk mode.
- Kiosk enabled devices: It lists all the devices to which a kiosk policy has been associated but not currently in kiosk mode.
- Kiosk exited devices: It lists all the devices that have exited from the kiosk mode.
Peripheral settings
From Wi-Fi and Bluetooth configurations to Display and App settings, Peripheral Settings include a broad range of peripheral controls for the devices in Android Kiosk mode. For a detailed description of the configurations, refer to the Peripheral Settings document.
Disable Android device lockdown
Disabling or exiting Kiosk mode can be done from the portal as well as from the device.
After ensuring your devices are connected to a network, you can use any of the following methods to disable/remove Kiosk mode from the MDM console.
-
Disable Kiosk Mode from the Manage tab
- On the Manage tab, choose the devices and click on Actions.
- Select Disable Kiosk Mode.
With this method, you can temporarily get the device out of kiosk mode. You can get back into kiosk mode by clicking Manage > Actions > Enable Kiosk Mode.
-
Remove the policy from the device
- Head to the Manage > Devices and click on your device name.
- From the device details page, continue onto Policies sub-tab.
- Click on the trash icon near the policy name.
-
Remove the device from policy targets
- Go to Policies and click on the policy name.
- Continue onto Policy Targets.
- Click on the remove option near the device name.
-
Delete the policy
- Navigate to Policies.
- Select the policy that associates the kiosk mode with your device. Click on Manage > Move to Archive.
- After archiving the policy, go to Policies > Archived Policies.
- Select the policy you want to delete. Click on Manage > Delete.
-
Disenroll the device from the Manage tab
- From the Manage tab, choose the device and click on Actions.
- Select Disenroll Device.
You can also setup exit-alternatives where the users themselves can exit kiosk lockdown mode from the device end. These methods do not require internet connectivity. They are mentioned below.
-
Using Kiosk Exit Settings via the Policy tab
- Go to Policies and create a new policy. You can also continue with the existing policy if you like.
- Go to Kiosk Lockdown > Android Kiosk Lockdown > Kiosk Exit Settings.
- Click Configure.
- Check the option ‘Allow manually exiting kiosk mode’ to give the users a means to manually exit kiosk mode.
- You have the following options:
Restriction Description Kiosk exit password Setup a local kiosk exit password which can be used to exit kiosk mode on the device.
Number of taps to display the popup to enter the exit passcode Enter the number of times the user must tap in quick succession to display the popup asking for the kiosk exit password.
The number of taps must be within the range of 5 to 15.Exit manually from kiosk mode while an app is open Check this option to allow exiting from kiosk mode when an app is open on the screen. A pop up requesting the exit password will appear after tapping on the blank part of the screen for the selected number of times.
Reboot and tap to exit from kiosk mode Check this option to let the user disable kiosk mode after reboot. Tap the screen for the selected number of times and give the exit password before the specified ‘Re-launch app –seconds after reboot’ time set. Relaunch app – seconds after reboot If ‘Reboot and tap to exit from kiosk mode’ is checked, specify the number of seconds after which the app launches itself in kiosk mode once the device is rebooted.
-
Using Global Exit Settings via Admin for Android
- Head onto the Admin > General Settings.
- The Exit Passcode is mentioned under Global Exit Settings (Android). This password is known as ‘global exit password’.
On the device end, tap the screen for as many times set under Number of taps to display the popup to enter the exit passcode. You can find this option under ‘Policies > New Policy > Kiosk Lockdown > Kiosk Exit Settings’. A pop-up is displayed where the user can enter the global exit password.
-
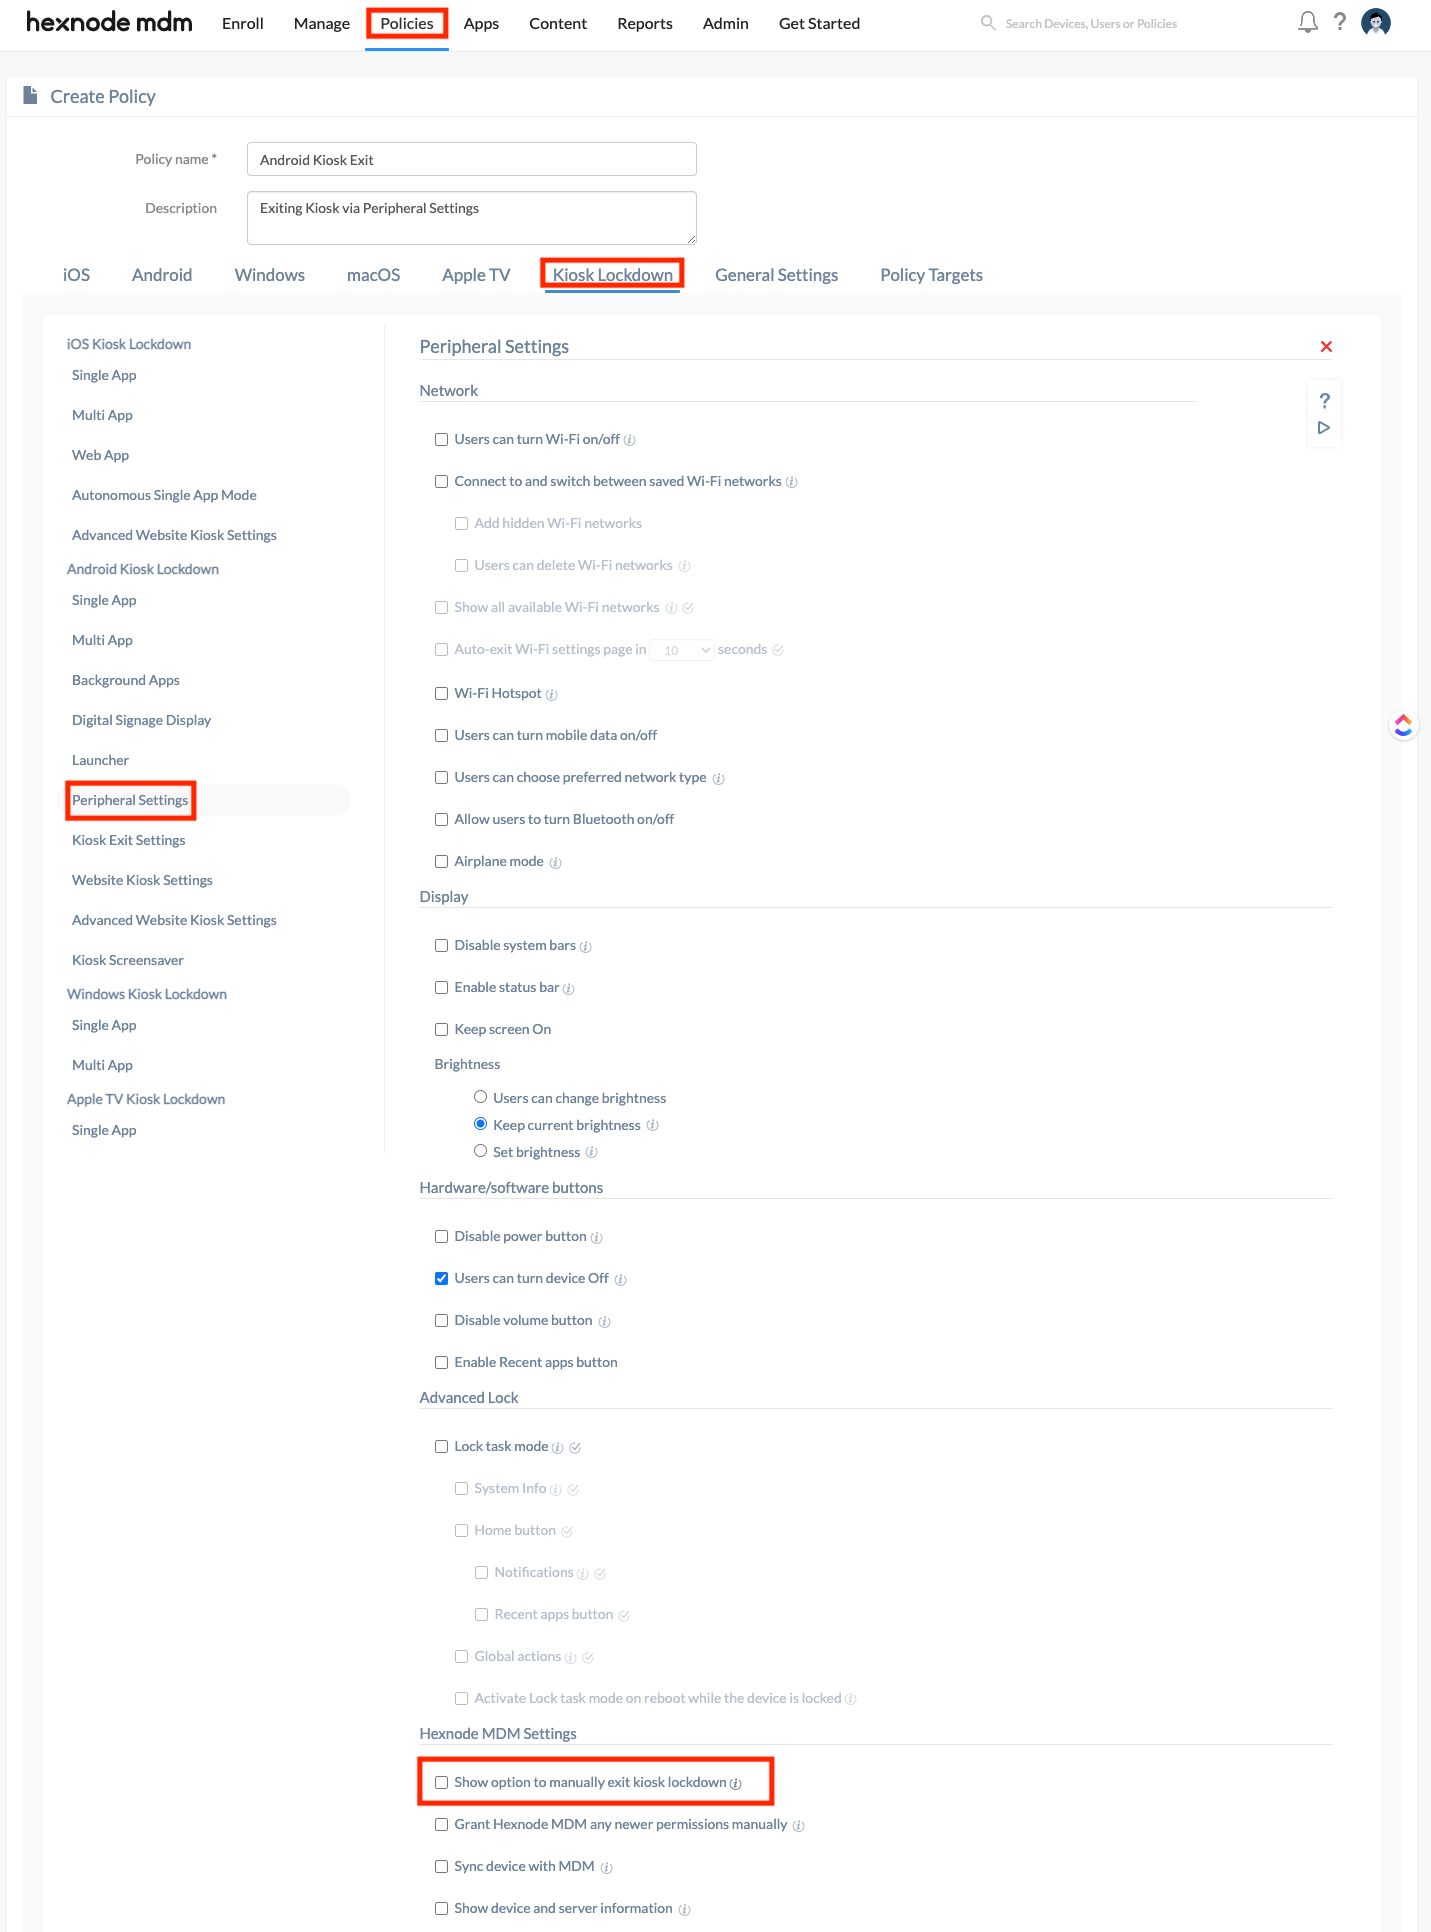
Exiting Kiosk Mode via Peripheral Settings
- If you’ve enabled ‘Show option to manually exit kiosk lockdown’ from ‘Kiosk Lockdown’ > ‘Peripheral Settings’ > ‘Hexnode UEM Settings’, an option will be available to enter the kiosk exit password. Use the password set under Admin > General Settings > Global Exit Settings (Android) or Kiosk Lockdown > Android Kiosk Lockdown > Kiosk Exit Settings.
If both local and global passwords are specified, use the local kiosk password defined via policies to exit kiosk mode.
- If you’ve enabled ‘Show option to manually exit kiosk lockdown’ from ‘Kiosk Lockdown’ > ‘Peripheral Settings’ > ‘Hexnode UEM Settings’, an option will be available to enter the kiosk exit password. Use the password set under Admin > General Settings > Global Exit Settings (Android) or Kiosk Lockdown > Android Kiosk Lockdown > Kiosk Exit Settings.