Linux Device Management 101
Tricky Linux hardware? Our Device Management 101 tutorial breaks down udev rules and the /dev filesystem into simple steps.
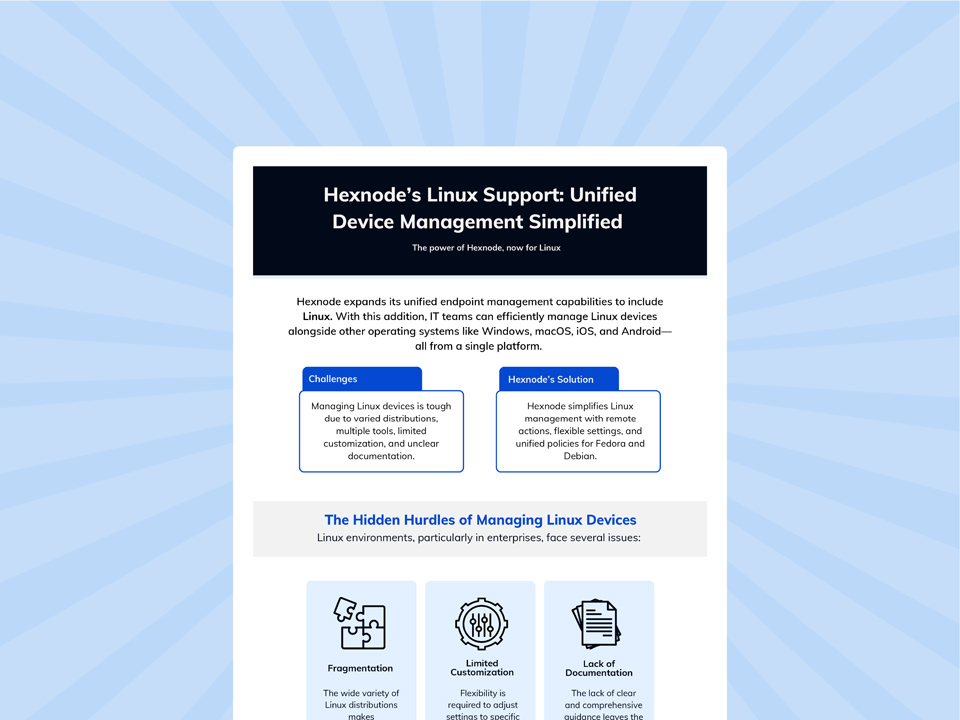
The post What is Linux kiosk mode & how to set it up? appeared first on Hexnode Blogs.
]]>That’s where Linux kiosk mode comes in. This blog explores how you can leverage Linux’s flexibility to create a secure, single-purpose environment that keeps users focused on exactly what you want them to access and nothing else.
By the end, you’ll not only know how to enable Linux kiosk mode, but also about how Hexnode assists in its setup, management and security while also optimizing it for reliability, security, and real-world usability.
At the core, Linux kiosk mode refers to configuring a Linux device, so it runs a single application, or a restricted set of applications, while ensuring users have a focused experience within a controlled environment. Unlike a generic locked-down interface or a system in secure mode, a Linux kiosk setup is intentionally minimal.
A kiosk device is a computing system configured to serve a single, well-defined purpose with a locked-down interface. When it comes to implementing kiosk mode, Linux has become a platform of choice. Its strengths lie in flexibility, low cost, and the fact that it’s open source.
Depending on the deployment environment, Linux kiosk mode can take several forms:
Like any deployment strategy, Linux as a kiosk terminal brings notable benefits and a few challenges:
Pros
Cons / Challenges
The many ways of Linux kiosk mode make it a natural fit across industries. From digital signage kiosks to secure testing terminals, organizations rely on Linux to deliver stable, locked-down environments that are lightweight yet customizable. Below are some of the real-world applications.
Linux-powered kiosks can run in single-app mode, looping browser-based content or signage software in full-screen. They’re widely adopted for:
Key Benefits: Lightweight OS, remote content updates, and minimal maintenance. This makes Linux digital signage kiosks highly scalable for enterprise environments.
A Linux kiosk setup can streamline customer interactions by powering POS systems, self-checkout counters, or ordering stations. Common deployments include:
Why Linux: Stable under heavy workloads, hardware-agnostic, and easy to customize for branding and workflows.
Hospitals and clinics implement Linux kiosks to improve patient service efficiency while maintaining compliance. Typical use cases:
Security Note: With the right lockdown policies, Linux kiosk mode can be hardened to align with HIPAA or local data compliance frameworks.
Academic institutions use Linux as a kiosk terminal to provide controlled access to educational tools. Examples include:
Why It Works: Restricts misuse, prevents distractions, and reduces IT maintenance overhead.
Enterprises leverage embedded Linux kiosks to display real-time data in workspaces or production floors. These include:
Advantage: Minimal overhead, fast boot, and automatic lockdown for continuous uptime.
Tourism boards and municipalities adopt Linux digital signage kiosks to help visitors navigate spaces. Examples:
UX Consideration: Linux enables full UI customization and multilingual support, improving accessibility.
In R&D and industrial labs, Linux single-app mode is often used to isolate testing systems. Applications include:
This ensures only designated apps run, minimizing risk of tampering or accidental interruptions.
Before diving into setup, a successful Linux kiosk mode implementation depends majorly on planning. From hardware selection to recovery strategies, each choice determines the kiosk’s reliability, performance, and security. Below are the critical factors to evaluate before deployment.
The foundation of a Linux kiosk setup begins with the right combination of hardware and operating system:
A well-designed kiosk environment minimizes user privileges and automates session handling:
At the heart of Linux single-app mode is the application users will interact with:
Network planning and lifecycle management are crucial for long-term kiosk reliability:
Resilience is key for unattended kiosks that must operate continuously:
Explore Hexnode's advanced capabilities for Linux endpoint management, focusing on how the platform delivers centralized security, configuration, and administrative control.
Download InfographicThis section covers two canonical options, a browser-based kiosk and a custom application kiosk, plus the system-level plumbing to build a fully locked-down Linux kiosk mode.
To note: The scripts below are templates. Adjust paths, user names, environment variables, and options for your Linux distro, display server (X11 / Wayland), and app requirements.
For modern desktops (Ubuntu, Fedora) running Wayland, the built-in single-application session method is preferred over custom Window Manager (WM) hacks as it’s more secure and resilient.
This method relies on setting up a custom session that runs a specific application instead of the full GNOME Shell.
1. Create a kiosk user:
sudo useradd -m -s /bin/bash kiosk
sudo passwd -d kiosk # Set passwordless login
2. Create the application desktop file:
File: /usr/share/applications/kiosk-app.desktop
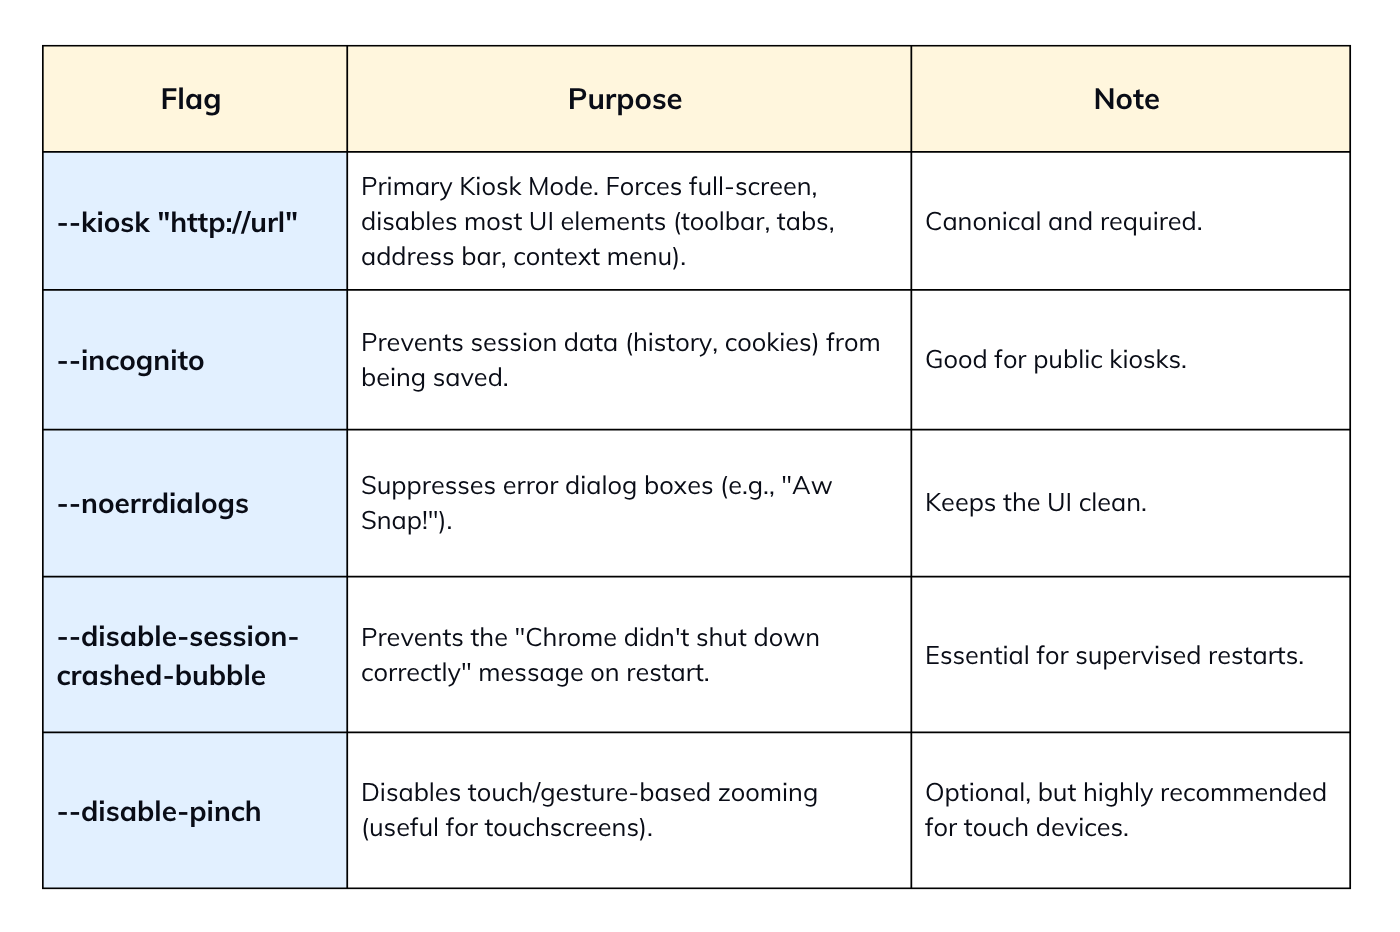
[Desktop Entry]
Name=Kiosk Application
Comment=Starts Chromium in Kiosk Mode
Exec=/usr/bin/chromium-browser --kiosk --incognito --noerrdialogs --disable-session-crashed-bubble http://your-url-here
Icon=chromium
Type=Application
Terminal=false
X-GNOME-WM-Class=kiosk-app
3. Create a custom session file:
This file tells the display manager (GDM/LightDM) to use the Kiosk Application instead of a standard session. File: /usr/share/xsessions/kiosk.desktop (for X11/Fallback) File: /usr/share/wayland-sessions/kiosk.desktop (for Wayland)
[Desktop Entry]
Name=Kiosk Mode Session
Comment=Kiosk mode running a single app
Exec=/home/kiosk/kiosk-wrapper.sh
Type=Application
DesktopNames=Kiosk
(Note: The Exec line points to a wrapper script to handle environment setup, similar to your original Openbox script, but without the X11 specific xset commands if using Wayland).
4. Configure GDM for auto-login:
File: /etc/gdm/custom.conf
#GDM autologin is usually configured in custom.conf
[daemon]
AutomaticLoginEnable=true
AutomaticLogin=kiosk
#Optionally, set the default session for the user
#Note: On many modern systems, the session is set in /var/lib/AccountsService/users/kiosk
For digital signage and web dashboards on Ubuntu Core or Server, Ubuntu Frame is a highly recommended, purpose-built, Wayland-based solution for running a single window full-screen.
1. Install Ubuntu frame and an application snap:
sudo snap install ubuntu-frame
# For a web kiosk:
sudo snap install wpe-webkit-mir-kiosk
# Connect the app to the frame
sudo snap connect wpe-webkit-mir-kiosk:wayland ubuntu-frame:wayland
2. Set the URL:
The app snap usually has a simple configuration to set the content.
sudo snap set wpe-webkit-mir-kiosk url='http://your-signage-url'
The following set of Chromium flags is current, robust, and supported.
The recommended way is to use a configuration drop-in file to avoid modifying the main /etc/lightdm/lightdm.conf.
File: /etc/lightdm/lightdm.conf.d/50-kiosk.conf
[Seat:*]
autologin-user=kiosk
autologin-user-timeout=0
user-session=openbox # Must match a name from /usr/share/xsessions/*.desktop
Explicitly note the path and the use of & for running the script non-blocking.
File: /home/kiosk/.config/openbox/autostart
#!/bin/sh
# Disable power management
xset s off &
xset s noblank &
xset -dpms &

# Launch your main script in the background
/home/kiosk/kiosk.sh &
The DontVTSwitch and DontZap options are valid, but must be presented as obfuscation and not as a security boundary.
File: /etc/X11/xorg.conf
Section "ServerFlags"
 # Prevents Ctrl+Alt+Backspace from killing the X server
 Option "DontZap" "true"
 # Prevents Ctrl+Alt+Fx from switching Virtual Terminals (TTYs)
 Option "DontVTSwitch" "true"
EndSection
For managed multi-app environments, using a minimal WM to launch a supervisor or using a commercial MDM/UEM solution is the secure approach.
This uses Openbox (or similar) to launch a simple, curated desktop environment you control (e.g., a custom task switcher or launcher application).
Setup Openbox/LightDM.
Modify /home/kiosk/.config/openbox/autostart to launch your supervisor app.
#!/bin/sh
# xset commands... (if needed)

# Launch a custom application that acts as a simple, full-screen menu/launcher
/usr/bin/my-kiosk-supervisor &
The my-kiosk-supervisor app must handle launching, switching, and relaunching the approved applications.
For enterprise security and policy management, a commercial solution is far more effective for multi-app control, as it uses an agent to enforce a strict allow-list and prevent process-level escapes.
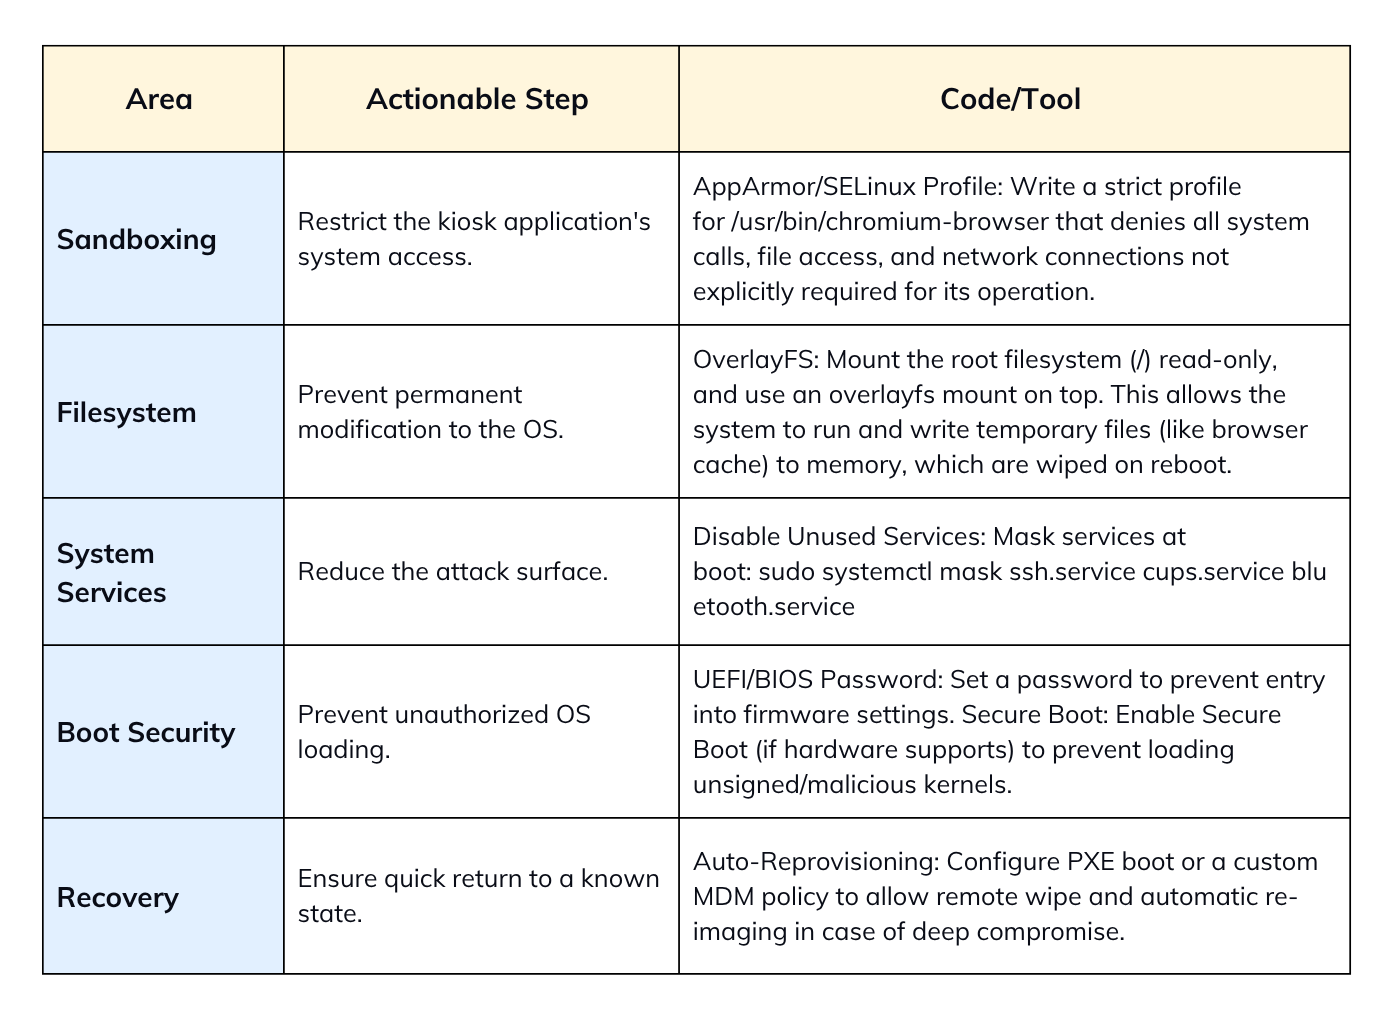
Security should focus on sandboxing and creating a read-only root filesystem.
systemd is the recommended baseline for launching and supervising the kiosk application due to its robust restart/monitoring capabilities.
File: /etc/systemd/system/kiosk-app.service
[Unit]
Description=Kiosk Application Service
After=network.target graphical.target


[Service]
Type=simple
User=kiosk
Environment=DISPLAY=:0
# Use the full path to your kiosk app/script
ExecStart=/home/kiosk/kiosk.sh
Restart=always
RestartSec=5
# Optional: Enable systemd watchdog for external health check
# Requires application to send sd_notify(WATCHDOG=1) signal,
# or use a check script combined with Type=simple (less effective).
# WatchdogSec=30s


[Install]
WantedBy=graphical.target
To activate:
sudo systemctl daemon-reload
sudo systemctl enable --now kiosk-app.service
Restart=always ensures that if the app process crashes, is manually killed, or exits (as in your loop-less GNOME setup), systemd will restart it automatically after RestartSec seconds.
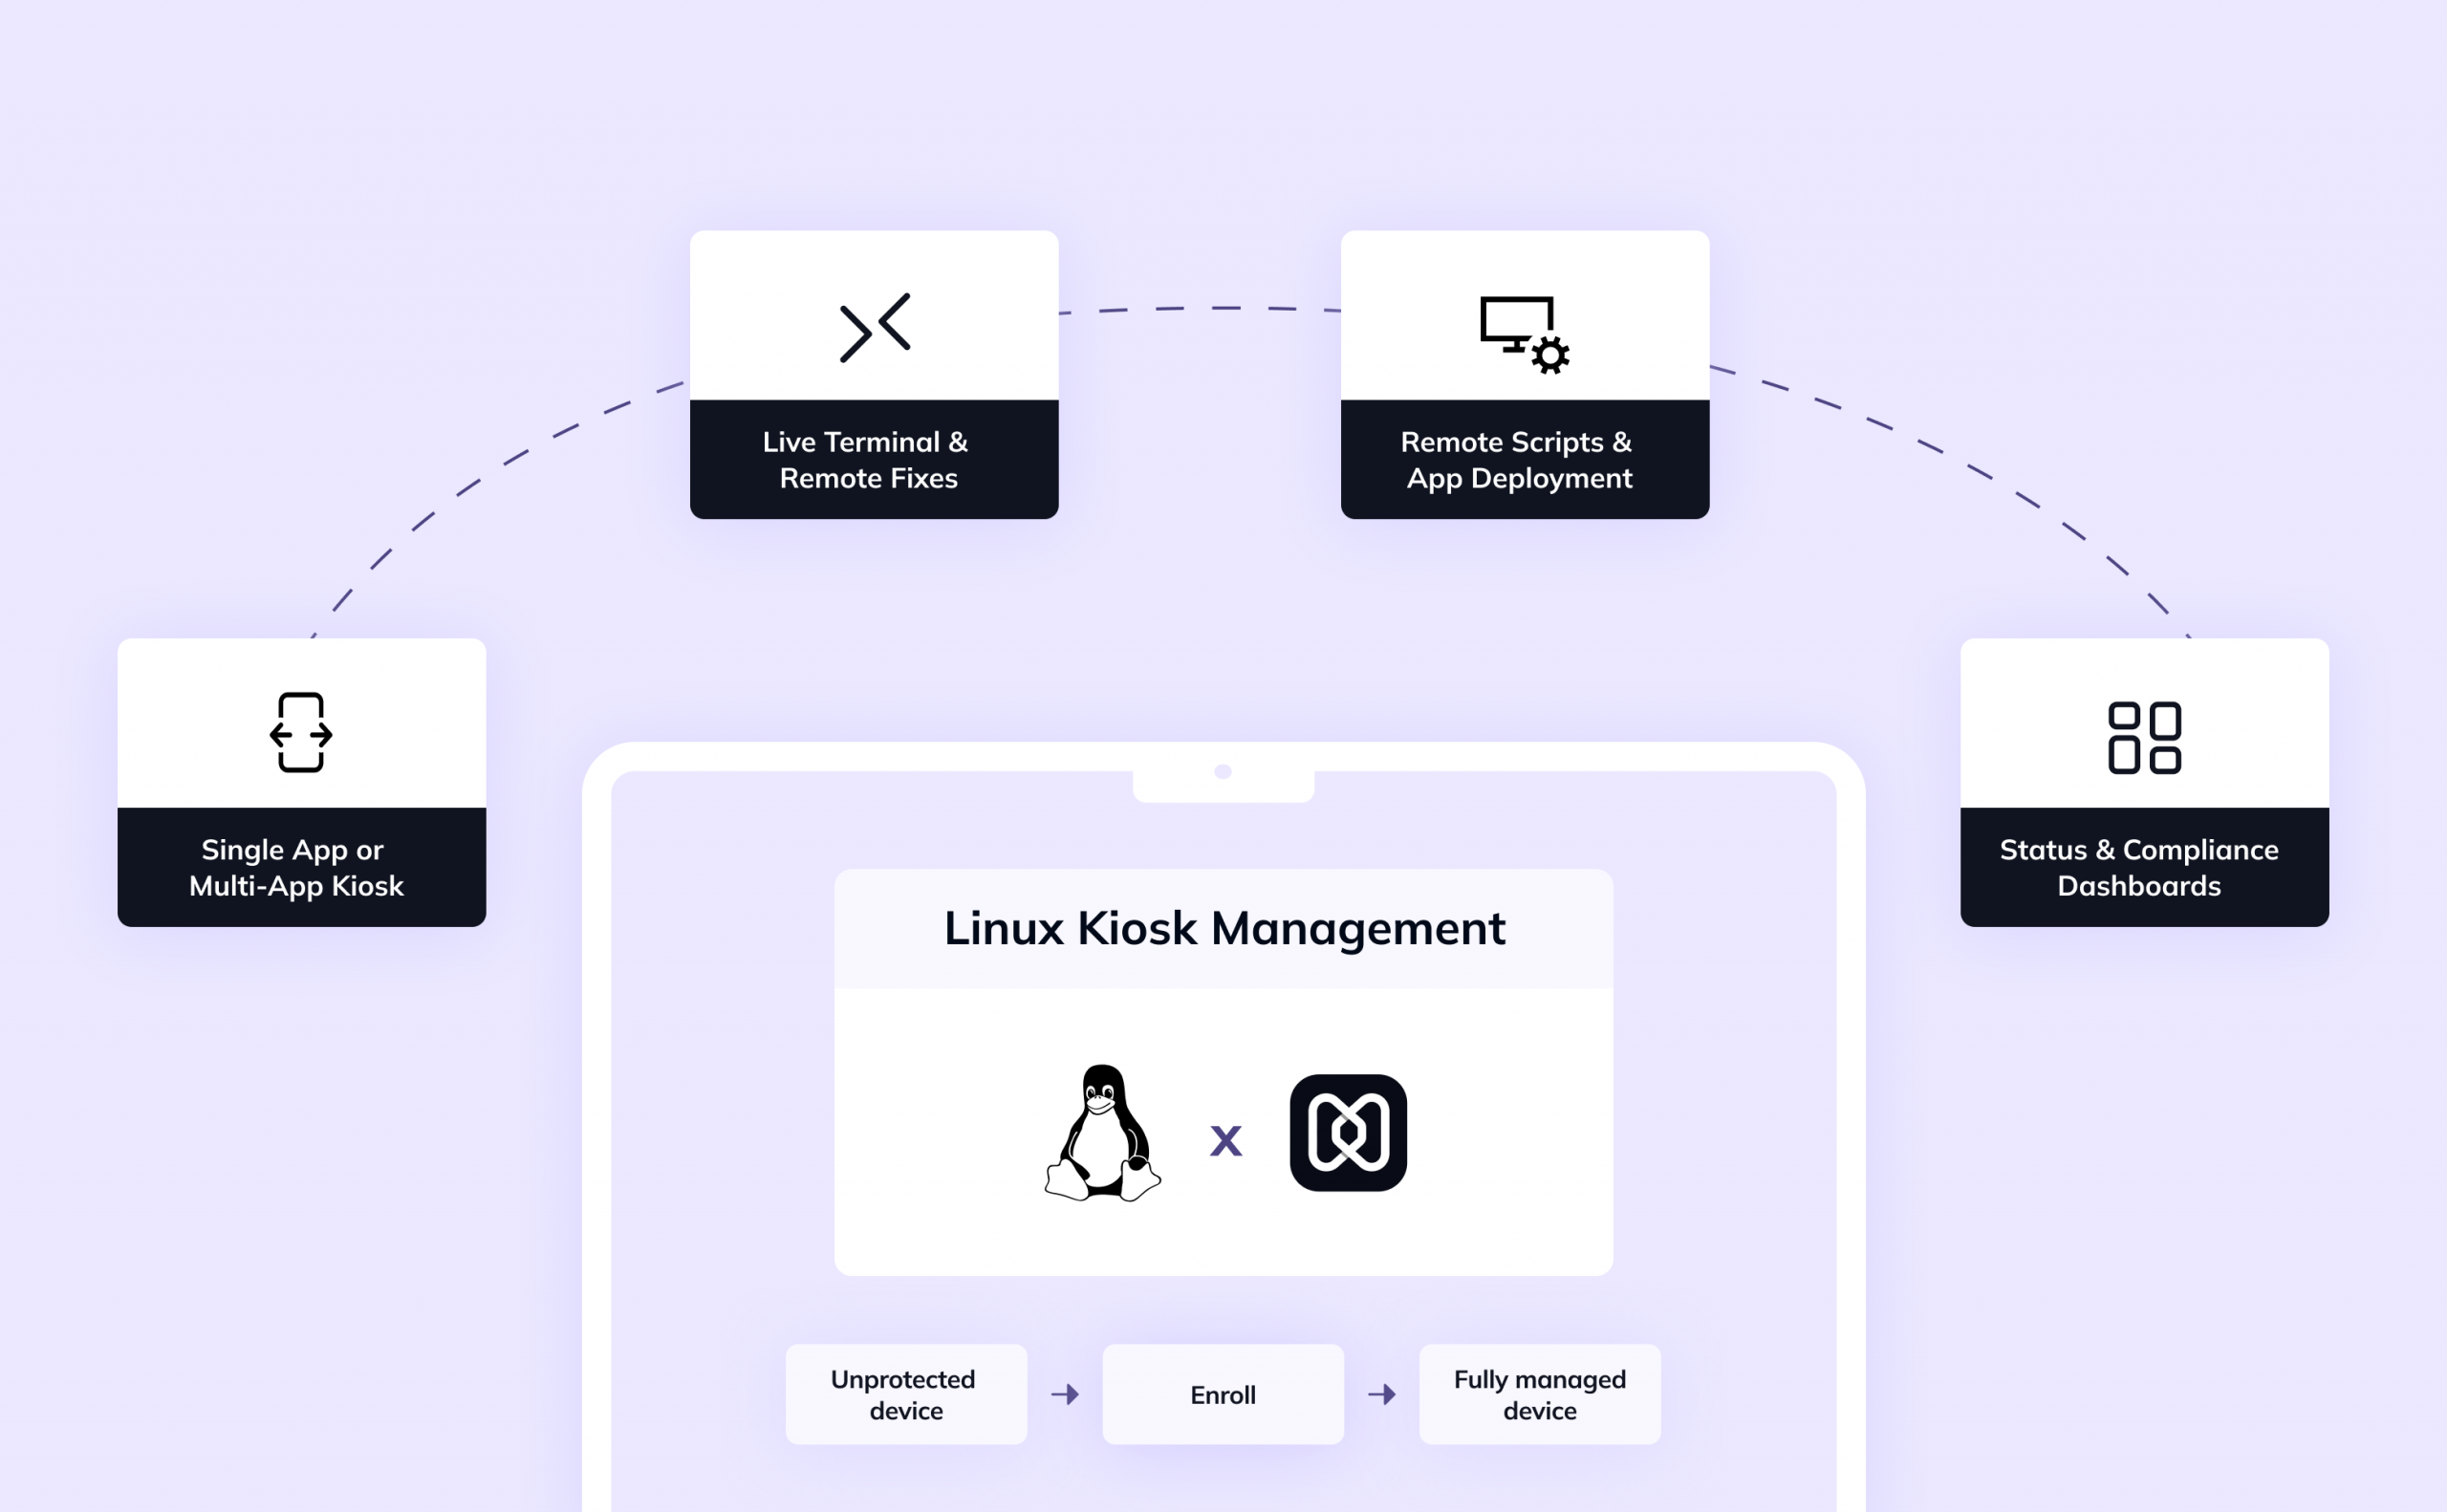
So, how you can leverage Hexnode to simplify your Linux kiosk lifecycle? Here’s how
While Hexnode has long supported kiosk lock-down for Android, iOS, and Windows, its Linux device complete kiosk management solution is increasingly robust.
Key capabilities include:
As of now, the primary mode for Linux kiosk support is single app mode configuring – a device to boot directly into one designated app (your kiosk mode) and preventing users from exiting it.
You must enroll your Linux devices into your Hexnode UEM environment, before you can manage kiosk mode:
After devices are enrolled, you can define a kiosk policy and apply it:
Once devices are managed, Hexnode offers a variety of remote tools:
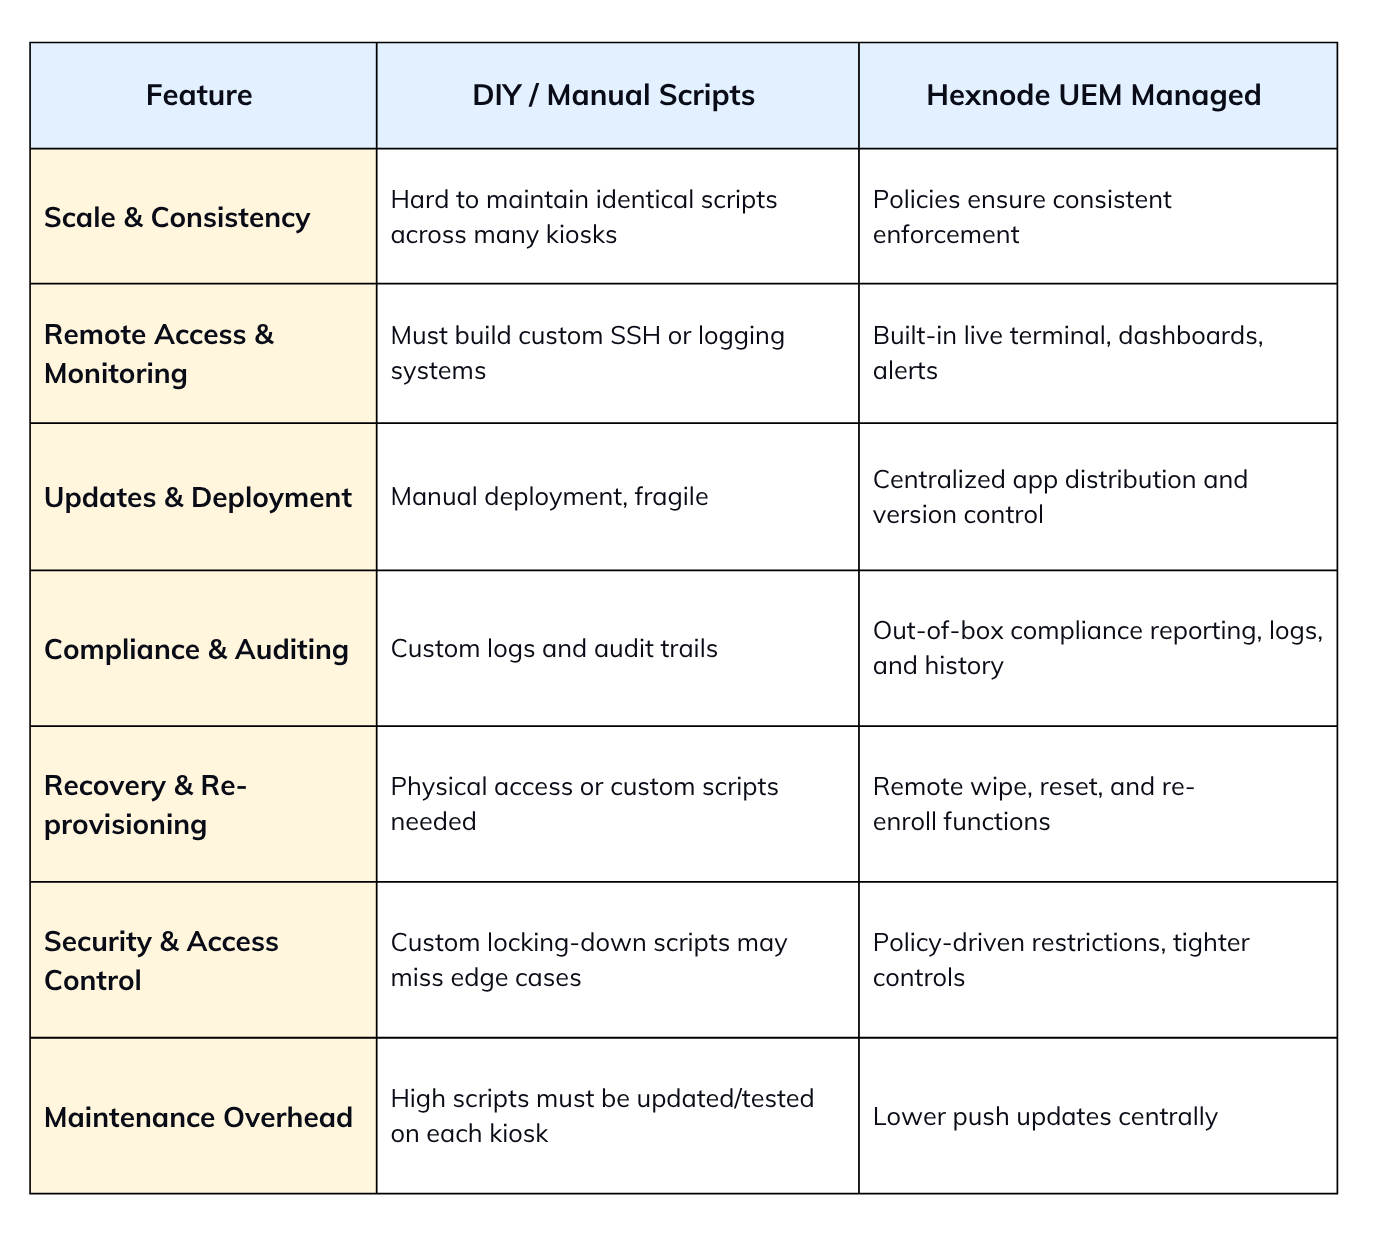
Adopting Hexnode for managing linux kiosk mode offers several advantages over a purely DIY, script-based approach:
With a good Linux kiosk setup present, the operational reliability depends on following a disciplined set of best practices. Skipping these steps often leads to avoidable downtime, security incidents, or excessive IT overhead.
Make the system accommodate only what’s necessary:
Plan for unavoidable failures:
The kiosk is as secure as its connectivity:
Visibility is much needed for uptime and compliance:
Kiosks shouldn’t crash when the network drops:
Even stable apps store memory usage over time:
Never push changes directly to production kiosks:
A kiosk is often exposed in public areas:
1. Can I exit the Linux kiosk mode?
Yes, you can but you’ll need admin control. Usually, users can’t exit due to locked hotkeys and restricted shells. Recovery is normally done through SSH, alternate TTYs, or editing startup scripts.
2. What happens if the app crashes in Linux kiosk mode?
Without safety measures, the screen may go blank or return to the desktop. Using systemd service unit configuration with Restart=always auto-restarts the app. Watchdog scripts also provide extra protection. Hexnode can enforce remote recovery.
3. Can I update the Linux kiosk app remotely?
Updates can be pushed through SSH scripts or package managers in DIY scenarios. Enterprises use UEM tools for remote app deployment.
4. Can I have multiple apps or switch between modes in Linux kiosk mode?
Linux kiosk mode is usually single-app, but multi-app kiosks are possible. A lightweight window manager can control switching securely. Hexnode profiles allow policy-based mode switching. Always ensure apps remain sandboxed.
5. Does Linux kiosk mode support touch / gestures?
Yes, if the hardware drivers are supported by the distro. Chromium, Qt, and GTK apps can handle touchscreen input natively. Kiosks often use touch for digital signage or POS. Optimize UI for gesture-friendly layouts.
6. Is Linux kiosk mode secure and tamper-proof?
It can be hardened, but no system is fully tamper-proof. Lock shells, disable hotkeys, and block unused ports. Use SELinux/AppArmor to sandbox apps. Combine with secure boot, firmware locks, and enclosures for strong protection.
Linux kiosk mode transforms a general-purpose Linux system into a locked-down, single-purpose terminal. Whether for digital signage, self-service kiosks, or enterprise dashboards, it provides a secure, minimal, and flexible environment.
If you’ve just begun, Hexnode offers a 14-day free trial for you to understand the product better. Once proven, increase gradually across your workspace and simplify policies like updates, monitoring, and compliance enforcement.
Ready to streamline your kiosk deployments? Try Hexnode’s free trial to see how easy it is to create, manage, and secure Linux kiosks at large.
1. Systemd Unit Configuration (Restart/Supervision):
Source: FreeDesktop.org – systemd.service man page
Source: Linux Kernel/Watchdog Documentation (For WatchdogSec context)
2. GNOME Kiosk Mode/Session Files:
Source: GNOME System Administration Guide – Single-Application Mode
3. Chromium Command Line Flags:
Source: Chromium Googlesource – Command Line Switches
4. LightDM Configuration (autologin):
Source: Ubuntu/Arch Linux LightDM Wiki Documentation
5. Xorg ServerFlags (DontZap, DontVTSwitch):
Source: X.Org Server Documentation (xorg.conf man page)
6. Ubuntu Frame Kiosk:
Source: Canonical/Ubuntu Frame Snap Documentation
Start your 14-day free trial now and see how easy it can be to manage your system!
Signup now!The post What is Linux kiosk mode & how to set it up? appeared first on Hexnode Blogs.
]]>The post What is Geo blocking? A Complete Guide for IT Admins & Enterprise Leaders appeared first on Hexnode Blogs.
]]>Geo-blocking is the practice of controlling access to digital content or services based on a user’s geographic location. While most people encounter it in consumer spaces, its role in the enterprise environment is far more strategic and important.
In organizations, geo-blocking directly works with SaaS access, device usability, and workforce productivity on the whole. IT teams can reduce cyberattacks, prevent unauthorized logins, and make sure the data is under residency laws, by restricting access to apps or systems from high-risk regions.
This feature functions by identifying a user’s physical location and then applying access rules based on that information. This detection process can use multiple data, each offering a different level of accuracy and reliability.
Once a system determines that a user falls outside the allowed region, restrictions are triggered. These include:
Organizations apply geo-blocking for several business, legal, and security reasons, each critical in today’s economy.
Content licensing and copyright protection – OTT platforms and digital publishers use geo-blocking for licensing agreements and copyright restrictions. This allows the content to be only available in regions where rights have been purchased or granted.
Market segmentation – Businesses use it to create a difference in pricing across regions. For example, a software product may cost less in developing markets than in mature economies, resulting in affordability with local purchasing power.
Regulatory compliance – This helps organizations comply with local data protection and digital regulations, such as GDPR, DMCA, or country-specific internet restrictions minimizing legal risks while maintaining operations in line with local governance.
Security enhancements – By restricting access from high-risk geographies, enterprises can reduce fraud attempts, block suspicious logins, and resolve cyberattacks.
The impact isn’t just created on what content users can see – it has actual consequences for both employees and IT teams managing enterprise devices.
Restricted access while traveling
Employees traveling for work may find essential services unavailable, impacting productivity and workflow continuity.
Increased use of VPNs and bypass tools
To navigate geo-restrictions, employees use VPNs, proxies, or Smart DNS services. These can introduce security risks and complicate device management for IT teams.
Blocked access to essential apps and tools
Geo-blocking may prevent employees from using collaboration platforms like Google Workspace, Microsoft Teams, or CRM systems in certain regions, directly affecting productivity, communication, and IT support efficiency.
App deployment and update challenges
Enterprise apps may be restricted by country-specific app stores, delaying updates or preventing access altogether.
Compliance and legal risk
Accidental access or exposure in restricted regions can violate local or international regulations, or even loss of software licenses.
Geofencing for Android: Maximize Productivity with Hexnode UEM
Executing geo-blocking at its entirety comes with several technical challenges that enterprises must consider:

Enterprises are looking at the new trends in the tech market that provide more flexibility and precise control over regional access, such as:
These trends show a shift from direct restrictions toward smarter, context-aware approaches that protect enterprise resources while enhancing the user experience.
Understanding geofencing just got a whole lot more fun. Explore dynamic location-based policy management insights. This infographic draws a truly insightful comparison.
Download InfographicControlling digital access, understanding its techniques and the associated enterprise risks are crucial for IT teams.
Common methods of bypassing
Enterprise risks of bypassing Geo-blocking
Effectively managing geo-blocking and these bypass risks requires policy awareness, and user education to maintain security without hindering productivity.
When centralized control and location-aware policies come together with UEM, this ensures security, compliance, and a seamless user experience across regions.
By combining these capabilities, organizations with UEM can mitigate geo-blocking challenges effectively while also not compromising on maintaining security and compliance.
In general, UEM platforms allow IT teams to enforce geo-blocking to ensure that corporate data and systems remain secure while maintaining operational flexibility. In addition to it, by integrating location-based controls, Hexnode allows organizations to manage devices and applications with precision.
By centralizing control through UEM, effective geo-blocking, security, compliance, and usability can be ensured across all endpoints.
1. Is it legal to bypass geo-blocking?
To bypass geo-blocking can be a legally complex concept. Some regions might allow the use of VPNs or other methods to access restricted content, but doing so may violate terms of service, copyright laws, or local regulations.
2. Is geo-blocking the same as geo-fencing?
Not necessarily. The two features differ with:
3. What are the benefits of geo-blocking?
Geo-blocking helps enterprises with:
4. What are geo-locked apps or geo-restricted apps?
Apps that are geo-locked or geo-restricted have their access limited to specific regions or countries. This restriction can majorly affect the app’s installation, functionality, or content availability, all of it depends on local licensing, regulatory requirements, or enterprise policies.
Geo-blocking was and will be a critical tool in the digital ecosystem. While it does provide essential control over your device and access to its content, the effectiveness predominantly depends on:
By utilizing UEM solutions, businesses can carry out geo-blocking intelligently, and in a dedicated manner of managing devices, applications, and user behaviour.
Explore how our UEM empowers you with robust location-based policies, security, and management. Start your 14-day free trial today.
Signup nowThe post What is Geo blocking? A Complete Guide for IT Admins & Enterprise Leaders appeared first on Hexnode Blogs.
]]>The post Preparing for DORA in 2026: How Financial Institutions Can Build Cyber Resilience with UEM + XDR appeared first on Hexnode Blogs.
]]>With 38% of firms targeting full compliance in 2026, the time for integrated action is now. Implementing a Zero Trust model by deploying the DORA-Baseline-Policy can be an actionable step in UEM. Operational resilience is no longer a cost of doing business; it is the business. Discover how our unified platform simplifies your entire ICT risk management framework.
The Digital Operational Resilience Act (DORA) is the EU’s critical mandate. It brings forth uniform rules for the Information and Communication Technology (ICT) resilience of the entire financial sector.
Hexnode UEM + XDR is uniquely delivering this compliance by unifying endpoint prevention and cross-layer threat detection into a single, proactive framework.
Started from January 17, 2025, the Digital Operational Resilience Act was enforced, impacting everything from banks and insurers to FinTech’s, payment providers, and critical third-party ICT service providers. DORA aims to ensure financial organizations can prevent, withstand, and recover from ICT-related disruptions through unified cyber resilience.
The urgency is undeniable due to threats where the average cost of a data breach in the financial industry has soared to $6.08 million. The risks are clear: escalating ransomware attacks, complex supply-chain vulnerabilities, and the growing threat of regulatory action. As the new mandate states, penalties can reach up to 2% of the total annual worldwide turnover for critical failures in risk management.
This is why proactive ICT risk management is key. Our thesis is that true DORA compliance and cyber resilience for banks requires moving beyond siloed security tools. Hexnode simplifies this complex undertaking by offering a unified console for both UEM and XDR, allowing security teams to manage policy compliance and respond to threats without switching platforms.

The Digital Operational Resilience Act is built on five core pillars, demanding a holistic, organization-wide approach to managing and responding to ICT-related risks. Compliance is a mandate to integrate preventative security controls (UEM) with proactive threat response capabilities (XDR) across all critical operations.
DORA shifts the regulatory focus from just ensuring financial stability to ensuring digital stability. The regulation is structured around five non-negotiable pillars that govern a firm’s entire ICT lifecycle and define modern financial cybersecurity:
In the age of digital dependence, resilience must be architected, not hoped for. This is the mandatory digital resilience culture DORA enforces.
For any financial institution operating in the EU, the Digital Operational Resilience Act translates into a complete overhaul of how ICT risk is governed and managed.
Hexnode’s UEM console acts as the single source for device compliance status, configuration management, and patching, which is essential for maintaining a strong cyber resilience for banks.
The Digital Operational Resilience Act passed in 2023, and full enforcement began on January 17, 2022. This leaves a crucial phase from 2024–2025 to completely restructure frameworks, conduct mandatory resilience testing, and evaluate vendor contracts.
Given that a recent survey found 55% of financial institutions globally are not prepared to meet DORA’s implementation deadline, urgency is paramount. Mapping all critical ICT systems and third-party vendors to DORA’s requirements includes deploying the pre-configured DORA ICT Vendor Vetting Profile straight from your Hexnode console, allowing you to automate essential vendor compliance checks.
Don’t wait for the deadline, read our next section to see how Hexnode UEM + XDR delivers tangible solutions for each DORA pillar today.
Stop guessing about compliance. Learn the critical steps your organization must take and how Unified Endpoint Management (UEM) is essential for automating controls, mitigating risks, and achieving continuous compliance across all endpoints.
DownloadAchieving DORA compliance is the foundation, but true operational continuity requires building proactive, continuous cyber resilience that withstands evolving threats.
Many institutions focus purely on regulatory boxes, viewing the DORA as just another compliance task. But, simply documenting risk frameworks and logging incidents does not prevent a breach.
The real danger lies in the average time to identify and contain a breach in the financial sector is a staggering 223 days. This gap shows that mere DORA compliance is not resilience. A breach of one critical vendor or unpatched endpoint can still trigger a cascading, multi-system disruption.
The proactive stance of moving beyond compliance to continuous resilience leads to improved customer trust, strengthened regulatory standing, and dramatically reduces breach recovery costs and downtime.
Crucially, a unified platform like Hexnode UEM + XDR enhances cross-department accountability for ICT risks, ensuring security teams and business leaders work from the same trusted data.
Hexnode’s unified console simplifies the journey to true cyber resilience for banks by allowing UEM and XDR data to trigger immediate, contextual responses, accelerating your MTTC and ensuring operational continuity.
Discover how we turn DORA requirements into a strategic business advantage.
The path to achieving DORA-aligned cyber resilience is often blocked by inherited ICT fragmentation, reliance on manual processes, and critical endpoint visibility gaps.
With organizations in the financial sector using an average of 110 security tools, the fragmentation is clear. Each vendor offers limited visibility, making the DORA requirement for unified oversight and holistic ICT risk management nearly impossible.
When an incident occurs, security teams waste critical minutes manually correlating data across disparate consoles, directly increasing incident dwell time and violating DORA’s swift recovery goals.
The Digital Operational Resilience Act demands continuous monitoring of ICT risks, a stark contrast to the static, yearly audits many firms still rely on.
Manual compliance processes, where device configurations and access controls are checked quarterly, leave the firm exposed for months. This lack of automated remediation and real-time posture assessment means incidents are only detected long after they begin, accelerating regulatory risk and preventing true DORA compliance.
Endpoint blind spots like unmanaged mobile devices, weakly configured workstations, and delayed patching schedule remain the leading breach vectors for financial cybersecurity. Without a dedicated UEM solution, compliance gaps proliferate, directly threatening cyber resilience for banks. You can instantly execute this discovery using the Execute-Inventory-Discovery command through the Hexnode console to eliminate blind spots and ensure every asset adheres to its security baseline.
The following section speaks of how a unified approach eliminates these risks.

Extended Detection and Response (XDR) is the critical technology layer that enables financial institutions to achieve DORA’s mandates for continuous threat detection, rapid response, and operational recovery.
The shift required by DORA compliance is a shift toward continuous detection. XDR is the engine for this change. It combines telemetry holistically across endpoints, networks, cloud environments, and identity layers. This unified data stream allows security teams to see the full attack chain, not just isolated events.
This comprehensive visibility directly satisfies DORA’s core requirement for continuous detection and incident reporting across the entire ICT framework.
XDR excels at immediate action and flawless documentation by centralizing investigation and automatically collecting crucial forensic evidence for regulatory reports. The speed is transformational: companies using XDR solutions have reported reducing their Mean Time to Respond (MTTR) by an average of 70%.
By automating the evidence collection process, Hexnode XDR ensures that the standardized reporting demanded by DORA’s ICT risk management pillars is instantaneous and comprehensive.
True cyber resilience for banks is measured by the ability to recover, not just the ability to protect. XDR dramatically strengthens resilience by offering immediate, automated containment capabilities.
The capacity for rapid isolation is fundamental to meeting DORA’s stringent business continuity standards, which prioritize the continuous availability of critical services.
Hexnode XDR is built directly upon the foundation of our UEM, ensuring that all policy configurations and device compliance data feed directly into the detection engine. This tight integration means your XDR response is always contextually aware of device state, drastically reducing false positives and accelerating your recovery efforts.
Our unified console provides the single pane of glass required for comprehensive financial cybersecurity oversight and simplified DORA compliance.
Learn exactly how our combined solution works in the next section.
UEM is a much-needed layer of prevention, guaranteeing that all devices accessing critical ICT systems meet DORA’s strict security and configuration requirements. Hexnode UEM automates the entire device lifecycle, providing the granular control necessary to enforce compliance across mobile, desktop, and IoT devices.
It’s the only way to eliminate the blind spots that threaten financial cybersecurity.
This level of automated documentation streamlines the audit process required for DORA compliance and proves the continuous nature of your security framework.
This foundational layer prepares your institution for full-spectrum cyber resilience for banks.
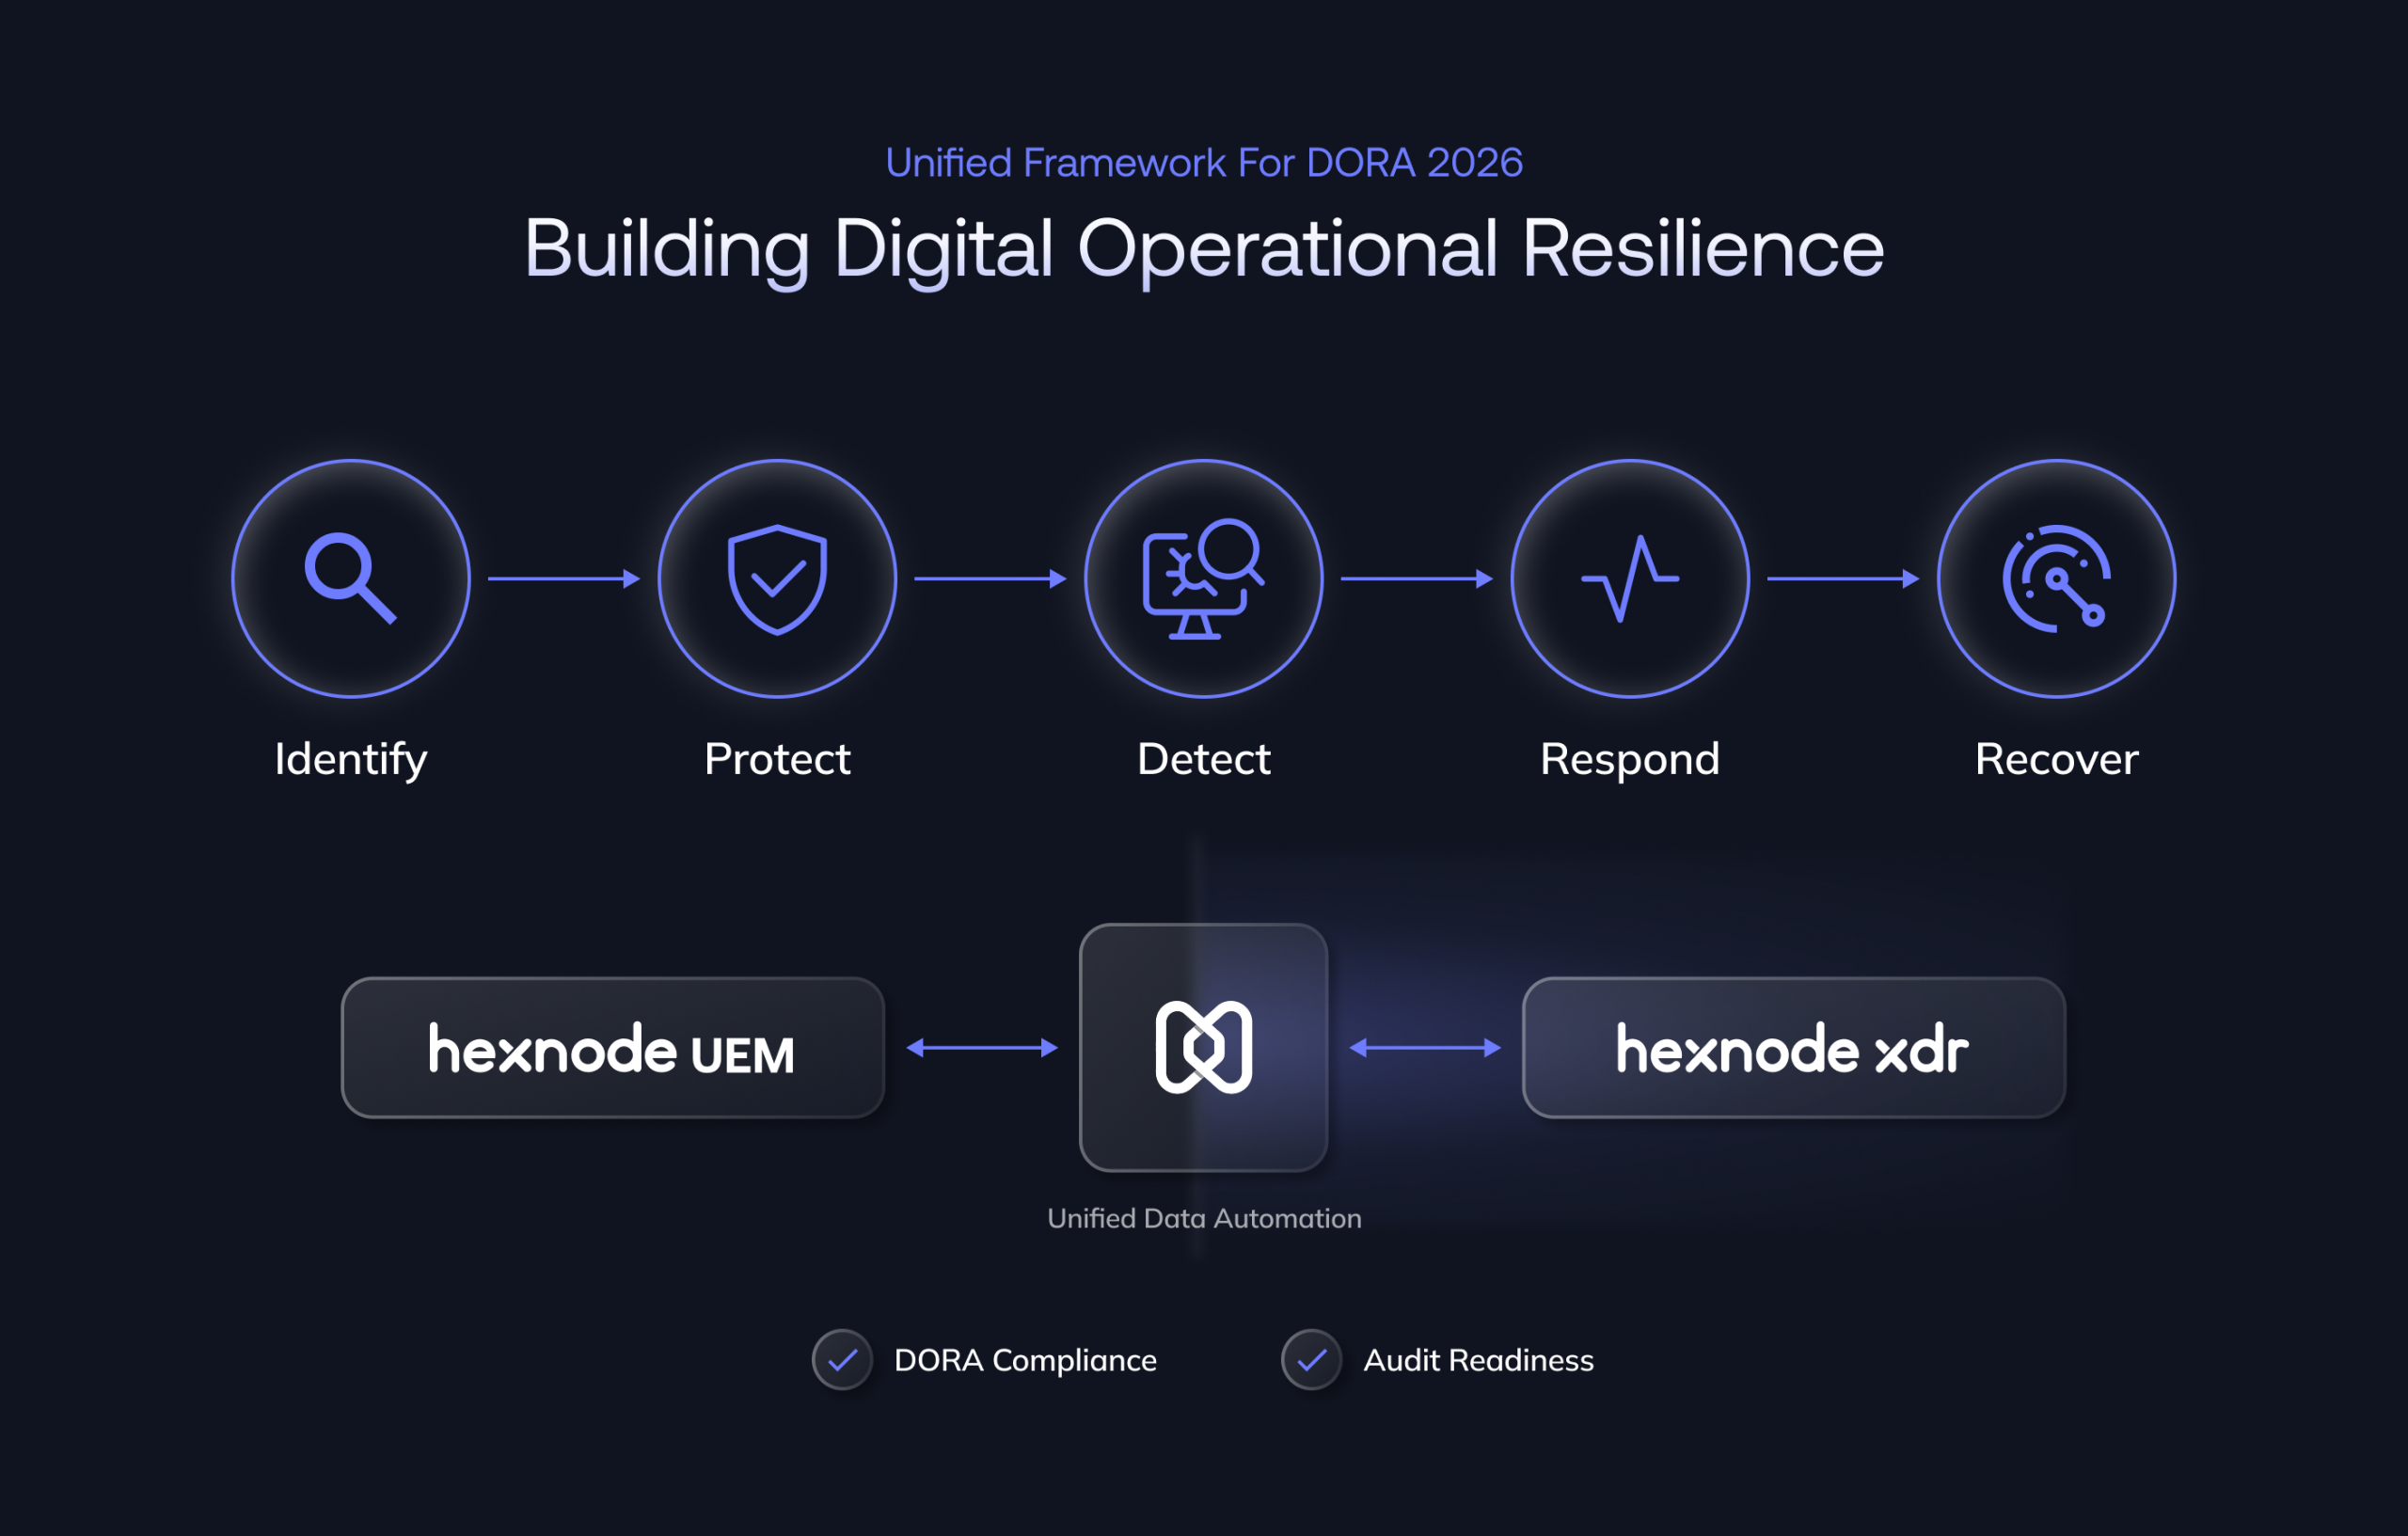
The most effective strategy for meeting the Digital Operational Resilience Act in 2026 is unifying prevention and response into one smooth, automated framework: Hexnode UEM + XDR.
DORA’s complexity demands simplification. Our unified solution provides the single pane of glass that regulators and SOC teams need for complete oversight. Hexnode UEM manages the Identify and Protect stages, confirming policy compliance, asset inventory, and configuration.
Hexnode XDR manages the Detect and Respond stages correlating threats across the infrastructure. This combined UEM + XDR dashboard eliminates the fragmented ICT environments, speeding up incident triage and ensuring centralized ICT risk management documentation.
Automation is the key to both cost efficiency and rapid resilience. Hexnode UEM enforces security and access policies. Hexnode XDR, however, continuously validates endpoint status against threats, reporting incidents aligned with DORA metrics. This powerful automation is financially critical: companies using security automation report a cost difference of $3.85 million less per data breach compared to those without.
The true measure of cyber resilience for banks is validated through testing. Hexnode fully supports Digital Operational Resilience Testing (DORT), fulfilling the requirement to validate your firm’s ability to withstand and recover from severe disruptions. This integration enables simulated breach testing, automated incident validation, and real-time policy updates.
By leveraging Hexnode UEM + XDR, you transition from simply preparing for DORA to building a resilient, future-proof financial institution.
Achieving DORA compliance requires adopting a lifecycle approach that seamlessly integrates the preventative control of UEM with the automated response capabilities of XDR.
Here are the critical steps financial institutions must take:
Implement automated, quarterly breach simulation tests across your most critical ICT functions. This unified approach drastically simplifies the journey to continuous DORA compliance.
The ultimate goal of DORA readiness is to prove operational resilience through measurable performance improvements. Hexnode UEM + XDR provides the unified metrics necessary to quantify this success and generate confidence across stakeholders.
Success in DORA compliance is measured in reduced risk and faster recovery. Our customers who unify their security stack see dramatic, quantifiable gains: integration of Hexnode XDR, for example, results in a 40% reduction in Mean Time to Detect (MTTD), a vital metric for DORA’s incident reporting pillar.
With improved cyber resilience for banks, you benefit from reduced potential downtime and quick recovery, securing improved stakeholder trust and regulatory standing. The Hexnode console centralizes all necessary evidence, resulting in high regulatory audit readiness.
Hexnode simplifies the proof of performance by aggregating all metrics into one view, generating a real-time DORA score visible in the DORA-Compliance-Confidence-Score dashboard.
The DORA is clearly changing the standard of financial cybersecurity, demanding continuous, verifiable operational resilience by January 2026. Hexnode UEM + XDR offers the industry’s most unified solution, bridging the gap between endpoint compliance and proactive cross-layer threat detection.
The 2026 deadline is almost here, and with some of the institutions still unprepared DORA marks a mandatory shift from isolated security products to a unified resilience framework.
Hexnode bridges the gap with UEM enforcing baseline compliance, implementing every asset to security policies, while XDR drives proactive detection and automated response across the entire infrastructure.
Prepare for DORA 2026 with Hexnode UEM + XDR by getting your demo now!
What is the Digital Operational Resilience Act (DORA)?
DORA is an EU regulation effective January 2026 requiring financial entities to strengthen ICT risk management, incident response, and third-party oversight to ensure operational continuity and cybersecurity resilience.
How do UEM and XDR help with DORA compliance?
UEM ensures device-level compliance, patching, and configuration control, while XDR provides unified detection, response, and reporting. Together, they help financial institutions meet DORA’s continuous monitoring, auditability, and recovery mandates.
Start securing your endpoints risk-free. No credit card required. Try Our 14-Day Free Trial!
Signup nowThe post Preparing for DORA in 2026: How Financial Institutions Can Build Cyber Resilience with UEM + XDR appeared first on Hexnode Blogs.
]]>The post How Companies Boost Productivity with IT Automation Using Hexnode appeared first on Hexnode Blogs.
]]>In this blog, we’ll delve into the various ways Hexnode enhances productivity within an organization.
Operational downtime doesn’t just stall business processes—it impacts revenue, disrupts workflows, and increases IT burden. Hexnode helps organizations pre-empt and resolve technical issues faster with a powerful set of remote troubleshooting tools.
Manual device setup can slow down onboarding and overwhelm IT teams—especially when managing devices at scale. Hexnode eliminates setup bottlenecks through automation-driven deployment processes.
The importance of workplace automation: Empowering enterprises for the future
Employee productivity often takes a hit due to digital distractions. Hexnode allows businesses to proactively define digital boundaries and reinforce focused work environments through policy automation.
Outdated systems are vulnerable to threats and operational hiccups. Yet, coordinating updates across hundreds or thousands of endpoints can be taxing. Hexnode automates this task, reducing admin workload and maintaining device integrity.
Access to the right tools shouldn’t be delayed by manual app installation or miscommunication. Hexnode makes app delivery streamlined with centralized management features.
IT processes when carried out manually, are susceptible to human errors. Hexnode automates such tasks through the following features:
Repetitive tasks often drain valuable time and resources, pulling focus away from strategic initiatives that drive business growth.
Hexnode minimizes repetitive work through:
Reducing operational costs involves more than cutting expenses—it’s about optimizing resources to generate greater value. With the right management tools in place, businesses can reduce waste and reinvest savings into core growth areas.
Hexnode supports cost optimization through:
Maintaining regulatory compliance and managing IT risks are vital for business continuity and reputation. Effective risk management combines clear policies, constant oversight, and proactive controls.
Hexnode reinforces compliance and security through:
In the digital era, data is a critical asset for decision-making. Hexnode transforms raw data into actionable insights that help organizations make smarter choices and refine their IT strategies.
Analytics and reporting tools include:
Bring Your Own Device (BYOD) programs improve employee experience by allowing individuals to work on their own devices—bringing comfort and familiarity to the workplace. But securing these devices without compromising usability is key.
Hexnode supports secure and employee-friendly BYOD experiences through:
As organizations grow, IT infrastructure must scale without adding complexity. Hexnode supports rapid expansion by offering scalable features including:
Customer Stories: What Our Users Say
Hexnode’s effectiveness is best showcased through the experiences of our customers. From educational institutions to global logistics companies and healthcare providers, organizations have leveraged our solution to streamline IT operations, enhance security, and drive productivity.
Here’s what they have to say:
To read more about how Hexnode has helped organizations achieve their goals, you can explore additional customer stories and case studies here.
Conclusion
Hexnode, a unified endpoint management (UEM) solution, automates IT processes to significantly boost productivity. It minimizes downtime with remote troubleshooting, accelerates deployment with zero-touch enrollment, and reduces distractions using features like Kiosk Mode and web filtering. The platform also automates app and OS updates, streamlines app distribution, and reduces human error through predefined policies. By providing centralized management and data-driven insights, Hexnode cuts costs and strengthens security, allowing organizations to scale operations efficiently while improving employee satisfaction.
Take control of IT automation and make it simpler with Hexnode UEM.
SIGN UP NOWThe post How Companies Boost Productivity with IT Automation Using Hexnode appeared first on Hexnode Blogs.
]]>The post How to manage FileVault recovery keys appeared first on Hexnode Blogs.
]]>File encryption is the process of converting data into a code to prevent unauthorized access. When a file is encrypted, its original content becomes unreadable gibberish unless decrypted using a key or password.
On macOS, FileVault is Apple’s native full-disk encryption tool. It uses XTS-AES-128 encryption with a 256-bit key to protect data stored on a Mac’s startup disk. The goal? Ensure that if a Mac falls into the wrong hands, its data remains indecipherable.
But encryption is a double-edged sword. If the password or decryption key is forgotten, even authorized users are locked out. To counter that, Apple provides the option to generate a recovery key—a kind of master password that can unlock the device if the user password is lost.
When FileVault is enabled, it encrypts the entire content of your disk. This means that the operating system, your documents, your applications—everything—is protected. The encryption kicks in the moment your Mac is turned off or restarted. When you log in, macOS uses your credentials to decrypt the disk on the fly, giving you seamless access.
In unmanaged devices, users can enable FileVault via System Settings > Privacy & Security > FileVault, but in organizations where hundreds or thousands of Macs are deployed, this needs to be automated—and that’s where MDM platforms like Hexnode come into play.
A FileVault Recovery Key (FRK) is a unique alphanumeric string created during the encryption process. It acts as a fallback method in case the main user password is forgotten. Think of it as a lifeboat for your data. Without it (or the password), your encrypted disk is practically unrecoverable.
Recovery keys are especially critical in enterprise environments where devices are shared or managed centrally. That’s why they must be properly created, securely stored, and—most importantly—easily accessible to authorized IT personnel if disaster strikes.
If you lose both your login credentials and the recovery key, there’s no way to access your encrypted data. That’s not just a personal inconvenience—it can be a business disaster.
From lost productivity and IT costs to regulatory penalties for data inaccessibility, the stakes are high. Properly managing recovery keys ensures business continuity, data recovery, and security compliance. And when recovery keys are involved, central management is the gold standard.
Hexnode UEM simplifies Mac management for growing businesses (SMBs/enterprises), securing devices for BYOD and remote work against unauthorized access.
Download the White paperFileVault offers three models of recovery key strategies:
Let’s break them down one by one.
Institutional Recovery Keys (IRKs) are typically used by organizations that prefer a centralized decryption method across all managed Macs. If a user forgets their login password, the IRK serves as a backup unlock method. To maintain security, the IRK certificate must be password-protected and securely managed. One key benefit of this approach is that if the original key becomes inaccessible or damaged, a new certificate-based key can be downloaded again from the MDM portal, ensuring continued access without compromising control.
How it works
The Institutional Recovery Key approach is designed for organizations that require a common key to decrypt all their devices. In this model:
This ensures that only someone with the matching private key can decrypt and access the recovery key.
Decrypting with an Institutional Recovery Key
When recovery is needed (e.g., an employee forgets their password), the IT admin:
Benefits and best use cases
But be warned—if the private key is lost or compromised, all dependent recovery keys are useless or at risk.
Personal Recovery Keys (PRKs) are unique alphanumeric codes generated during the FileVault encryption process. Each PRK is specific to the individual Mac it’s created for and is displayed to the user before encryption begins. Since it isn’t automatically stored by macOS, it’s crucial for users to record it safely. However, with solutions like Hexnode, you can securely escrow the PRK during deployment—allowing IT administrators to retrieve it later in case the key is lost, ensuring recoverability.
How it works
The Personal Recovery Key is a unique key created per device. Unlike the IRK, this is:
Hexnode can escrow this key automatically, storing it in a secure location where admins can retrieve it later.
Decrypting with a Personal Recovery Key
If a user forgets their login credentials:
Benefits and best use cases
However, users might fail to store their PRK securely, so MDM-based key escrow becomes essential.
How it works
Why choose one when you can have both?
This is the recommended method. In this method, an institutional recovery key as well as a personal recovery key will be generated for the user. The advantage of this method is that, in the event of your personal recovery key being lost, you can still use the institutional recovery to decrypt your device.
In this hybrid model:
This gives IT admins two lifelines:
Decrypting with both
Benefits and best use cases
This method reflects the highest standard of data protection—especially when paired with strong key lifecycle management.
Android Device Encryption vs iOS Device Encryption: A Comprehensive Comparison
Escrowing refers to the secure storage of personal recovery keys in a trusted location. This is critical in organizations because:
When FileVault is enabled via Hexnode’s policy, the PRK is generated silently during encryption and Hexnode automatically captures the PRK and stores it securely within the portal.
Conclusion
FileVault is one of the most powerful tools in Apple’s security arsenal—but only when paired with robust recovery key management. Whether you’re overseeing ten devices or ten thousand, losing access to a single encrypted Mac can mean losing critical data, incurring costly downtime, or worse—facing compliance violations.
MDM solutions like Hexnode are essential for this reason. With Hexnode, you can:
In short, Hexnode makes the complexity of FileVault recovery key management not just manageable—but effortless.
So lock your digital vaults tight—but never lose the key.
Simplify FileVault key management. Try Hexnode's powerful MDM solution to securely store and manage your recovery keys.
SIGN UP NOWThe post How to manage FileVault recovery keys appeared first on Hexnode Blogs.
]]>The post Mobile App Security: Zero Trust with Hexnode UEM & Quokka appeared first on Hexnode Blogs.
]]>Enterprises have invested heavily in device management, using platforms like Hexnode UEM to secure configurations, apply policies, and enforce compliance. But management isn’t security.
Historically, Mobile Threat Defense (MTD) solutions have been the primary tool for securing mobile endpoints. But MTD focuses on device-level security, missing the larger, application-specific risks that modern enterprises face.
Mobile app vetting is the proactive, app-centric approach that goes beyond malware detection to evaluate security, privacy, and compliance risks at the source. While both mobile app vetting and MTD solutions are generally integrated with UEM solutions, their deployment methods, scalability, and impact on security differ greatly.
MTD solutions typically focus on detecting known malware, network anomalies, and device vulnerabilities. While these are important, relying solely on MTD exposes several gaps in mobile security:
The core difference lies in their philosophy: vetting is about prevention, while MTD is about detection and response. By vetting apps before they are ever installed, an organization eliminates the risk of a malicious or risky app gaining access to sensitive data in the first place. MTD, by contrast, relies on its ability to detect a threat once it’s already on the device, which may be too late. A clever piece of malware could exfiltrate data before the MTD solution even flags it.
App stores like Google Play and Apple’s App Store have made significant strides in keeping out blatantly malicious apps. However, they are less effective at flagging apps with risky but not overtly malicious behavior, such as those that leak data, request excessive permissions, or connect to insecure backend servers. MTD often cannot identify more subtle threats such as:
MTD requires an on-device agent to monitor device behavior, consuming device resources like battery and processing power. End users are often resistant to MTD apps because of this battery consumption as well as privacy concerns. End user friction and concerns make large-scale deployments a challenge. When end user concerns aren’t an issue, the on-device agent typically requires a registration, which frequently fails and makes the deployment fragile. This reliance on an on-device agent also drives up the Total Cost of Ownership (TCO) through constant troubleshooting, deployment failures, and device performance complaints.
Traditional MTD reacts to threats. Mobile app vetting is proactive, analyzing and monitoring apps to detect flaws, privacy violations, and malicious behavior before they become incidents. Quokka brings this capability to life with Q-scout. Q-scout offers continuous mobile app vetting, seamless UEM integration, and actionable insights — at half the cost of most MTD solutions.
A critical component of modern security is visibility into the application supply chain. Mobile App Vetting is the only way to proactively address this. It involves deep analysis of the application’s components, including third-party SDKs and libraries, via the Software Bill of Materials (SBOM). By identifying and assessing these hidden risks before the app is deployed, organizations eliminate the threat at the source, which is crucial for modern risk management.
Key Benefits of Mobile App Vetting:
Quokka and Hexnode have partnered to deliver an integrated mobile security solution, uniting UEM control with real-time mobile app vetting.
| Feature | Quokka + Hexnode Value-Add |
|---|---|
| App Risk Scoring & Continuous Trust Assessment | Quokka Q-scout delivers a dynamic, data-driven risk score for every app. This score is instantly synced to Hexnode, providing the continuous trust signal needed for real-time Zero Trust policy decisions. |
| Closed-Loop Conditional Access | When Quokka identifies a high-risk app, Hexnode automatically enforces a Conditional Access policy. This instantly blocks the user’s access to corporate resources (like email or VPN) until the risk is remediated, enabling immediate, automated risk response. |
| Agentless, Zero-Disruption Deployment | The entire intelligence layer operates off-device by analyzing the app repository. This eliminates MTD-related user friction (battery drain, privacy pushback) and allows organizations to scale security across all devices instantly. |
| SBOM-Powered Patch Prioritization | Quokka generates the app’s SBOM to pinpoint vulnerable third-party libraries. Hexnode’s App Management features efficiently replace the entire vulnerable app by deploying a non-vulnerable version of the app (old or new) to affected devices, streamlining IT resources and focusing patch efforts. |
| Compliance-Ready Risk Mapping | Ensures findings and enforcement actions align instantly with key regulatory frameworks, including NIST Zero Trust, GDPR, HIPAA, and MASVS. |
Together, Hexnode and Quokka enable security teams to manage and secure both devices and the apps that run on them, creating true end-to-end protection and acting as a critical enforcement point for your Zero Trust strategy across the mobile ecosystem.
This combined solution helps enterprises:
By combining Hexnode’s device management with Quokka’s continuous app risk monitoring, organizations can strengthen and scale mobile security without added complexity. Visit the Quokka Q-scout listing in the Hexnode Marketplace to learn more about the integration.
1. How does Hexnode enforce a policy block without an on-device mobile agent?
Quokka’s intelligence is synced to the Hexnode UEM console via an API. Hexnode uses its existing management framework—such as Conditional Access policies enforced at the network or application layer (e.g., controlling access to Exchange or Microsoft 365)—to block resource access based on the risk score provided by Quokka. No new mobile agent is needed; the enforcement leverages Hexnode’s core UEM capabilities.
2. Is Quokka Q-scout available for both iOS and Android apps?
Yes, Quokka provides comprehensive app vetting and analysis for applications across both the iOS and Android ecosystems, ensuring unified mobile security coverage regardless of the device platform used in the enterprise.
Quokka is a mobile security company trusted by the Fortune 500 and governments worldwide to reduce mobile attack surfaces. Formerly known as Kryptowire, the company was founded in 2011 and is the first and now longest-standing mobile app security solution for the US Federal Government. To learn more, visit https://www.quokka.io/.
Integrate Quokka intelligence with Hexnode UEM to instantly enforce Zero Trust Conditional Access against risky apps.
Start Your Free Hexnode Trial!The post Mobile App Security: Zero Trust with Hexnode UEM & Quokka appeared first on Hexnode Blogs.
]]>The post Geofencing for Android: Maximize Productivity with Hexnode UEM appeared first on Hexnode Blogs.
]]>This blog explores the power of geofencing for Android devices and shows you how to leverage it to your advantage, especially with a powerful Unified Endpoint Management (UEM) solution like Hexnode.
Geofencing is a location-based technology that uses GPS, Wi-Fi, or cellular data to create a virtual perimeter, or “geofence,” around a real-world geographical area. When a mobile device enters or exits this pre-defined area, it triggers a pre-programmed action.
Think of it as an invisible fence for your devices. You can set up a geofence around your office building, a remote worksite, or even a specific event venue. The moment a device crosses this virtual line, it can automatically enforce a set of rules or send out an alert.
Geofencing isn’t just a cool gimmick; it’s a powerful tool with practical applications for businesses. Here’s how you can use it to your advantage on Android devices:
Security is a top priority for any organization. Geofencing can help you enforce security policies automatically. For example, you can set a rule that:
Geofencing can help streamline work processes and improve efficiency for your mobile workforce.
Businesses with a large number of company-owned devices, such as tablets used in retail stores or rugged phones on a construction site, can use geofencing to manage their assets more effectively.
While Android devices have native geofencing capabilities for developers, managing these on a large scale for an entire fleet of devices requires a dedicated UEM solution. Hexnode offers a robust and easy-to-use geofencing feature that takes the complexity out of the process.
By integrating geofencing with a powerful UEM platform like Hexnode, you gain a new level of control, security, and automation for your Android device fleet. It’s a game-changer for businesses looking to maximize productivity and protect their data in a modern work environment.
Automate security, enforce policies, and track corporate devices based on location. Start Android Geofencing with Hexnode.
SIGN UP NOWThe post Geofencing for Android: Maximize Productivity with Hexnode UEM appeared first on Hexnode Blogs.
]]>The post The Definitive Guide to Kiosk Management and Strategy (2025 Edition) appeared first on Hexnode Blogs.
]]>Kiosk Management is the comprehensive process of centrally provisioning, securing, monitoring, and maintaining a fleet of dedicated-purpose computing devices (kiosks). A Unified Endpoint Management (UEM) solution achieves this by locking the device down to a specific set of authorized applications and functions. This process prevents user tampering, ensures data compliance (like HIPAA and GDPR), and allows for remote troubleshooting across diverse operating systems like Android, iOS, and Windows.
The landscape of retail, healthcare, hospitality, and public services has been fundamentally reshaped by the proliferation of dedicated-purpose computing devices. What began as simple, single-function terminals has evolved into complex, internet-connected endpoints—the modern kiosk. Managing this ever-growing, diverse fleet requires a strategy far more robust than legacy desktop management, giving rise to the modern practice of Kiosk Management.
In 2025, Kiosk Management has moved decisively beyond merely implementing a simple “app lockdown” feature. Today, it is a critical, multi-faceted discipline focused on several key areas:
The global self-service revolution is the primary driver behind the demand for sophisticated Kiosk Management solutions. The shift toward self-service solutions has been phenomenal across numerous sectors:
The complexity of managing this diverse ecosystem is why Unified Endpoint Management (UEM) platforms, such as Hexnode, have become indispensable. A UEM solution is designed to eliminate the fragmentation of using multiple, single-purpose tools for different device types.
By centralizing control into a single, intuitive console, UEM allows organizations to:
The sheer scale and security requirements of modern kiosk deployments make a UEM platform a foundational technology, ensuring consistency and compliance at speed.
Effectively managing a kiosk fleet requires a clear understanding of its foundational components and the architecture that binds them together. A kiosk is not just a piece of hardware; it is a stack of interdependent technologies, all of which must be managed cohesively.
The ecosystem can be segmented into three distinct, yet interconnected, layers:

Learn to overcome security risks, avoid manual errors, and master a 3-step strategy for your business with Ultimate Guide to Kiosk Management.
Download the White paperDeploying a fleet of kiosks at scale is a significant logistical challenge. Modern UEM solutions leverage Zero-Touch Provisioning mechanisms to automate the enrollment and initial setup, significantly cutting down deployment time and reducing manual errors.
Key automated enrollment methods include:
By utilizing these automated pipelines, IT teams can ship devices directly to the installation site, where they are ready for use immediately upon power-on, ensuring a rapid, secure, and consistent fleet rollout.
The power of Unified Endpoint Management lies in its ability to abstract the complexities of managing different operating systems (OSes) while preserving the platform-specific lockdown features each OS offers. Below is an overview of the most common kiosk platforms and their dedicated management requirements.
Platform Comparison Table
| OS | Primary Use Cases | Deep-Dive Link (Spoke Page) |
| Android | Retail Self-Checkout, Healthcare Check-in, Public Information Terminals | What is Android kiosk mode? |
| iOS/iPadOS | Point-of-Sale (POS) Terminals, Exhibitions, Corporate Meeting Room Schedulers | |
| Windows | Enterprise Public PCs, ATMs, Gaming/Casino Terminals, Specialized Industrial Control | What is Windows kiosk mode? |
| macOS | High-Stakes Testing, Creative/Design Workstations, Corporate Reception Desks | How to set up macOS Kiosk Mode |
| Linux | Industrial Control Systems, Custom Embedded Kiosks, Raspberry Pi Digital Signage | Linux Kiosk Mode: A Complete Guide |
| Chrome OS | Education/Testing Devices, Digital Signage, Simple Web-Based Kiosks | ChromeOS Kiosk Mode: A Business Guide |
| Apple TV | Digital Signage, Meeting Room Displays | |
| Android TV | Digital Signage |
Android TV kiosk mode: The quick way to set up Android TV for remotely managed digital signage |
| Fire OS | Digital Signage |
Android is the dominant OS in the custom kiosk and self-service market due to its immense ecosystem. Because Android runs on everything from inexpensive consumer tablets to specialized ruggedized terminals, businesses can select the exact hardware tier that fits their budget and environment.
Modern Android Kiosk Mode turns these standard devices into dedicated endpoints. By leveraging the operating system’s native management frameworks, a UEM solution can restrict a device to a single application (Single-App Mode) or a secure, interactive dashboard of select apps (Multi-App Mode).
Key Management Capabilities:
The 10 best Android kiosk software for businesses of all sizes
iPads are highly popular for aesthetically driven, high-traffic applications like POS systems and museum exhibits, leveraging the hardware’s reliability and polished user interface.
Windows kiosk remains the standard for specialized industrial, governmental, and high-computation kiosks like ATMs, complex public information points, and healthcare diagnostic systems.
While less common for public-facing kiosks, macOS is critical for dedicated-use cases requiring high-performance applications, such as secure testing environments, creative studios, or corporate registration desks.
Due to its open-source, lightweight, and cost-effective nature, Linux is a powerful choice for custom-built kiosks, industrial controls, and large-scale digital signage.
Chrome OS is gaining traction for education, quick-service retail, and digital signage due to its simplicity, speed, and inherent security.
Chrome OS Kiosk Mode is a feature managed via the Google Admin Console and integrated UEM, allowing a device to launch a single, specified application (often a web app or a dedicated digital signage player) immediately upon booting, bypassing the standard login screen.
While often overlooked, these smaller, dedicated OS platforms are essential for enterprise Digital Signage deployments. Kiosk management extends to these devices by enabling Single App Mode (e.g., locking an Apple TV to a digital signage app or a meeting room display), ensuring the device is solely used for its intended corporate purpose and preventing user access to the OS settings or unauthorized content streaming.
The leap from managing a handful of kiosks to deploying a global fleet of thousands requires a mature, end-to-end strategic framework. The focus must shift from manual configuration to scalable automation, which is the core strength of UEM.
A successful enterprise rollout is broken down into a structured, six-step process, with automation at its core:
Before purchasing hardware, IT and business units must collaborate to answer critical questions:
The functional requirements directly dictate the hardware choice. A rugged, industrial tablet for a factory floor has vastly different needs than an iPad POS for a boutique retail store. Selection must also consider peripherals (card readers, receipt printers, barcode scanners) and their OS compatibility.
How to Choose the Best Android Tablet for Kiosks: Key Features, Tips, and Top Picks
This is the most critical step for scaling. Instead of a technician manually touching each device, the UEM platform automates the initial setup:
With the UEM in control, the device is secured against unauthorized use:
The kiosk must be on-brand and intuitive. UEM solutions enable:
Post-deployment, UEM is the central hub for ongoing operations:
Maximizing efficiency: Tips for choosing the best iOS kiosk device
The requirements of a kiosk are highly dependent on its operating environment and the regulatory demands of its industry. Specialized management ensures compliance, optimal performance, and target-specific functionality.
In these sectors, kiosks are directly linked to revenue, customer satisfaction, and operational efficiency.
The primary concern in healthcare kiosks is the security and privacy of sensitive patient data, governed by strict regulations.
These environments require durable, multi-user devices that can switch function rapidly and securely.
Kiosks are often not stationary but are ruggedized tablets used by technicians, logistics teams, or warehouse staff.
Security and compliance are the most critical responsibilities of modern kiosk management. Unlike corporate laptops, kiosks are designed to be unsupervised, making them a unique and vulnerable point of attack—the Unattended Attack Surface.
The public accessibility of kiosks exposes them to unique threats, including:
A robust UEM counteracts these threats by enforcing a permanent lockdown state, disabling all non-essential hardware functions, and providing real-time alerts for any unauthorized activity.
For any kiosk that handles user input (e.g., check-in forms, web browsing), securing session data is paramount.
What is a web-based kiosk and how can it help your business ?
Zero Trust, a security model based on the principle of “never trust, always verify,” is the gold standard for enterprise kiosk fleets. Applying this framework means:
UEM plays a central role in achieving and maintaining compliance with major regulatory frameworks:
Effective kiosk management is data-driven. The UEM’s reporting capabilities turn raw data into actionable business intelligence, linking IT operations directly to business ROI.
The kiosk is rapidly evolving from a static terminal to a dynamic, intelligent, and highly personalized endpoint. Tomorrow’s Kiosk Management must incorporate new trends in AI, accessibility, and corporate social responsibility (CSR).
Artificial Intelligence (AI) and Machine Learning (ML) are set to revolutionize both the kiosk user experience and its management.
As kiosks become ubiquitous in public spaces, adherence to accessibility standards is transitioning from a regulatory burden to a mandatory design principle.
Modern enterprise strategies now incorporate environmental considerations into technology deployment.
Ultimately, advanced kiosk management justifies its cost by demonstrating clear ROI. UEM features directly reduce operational costs by:
The complexity of today’s multi-OS, globally distributed kiosk fleets demand a single, powerful, and flexible management solution. Hexnode is engineered specifically to meet this modern challenge, establishing itself as a leader in Unified Kiosk Management.
Key Differentiators
Hexnode provides the depth of control necessary for enterprise-level deployments, with key features that set it apart:
Success Stories
Hexnode’s platform is trusted by organizations across highly regulated and high-volume sectors to power their self-service revolution:
What is kiosk management software?
Kiosk management software is a Unified Endpoint Management (UEM) or Mobile Device Management (MDM) solution used to centrally secure, monitor, and configure dedicated-purpose devices (kiosks) across various operating systems like Android, iOS, and Windows. It acts as the central control plane for large, distributed fleets.
How do I put a device into kiosk mode?
Kiosk mode is typically enabled remotely using a UEM platform like Hexnode. The administrator applies configuration profiles (e.g., Single-App Mode on iOS, Assigned Access on Windows) to lockdown the device to a curated whitelist of authorized applications and functions only, preventing the end-user from accessing the underlying operating system.
Is kiosk mode secure for public use?
Yes, modern kiosk mode is highly secure, provided it is managed by an enterprise UEM. It prevents user tampering and “breakout” attempts, restricts web access via a secure Kiosk Browser, and enables IT to remotely lock, wipe, or enforce mandatory security patches on the device if it is stolen or compromised, protecting both corporate data and public users.
Can kiosk devices run offline?
Yes, many kiosk applications (especially native apps) and management policies can function offline once they have been initially deployed by the UEM. However, remote updates, real-time monitoring, security logging, and web-based kiosk applications require active network connectivity (Wi-Fi or cellular) to maintain security and deliver current content.
What is the difference between single-app and multi-app kiosk mode?
Single-app kiosk mode locks the device to one application only (e.g., a self-checkout POS terminal or a specific digital signage app), making it a true dedicated-purpose device. Multi-app kiosk mode allows access to a curated, limited whitelist of 2-10 approved applications, providing limited functionality (e.g., a public library workstation with a browser, a PDF viewer, and a utility app).
Kiosk Mode
A configuration setting that locks down a computing device to run only a single, predetermined application or a limited selection of authorized applications, preventing user access to the underlying operating system and system settings.
Kiosk Browser
A specialized, highly restricted web browser deployed by a UEM that limits user navigation to a whitelist of approved URLs, disables features like address bars, downloads, and pop-ups, and automatically clears the session data upon logout or inactivity.
Kiosk Launcher
A custom-designed user interface that replaces the default home screen or desktop of a device in Multi-App Kiosk Mode. It displays only the whitelisted applications in a branded, simple, and tamper-proof layout.
Assigned Access
Microsoft’s built-in Windows feature that allows an administrator to lock a standard user account to run only a single Universal Windows Platform (UWP) app in a locked-down, dedicated kiosk environment.
Zero-Touch Enrollment
An automated, out-of-box method (such as Apple DEP or Android Zero-touch) for bulk provisioning new corporate devices. The device automatically enrolls into the UEM and applies all pre-configured policies immediately upon first boot and network connection, eliminating manual setup.
Guided Access
A native iOS/iPadOS accessibility feature that locally locks a device to a single application by triple-clicking the Home/Side button. While a basic form of lockdown, it is generally not suitable for enterprise-scale remote Kiosk Management, which requires Supervised Mode via UEM.
Remote Wipe
A critical security command executed from the UEM console that permanently deletes all data (or just corporate data) on a lost, stolen, or decommissioned device, ensuring sensitive information does not fall into the wrong hands.
Ready to scale? Simplify kiosk management with Hexnode's powerful, multi-OS UEM solution. Secure your fleet today.
SIGN UP NOWThe post The Definitive Guide to Kiosk Management and Strategy (2025 Edition) appeared first on Hexnode Blogs.
]]>The post Hexnode Teams with NENASAL to Bring Advanced Endpoint Management to European Businesses appeared first on Hexnode Blogs.
]]>With the European Union’s (EU) stringent regulatory frameworks such as NIS2 and GDPR, organizations are increasingly required to adopt endpoint management solutions to ensure data security and compliance. Reflecting this trend, Germany’s Enterprise Mobility Management (EMM) market is projected to reach $3.8 billion by 2033.
In response to this growing demand, Hexnode and NENASAL will equip DACH enterprises with advanced endpoint management solutions, helping them bolster security, maintain compliance, and seamlessly adapt to the evolving digital ecosystem.
“At NENASAL, we aim to make technology work for people, not the other way around. With Hexnode, we provide a secure and seamless way to manage devices, so businesses can stay safe and move forward with confidence.”
– Neven Savanovic, CEO, NENASAL
Hexnode’s UEM platform offers organisations with a centralized console to manage and secure endpoints across multiple operating systems. With features such as Patch Management, Application Management, Remote Monitoring, and AI-driven Automation, Hexnode helps businesses streamline IT operations while maintaining a strong security posture.
Beyond traditional endpoint management services, Hexnode also delivers specialised solutions such as Kiosk Management, BYOD Management and Rugged Device Management, enabling enterprises to optimise productivity and implement security strategies tailored to modern business environments.
“At Hexnode, our mission has always been to simplify endpoint management for businesses of all sizes. Partnering with Nenasal allows us to bring our solutions closer to enterprises in the DACH region, helping them navigate complex compliance requirements and security challenges with ease. Together, we’re committed to delivering intuitive, reliable, and scalable tools that empower IT teams and enhance the everyday experience of users across the organization.”
– Tim Bell, VP Sales (EMEA & APJ), Hexnode
This partnership reflects a shared commitment to innovation and excellence in endpoint management. Together, Hexnode and NENASAL aim to set a new benchmark for IT solutions, delivering exceptional value to their customers.
NENASAL supports businesses by making technology easier, safer, and more effective. We create custom software designed around specific client needs, develop e-commerce solutions that help companies grow online, and strengthen cybersecurity to keep sensitive data protected. By delivering these services in a simple and reliable way, we take the technical burden off our clients so they can focus on developing their business with trust and confidence.
Hexnode, the enterprise software division of Mitsogo, is a leading provider of endpoint solutions that streamlines management and security. Hexnode UEM provides powerful, autonomous, and AI-powered endpoint management, while Hexnode XDR features proactive threat detection and response. Empowering businesses in over 130 countries, Hexnode continues to build a seamless ecosystem of connected tools, one software at a time.
The post Hexnode Teams with NENASAL to Bring Advanced Endpoint Management to European Businesses appeared first on Hexnode Blogs.
]]>The post The Ultimate Guide to XDR (Extended Detection and Response) appeared first on Hexnode Blogs.
]]>
XDR takes the core capabilities of EDR and expands them across your entire infrastructure. Instead of just seeing the endpoint, it unifies security data from all your sources – endpoints, network, cloud, and identity into one platform. This allows it to correlate “weak signals” from different tools to find complex attacks, drastically reducing alert fatigue and allowing you to automate your response to stop threats in minutes, not days.
Modern cyberattacks are sophisticated and don’t stay in one place. An attack that starts with a phishing email can quickly move to a user’s workstation, spread to a server, and begin exfiltrating data before your team even sees the first alert.
The core problem for most IT teams is that their security tools operate in silos.
Your firewall, your identity provider, your cloud security tools, and even your EDR (Endpoint Detection and Response) all work separately.
This siloed approach creates critical issues.
This is where XDR (Extended Detection and Response) comes in.
It provides one comprehensive view of threats and, crucially, enables automated responses to stop attacks faster.
In this guide, we will cover everything you need to know about XDR, from its core components and architecture to the practical steps for implementing it in your organization.
The global XDR market is projected to grow from $2.12 billion in 2024 to $2.81 billion in 2025, a compound annual growth rate (CAGR) of 32.3%. (Source: The Business Research Company, 2024)
XDR stands for Extended Detection and Response. It is a cybersecurity platform that unifies security data from multiple sources – such as endpoints, networks, cloud workloads, and email into a single console.
Think of it as the next logical step up from Endpoint Detection and Response (EDR). While EDR focuses only on your endpoints (laptops, servers), XDR gives you a much wider view of your entire IT environment.
Let’s break down the name:
At its core, XDR works by collecting and connecting data from all your security tools, analyzing that data to find real threats, and giving you the tools to respond quickly.
The workflow is straightforward and can be broken down into three main steps:
An XDR platform’s first job is to pull in telemetry (data logs) from all your separate security layers. Instead of having to check five different dashboards, XDR centralizes the data for analysis.
Key data sources (its core components) include:
Endpoints: Data from your EDR solution (laptops, servers, workstations).
Network: Data from firewalls, network sensors (NDR), and VPNs.
Cloud: Data from your cloud workloads (AWS, Azure, GCP) and critical SaaS apps.
Identity: Data from identity providers like Active Directory, Azure AD, or Okta (who logged in, from where, and when).
Email Security: Data from your email gateways to detect phishing and malware delivery.
This is the “brain” of the XDR platform. An XDR doesn’t just store logs like a traditional SIEM (Security Information and Event Management) tool.
It uses artificial intelligence (AI) and machine learning (ML) to automatically stitch together “weak signals” from all those different sources to find a “strong threat.”
Here is a practical example:
1. An alert from your email gateway (a user received a phishing email).
2. A log from your identity provider (that same user clicked the link).
3. An alert from your endpoint (a malicious file was downloaded to their laptop).
4. A log from your firewall (that laptop is now connecting to a known command-and-control server).
Individually, these might be seen as low-priority alerts. The XDR platform correlates all four events into one single, high-fidelity incident for your team to investigate.
Instead of a list of confusing logs, the XDR platform presents the entire incident as a unified “story” or timeline. You can see the full chain of events in one interface.
This allows your team to stop guessing and start responding. XDR provides built-in tools and “playbooks” (automated workflows) to take immediate action from that same console.
Common response actions include:

Struggling to define the right security posture? This white paper provides a step-by-step guide to adopting a strategy that scales with your organization.
Download White paperAdopting XDR provides a distinct set of features (capabilities) that deliver tangible, real-world results (benefits) for an IT team.
The average cost of an insider threat incident rose to $16.2 million per organization in 2023, with CISA highlighting this in an August 2024 report. (Source: CISA / Kings Research, 2024)
This is one of the most common questions IT teams have. The easiest way to think about it is that XDR is the logical evolution of EDR.
EDR (Endpoint Detection and Response) is a foundational and critical tool. It’s your “security guard” specifically for your endpoints. It does an excellent job of monitoring what happens on those devices, such as file changes, running processes, and registry modifications.
The problem is that a real-world attack never stays on just one endpoint. Attackers move laterally across your network, attempt to access cloud storage, compromise user credentials, and use email to spread.
An EDR-only solution is blind to all that activity. It might see a malicious process on a laptop, but it can’t see the phishing email where it came from, the network connection it’s using to communicate, or the cloud server it’s trying to steal data from.
XDR includes EDR as one of its most important components. It starts with the rich, high-fidelity data from your endpoints and then adds context from all your other security layers:
By combining these, XDR can trace the entire attack chain.
Here’s a simple analogy:
If EDR is a security camera pointed at your front door, XDR is the central command center. It links that front door camera with all the other cameras (back door, hallways, network), and it also gives you the controls to lock all the doors and windows from one place.
This is another critical distinction. While XDR and SIEM (Security Information and Event Management) both deal with security data, they have different primary goals and are built for different jobs.
A SIEM’s primary job is aggregation and storage.
An XDR’s primary job is correlation for active threat detection and response.
In a 2024 survey, 43% of IT security leaders named XDR as the top technology they were planning to combine with their SIEM, showing a clear drive to use XDR’s correlation engine to fix the “alert fatigue” problem. (Source: 451 Research, 2024)
The Big Question: “Can XDR replace SIEM?”
The answer depends on your organization’s needs.
For many small to mid-sized businesses (SMBs): Yes. XDR can often serve as the primary, all-in-one platform for threat detection and response. It provides a simpler, more cost-effective, and less resource-intensive solution than a full-blown SIEM.
For large enterprises: They often work together. In this model, the XDR platform acts as the high-fidelity detection and response engine. It finds and confirms real threats, then sends those high-quality, correlated alerts to the SIEM. The SIEM is then used for what it does best: long-term log retention, organization-wide compliance reporting, and big-picture data archiving.
This is a simple but crucial distinction that often causes confusion. The difference is between a tool and a service.
XDR (Extended Detection and Response): This is the technology platform. It’s the software, the single-pane-of-glass console, and the analytics engine that your team buys, implements, and (usually) manages in-house. You are responsible for monitoring the alerts and taking action.
MDR (Managed Detection and Response): This is a human-led service. It’s an outsourced 24/7/365 Security Operations Center (SOC) that you hire. You are paying for a team of external experts to monitor your security, investigate alerts, and respond to threats on your behalf.
How They Relate
The two are not mutually exclusive; they are closely related.
An MDR provider uses a technology platform to deliver its service, and that platform is often an XDR (or EDR) solution.
When you buy XDR, you are buying the tool. When you buy MDR, you are buying the outcome (security monitoring and response) delivered by people using a tool.
This is another area of overlap, as both XDR and SOAR are heavily involved in automation. The key difference is in their primary purpose and architecture.
A SOAR platform is a tool specifically designed to act as the “connective glue” between all your different, separate security products.
Its main job is to automate complex workflows (called “playbooks”) that involve multiple systems. It doesn’t generate its own alerts; it takes alerts from other tools (like your SIEM or EDR) and then takes action.
Here is a classic SOAR playbook example:
“When the EDR tool reports a threat, automatically query the firewall for the source IP, tell the firewall to block that IP, tell Active Directory to disable the user, and then open a ticket in ServiceNow.”
A modern XDR platform has SOAR-like capabilities built-in.
The critical difference is that XDR is already natively integrated with its core data sources (endpoint, network, cloud, etc.). Because it’s an all-in-one platform, it doesn’t need a separate “glue” layer to connect its own components.
It can run automated playbooks across its own integrated systems (like “isolate this endpoint” and “block this user”) as part of its core-A function, often without the complexity of a standalone SOAR tool.
The Bottom Line
This leads to a simple summary:
XDR is a complete platform that provides the high-fidelity detections and the built-in automation to respond to those detections.
A standalone SOAR is a “bring your own detections” automation engine. It is a pure orchestration layer that relies on other tools (like a SIEM or EDR) to feed it alerts, which it then automates a response for.
As you evaluate XDR platforms, you will find they generally fall into two categories. The one you choose depends on your current security tools and vendor strategy.
This is a single-vendor approach. You buy your EDR, firewall, email security, and other components all from the same provider.
Pro: The integration between these tools is extremely tight and works “out-of-the-box.” It’s a simple, all-in-one solution.
Con: This leads to vendor lock-in. You might be forced to use a “weaker” product (like a vendor’s less-mature email security) just to get the full XDR integration, even if you prefer a different, best-in-class tool.
This is a “best-of-breed” approach. The XDR platform is designed with an open architecture, allowing it to integrate with your existing security tools from many different vendors.
You can keep your CrowdStrike EDR, your Okta for identity, and your Proofpoint for email. The Open XDR platform layers on top of all of them to unify the data.
Pro: You get total flexibility. You can choose the best tool for each job without being locked into one vendor’s ecosystem.
Con: Integration can sometimes be more complex, though this is the exact problem Open XDR platforms are built to solve with pre-built connectors.
At Hexnode, we take a hybrid approach that is natively unified with endpoint management.
This is our key advantage: we believe that you cannot have effective security without deep endpoint management. Our XDR is not a separate, bolted-on product; it is built directly into the Hexnode UEM (Unified Endpoint Management) platform.
This UEM-native design gives our XDR a massive advantage:
1. Unmatched Data: It has immediate access to the rich, deep data that only a UEM can provide (device health, compliance status, patch levels, user activity).
2. Powerful Response: Because it’s already the management tool, its ability to respond is instant and powerful. Actions like locking a device, wiping data, or enforcing a patch policy aren’t “requests” to another tool – they are native commands.
While our XDR is natively integrated with our UEM, it is built with an open philosophy, designed to integrate with the other best-of-breed tools you already use, giving you the best of both worlds.
Here is how XDR works in a practical, real-world scenario for an IT team.
This is the process of actively searching for threats in your environment, rather than waiting for an alert.
The Scenario: A new CISA (Cybersecurity & Infrastructure Security Agency) alert is released. It warns of a specific threat group using a new file hash, IP address, and registry key to attack organizations.
The Old Way (Without XDR): You would have to log into your EDR tool to search for the file hash. Then, log into your firewall to search for the IP address. Then, log into your SIEM (if you have one) to search for the registry key. This is slow, manual, and you might miss connections between them.
With XDR: Your analyst can run one single search (e.g., for the file hash) from the XDR console. That query instantly searches all data sources – endpoints, network traffic logs, and cloud activity at the same time. You get one complete answer in seconds, not hours.
This shows the power of XDR when an active attack is underway.
The Scenario: A user clicks a sophisticated phishing link, and a ransomware attack begins.
With XDR: Instead of getting 50 separate, confusing alerts, your XDR platform groups them into one single, high-priority incident and shows you the full attack chain as it happens:
1. (Email): Detects a malicious phishing email was delivered to user@company.com.
2. (Identity): Sees the user’s credentials were stolen from a fake login page.
3. (Endpoint): Correlates that event with malware execution on the user’s laptop, which is now encrypting files.
4. (Network): Detects the malware attempting to spread to other laptops and contact its external command-and-control (C2) server.
The Response: From that single incident screen, your team can take immediate, comprehensive action. With one click, an automated playbook can:
This unified response stops the attack, prevents lateral movement, and contains the threat in minutes, not days.
Adopting XDR is a strategic move, not a one-day installation. It’s a process that can be managed in clear, practical phases. Here is a simple 4-step plan to guide your implementation.
Before you can build, you must take inventory. Map out your existing security tools and, more importantly, identify your biggest blind spots.
Ask your team:
Don’t buy an XDR platform just because it’s the latest buzzword. Be specific about the one or two critical problems you are trying to solve. Your goals will determine which platform you choose.
Your primary goals might be:
Approximately 40% of new XDR deployments in 2025 are projected to be in small and medium-sized enterprises (SMEs). (Source: SNS Insider, 2024)
With your goals and your current stack in hand, you can now evaluate vendors. This is where you’ll apply the “Native vs. Hybrid” concept we discussed earlier.
You do not have to “boil the ocean.” A phased rollout is smarter, faster, and more effective.
Phase 1: Start with Your Core. Begin by integrating your most critical data source, which for most organizations is EDR. This establishes your foundational visibility and response capability on your most vulnerable assets.
Phase 2: Add Your Biggest Blind Spot. Look at your assessment from Step 1. What was your next biggest gap? For most, this is Identity (Active Directory, Azure AD) or Cloud (AWS, GCP, SaaS apps). Integrate this source next.
Phase 3: Automate and Expand. Once you are confident in the data from your first few sources, you can continue integrating other systems (network, email) and begin building out your automation playbooks. Start with simple alerts and gradually build up to more complex, automated responses.
While XDR offers significant advantages, it’s important to be realistic about the potential challenges. Being aware of these hurdles is the first step to a successful implementation.
Challenge 1: “XDR-Washing” (Marketing Hype) - The XDR market is noisy. Many vendors have simply rebranded their existing EDR or SIEM products as “XDR” to follow the trend. A true XDR platform must have two things: the ability to ingest and correlate data from multiple domains (not just the endpoint) and the ability to execute native response actions across those domains. Be skeptical of any “XDR” that is just a renamed EDR.
Challenge 2: Data and Integration Complexity - This challenge is tied directly to the “Native vs. Hybrid” model. If you choose a “Closed” XDR platform, you may be forced to “rip and replace” your existing, perfectly good security tools. This adds significant cost, migration complexity, and training overhead just to fit into that single vendor’s ecosystem.
Challenge 3: The Skills Gap – XDR makes your security analysts more efficient, but it does not replace them. It is a “force multiplier” that automates the simple tasks, allowing your skilled staff to focus on complex investigations. You still need qualified people to manage the platform, investigate the high-fidelity incidents it generates, and perform proactive threat hunting.
When you are ready to evaluate XDR vendors, it’s easy to get lost in marketing. Use this practical buyer’s checklist to cut through the noise and ask the right, IT-focused questions.
This is the most important factor. Ask the vendor: “Is your platform Open or Native?” Will it work with the security tools I already own and trust (like my existing firewall, EDR, and identity provider), or will it force me to “rip and replace” my stack just to work with the XDR? A flexible, open platform is almost always a better long-term investment.
The entire point of XDR is to reduce noise, not create more of it. During a Proof-of-Concept (POC), you must ask: “Does this platform produce high-fidelity incidents, or is it just another noisy dashboard?” The AI and analytics engine should be smart enough to correlate thousands of low-level logs into just a few actionable alerts that your team can actually investigate.
Look closely at the “R” (Response) in XDR. “How easy is it to build and run automation playbooks?” The response actions, like “isolate host” or “disable user,” should be native to the platform and execute instantly. You shouldn’t need a team of developers to write custom scripts; a good XDR makes automation simple and reliable from day one.
Ask yourself, “Can my team actually use this?” The user interface (UI) should make investigations simpler by clearly visualizing the attack chain. If the dashboard is a complex mess of logs, it won’t help you respond faster.
In a modern IT environment, this is critical. “Is the platform fully cloud-native?” A cloud-native solution will be faster to deploy, easier to scale, and requires no on-premise hardware for you to manage. This frees up your team from managing servers and lets them focus on security.
Yes, absolutely. The Endpoint Detection and Response (EDR) component found within every XDR platform is the modern replacement for legacy antivirus. Instead of just matching known files (signatures), EDR/XDR watches for malicious behavior to catch far more sophisticated threats.
No. A firewall is a network device that allows or blocks traffic based on rules. XDR is a separate platform that ingests security data from your firewall, correlates it with other alerts, and can then tell your firewall what to block as part of an automated response.
This is a common question. It’s better to say that XDR integrates with NDR (Network Detection and Response). NDR sensors provide a rich source of network data that the XDR platform analyzes. Some XDR platforms are now powerful enough to cover most NDR functions, but in a hybrid model, they are designed to work together.
It is a single, unified platform. The value of XDR is that it integrates a collection of data sources (from your EDR, firewall, cloud, etc.) into one product with one console, one analytics engine, and one set of response tools.
While a few legacy vendors may offer on-premise options, all modern, effective XDR platforms are cloud-native. This is a requirement, as the massive scale of data processing, AI analysis, and rapid automation simply isn’t feasible with on-premise hardware.
Because EDR can only see the endpoint. A good EDR will tell you what happened on a laptop, but it can’t show you the phishing email that started the attack, the compromised cloud account, or the attacker’s movement across the network. XDR connects all those dots to give you the full story.
With modern cloud-native platforms, the initial time-to-value is very fast. You can often deploy agents and start ingesting data in a matter of hours. You will typically begin to see high-fidelity, correlated alerts and a clear reduction in noise within the first few days.
XDR is still evolving, and the platform is quickly becoming smarter and more integrated. Here is a brief look at what’s next.
Generative AI: The next major leap is the integration of “ChatGPT-like” interfaces for security analysis. Instead of complex queries, an IT admin will be able to ask plain-language questions like, “Show me all hosts that communicated with this malicious IP in the last 7 days and what they did.” This will make advanced threat hunting accessible to everyone, not just highly specialized analysts.
Deeper IoT/OT Integration: The “X” in XDR will continue to “Extend.” The next frontier is bringing Internet of Things (IoT) and Operational Technology (OT) devices like smart sensors, cameras, and factory equipment under the XDR umbrella. This will provide a single platform to protect all connected technology, not just traditional IT assets.
From “Response” to “Prediction”: As the AI models are fed more data, the goal is to shift from reactive detection to proactive prediction. Future XDR platforms will aim to identify precursors to an attack – the subtle combination of events that signal an attack is about to happen and automatically stop it before it can even execute.
For too long, IT and security teams have been forced to work with siloed tools. This creates visibility gaps, floods your team with low-quality alerts, and makes responding to a real attack a slow, manual, and frustrating process.
XDR (Extended Detection and Response) solves this. It breaks down those silos by unifying your security data from endpoints, networks, cloud, and identity. It gives you one platform for comprehensive visibility and the power to take fast, automated actions to stop threats.
The XDR market can be complex, but at Hexnode, we believe in unifying security and management. You can’t have effective security if you can’t manage your devices, and you can’t have effective management if you can’t secure your devices. They must work together.
That’s why we’ve built Hexnode XDR directly into our industry-leading Unified Endpoint Management (UEM) platform.
This UEM-native design means our XDR doesn’t just see security data – it sees deep device context, compliance status, and patch levels. Most importantly, it can respond instantly with powerful, native management actions. It’s the only platform that truly unifies your security operations and your device management, all from one console.
Ready to break down your security silos and see what unified protection looks like?
Secure your endpoints, network, and cloud from a single console with Hexnode.
Start Your 14-Day Free TrialThe post The Ultimate Guide to XDR (Extended Detection and Response) appeared first on Hexnode Blogs.
]]>